Lawn Fawn | Mixed Media Birthday Card

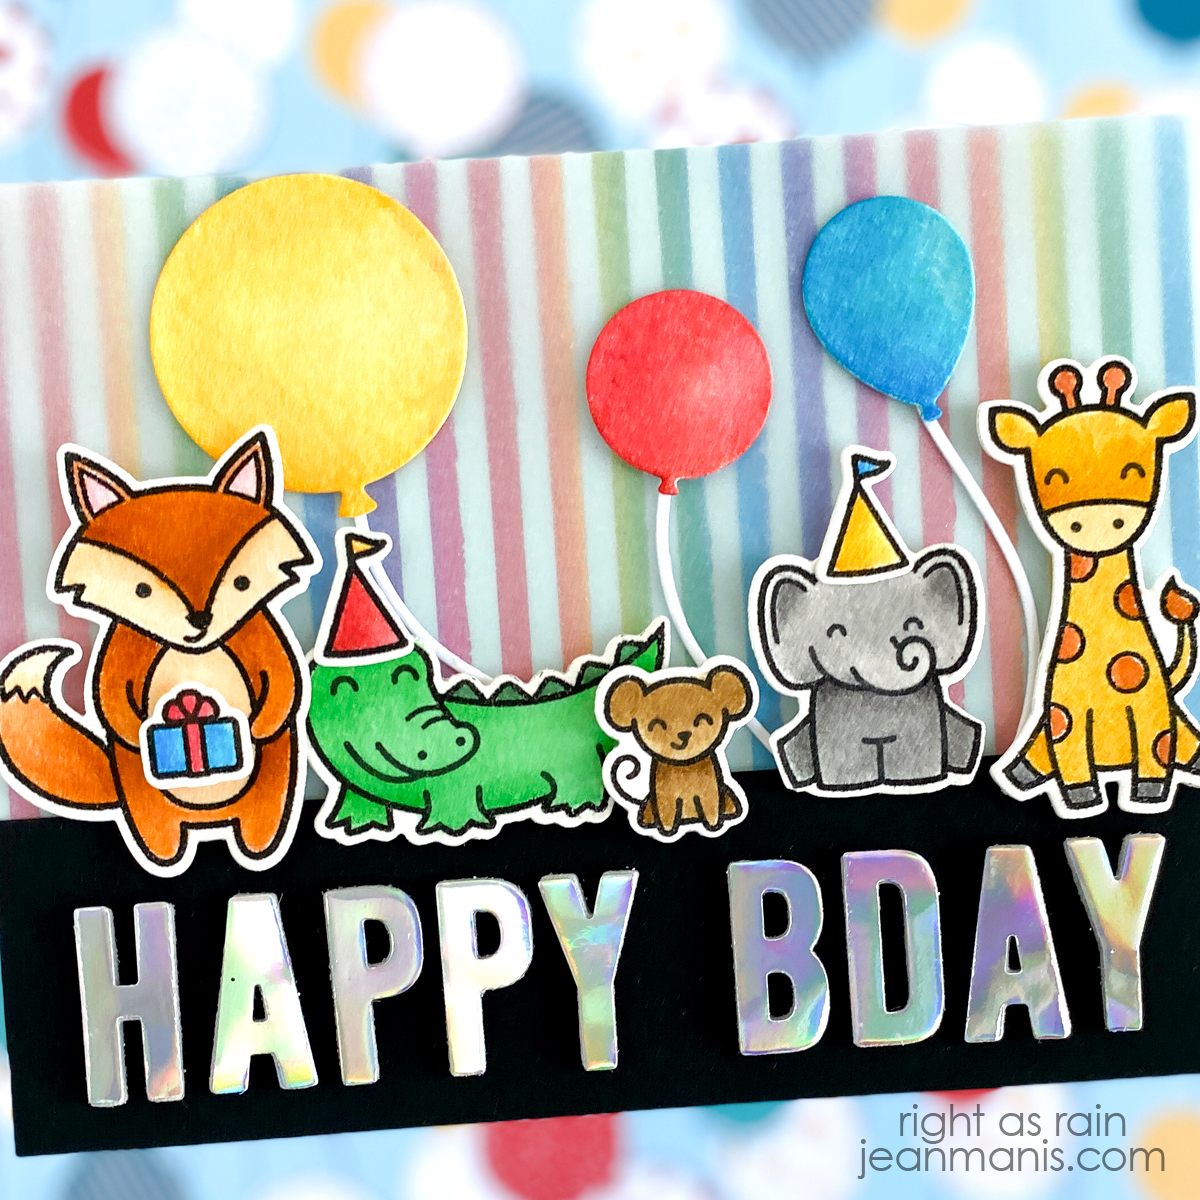
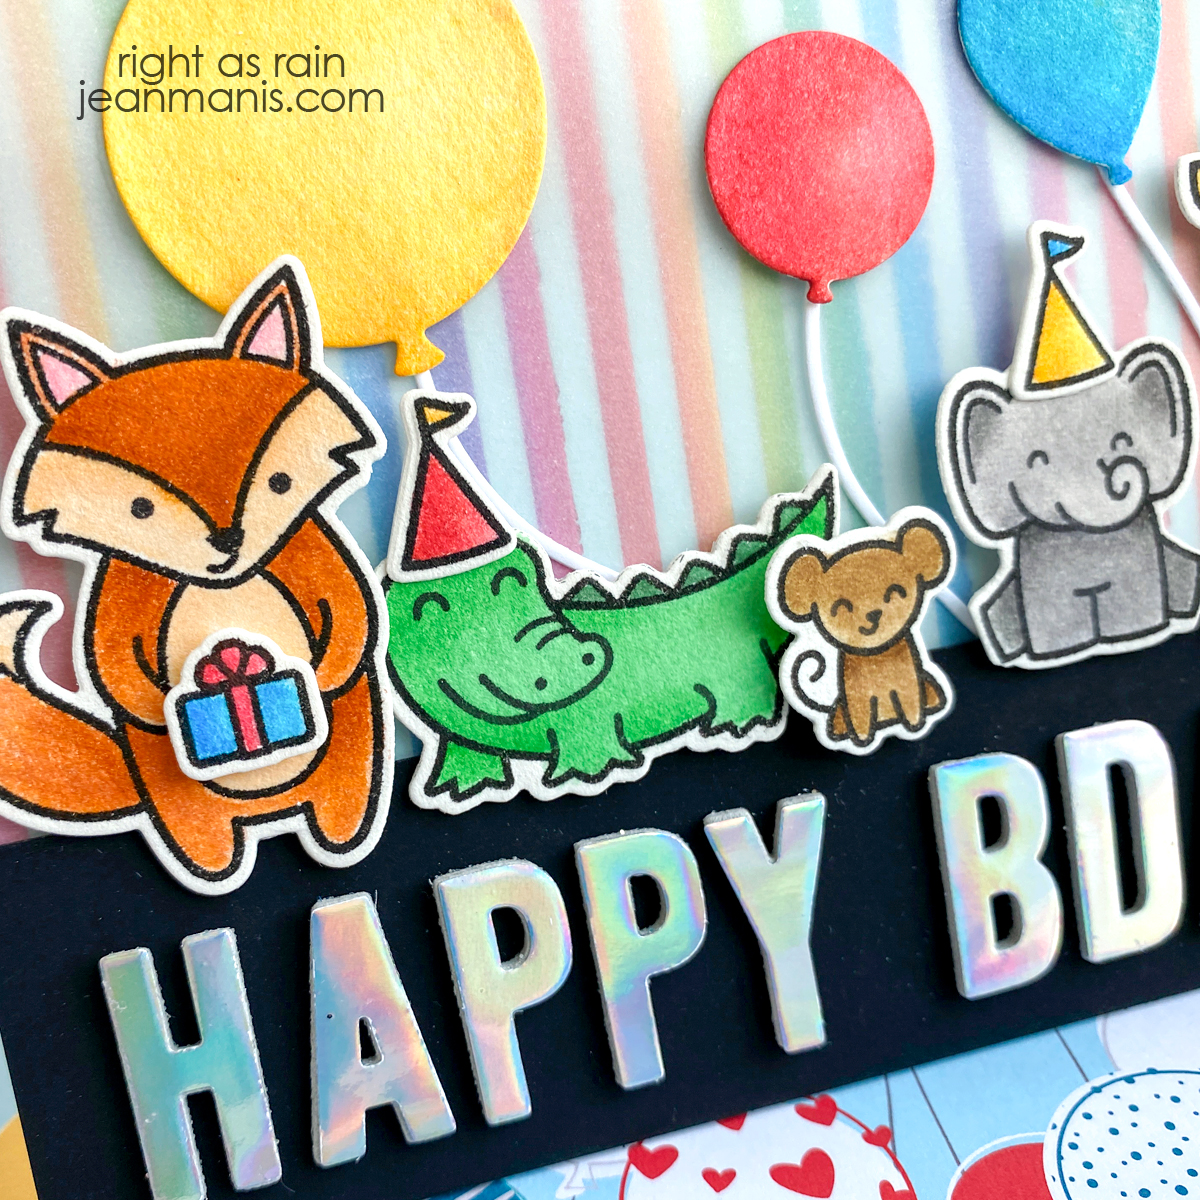
Hello! Today I am sharing a birthday card, featuring Lawn Fawn products, that I am entering into the Lawn Fawnatics Challenge #144 – All Things Birthday. This is not a card I just whipped up. It took time to watercolor the images and foil the background and letters! I learned a lot along the way.

Lawn Fawn | Mixed Media Birthday Card

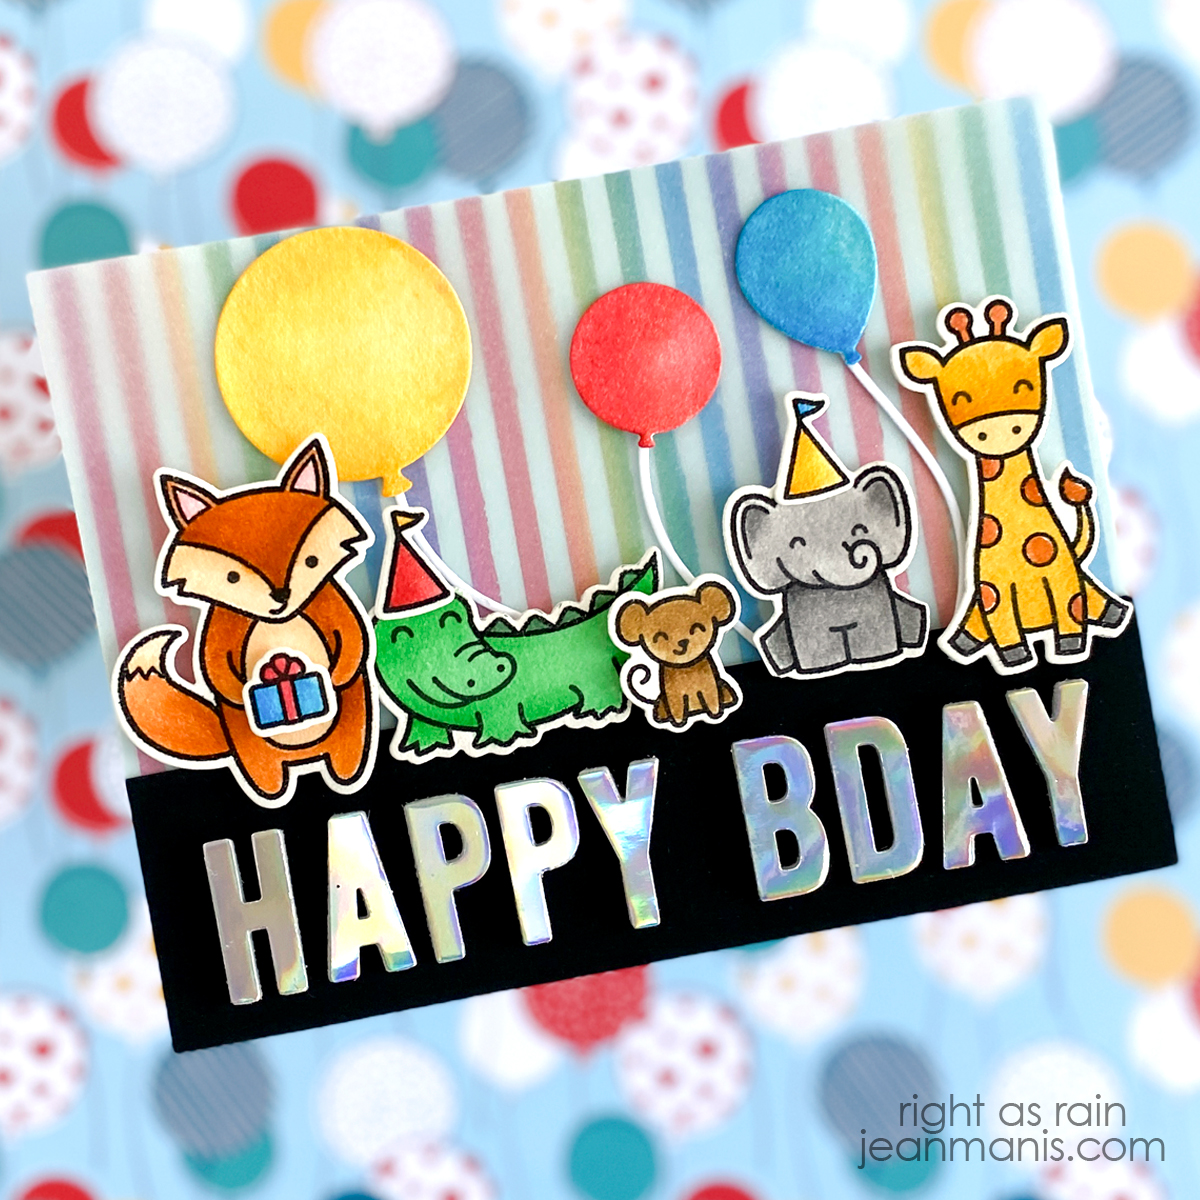
  • Stamp images from the Wild for You and Party Animal sets in VersaFine ink on Arches Cold Press watercolor paper; heat set ink. Color images using Zig and Tombow markers. Once dry, cut with coordinating dies.
    Fox: Zig Brown, Zig Oatmeal; Alligator: Tombow Sap Green, Zig Deep Green; Mouse: Tombow Chocolate; Elephant: Zig Dark Gray; Giraffe: Zig Brown, Zig Light Brown, Tombow Peach.
  • Cut Party Balloons from watercolor paper and color with markers (Zig Persian Blue, Tombow Warm Red, Zig Bright Yellow). Die-cut strings from white cardstock and attach to dried balloons.
  • Foil Iridescent foil to toner sheet. Cut sentiment from foil with Cole’s ABCs. Cut same letters from Silver Glitter Foam and glue to the back of the foiled letters (glitter side down). (Any foam that can be die cut would work.) Cut Matte Black cardstock 1 1/2 inches by 5 1/2 inches and adhere letters to strip.
  • Apply Therm O Web Blanco Transfer Gel through the straight Skinny Stripes stencil on Sea Glass cardstock. Once dry, foil with Rainbow Deco Foil. (Notice that the stripes of the rainbow go from left to right, not top to bottom.) Trim panel to A2-size and add to card base. Adhere Vellum to panel with double-sided tape along the bottom which the sentiment strip will cover.
  • Add sentiment strip to background, attach balloons to background, and attach animals with foam adhesive. Glue can be added to the vellum behind the items to help secure it to the foiled background.

Lawn Fawn | Mixed Media Birthday Card


Newton’s Nook | Mixed Media Birthday Card

Hello! Lately, I have been practicing a number of techniques including watercoloring and foiling with a laminator. I have used both on this birthday card that features supplies from Newton’s Nook. While I intend to use the card for a birthday, the image, sentiment, and background would work for other occasions.

Newton's Nook | Mixed Media Birthday Card

  • To create focal image, stamp Sky High Celebrations image with VersaFine ink on Arches Cold Press watercolor paper. Heat set and watercolor with markers (markers linked in the supply list, colors used below). Once dry, cut image with coordinating die.
    Balloons + Bird: Tombow Warm Red, Zig Orange, Tombow Process Yellow, Zig May Green, Zig Persian Blue, Zig Cobalt Blue, Zig Deep Violet
    Dog: Tombow Burnt Sienna, Tombow Light Sand, Tombow Lamp Black
    Cat: Zig Warm Gray 5, Tombow Lamp Black, Tombow Pale Pink
  • To create background, apply Blueprint Sketch, Mermaid Lagoon, and Salvaged Patina Distress inks to white cardstock. Apply the same inks again with one of the Balloon stencils in place (the set contains two stencils).
  • Apply Therm O Web Transfer Gel to panel using the other Balloon stencil. (I masked the balloons in the lower-right corner where I wanted to stamp the sentiment.) Set aside to dry.
  • Apply White Latte flock to the stenciled panel. (I used a Minc Mini set on 5 and allowed to heat for at least 15 minutes.) Stamp the Sky High Celebrations sentiment in lower-right corner with VersaFine ink. Trim panel, attach to card base, and add watercolored Sky High Celebrations image with foam adhesive.

Newton's Nook | Mixed Media Birthday Card


Therm O Foil | Rainbows Galore

I have been wanting to play with Therm O Web products after seeing projects on their blog and the Facebook group Therm O Web Craft Room. They have a terrific YouTube channel as well. Today, I am sharing two quick-and-easy encouragement cards using the Rainbows Galore toner panel.

Therm O Foil | Rainbows Galore

  • Foil Rainbows Galore toner panel with Rainbow Deco Foil. For my Mini Minc laminator (6″ Foil Applicator), I set the heat to 5 (the highest setting) and let the machine warm up for at least 20 minutes.
  • For the second foiled background, use the leftover foil with a Toner Sheet.
  • Trim Rainbows Galore panels to 4 inches by 5 1/4 inches and add to A2-size Black Matte cardstock. Add to card bases.
  • Stamp Simon Says Stamp You Got This sentiment (an older sentiment which is still available) in black ink on white cardstock. For second card, heat-emboss the sentiment in white on Black Matte cardstock. Cut sentiments with banner die and trim to 3-inch width. Add sentiments to card fronts with foam adhesive.

Therm O Foil | Rainbows Galore


Spellbinders July Clubs Blog Hop

Hello! Today, I am delighted to be participating in a blog hop along with other papercrafters sharing projects created with the Spellbinders July 2020 Club Subscriptions. You should have reached me from the blog of Joy Baldwin. (The entire list of participants is included at the end of my post.) For the hop, I created two cards showcasing the July Small Die of the Month kit from Spellbinders – “Ornamental Floral Card Creator.” I shared two other cards created with this set in this post.

Spellbinders July Clubs Blog Hop

To celebrate this release, Spellbinders is giving away a $50 gift certificate to three blog readers – selected from the comments on the Spellbinders blog. Hop along for additional chances to win. Giveaway closes on Sunday, July 26th, 11:59 pm EDT. The winner will be announced in the blog hop post the following Tuesday. The winner is responsible for shipping cost, duties and taxes.

My cards are similar in design; both combine the Small Die of the Month set with foiled sentiments from the Stylish Script Collection. On the first card, I foiled the Beautiful Ride sentiment and surrounded it with a frame, blossoms, foliage, and small flowers cut with the Small Die of the Month set.

Spellbinders July Clubs Blog Hop

Because the petals are the same color as the flower’s outline, inlaying the petals was easy. I simply added tape on the back when I first cut the shape. I glued the foliage pieces before adding leaves cut from Brush Gold.

Spellbinders July Clubs Blog Hop
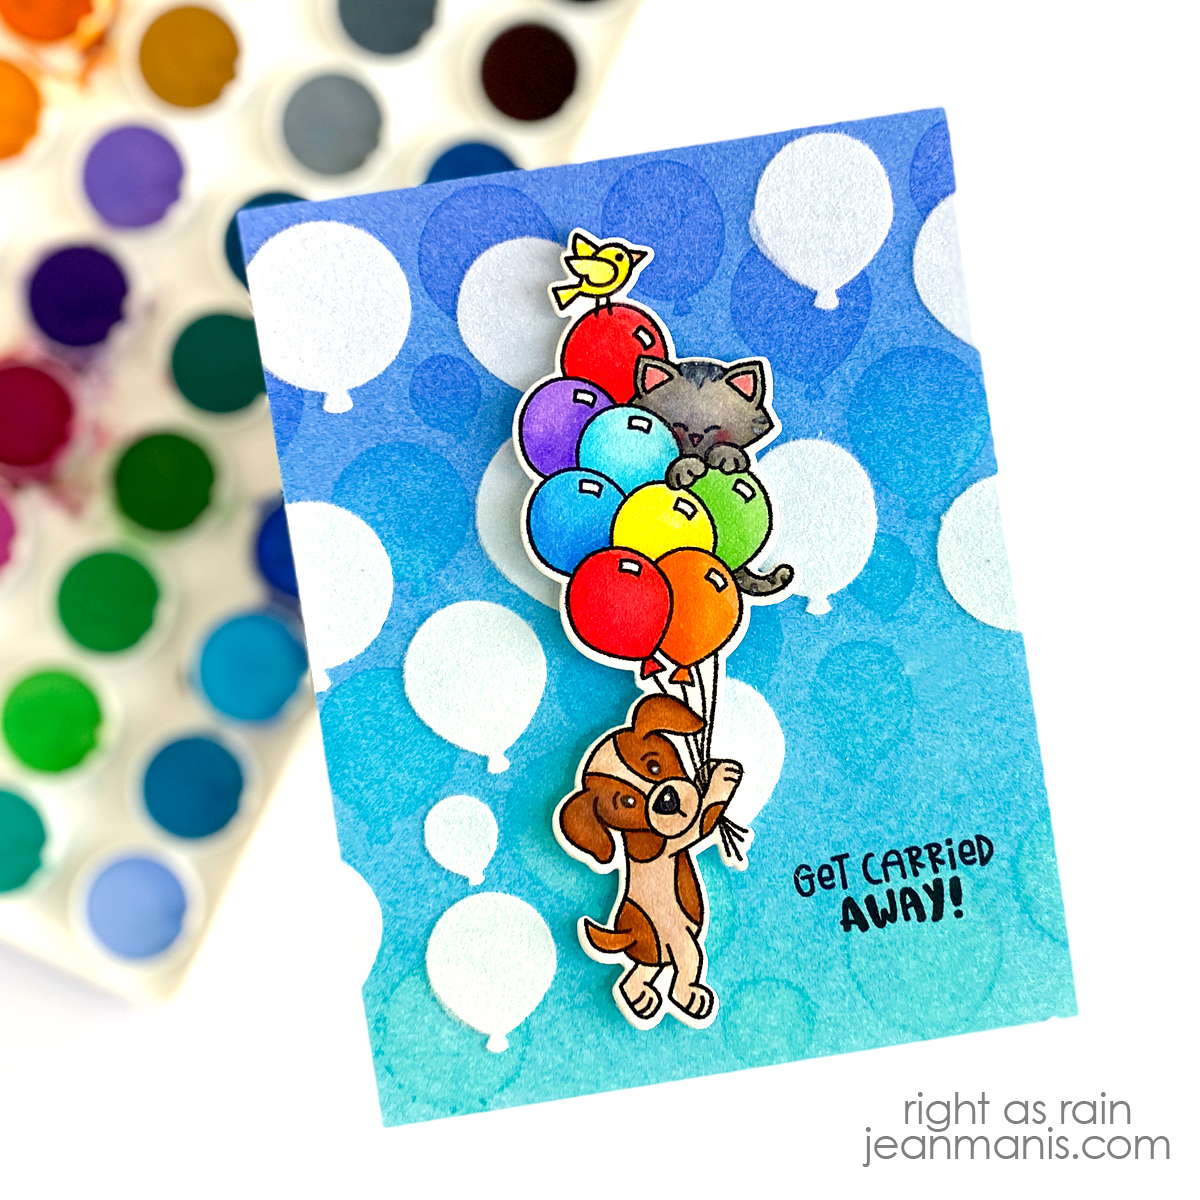
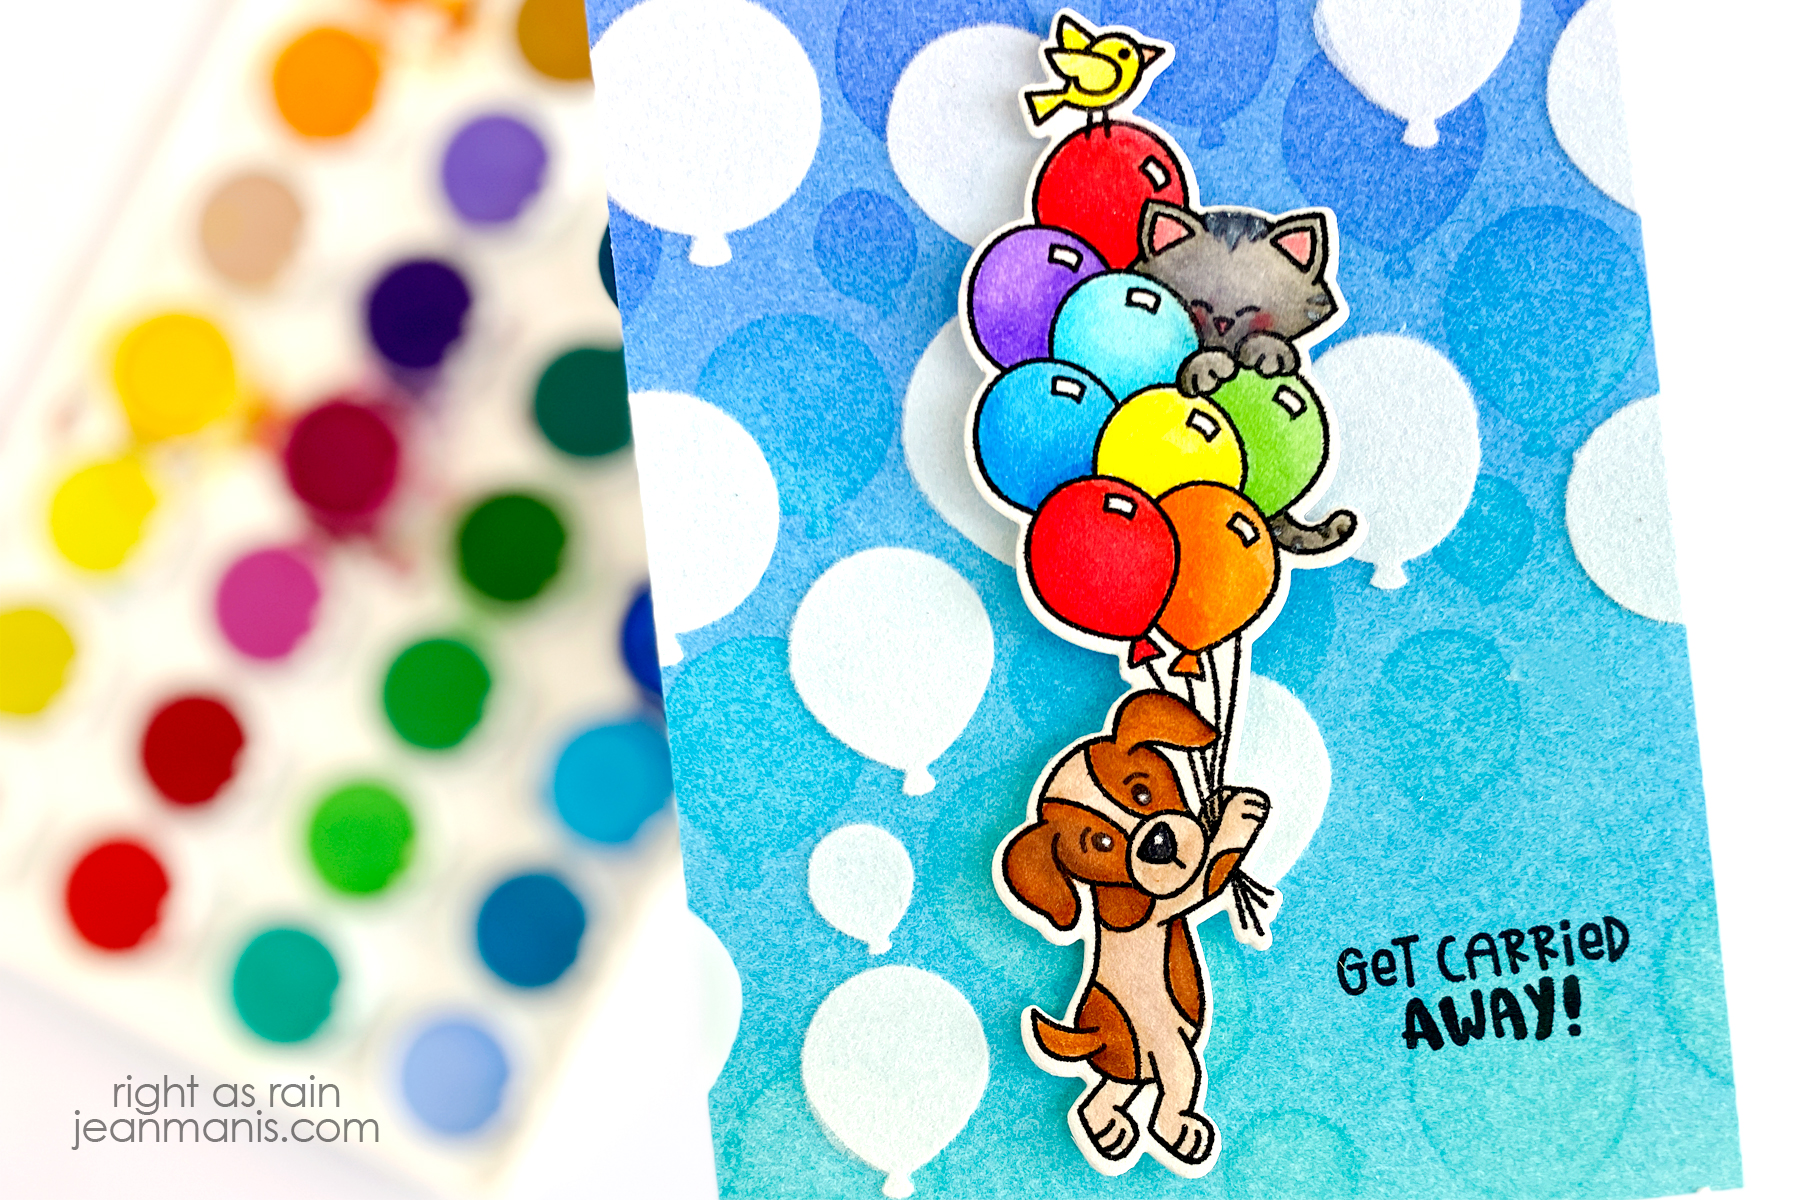
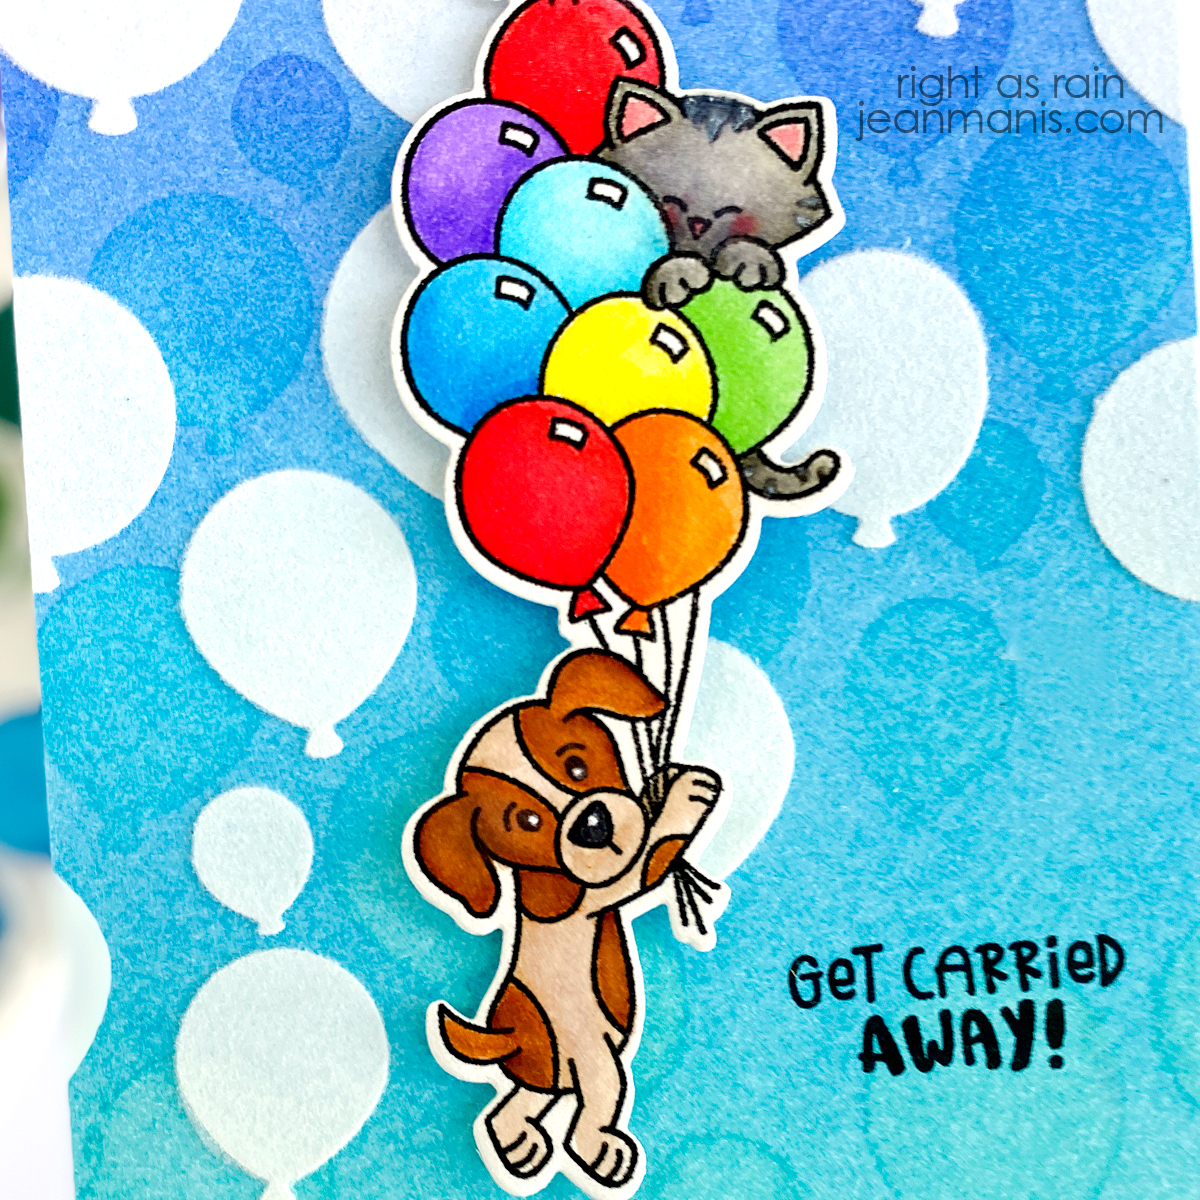
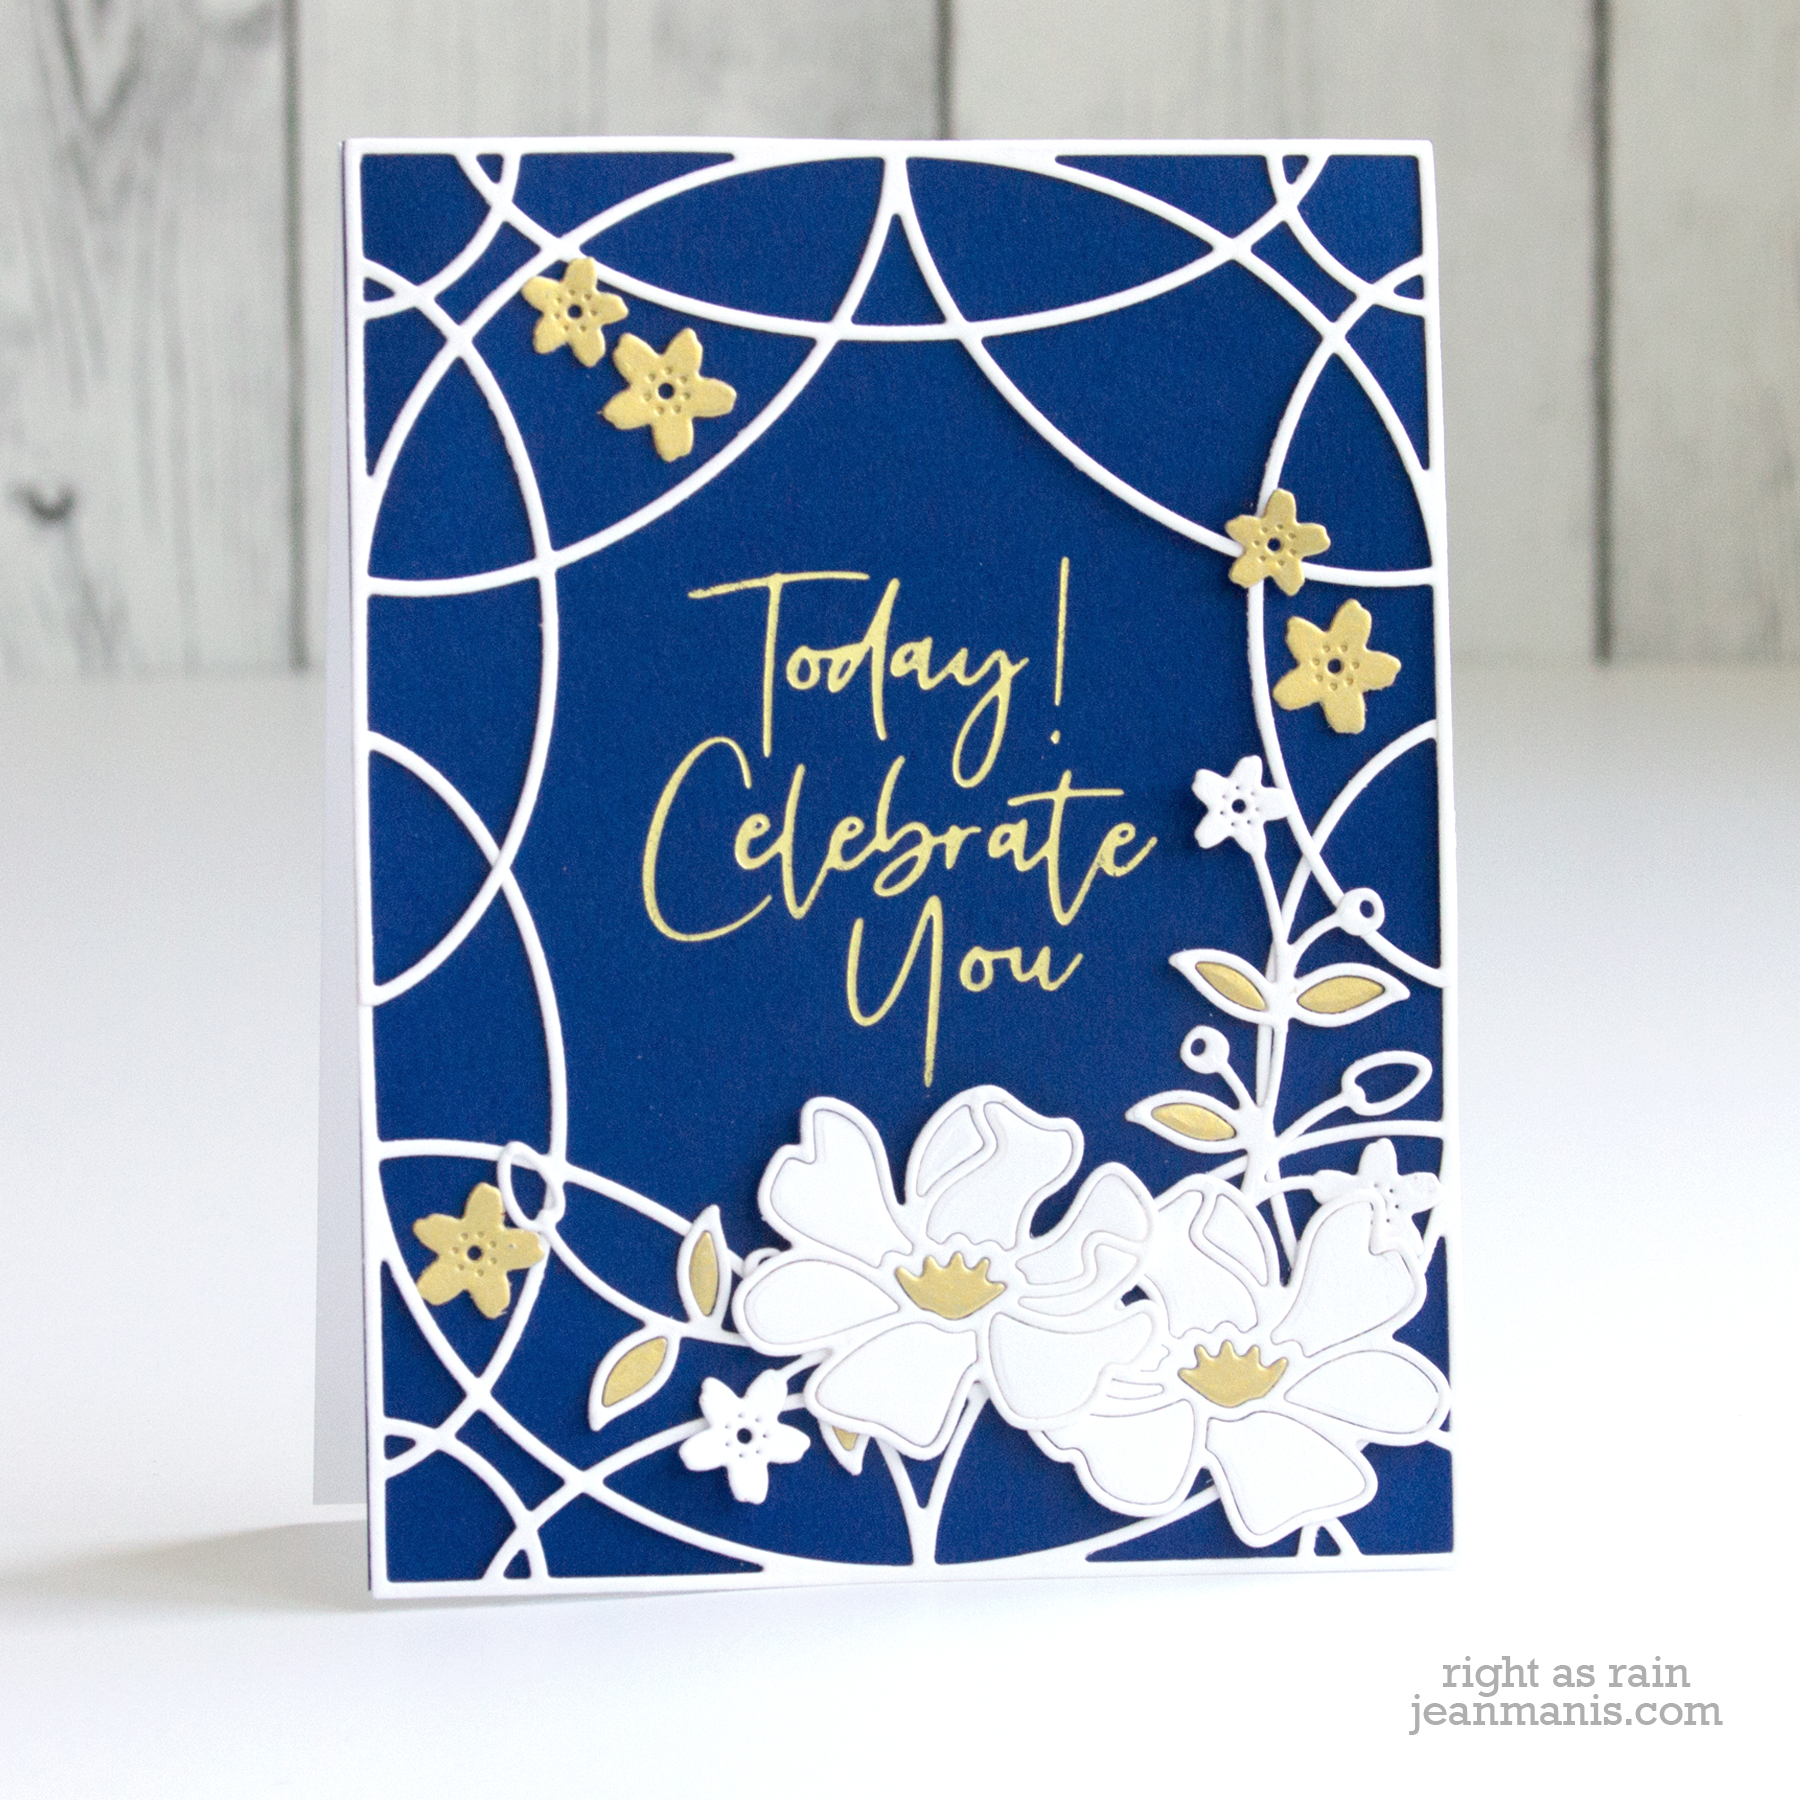
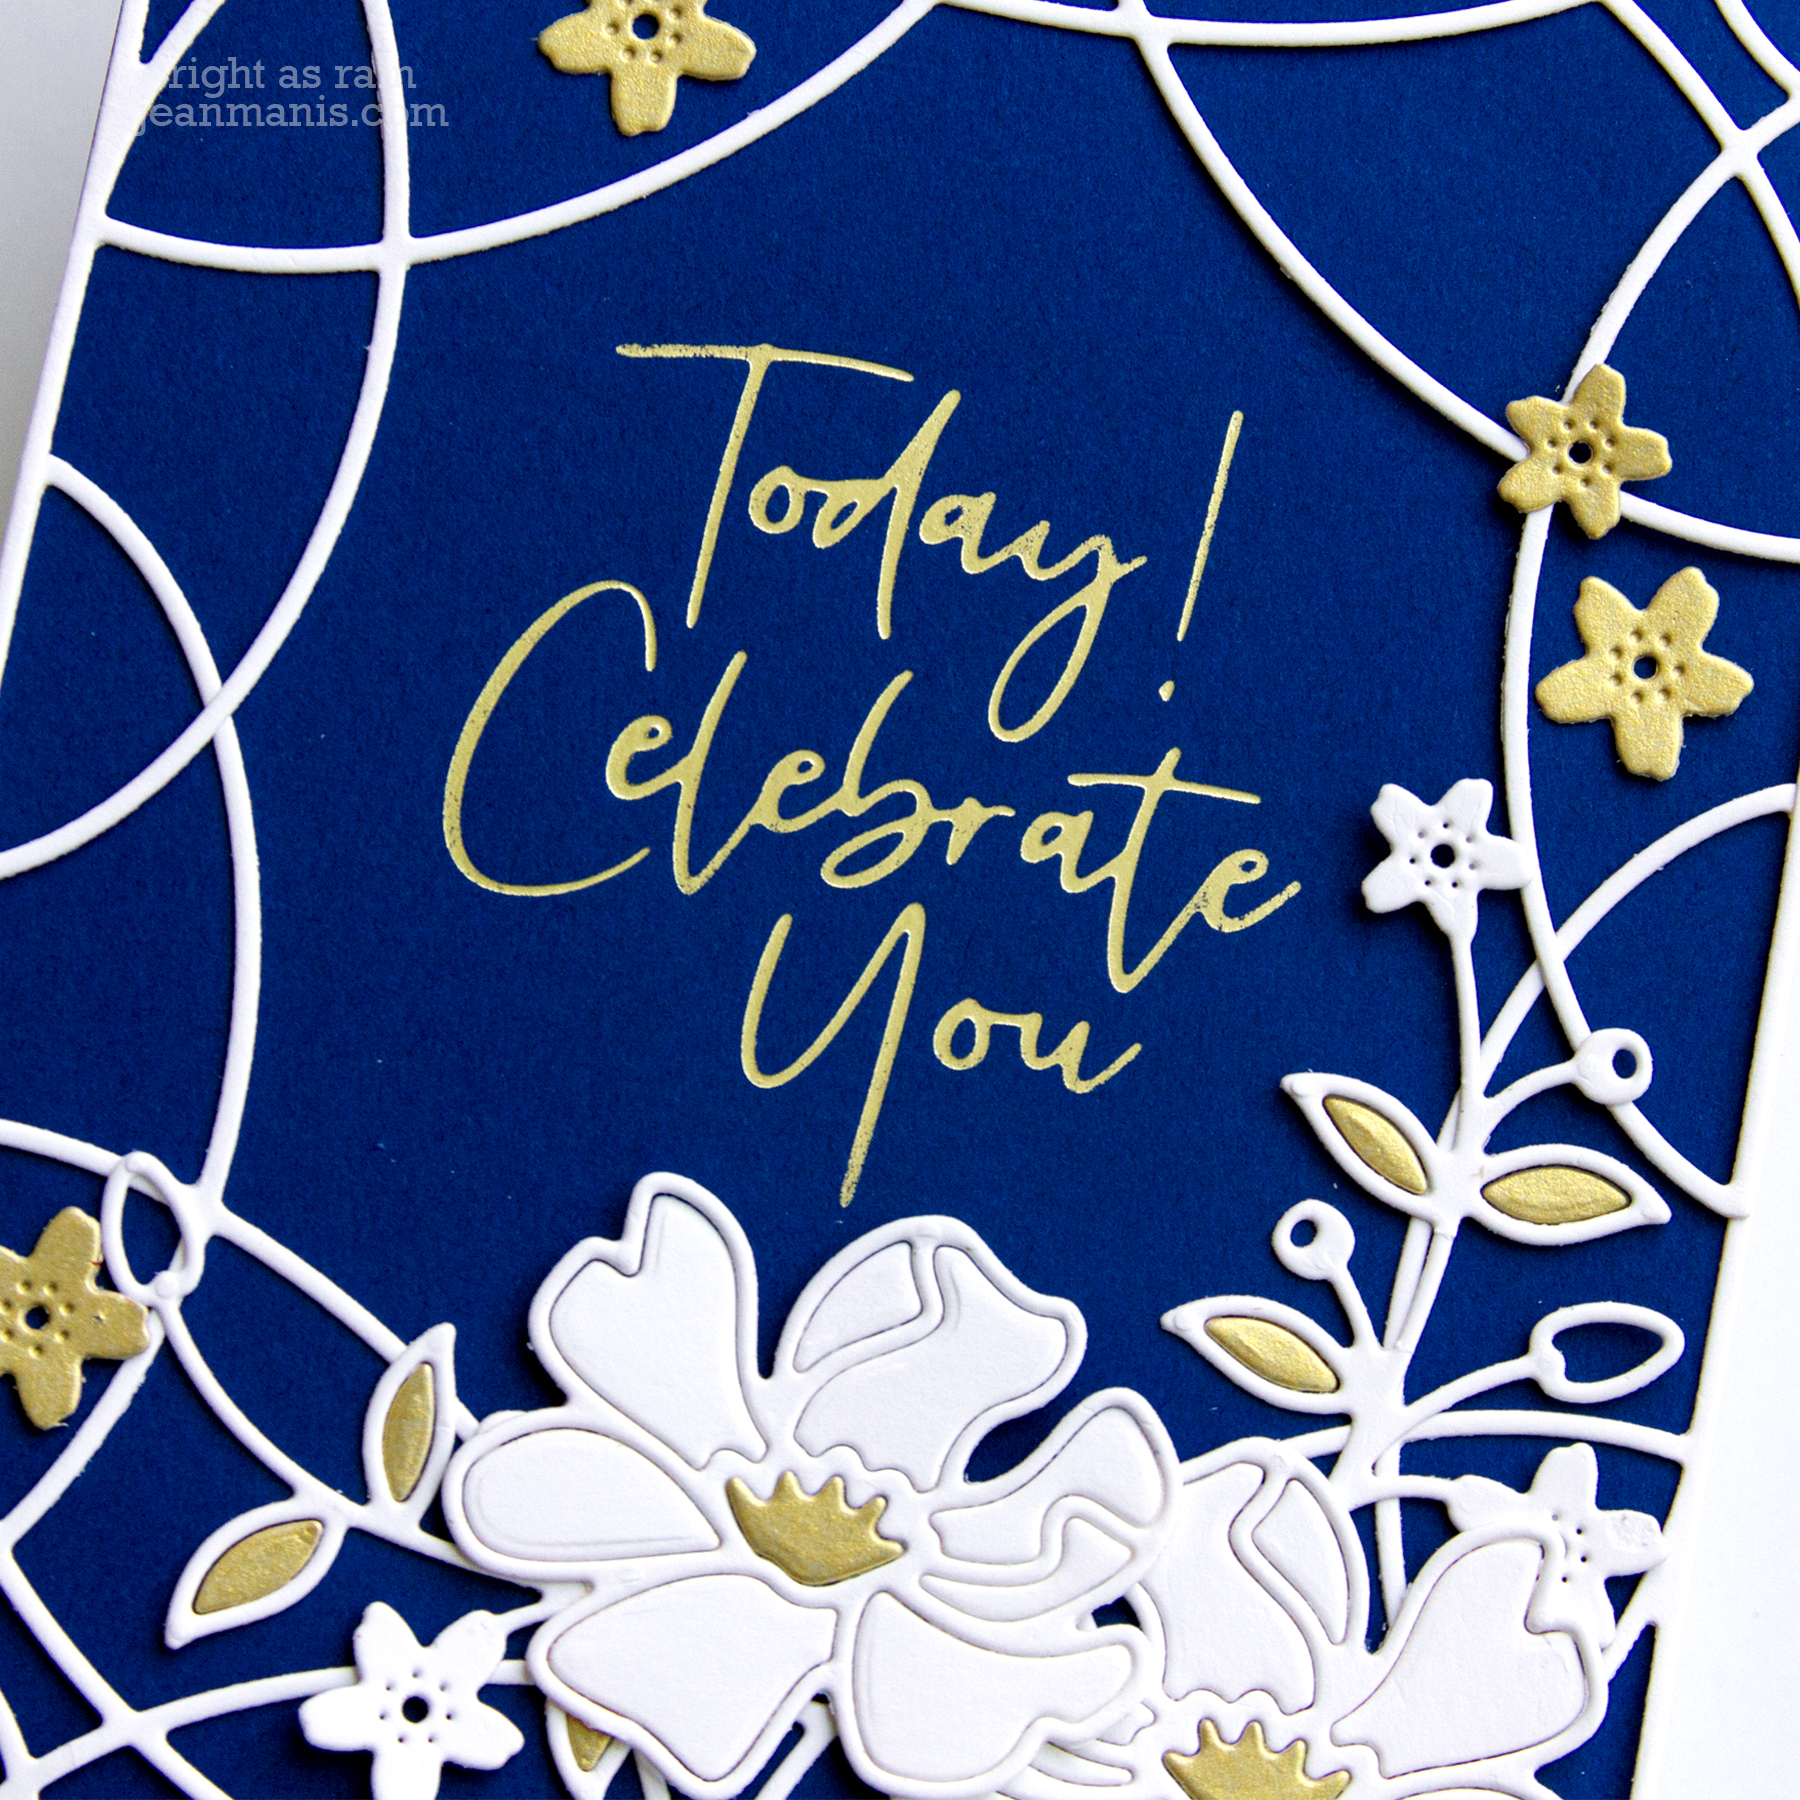
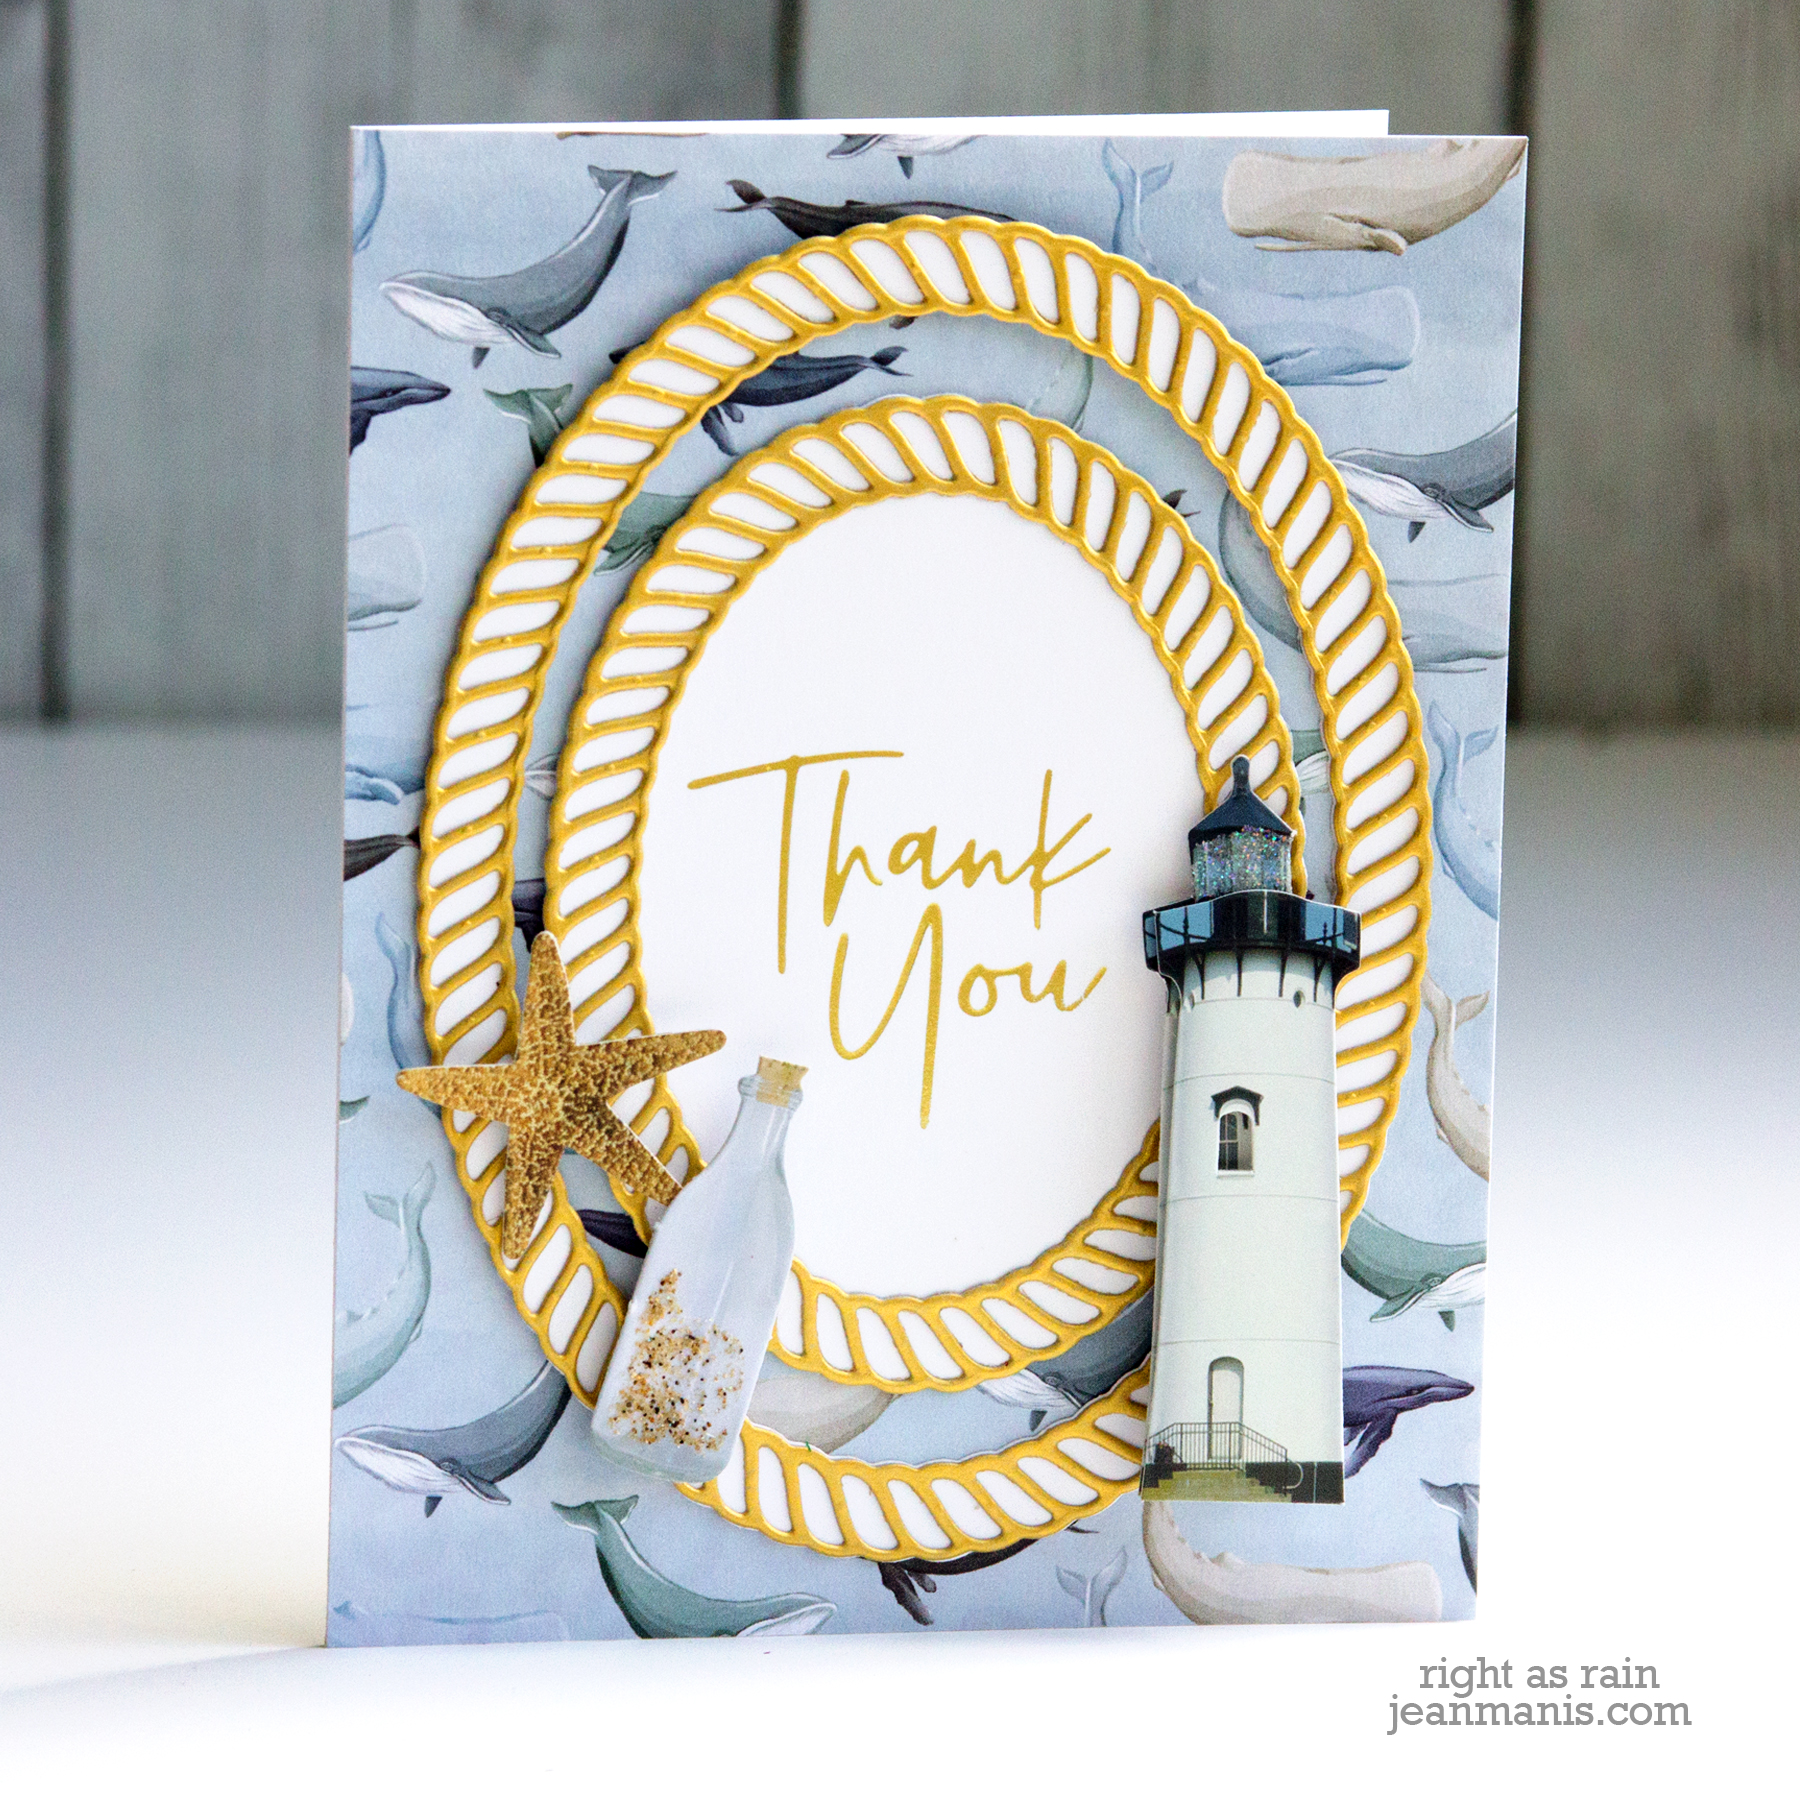
On my second card, I foiled a sentiment from the For You set. This time, I simplified the floral clusters (eliminating the one in the upper-left corner) and added more small flowers cut from Brush Gold.

Spellbinders July Clubs Blog Hop

Spellbinders July Clubs Blog Hop

Thanks for stopping by! The next stop on the hop is the blog of Virginia Lu. Scroll for the list of participants.

Supplies:

Blog Hop List:
Spellbinders Blog
Nichol Spohr
Tina Smith
Carrie Rhoades
Bibi Cameron
Kathy Clement
Alicia Havranek
Jill Hilliard
Laurie Willison
Joy Baldwin
Jean Manis
Virginia Lu
Ilina Crouse
Varada Sharma
Hussena Calcuttawala
Jeanne Jachna
Gemma Campbell

Spellbinders Foiled Nautical Thank You

Hello! Today I am sharing a CAS card showcasing a foiled sentiment from the Spellbinders Stylish Script Collection.

Spellbinders Foiled Nautical Thank You

I paired the foiled Thank You sentiment with ovals cut using dies in the Elegant Twist Ovals set. I previously shared a card created with this same die set here.

To create a nautical-themed Thank You:

  • Foil the sentiment on Whip Cream cardstock in Gold.
  • Cut the Elegant Twist Ovals frames from Brush Gold cardstock.
  • With dies in the set, cut an oval from Whip Cream cardstock; adhere to the back of the larger gold twist oval.
  • With a die in the set, cut the foiled sentiment cardstock; adhere the smaller gold twist oval on top.
  • Add the ovals to a card base covered with Carta Bella paper; add nautical stickers (Paper House Productions “At the Beach”) for embellishment.

Note: the card is slightly larger than A2.

Spellbinders Foiled Nautical Thank You

Supplies: