Online Card Classes Background Check – Day Two

I’m sharing a card created with one of the techniques shown by Kristina Werner in the Day Two lesson of the Online Card Classes Background Check class.

OCCBCDay2

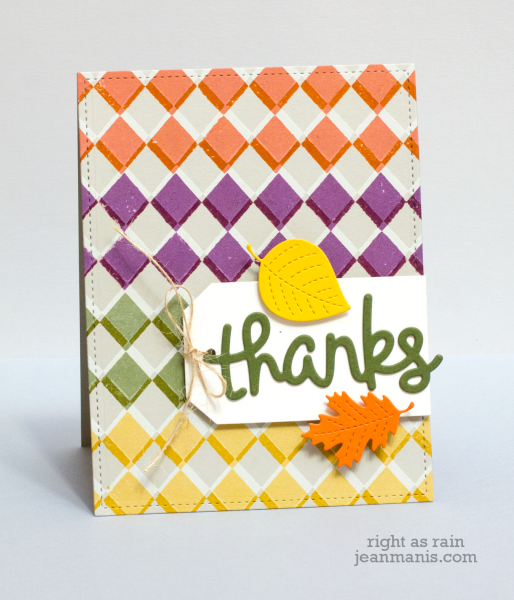
I stamped the Argyle Backdrop with ColorBox white pigment ink onto Stampin’ Up Sahara Sand cardstock. When that was dry, I stamped over the pigment ink (shifting slightly) with four Stampin’ Up dye inks. I cut out the panel with a Lawn Fawn stitched rectangle die; it’s A2 sized. I cut the thanks sentiment and leaves with Lawn Fawn dies.


Supplies:

Online Card Classes Background Check – Day One

I’m sharing a card created with one of the techniques shown in the Day One lesson of the Online Card Classes Background Check class.

Day1

I inked the cardstock panel with three Distress Inks, ran it through the Big Shot with the My Favorite Things stencil (adding some dimension) and then dabbed at the open areas of the stencil with a baby wipe to life off some of the ink. The card design is based on one used by Jennifer Rzasa in an earlier Online Card Classes course.
Supplies: Hero Arts sentiment from a retired set

Stretch Your Dies Day Two

I’m still working through the lessons from the Online Card Classes Stretch Your Dies class. Today, I’m sharing a card inspired by the techniques shown by Kristina Werner in the Day Two lesson.

Day Two

I colored a piece of watercolor paper with Distress Inks and then die cut the star shapes. Kristina went on to take her shapes and arrange them in a cluster that she cut with a circle die. It’s a cool technique, but I decided I didn’t think it would add anything to my design. I finished the card with an apt sentiment.

I like coloring watercolor paper with Distress Inks and then cutting the paper with dies, so that each die cut has a different color pattern. Ideally I would have a stack of watercolored panels on hand to die cut!

Supplies:

Stretch Your Dies Day 3

Today I’m sharing a card inspired by one that Karolyn Loncon showed in the Online Card Classes Stretch Your Dies class. Karolyn had a different set of dies and stamps than mine, but the main idea was using a die to dry emboss the cardstock after masking the card off with the same shape.

DayThree

I masked off a rectangular shape and applied Distress Inks – Wild Honey, Worn Lipstick, Picked Raspberry – to the heavyweight cardstock card front. I then stamped the rectangle with Penny Black’s 40-379 Applause inked with Picked Raspberry and Barn Door Distress Inks. After inking and stamping, I removed the mask and dry embossed with the same rectangle die (there’s a stitched edge that may or may not be visible). To finish the card, I added a sentiment die cut with the 51-038 Hooray set. I will definitely be using this technique again. I’m really enjoying some time to work through the class lessons!

header

Stretch Your Dies Day 4

Today, I’m sharing a card based on one shown by Jennifer Rzasa in the Online Card Classes Stretch Your Dies class. The idea of today’s class is to use smaller dies effectively on a card.

DayFour
I cut the balloons and heart from Ranger watercolor paper colored with Distress Inks. This is definitely a technique I’ll be using again! These colors make me happy.

Supplies: