Sneak Peek – Inspiration Station

Hello ‘Fetti Fans! Here’s a sneak at a summer-themed, wall art project I created for the Reverse Confetti Newsletter showcasing the Reverse Confetti die cut sets Love & Ice Cream and Let’s Chill.

InspirationStationJuly2015closeup


The newsletter includes projects crafted with Reverse Confetti projects, along with the inspiration for the projects. I was inspired by an illustration by Lauren Gentry.

Have you subscribed to the Reverse Confetti Newsletter? Sign up to receive exclusive inspirational content, sneak peeks, inventory updates and more!

Reverse Confetti June Creative Blog Hop

Welcome! This month’s creative hop started on the Reverse Confetti blog, and you should have made it here from Lisa’s blog. It would be worth your while to start at the beginning of the hop, so you don’t miss a thing. We have tons of inspiration for you!

I’m sharing a gift/treat packaging idea for Father’s Day created with Reverse Confetti stamps and dies.

The packaging base was created with Tagged Tote Confetti Cuts to which I added clouds (Sun ‘n Clouds Confetti Cuts) and the airplane and propeller from Here We Go Confetti Cuts.

June8Masculine2

I added a tag die cut with the Folded Tag Confetti Cuts set. For the tag front, I stamped a sentiment from Fancy Word Coordinates repeatedly (first and second generation). I cut the stamping out at an angle and added the “DAD” stickers.

I hope you’ve enjoyed hopping with us today. Comment at each stop along the way for a chance to win a $15 gift certificate. Comments close Thursday at noon CST; the winner will be announced on Friday. Now it’s time to hop on over to Kathy’s blog. If you get lost along the way, you can find the hop order and list of all the participating designers over on the Reverse Confetti blog.

Reverse Confetti “Spring is in the Air” Blog Hop

Welcome to the Reverse Confetti Spring Fling Blog Hop!  You should have reached my blog from Leigh’s.

Today, I’m sharing a thank you gift idea created with one of the four dies in the Layered Banner Duo Confetti Cuts set. I had in mind an appreciation gift when I created this project-the gift would work as a thank you to a teacher, a volunteer, or a work colleague.

I cut the banner in three colors of cardstock to which I adhered wood letters from my stash. (I have a lot of chipboard and wood veneer alphabet sets!) I punched the banner pieces in the corners and ran twine through the holes, tying the twine onto the stakes, which are BBQ skewers. The banner is an easy way to make a distinctive and customized gift.

TeacherAppreciation

Next on the blog hop list is Laurie.

Be sure to leave a comment at each stop along the way for a chance to win a $15 gift certificate to the Reverse Confetti store…in time for the May 8th release.  Comments are open until May 1 and the winner will be posted on the Reverse Confetti blog on May 3.

4 Easter Treat Packaging Ideas with Confetti Cuts

Today, I’m sharing four Easter treat packaging ideas using Reverse Confetti Confetti Cuts. All four projects include the bunny from the just-released More Than Jellybeans Confetti Cuts set.

EasterPackagingTaggedTote

For the first project, I used the Tagged Tote Confetti Cuts to create a treat tote, to which I added a grass strip cut with the Double Edge Wonky Scallop Border and the bunny from More Than Jellybeans Confetti Cuts. The candy is contained in a cellophane bag slipped inside the Tagged Tote. I added a bow to the bunny, as well as a pom-pom.

Looking for something simpler? Add a tag cut with Folded Tag Confetti Cuts, decorated with the More Than Jellybeans Confetti Cuts bunny, to a cellophane bag of candy.

EasterPackagingFoldedTagBag

For my third idea, I cut a bag front and back with the Sweet Treat Tent Confetti Cuts and then cut the front panel with the bunny in the More Than Jellybeans Confetti Cuts set. The candy in the cellophane shows through.

EasterPackagingSweetTreatTent

Lastly, I cut a treat bag topper with the rectangular die in the Documented Confetti Cuts set to which I added the More Than Jellybeans Confetti Cuts bunny and grass cut with the Double Edge Wonky Scallop Border.

EasterPackagingDocumented-Topper

And there you have it – one bunny, four treat packaging ideas!

Additional supplies: Doodlebug Design Hello Sunshine patterned paper, solid cardstock, pastel-colored M & M’s, ribbon, twine, cellophane bags and white pom-poms.

Reverse Confetti ABC Valentines

Welcome to this month’s Reverse Confetti Blog Hop. If you were following along from the beginning, you reached me from Lisa Henke’s blog.

I’m sharing two ABC [Anything but a Card] packaging projects designed for Valentine’s Day treats. I chose a preppy color scheme for a twist on traditional Valentine’s Day colors!

ABCValentines

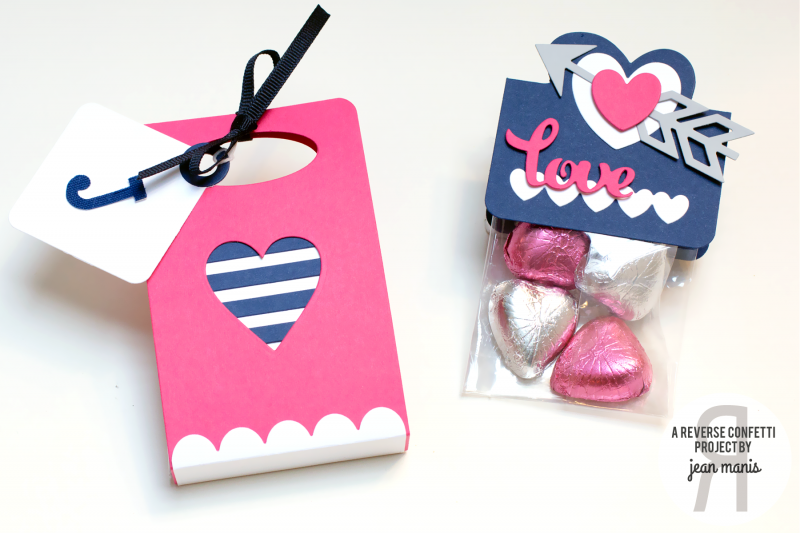
The treat tent, (on the left in the photo above), houses heart-shaped chocolates, but it could just as easily be used to package a nail polish bottle, small soaps, or trial-size cosmetics. To begin its construction, I used the Sweet Treat Tent Confetti Cuts to cut three tent pieces. With my paper trimmer, I trimmed the top tab off of all three. Next, I die cut a heart from one of the tents, the one for the front, with the heart die in the Puppy Love Confetti Cuts set.

I covered the heart cutout with a combination of the Straight Stripes Pretty Panel and the Class Act rounded rectangle, which is the same size as the Pretty Panel. Next I covered the tent front with another tent panel, which I trimmed at the bottom score line. I attached the trimmed tent panel to the tent panel front.

For the scallop bottom, I used Love Note to cut a scallop rectangle. I cut off the two short ends, cut the rectangle in half and trimmed the pieces to the depth of the tent base. Both sides of the treat tent have a scallop bottom treatment.

To finish off the packaging, I added an adhesive letter to the Square Tag for a monogrammed (and personalized) gift tag tied on with navy grosgrain 1/4″ ribbon.

Now let’s take a look at the treat topper. To begin, I cut a rounded rectangle with the die in Documented. I scored the rectangle at its center point approximately 5/8″ from the left and the right. Next I positioned the large heart die from the Heart to Heart Confetti Cuts set in the center of the panel. I placed the top plate of the cutting sandwich on the score line and ran it through my Big Shot. In this manner, only the top part of the heart was cut.

I scored the rectangle on the score lines and embellished it with die cuts cut with Heart LoveArrow and Love Note. The arrow was cut in the middle so that I could extend it a bit. The top heart is attached with dimensional adhesive, as is the love sentiment.

Thanks for joining me today! Next on the list is Kathy Martin’s blog. Comment at each stop along the way for a chance to win a $15 gift certificate. Comments close Thursday at noon CST; the winner will be announced on Friday.