Countdown to Confetti Day Two

Welcome back to Day Two of the Countdown to Confetti. Today Reverse Confetti is introducing the stamp sets Shine From Within and Color Me Happy, as well as the Hello Confetti Cuts.

My first card features a sentiment from Shine From Within heat-embossed over stamped brush strokes from Color Me Happy.

ShinefromWithinColorMeHappy

For my second card, I’m showcasing the new Hello Confetti Cuts die cut paired with the Geometric Background Confetti Cuts.

GeometricPanelHello

I cut the Geometric Background Confetti Cuts from white, turquoise, green, orange and red cardstock, piecing the colored pieces into the white frame. I cut the hello sentiment twice, placing it over a die cut vellum circle.

There are two $15 gift certificates up for grabs – one for blog commenters and one for Facebook commenters. Increase your chance of winning by leaving a comment on each sneak peek post for each designer. Comments will close at noon CST on April 7th and the winner will be announced at 5pm on April 7th on the Reverse Confetti blog and FB page.

Countdown to Confetti Day One

It’s Countdown to Confetti time at Reverse Confetti! There are FIVE stamp sets, EIGHT Confetti Cuts and “Piña Colada” Quick Card Panels in the April “Special Release”!! Today, Reverse Confetti introduces two awesome stamp sets – Leaping Lions and Pineapples Aplenty – both with coordinating Confetti Cuts!

My first project features the stamp set Leaping Lions along with its coordinating Confetti Cuts set, as well as one of the Piña Colada Quick Card Panels and the Double Banner Garland Confetti Cuts die.

LeapingLions

I stamped and clear-embossed the lion and his pedestal on watercolor paper and then colored both with watercolor pencils. I stamped the sentiment directly on the Quick Card Panel. The Double Banner Garland Confetti Cuts was cut in both orange and white cardstock and then glued together.

For my next project, I used the one of the die cuts from the Layered Banners Confetti Cuts set to create a birthday decoration.

LayeredBanners

I added gold foil chipboard letters to banners cut from cardstock with the largest die in the set. I strung the banners with cord on two cardboard sticks (the type used to make cake pops). It’s an easy way to create custom birthday decorations!

There are two $15 gift certificates up for grabs – one for blog commenters and one for Facebook commenters. Increase your chance of winning by leaving a comment on each sneak peek post for each designer. Comments will close at noon CST on April 7th and the winner will be announced at 5pm on April 7th on the Reverse Confetti blog and FB page.

Countdown to Confetti Day Three

Welcome back to the final day of Countdown to Confetti! I’m sharing projects created with the  The Buzz stamp set and its coordinating Confetti Cuts, as well as the Shine Bright stamp set and Sun ‘n Clouds Confetti Cuts set.

Let’s start with The Buzz. With one of the bee stamps in The Buzz set, I stamped and heat embossed vellum, which I colored with markers. I then cut out the bees with the coordinating die. I stamped and heat-embossed a rectangular piece of cardstock with a sentiment from The Buzz set and the dashed lines. I cut the rectangle with the large die in the Documented set to which I added the bees along with flowers cut with The Tweet Life Confetti Cuts. I adhered the panel to a dry-embossed card base.

TheBuzz

Ready for some sunshine? I stamped and heat-embossed a sentiment from Shine Bright on a kraft cardstock base. I cut the sun and clouds with the Confetti Cuts set and added them to a rectangular panel, to which I also added flowers and petals cut with The Tweet Life Confetti Cuts. I drew in some white pencil lines for stems.

Sunshine

There are two $15 gift certificates up for grabs – one for blog commenters and one for Facebook commenters. Increase your chance of winning by leaving a comment on each sneak peek post for each designer. Comments will close at noon CST today and the winner will be announced at 5pm on the Reverse Confetti blog and FB page.

I’ll be back tomorrow with a few more projects created with stamps and Confetti Cuts from this release.

Countdown to Confetti Day Two

Welcome back to Day Two of the Countdown to Confetti. There are two stamp sets being previewed today – Folded Tag Sentiments and the corresponding Folded Tag Confetti Cuts die set.

The Folded Tag set is one you’ll grab whether you want to custom coordinate gift packaging or simply add a tag to a generic gift bag. In my first example, I created the tag to go with a bag created with the Tagged Tote Confetti Cuts set.

FoldedTagI stamped one of the Folded Tags Sentiments and cut it with the rectangle die in the coordinating Confetti Cuts set. I cut the tag out of coordinating patterned paper and added the sentiment to the front. Open the flap for a personalized message!

Let’s say you’ve got some white gift bags and colored tissue paper. It’s easy to create a gift tag out of patterned paper to dress up the packaging.

For this example, I cut the tag twice out of patterned paper and trimmed off the bottom portion of the inside part of the tag. I adhered the two together. I did so for two reasons: the flip side of the patterned paper was not one that I wanted to be seen on my tag, and I liked the idea of the tag inside and outside matching.

FoldedTagGiftBagInside

I stamped the sentiment and used the tag die to cut it out so that the sentiment could be placed on the lower portion of the inside tag. There are lots of ways that this set can be used to dress up your gift packaging!!

There are two $15 gift certificates up for grabs – one for blog commenters and one for Facebook commenters. Increase your chance of winning by leaving a comment on each sneak peek post for each designer. Comments will close at noon CST on March 7th and the winner will be announced at 5pm on March 7th on the Reverse Confetti blog and FB page.

Countdown to Confetti Day One

It’s Countdown to Confetti time at Reverse Confetti! There are FIVE stamp sets, SEVEN Confetti Cuts and “Spring Fling” Quick Card Panels in the March release!! Today, I’m happy to introduce two awesome stamp sets – The Tweet Life and More Than Jellybeans – both with coordinating Confetti Cuts and perfect for Easter and spring-themed crafting!

Let’s get started! My first project features the stamp set More Than Jellybeans along with its coordinating Confetti Cuts set, as well as one of the Spring Fling Quick Card Panels and Banner Garland Duo, a standalone Confetti Cuts die.

Jellybeans

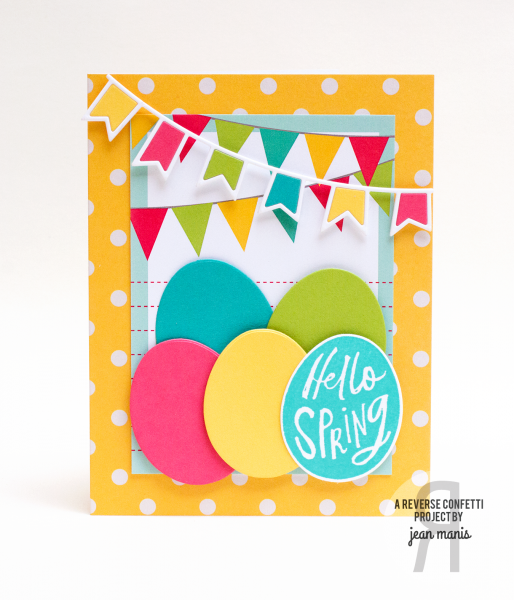
I stamped one of the More Than Jellybeans sentiments and cut it out, as well as the solid-colored cardstock eggs, with the Confetti Cuts die. I adhered those to one of the Quick Card Panels and added a Banner Garland Duo.

With one of the Banner Garland Duo dies, I cut a solid white garland. With the other, I cut a garland that I adhered to the solid one, after removing the white flags. I used that garland die to cut yellow, pink, green and teal pieces that I inlaid into the open flag spaces. The Quick Card Panel and garland were adhered to a card base.

My next project was created with The Tweet Life stamp set, its Confetti Cuts set and a Quick Card Panel.

TweetLife

I stamped and watercolored one of The Tweet Life set’s birds and cut it with the corresponding Confetti Cuts die. I cut the leaves and branch with the set’s Confetti Cuts dies and watercolored those as well. I heat-embossed the sentiment and cut it with the Office Edges file tab die. I attached the bird, branch, leaves and sentiment to a Quick Card Panel, tied on some twine and adhered that to a card base.

There are two $15 gift certificates up for grabs – one for blog commenters and one for Facebook commenters. Increase your chance of winning by leaving a comment on each sneak peek post for each designer. Comments will close at noon CST on March 7th and the winner will be announced at 5pm on March 7th on the Reverse Confetti blog and FB page.