Taylored Expressions: Look with your Heart

Hello! Today I am sharing a CAS Autism-themed card combining a sentiment from the Look with your Heart set with the Little Bits – Puzzle Piece die. Taylored Expressions will be donating 25% of the profits from the sale of every Look with your Heart stamp set to the National Autism Society throughout the month of April.

Taylored Expressions: Look with your Heart

I cut the Little Bits – Puzzle Piece from TE cardstock in Watermelon, Candy Corn, Lemon Meringue, Lime Zest, Cookie Monster, Jelly Donut, and Lollipop. I assembled the frame and taped it from behind.

Taylored Expressions: Look with your Heart

I stamped and heat-embossed the Look with your Heart sentiment on Sugar Cube cardstock. I attached the frame of puzzle pieces to an Oreo cardstock base over the sentiment panel.

Supplies:

Simon Says Stamp FLUTTERING BY Release Blog Hop

Hello! Today, I’m delighted to be participating in a Simon Says Stamp blog hop with products from their FLUTTERING BY release.

Simon Says Fluttering By Blog HopAll of the cards I am sharing today include backgrounds created with the Abstract Triangle stencil; I have used the stencil in three different ways. Just as in the projects I shared in this post, I have used the Big Thanks Words stamp set and Big Thanks dies to create the sentiments. Let’s get started!

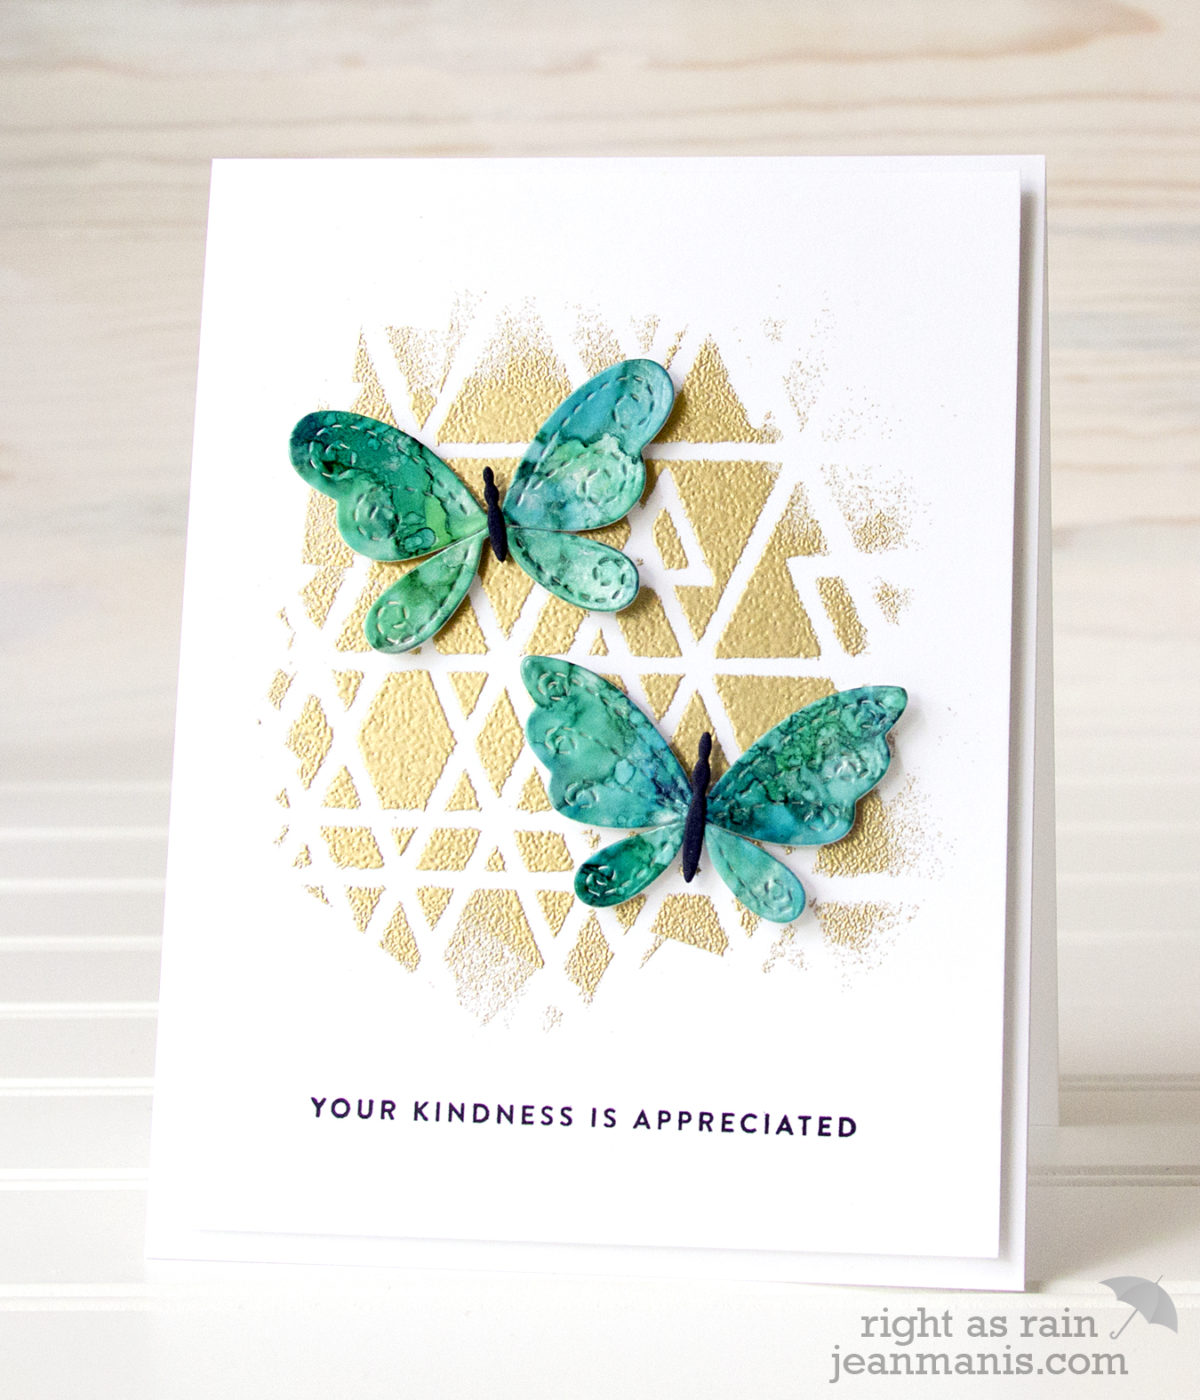
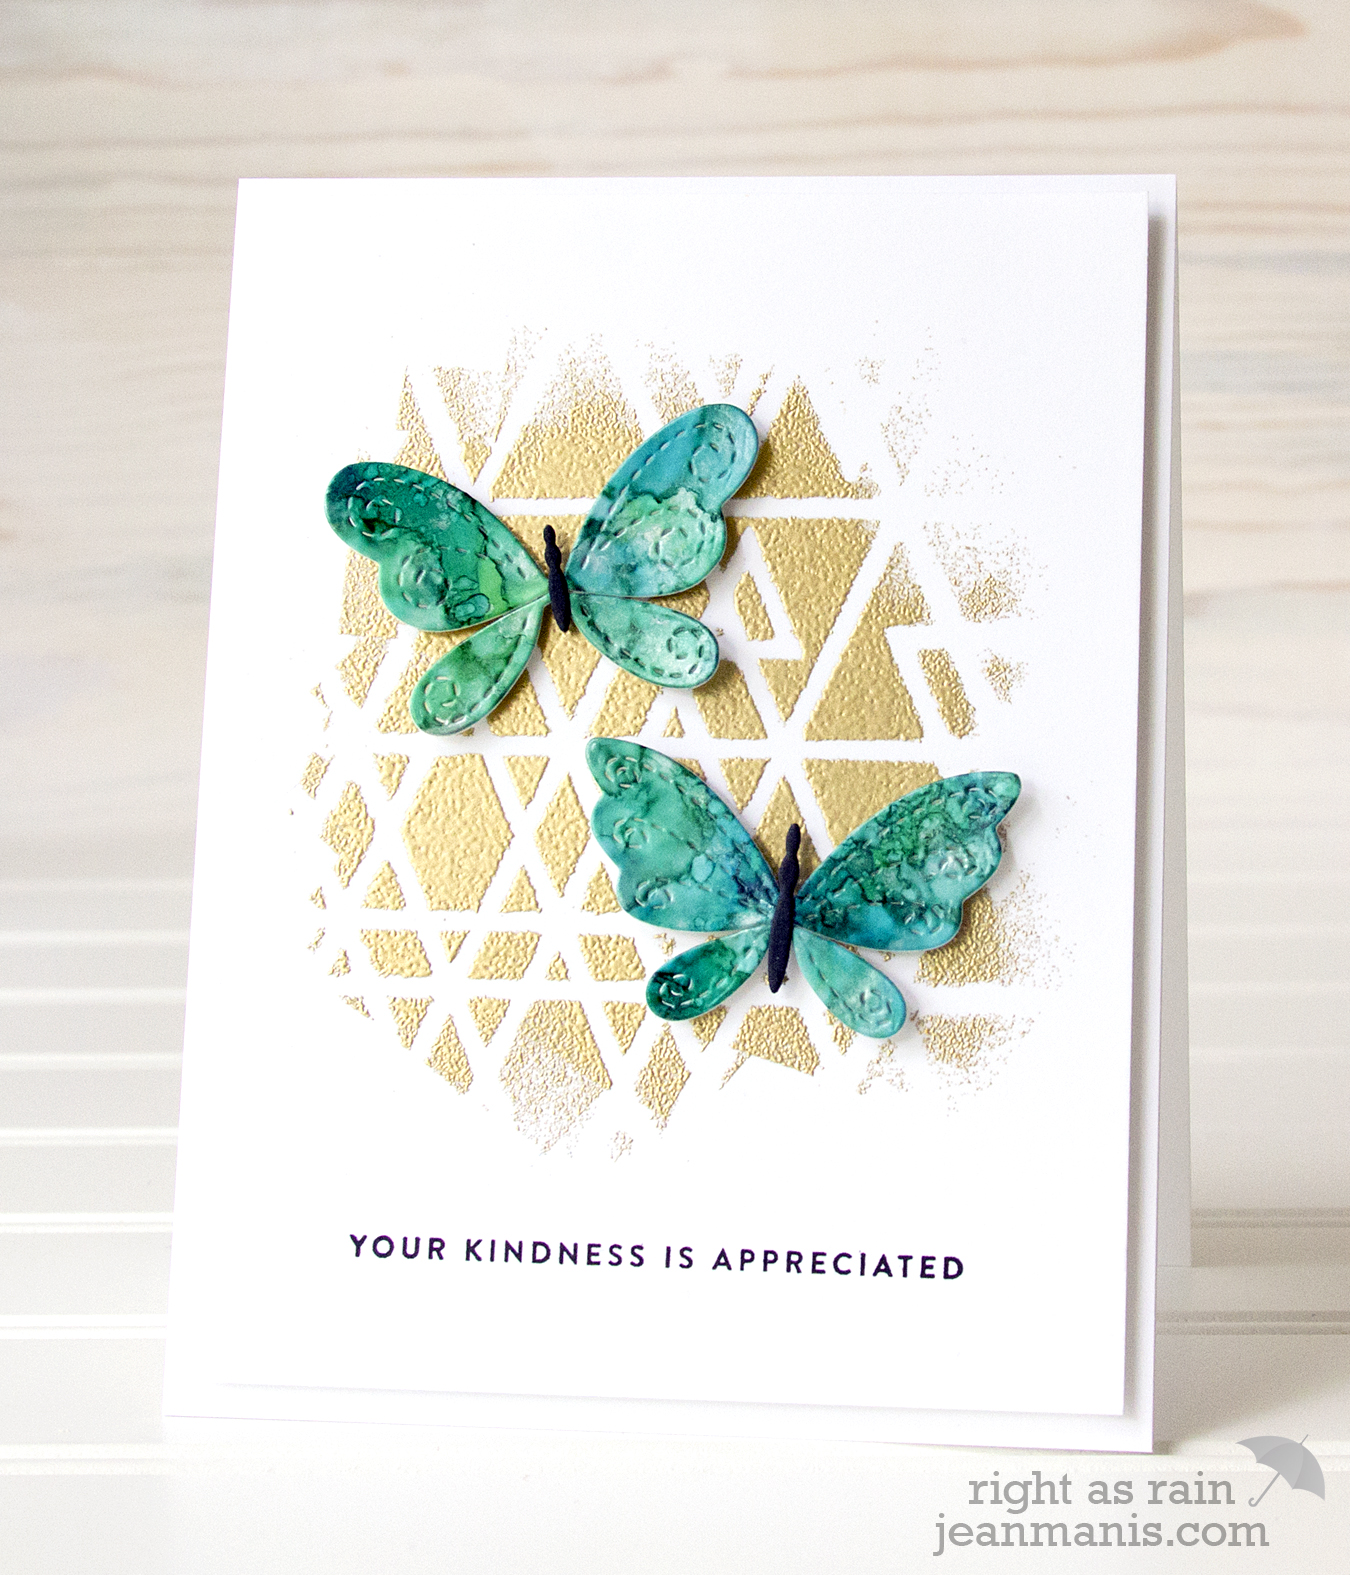
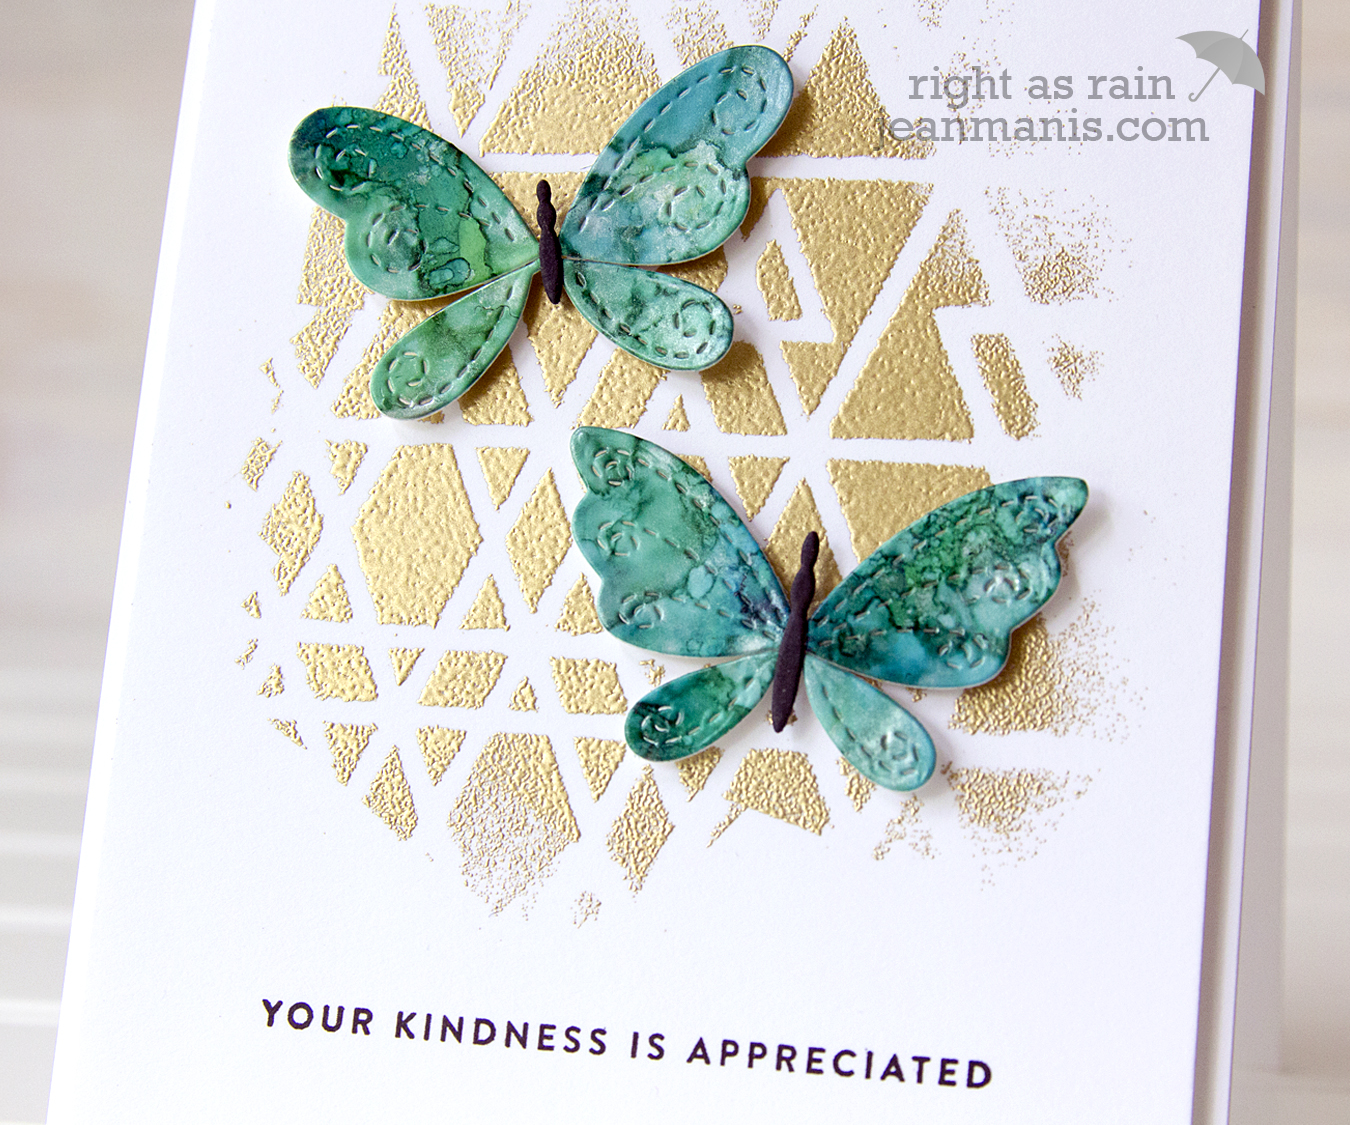
My first project pairs the Abstract Triangle stencil with the Stitching Butterflies dies.

SSS Fluttering By Release - Stitching Butterflies

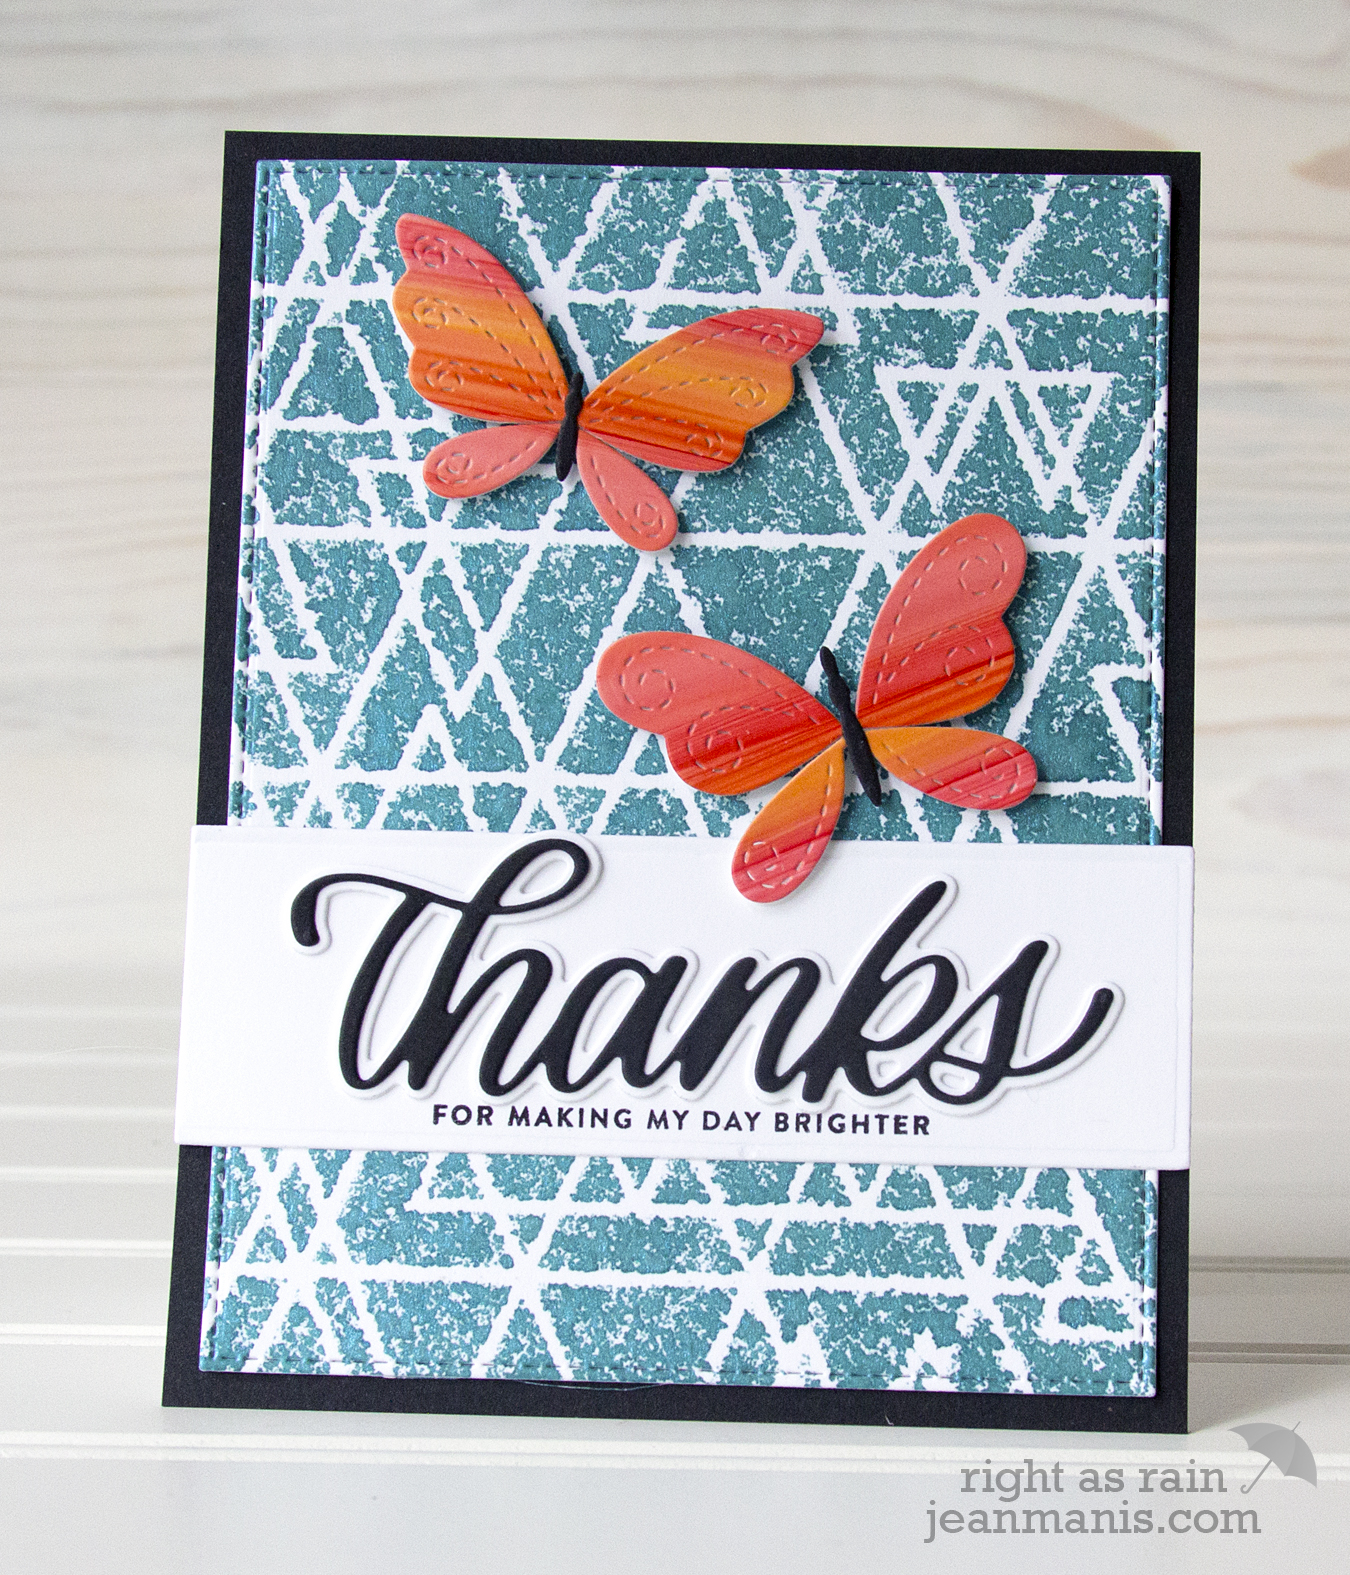
To begin, I sprayed Prima Color Bloom 2 – Dragonfly Blue spray through the Abstract Triangle stencil. Once dried, I added the Stitching Butterflies, cut from Yupo paper which had been colored with alcohol inks in Sunshine Yellow, Watermelon, and Red Pepper.

SSS Fluttering By Release - Stitching Butterflies

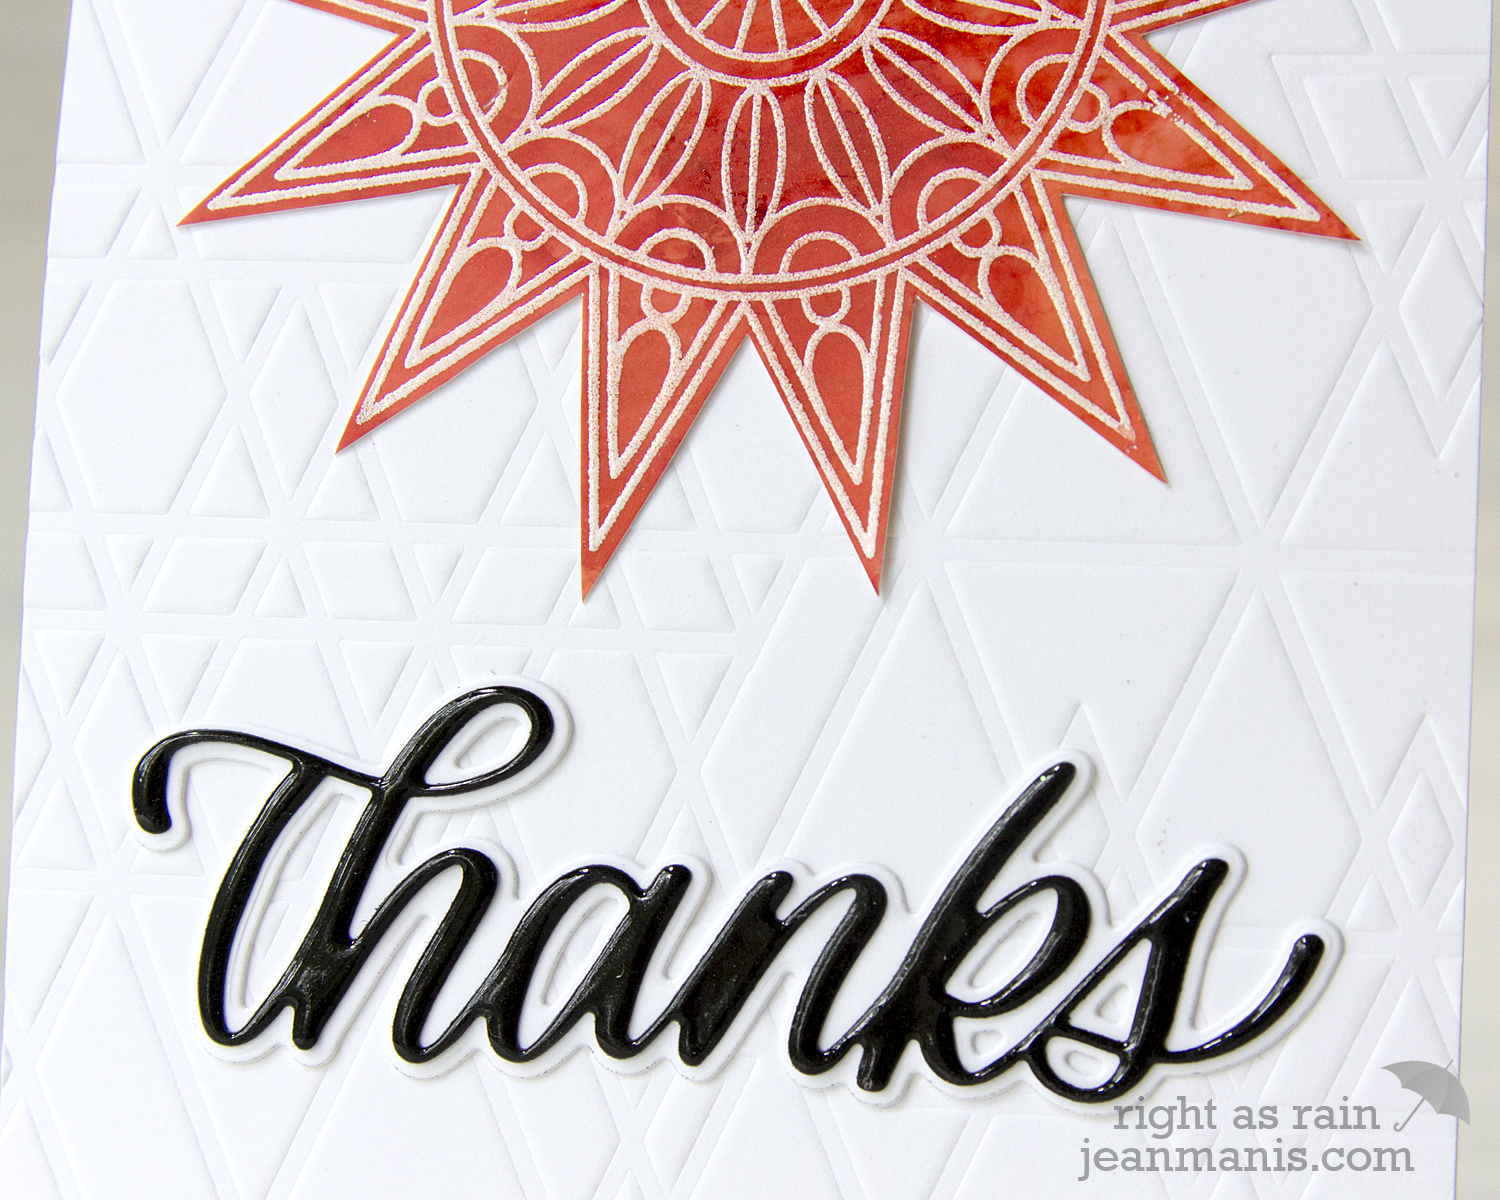
For my second project, I dry-embossed white cardstock with the Abstract Triangle stencil and added heat-embossed starbursts created with the Center Cut Burst background stamp.

SSS Fluttering By - Center Cut Burst background

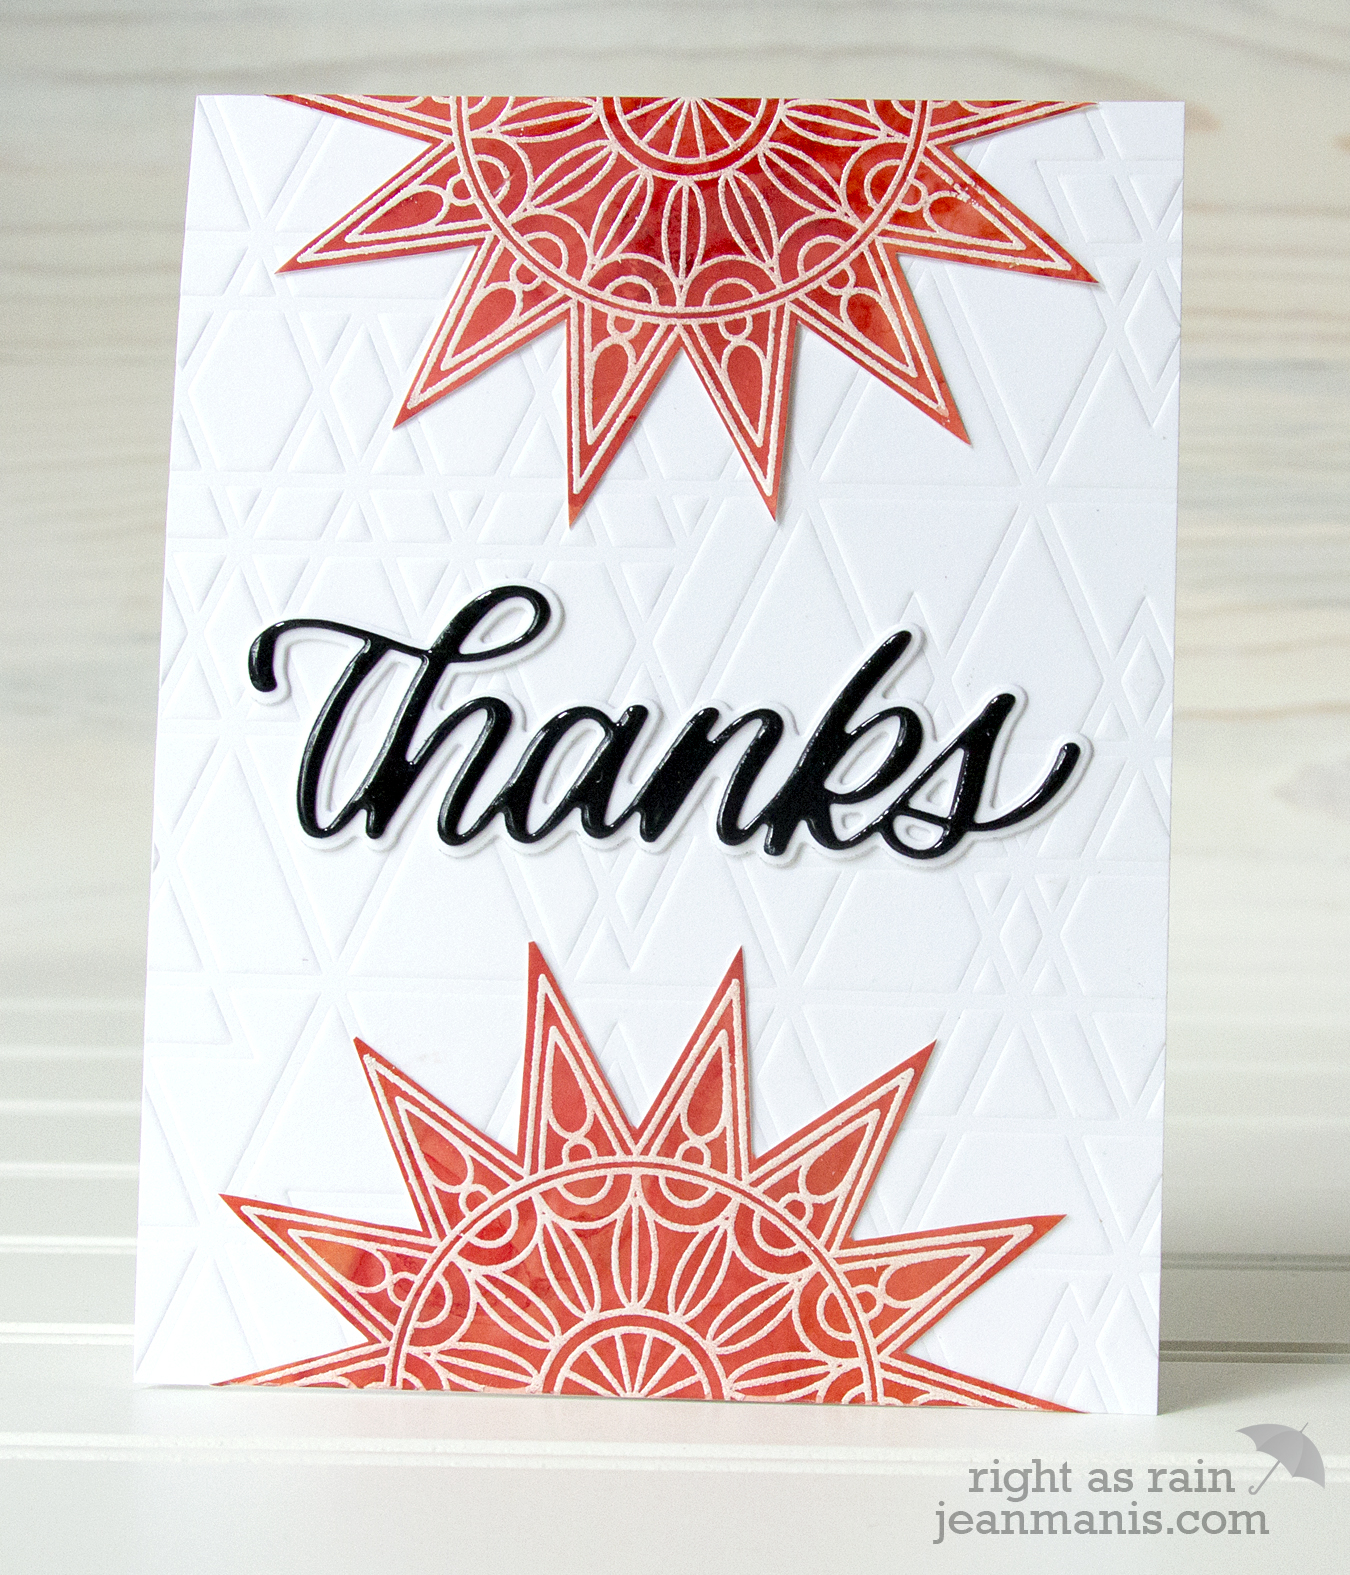
I stamped and heat-embossed the center portion of the Center Cut Burst background stamp two times on Yupo paper, which had been colored with alcohol inks in Sunshine Yellow, Watermelon, and Red Pepper (same colors as the first project but a different method of applying the inks).  I fussy-cut the images and added portions on the top and bottom of the card.

SSS Fluttering By - Center Cut Burst background

My third project combines a stenciled background with die-cut butterflies, cut with the Flickering Butterflies set from cardstock colored with Copic markers.

SSS Fluttering By Release - Abstract Triangle stencil

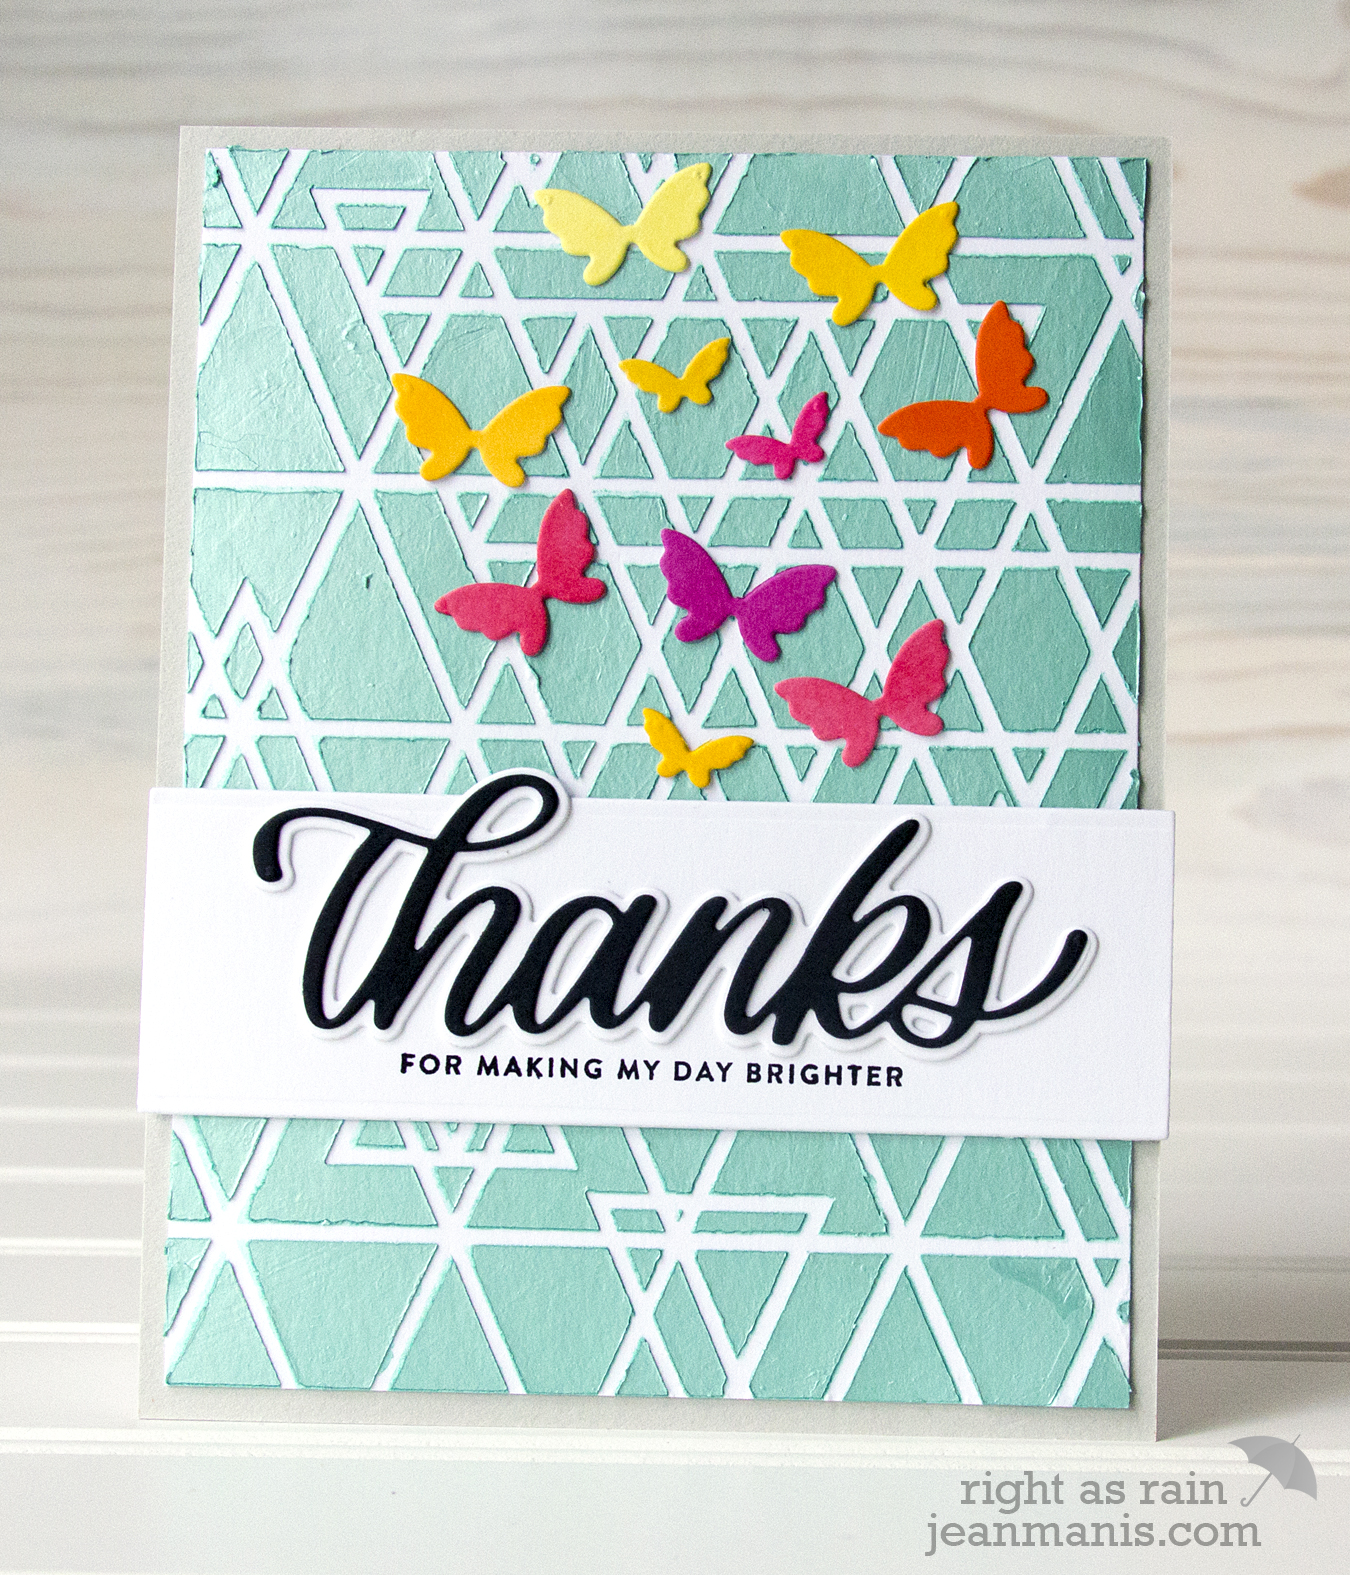
For this card, I applied Aquamarine Nuvo Mousse through the Abstract Triangle stencil on white cardstock to create the background. Once dry, I added the panel to a Fog cardstock base. After adding the sentiment strip, I placed the butterflies on the card in an arrangement that I liked. Using the Press ‘N Seal method, I lifted the butterflies, added glue to their backs, and applied them to the card front.

In this post, I added Distress Oxide inks through the stencil to create a background. Above, I have shown three other ways to use the Abstract Triangle stencil for a background: use a spray, dry-emboss, or apply embossing paste.

Thanks for joining me! Here is the list of the designers participating in the blog hop today:


Simon Says Stamp FLUTTERING BY Release

Hello! Today, I’m delighted to share three projects featuring products from the Simon Says Stamp FLUTTERING BY release.

SSS Fluttering By Release

My first project showcases the Picture Book Squirrel which I’ve paired with Flickering Butterflies and the Woodgrain Block.

SSS Fluttering By Release - Picture Book Squirrel

I cut the Picture Book Squirrel from white cardstock and colored the pieces with Copic markers. I pieced them together over a piece of cardstock, which was cut slightly smaller than the assembled squirrel, and glued the colored pieces to it. For a bit of whimsy, I added googly eyes.

SSS Fluttering By Release - Center Cut Burst background

I clear-embossed the Big Thanks sentiment cut from white cardstock and backed it with vellum, cut with the same die set. I added the sentiment to cardstock cut with the Woodgrain Block die. I cut the Flickering Butterflies from cardstock which had been colored with Copic markers. The clouds were cut with the Picture Book Sky Background die.

My second project features the Center Cut Burst background stamp.

SSS Fluttering By Release - Center Cut Burst background

I began by inking a cardstock panel with Distress Oxide inks in Squeezed Lemonade, Spiced Marmalade, and Picked Raspberry. I then stamped the Center Cut Burst stamp (without the center) with Archival black ink. I next stamped the sentiment from the Big Thanks Words stamp set. I added the die-cut Thanks, which I cut with the dies in the Big Thanks die set, above the stamped sentiment.

SSS Fluttering By Release - Center Cut Burst background

My final project today showcases the Abstract Triangle stencil on a CAS thank you card.

SSS Fluttering By Release - Abstract Triangle stencil

I inked white cardstock through the stencil with Distress Oxide inks in Cracked Pistachio, Peacock Feathers, and Blueprint Sketch. I added a sentiment strip stamped with the Big Thanks Words stamp set to which I adhered a clear-embossed Big Thanks cut from black cardstock.

Picture Book Panda

Hello! Today, I am sharing a CAS birthday card featuring the Simon Says Stamp Picture Book Panda die set.

SSS Picture Book Panda

To create the background, I used a technique shown by Laura Bassen in the Online Card Classes Background Check class; I repeatedly die cut the Simon Says Stamp Simple Numbers Dies (the set appears to be discontinued). I have the set of numbers still together, which makes this technique fairly straightforward.

I die-cut and assembled the panda and added him to a strip cut from the Lawn Fake Tan cardstock which I stamped and heat-embossed with a sentiment from the Birthday Messages set.

SSS Picture Book Panda

I cut the balloons with the Penny Black Uplifting dies from Lawn Fawn cardstock in Chili Red, Sunflower, and Blue Jay. I used the Taylored Expressions Balloon Strings die set to cut the strings. I tucked two of the balloon strings behind the sentiment strip and let the string from the largest balloon come in front.


TE April 2018 Release Day

Hello! Welcome to the Taylored Expressions April 2018 Release! All of the products that we have been sharing this week are now available in the TE store! Before you head off to shop, I have several more projects to show you.

My first project showcases the Stitched Frame Stacklets 2 paired with the Little Bits – Butterflies.

TE April 2018 Release

Using the Blooming Beautiful Stencil I inked Pink Champagne cardstock with Guava ink which I cut with the largest die in the Frayed Edge Stacklets set. I die-cut the Little Bits – Butterflies from Guava cardstock and used the Stitched Frame Stacklets 2 to frame them. I heat-embossed a sentiment from the Simply Stamped – Wreath set on Confetti Cake cardstock.

TE April 2018 Release

Supplies:


My second project combines felt flowers created with the Roll With It Flower 1 and Roll With It Flower 2 mixed media dies.

TE April 2018 Release

I cut the flowers from a variety of felt colors – Cotton Candy, BubblegumCherry BlossomPink Sherbert – and glued them with hot glue. These felt flowers are a cinch to make! I applied embossing paste to Pink Champagne cardstock, cut with the largest Frayed Edge Stacklets die, through the Blooming Beautiful Stencil. I heat-embossed a Simply Stamped – Wreath sentiment on Sugar Cube  cardstock cut with the one of the dies in the Stitched Oval Stacklets set. I used hot glue to glue the felt flowers to the oval and added a few sprigs of greenery cut with the Leafy Branch die.

TE April 2018 Release

Supplies:

For a limited time, earn DOUBLE CRAFTY POINTS when you purchase the TE Stencil Bundle which includes all 6 of our new stencil designs! If you’re not a Crafty Points member, it’s free and easy to join. Just create an account at the TE webstore and you’re automatically enrolled to begin earning crafty points with every purchase. You’ll earn 84 Crafty Points on the purchase of the Stencil Bundle! Offer valid on qualifying purchases made between 9am CDT on Thursday, April 5, 2018 and 11:59 pm CDT on Sunday, April 8, 2018 and only while supplies last. Crafty Points are only available on purchases made via our retail site: www.tayloredexpressions.com.

TE April 2018 Release Promotion

Thanks so much for stopping by! To see more projects with the new release and new product information, head over to the TE Blog for a complete list of the participating designers!