Countdown to Confetti Day Two

Welcome back to Day Two of the Countdown to Confetti. There are two stamp sets being previewed today – Folded Tag Sentiments and the corresponding Folded Tag Confetti Cuts die set.

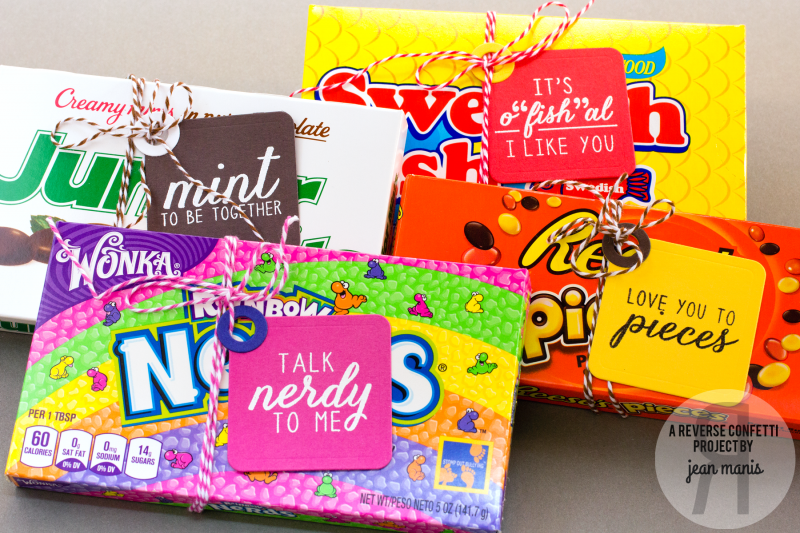
The Folded Tag set is one you’ll grab whether you want to custom coordinate gift packaging or simply add a tag to a generic gift bag. In my first example, I created the tag to go with a bag created with the Tagged Tote Confetti Cuts set.

FoldedTagI stamped one of the Folded Tags Sentiments and cut it with the rectangle die in the coordinating Confetti Cuts set. I cut the tag out of coordinating patterned paper and added the sentiment to the front. Open the flap for a personalized message!

Let’s say you’ve got some white gift bags and colored tissue paper. It’s easy to create a gift tag out of patterned paper to dress up the packaging.

For this example, I cut the tag twice out of patterned paper and trimmed off the bottom portion of the inside part of the tag. I adhered the two together. I did so for two reasons: the flip side of the patterned paper was not one that I wanted to be seen on my tag, and I liked the idea of the tag inside and outside matching.

FoldedTagGiftBagInside

I stamped the sentiment and used the tag die to cut it out so that the sentiment could be placed on the lower portion of the inside tag. There are lots of ways that this set can be used to dress up your gift packaging!!

There are two $15 gift certificates up for grabs – one for blog commenters and one for Facebook commenters. Increase your chance of winning by leaving a comment on each sneak peek post for each designer. Comments will close at noon CST on March 7th and the winner will be announced at 5pm on March 7th on the Reverse Confetti blog and FB page.

Reverse Confetti ABC Valentines

Welcome to this month’s Reverse Confetti Blog Hop. If you were following along from the beginning, you reached me from Lisa Henke’s blog.

I’m sharing two ABC [Anything but a Card] packaging projects designed for Valentine’s Day treats. I chose a preppy color scheme for a twist on traditional Valentine’s Day colors!

ABCValentines

The treat tent, (on the left in the photo above), houses heart-shaped chocolates, but it could just as easily be used to package a nail polish bottle, small soaps, or trial-size cosmetics. To begin its construction, I used the Sweet Treat Tent Confetti Cuts to cut three tent pieces. With my paper trimmer, I trimmed the top tab off of all three. Next, I die cut a heart from one of the tents, the one for the front, with the heart die in the Puppy Love Confetti Cuts set.

I covered the heart cutout with a combination of the Straight Stripes Pretty Panel and the Class Act rounded rectangle, which is the same size as the Pretty Panel. Next I covered the tent front with another tent panel, which I trimmed at the bottom score line. I attached the trimmed tent panel to the tent panel front.

For the scallop bottom, I used Love Note to cut a scallop rectangle. I cut off the two short ends, cut the rectangle in half and trimmed the pieces to the depth of the tent base. Both sides of the treat tent have a scallop bottom treatment.

To finish off the packaging, I added an adhesive letter to the Square Tag for a monogrammed (and personalized) gift tag tied on with navy grosgrain 1/4″ ribbon.

Now let’s take a look at the treat topper. To begin, I cut a rounded rectangle with the die in Documented. I scored the rectangle at its center point approximately 5/8″ from the left and the right. Next I positioned the large heart die from the Heart to Heart Confetti Cuts set in the center of the panel. I placed the top plate of the cutting sandwich on the score line and ran it through my Big Shot. In this manner, only the top part of the heart was cut.

I scored the rectangle on the score lines and embellished it with die cuts cut with Heart LoveArrow and Love Note. The arrow was cut in the middle so that I could extend it a bit. The top heart is attached with dimensional adhesive, as is the love sentiment.

Thanks for joining me today! Next on the list is Kathy Martin’s blog. Comment at each stop along the way for a chance to win a $15 gift certificate. Comments close Thursday at noon CST; the winner will be announced on Friday.

Countdown to Confetti Day Three

Welcome back to the final day of Countdown to Confetti! I’m sharing projects created with Love Blooms, which has its own corresponding Confetti Cuts set, along with Sugary Sweet Sentiments and a Square Tag Confetti Cuts set.

Let’s take a look at the gorgeous Love Blooms!

JMLoveBlooms

The coordinating Confetti Cuts set makes creating a bouquet of blossoms easy! The sentiments in Love Blooms work for a variety of occasions including Valentine’s Day, a card to a friend or a card congratulating a newly-engaged couple!

Now for a fun treat packaging idea that could be used for classroom treats or a party favor. On tags cut with the Square Tag Confetti Cuts set, I heat-embossed several of the Sugary Sweet Sentiments. I chose colors for the tags that coordinated with the various candies, which are the movie-size boxes. I tied the tags onto the boxes with baker’s twine.

JM-SugarySweet

Don’t forget, there are two $15 gift certificates up for grabs – one for blog commenters and one for Facebook commenters. Increase your chance of winning by leaving a comment on each sneak peek post for each designer. Comments will close at noon CST on JAN 7th and the winner will be announced at 5pm on JAN 7th on the Reverse Confetti blog and FB page.