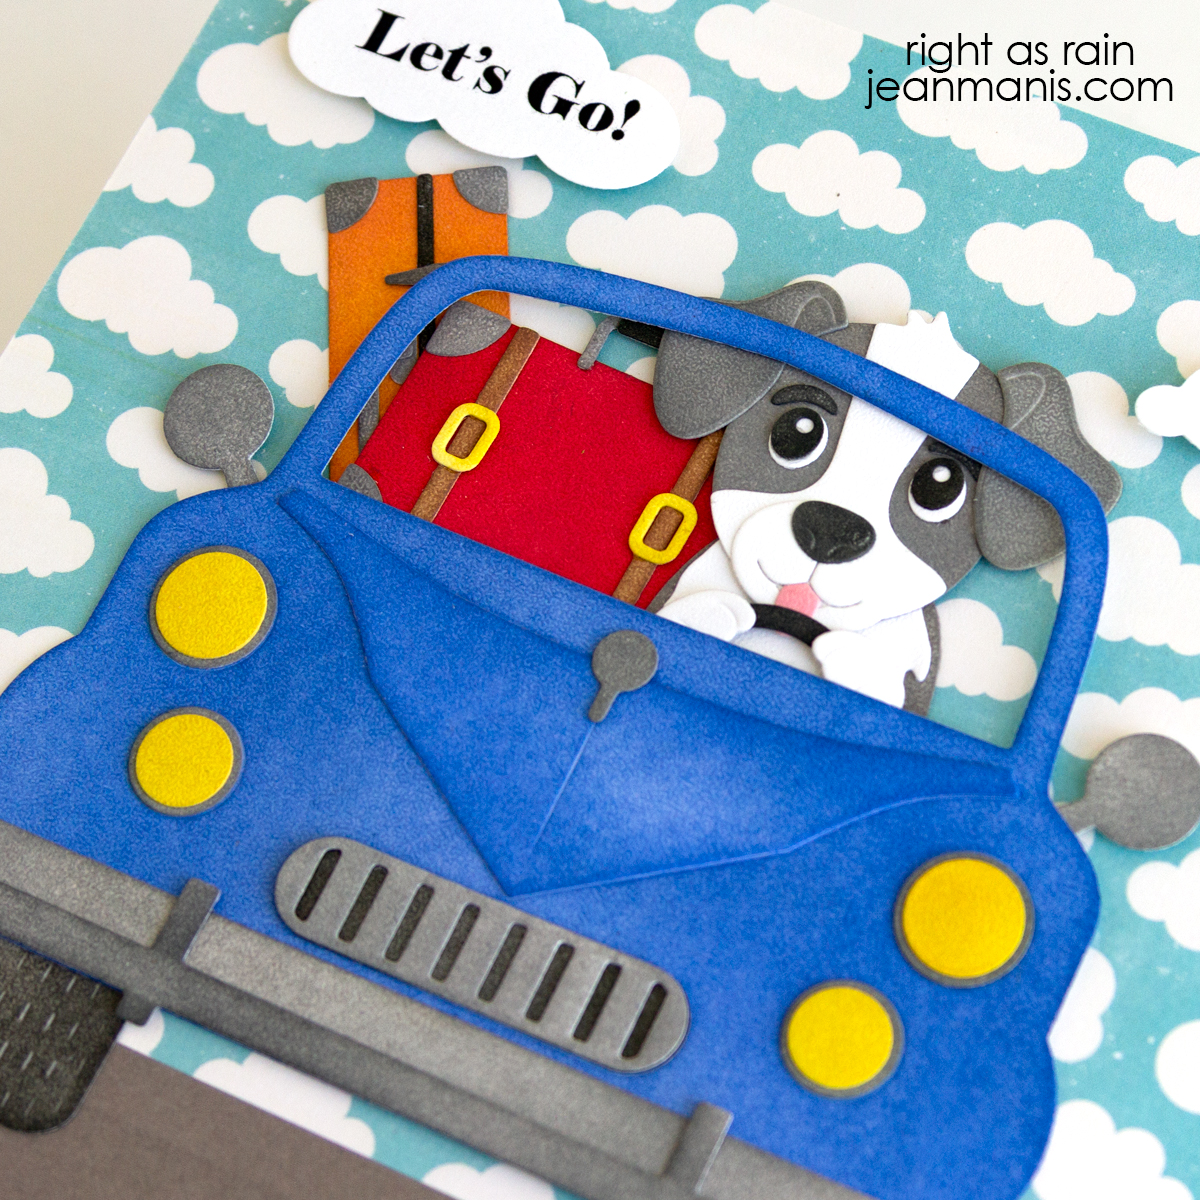
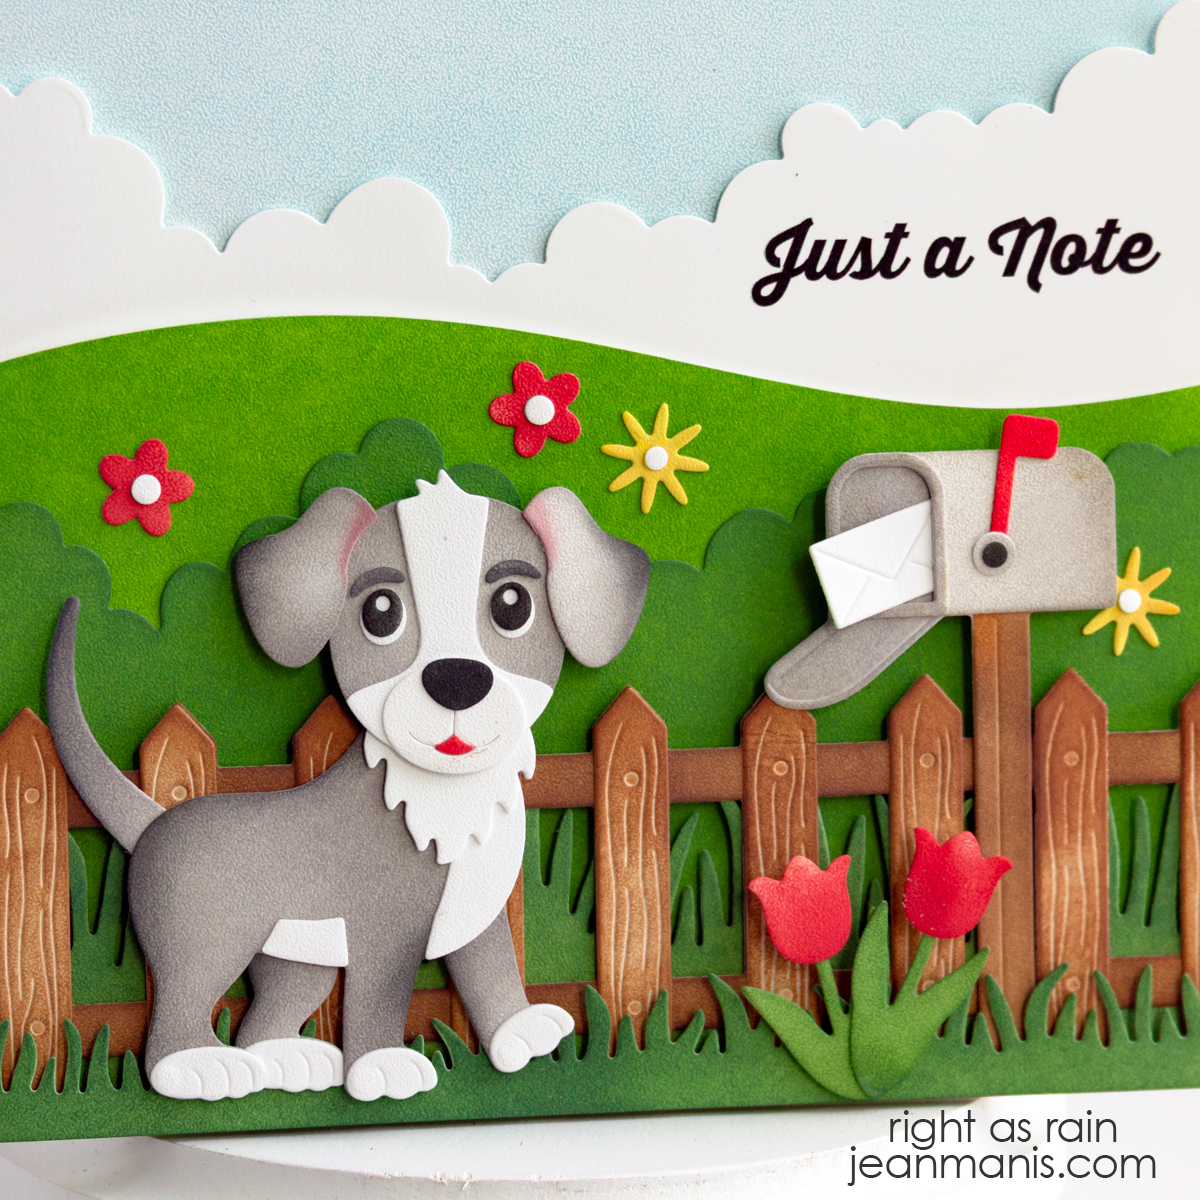
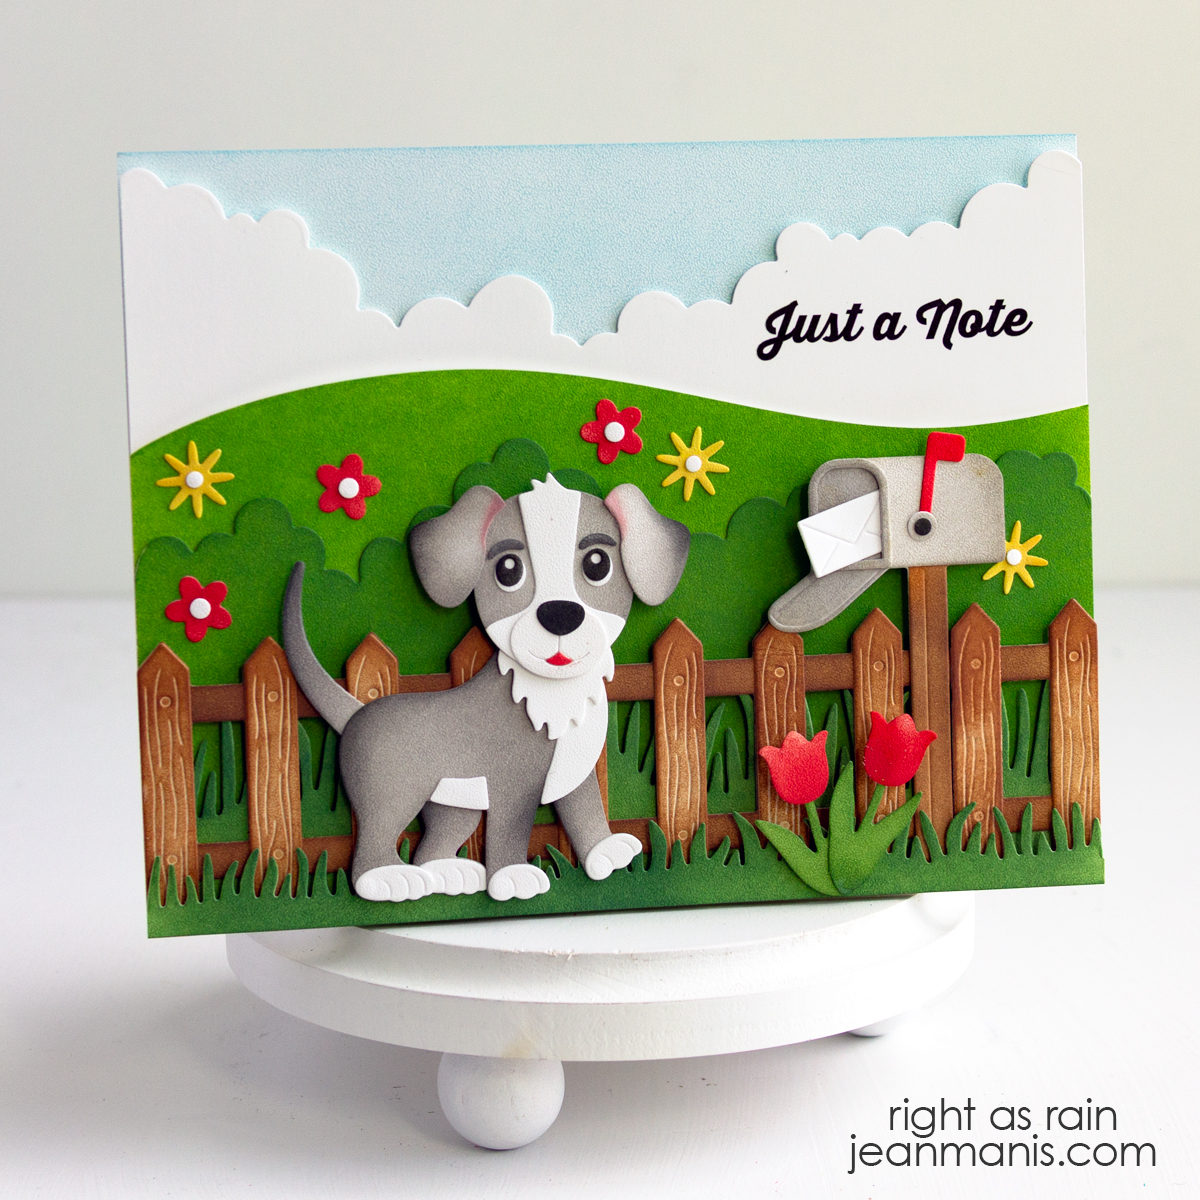
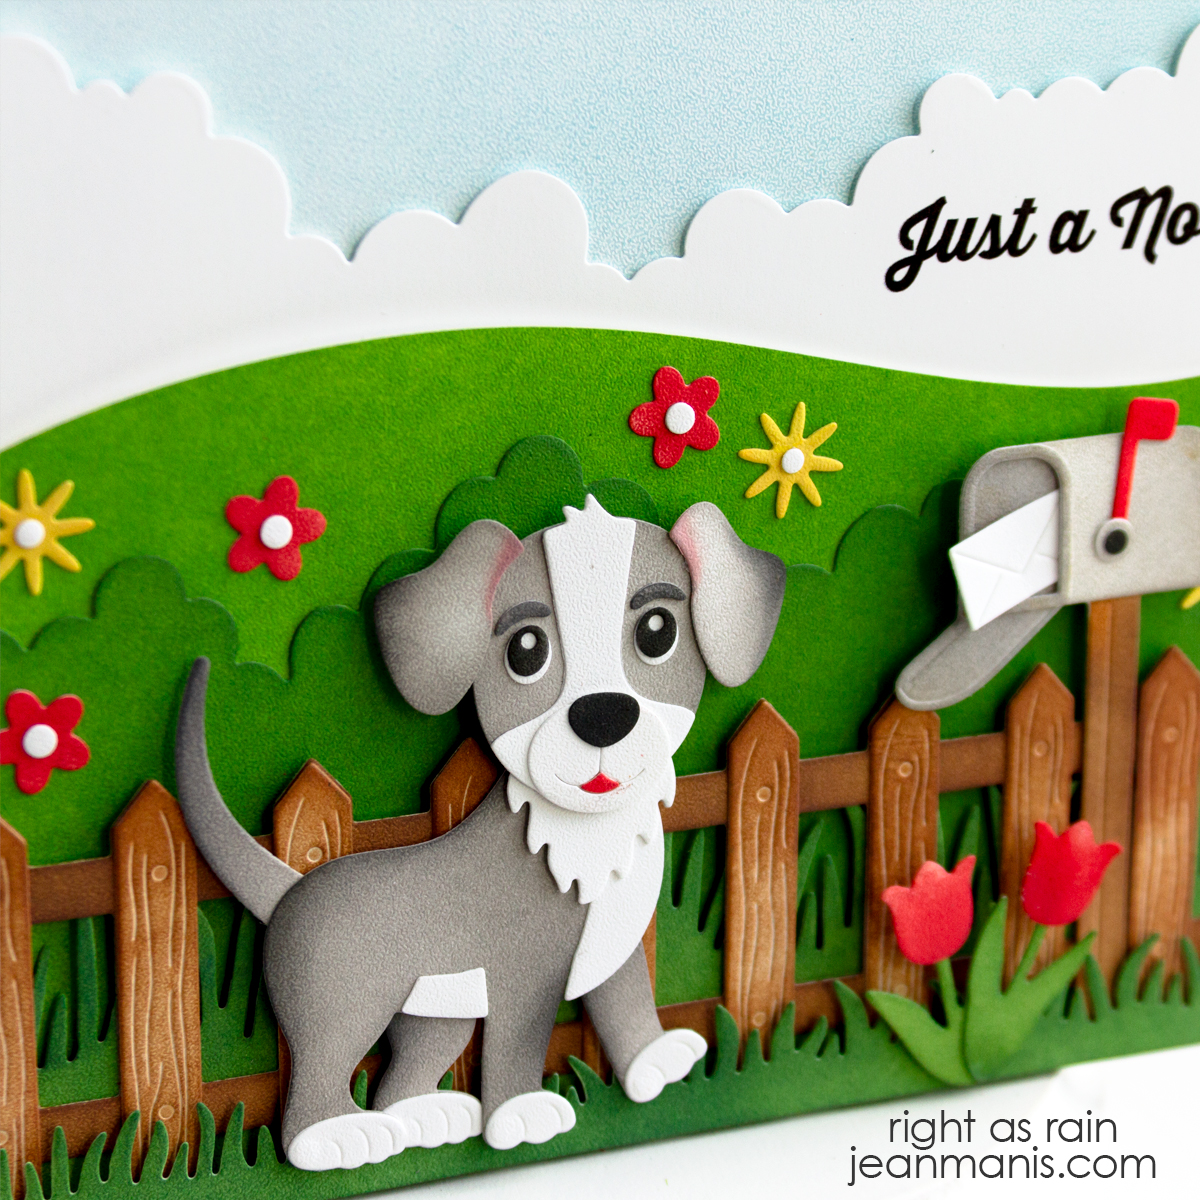
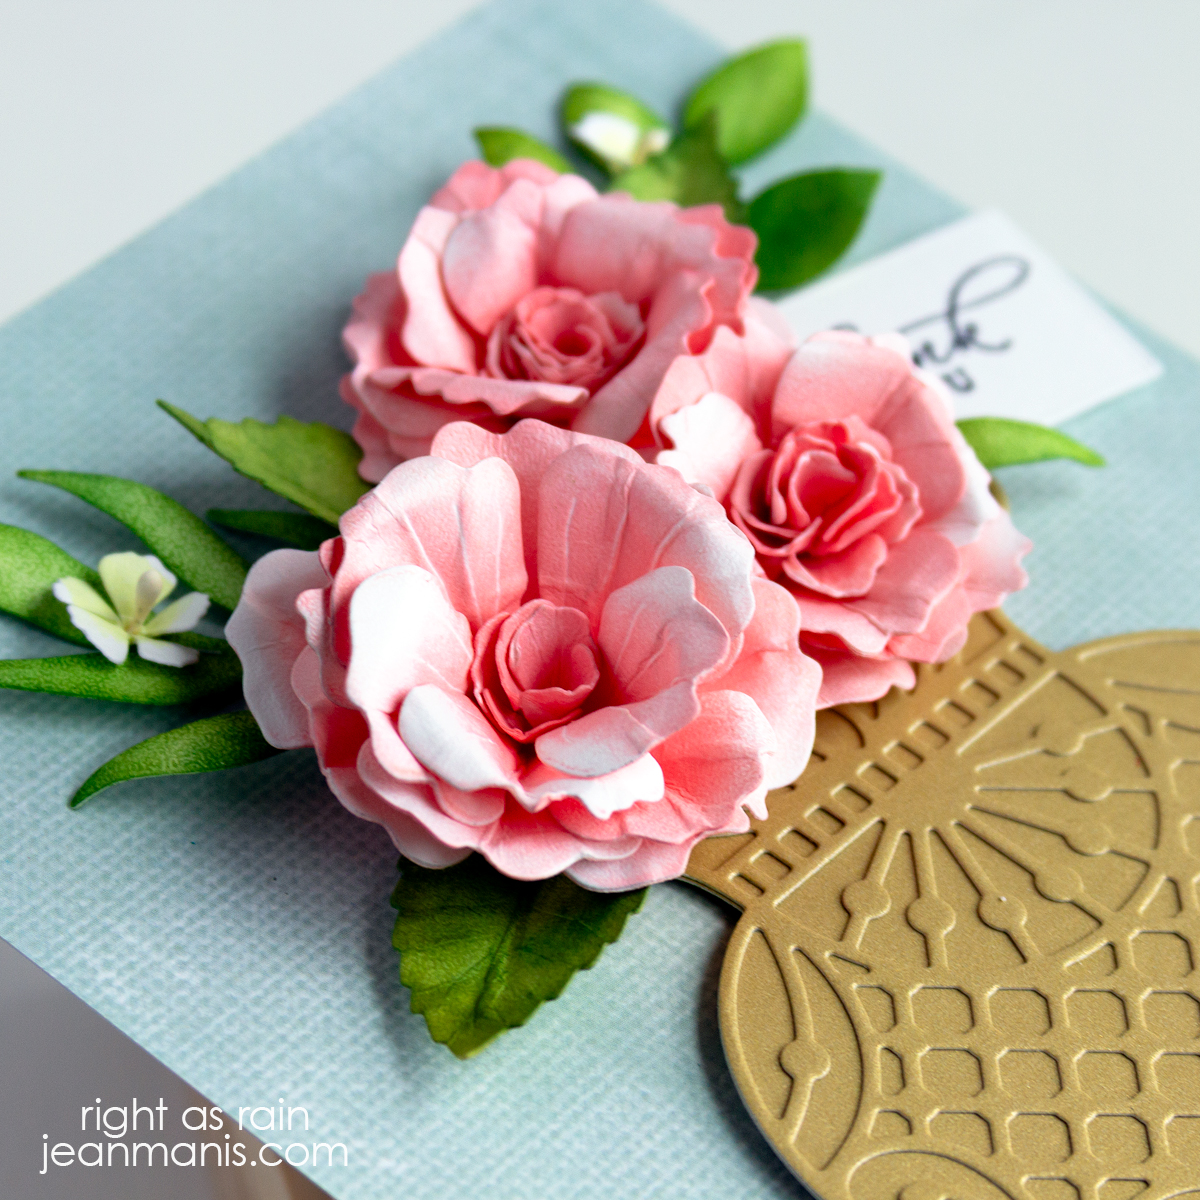
Holiday Greenery Card with Natural Elegance

Hello! Embrace the quiet elegance of nature with a card that feels like a festive visit to a garden nursery, featuring realistic poinsettias, evergreen, and berry boughs tucked into a flower bucket. Using Elizabeth Craft Designs die sets, I’ve crafted a serene design that’s perfect for spreading warm, understated holiday cheer.

Holiday Greenery Card with Natural Elegance

    • With the Flower Pot / Bucket die set, cut Soft Finish cardstock. Color with Distress inks and assemble.
    • With the Florals 29, Holly Greenery, and Floral Greenery 1 die sets, cut Soft Finish cardstock. Color with Distress inks. Shape with flower tools if desired. (I have tools from Dress My Craft, Heartfelt Creations, and McGill.) Assemble. I used Dress My Craft Pollen for the centers of the two small white flowers.
    • Create 5″ x 7″ card base and cover with Soft Finish cardstock. Add a 4 5/8″ x 6 5/8″ Evergreen Season Collection Solids 1 patterned paper panel.
    • Stamp Holiday Snippets sentiment in brown ink on the smooth side of Soft Finish cardstock. Cut with small tag die (I used a die from a now-retired MFT tag set).
    • Add assembled items and sentiment tag to the card front with foam and dot adhesive.

Holiday Greenery Card with Natural Elegance

Looking for more inspiration? You can read this post where I used some of the same and similar products to create a holiday card.

Save 10% off your entire order (with a minimum purchase of USD $25) at Elizabeth Craft Designs with the code PNWMANIS.


Die-cut Winter Bouquet Card

Hello! Today, I’m excited to share a Christmas card that brings the beauty of winter botanicals to life! Using Elizabeth Craft Designs stamps and dies, I crafted a floral spray featuring poinsettias, evergreen, and berry boughs. The realism of the elements makes this card a celebration of the season’s natural beauty.

Die-cut Winter Bouquet Card

When creating realistic blooms, I research the flower. Did you know that the poinsettia is the most popular flowering plant sold in the United States with more than 70 million sold nationwide each year? What we consider the petals are actually bracts, which are more like leaves than petals. The true flowers of poinsettias are the small clusters of yellow blooms in the center.

    • With the Florals 29 and Holly Greenery die sets, cut Soft Finish cardstock. Color with Distress Inks. Shape with flower tools if desired. (I have tools from Dress My Craft, Heartfelt Creations, and McGill.) Assemble.
    • Create 5″ square card base and cover with patterned paper. Cut doily shape with large die in the Joyous Ornament – Round set from white cardstock. With the circle die in the same set, cut another patterned paper. Add doily shape and circle to card base.
    • Stamp Joyous Christmas sentiment in brown ink and cut with a die in the Layered Labels set.
    • Add assembled floral items to card front. Add sentiment label with foam adhesive.

Die-cut Winter Bouquet Card

Save 10% off your entire order (with a minimum purchase of USD $25) at Elizabeth Craft Designs with the code PNWMANIS.


Elizabeth Craft Designs | Harvest Sunflowers

Hello and happy final week of August! Today, I am sharing a handmade card that brings the beauty of sunflowers to life! Featuring a wood barrel brimming with sunflowers, this card is created using Elizabeth Craft Designs die sets. I cut the pieces from white textured paper, coloring each piece with inks to achieve rich, vibrant tones that make the sunflowers pop.

Elizabeth Craft Designs | Harvest Sunflowers

    • Cut pieces for sunflowers, leaves, and stems with the Florals 26 set from Soft Finish cardstock. Color with Distress Inks. Shape with flower tools if desired. (I have tools from Dress My Craft, Heartfelt Creations, and McGill.) Assemble.
    • Cut pieces for barrel with dies in the Floral Foliage 1 set from Soft Finish cardstock. Color with Distress Inks and assemble. I previously shared a card HERE featuring the Floral Foliage 1 set.
    • Create a 5″ x 7″ card base from textured white cardstock. Add patterned paper cut with the largest die in the Nestabilities 5 x 7 Matting Basics A set.
    • Add barrel, flowers, and leaves to the card front with foam and dot adhesive.
    • Stamp sentiment (I used an older SU set) on white cardstock in Potting Soil ink. Cut with small tag die (I used a now-retired MFT set).

Elizabeth Craft Designs | Harvest Sunflowers

Save 10% off your entire order (with a minimum purchase of USD $25) at Elizabeth Craft Designs with the code PNWMANIS.


Elizabeth Craft Designs | Autumn Scene

Hello! As the colors of fall begin to grace the trees, I was inspired to capture the season’s beauty on my latest card creation. Using the Elizabeth Craft Designs Floral Foliage 1 die set, I crafted a scene featuring a wooden barrel overflowing with realistically colored autumn leaves. The set includes a birdhouse, complete with a pair of birds. You can find more fall-themed handmade card inspiration HERE.

Elizabeth Craft Designs | Autumn Scene

    • Create a 5″ x 7″ card base. Cover the base with patterned paper, cut with the largest die in the 5″ x 7″ Matting Basics A set. (I used Simple Stories patterned paper from several years ago designed by Katie Pertiet; she is now creating products for 49 & Market.)
    • With the Floral Foliage 1 set, cut pieces from Soft Finish cardstock, and color with Distress Inks. I used Brushed Silver cardstock for the bands on the barrel. Shape colored leaves with ball stylus tools. Add Finnabair black micro beads for the bird’s eyes.
    • Stamp sentiment (SU set) in Potting Soil ink; cut with small tag die (I used a now-retired MFT tag.)

Elizabeth Craft Designs | Autumn Scene

Looking for more inspiration? I previously used the Floral Foliage 1 die set on a Christmas card HERE. Save 10% off your entire order (with a minimum purchase of USD $25) at Elizabeth Craft Designs with the code PNWMANIS.


Elizabeth Craft Designs Jungle Friendship

Hello! Step into the jungle with a friendship card featuring the Elizabeth Craft Designs Slow the Sloth hanging from a tree. The scene is set upon a jungle leaf background which reinforces the theme. A tropical flower adds a burst of color to the whimsical design.

Elizabeth Craft Designs Slow the Sloth

    • Cut the Leaves Background from Noble Fir cardstock. Add to a Sea Glass cardstock panel measuring 4″ x 5 1/4″. Add the assembly to a white, orange -peel textured, A-2 sized cardstock panel affixed to a card base. You can read about the use of cover plate dies to create card backgrounds HERE.
    • With the Slow the Sloth set, cut the sloth and tree branch from a variety of cardstock colors. Assemble and add to the card background with foam adhesive. You can watch an introduction to the Jungle Party collection and assembly of the sloth HERE.
    • Create sentiment and cut with an Everyday Sentiment Banner die. I created the sentiment “Let’s Hang Out” on my computer.
    • Embellish card with a hibiscus bloom and tropical leaf cut with dies in the Jungle Leaves set.

The sloth’s laid-back charm will bring a smile to the recipient and serve as a reminder to take it easy amidst life’s hustle and bustle!

Elizabeth Craft Designs Slow the Sloth