OCC Holiday Card Workshop 2013 Day One Part Two

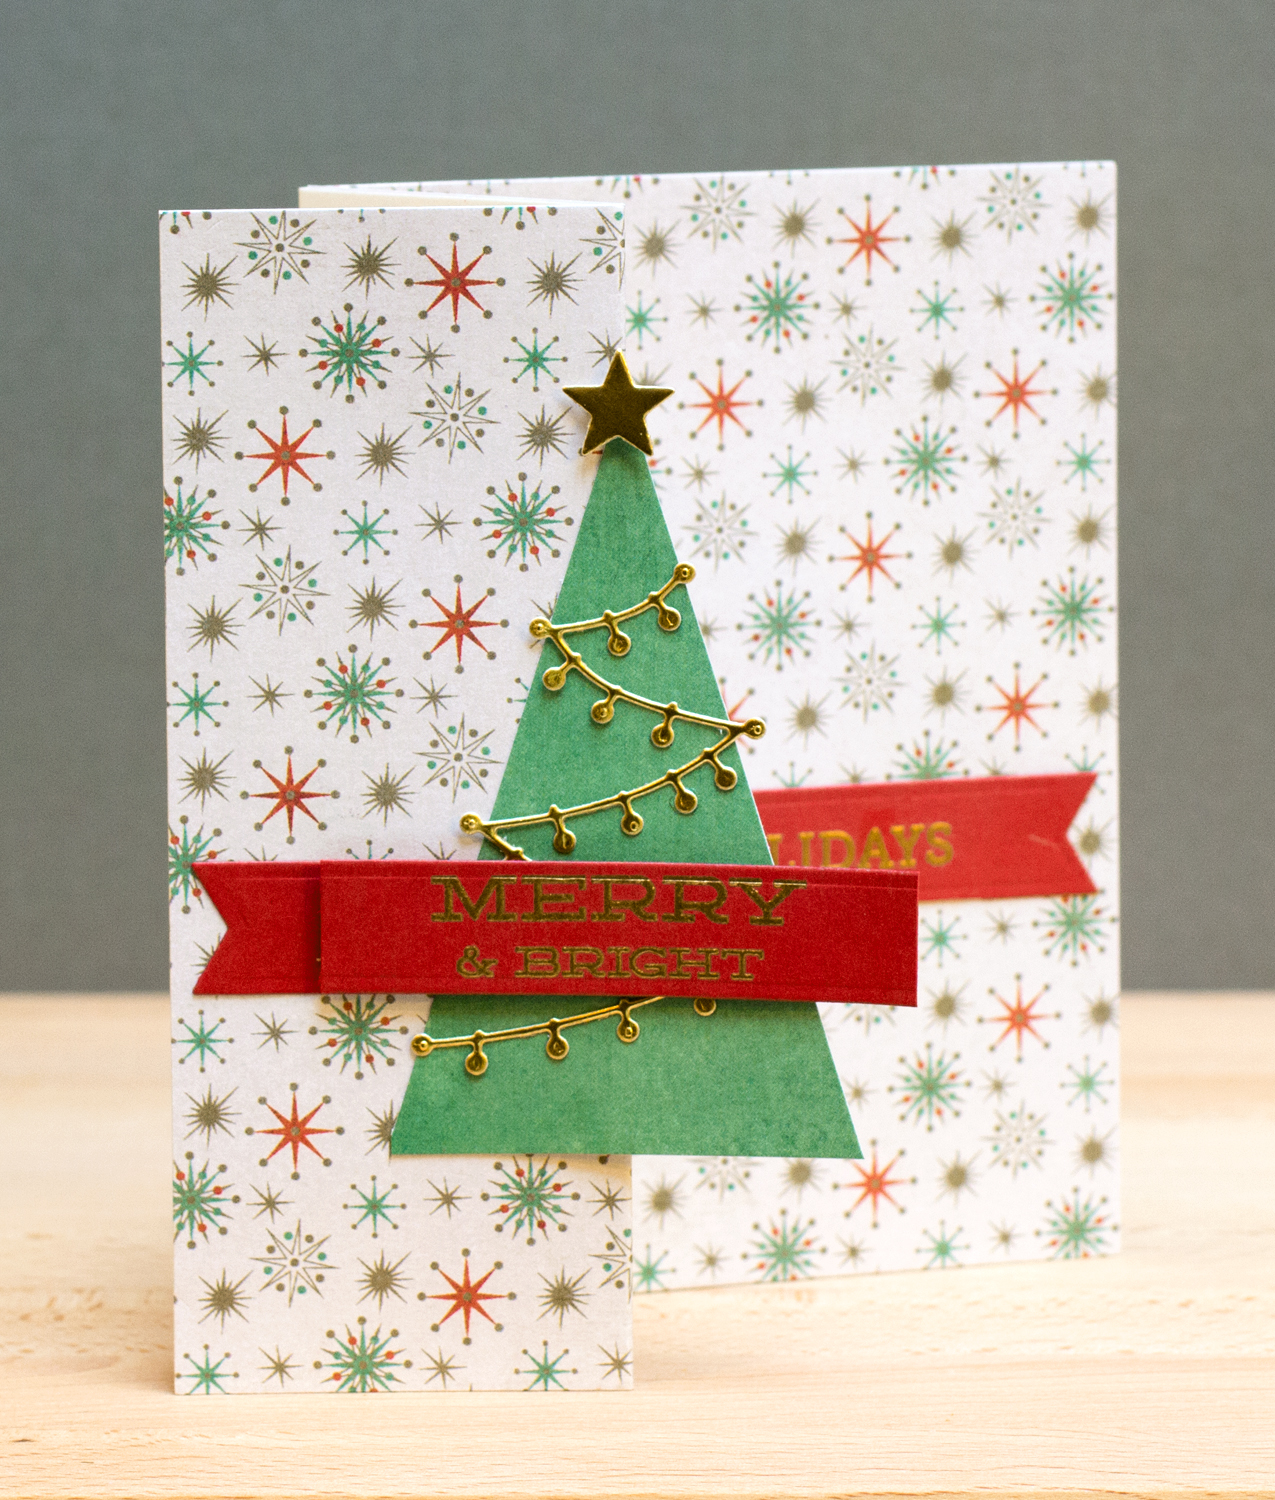
This go round, Online Card Classes are giving extra days after lessons to complete the cards. I was able to finish up a second card from Day One’s lesson of the Online Card Classes Holiday Workshop yesterday afternoon, but it was too late to photograph it when I finished. There’s still not a light in which to photograph it, but time is of the essence! 🙂

I tried the Z-fold card shown by Jennifer McGuire, using papers from 25th and Pine for the card base, rather than stamping the background as Jennifer did (which was lovely by the way).

OCC Holiday Card Workshop 2013 Day One Part Two


The card opens up to reveal the sentiment “Happy Holidays.” I heat embossed sentiments from the Hero Arts “Banners and Messages” stamp set. I already know I’ll be reaching for this set time and again. I used WOW gold embossing powder. I’d really like to try the Hero Arts gold embossing powder. I use their silver powder all the time. The tree lights were cut from Stampin’ Up gold paper with a Poppystamps die.

OCC Holiday Card Workshop 2013 Day One Part Two


OCC Holiday Card Workshop 2013 Day One

Starting off this week with the Online Card Classes Holiday Workshop. What a treat for a Monday.

Today’s lesson shared ideas for decorating the insides of cards that coordinated with the outsides. I based my card on the one shared by Kristina Werner, however, I haven’t added the vellum gift card pocket to my card. The idea is that the washi tape on the outside is used to adhere the pocket on the inside.

OCC Holiday Card Workshop 2013 Day One

I really liked the stamp she used on her card, a cute penguin from Darcie’s. Since I don’t have that stamp, I used a Paper Smooches snowman from Swanky Swanky Snowdudes instead. The sentiment is from the Papersmooches Warm Hearts set. There’s some Wink of Stella on the olive green scarf and some Stickles on the hat and buttons.

There’s so much material in today’s lesson – off to watch more videos. Hope you’re having a fantastic start to your week!

Debby Hughes CASE

With each lesson of the Online Card Classes Tim Holtz Creative Chemistry 102 class, we received a download of inspiration cards and projects based on the techniques. Today, I’m sharing a card I created based on one that Debby Hughes contributed to the class.

Debby Hughes CASE

I replaced some of the elements on Debby’s card with supplies I owned. I die cut the leaves from Craft-a-Board and painted them, before adding the Distress Glitter, in a matching color, to a Glossy Accents coating. On the card background, I applied embossing paste through a stencil. I watched several videos on the application of the paste, and honestly, it couldn’t be easier! I used a plastic disposable knife to spread the paste through the stencil.

Supplies: Technique Tuesday Go Outside stamp set (sentiment); Tim Holtz Mini Tattered Leaves Die Set (smaller leaf)

Tim Holtz Style Holiday Tag

I’m still working through the techniques from the Online Card Classes Tim Holtz Creative Chemistry 102 class – there was a lot of material covered in just one week! I’m relatively new to the “World of Tim Holtz” so there’s quite a learning curve for me.

To continue practicing the techniques, I made a holiday-themed tag working with a Distress Stain tag base. I spent several hours testing color combinations and watching videos. I found the video in this post of Tim’s to be the most useful for creating the type of distress stain background I most liked. In short, the Mini Mister is my friend!

Tim Holtz Style Holiday Tag

As I don’t own many Tim Holtz Sizzix dies, I worked with some recently-released Savvy dies. The cardinal, cut from Craft-a-Board, was painted with Festive Berries Distress Paint before an application of Glossy Accents and Festive Berries Distress Glitter. I cut the branch and holly from Kraft Core cardstock and lightly sanded them. I stamped the snowflakes (from a discontinued October Afternoon set) with Broken China ink, and embossed with them with Sticky Powder before applying Clear Rock Candy Distress Glitter.

Supplies:

Tim Holtz Chemistry 102 Smudge Stamping

One of the techniques shared in the Online Card Classes Tim Holtz Creative Chemistry 102 class was smudge stamping with distress inks. The idea being that you stamped once, then stamped a second time and smudged the stamped image. I attempted this technique, but I wasn’t able to smudge the ink.

Tim Holtz Chemistry 102 Smudge Stamping

I don’t know if my distress ink pads aren’t juicy enough, or whether I wasn’t smudging the right way. At any rate, trying the technique gave me an opportunity to use  the Tim Holtz Seasons Silhouettes stamp set, which I bought when I first started stamping two years ago.

The trickiest part was using the sentiment stamp, which is a subway art stamp with several sentiments. I put sticky notes on the stamp after I carefully inked the “Believe” sentiment and also put sticky notes on the tag to block out the area in which I wanted to stamp. I finished off with some Vintage Photo around the edges. I think I like the first generation stamped tag the best. I’ll add ribbon, die-cut evergreen pieces, and maybe a bell to finish it off.