Lawn Fawn Butterfly Kisses

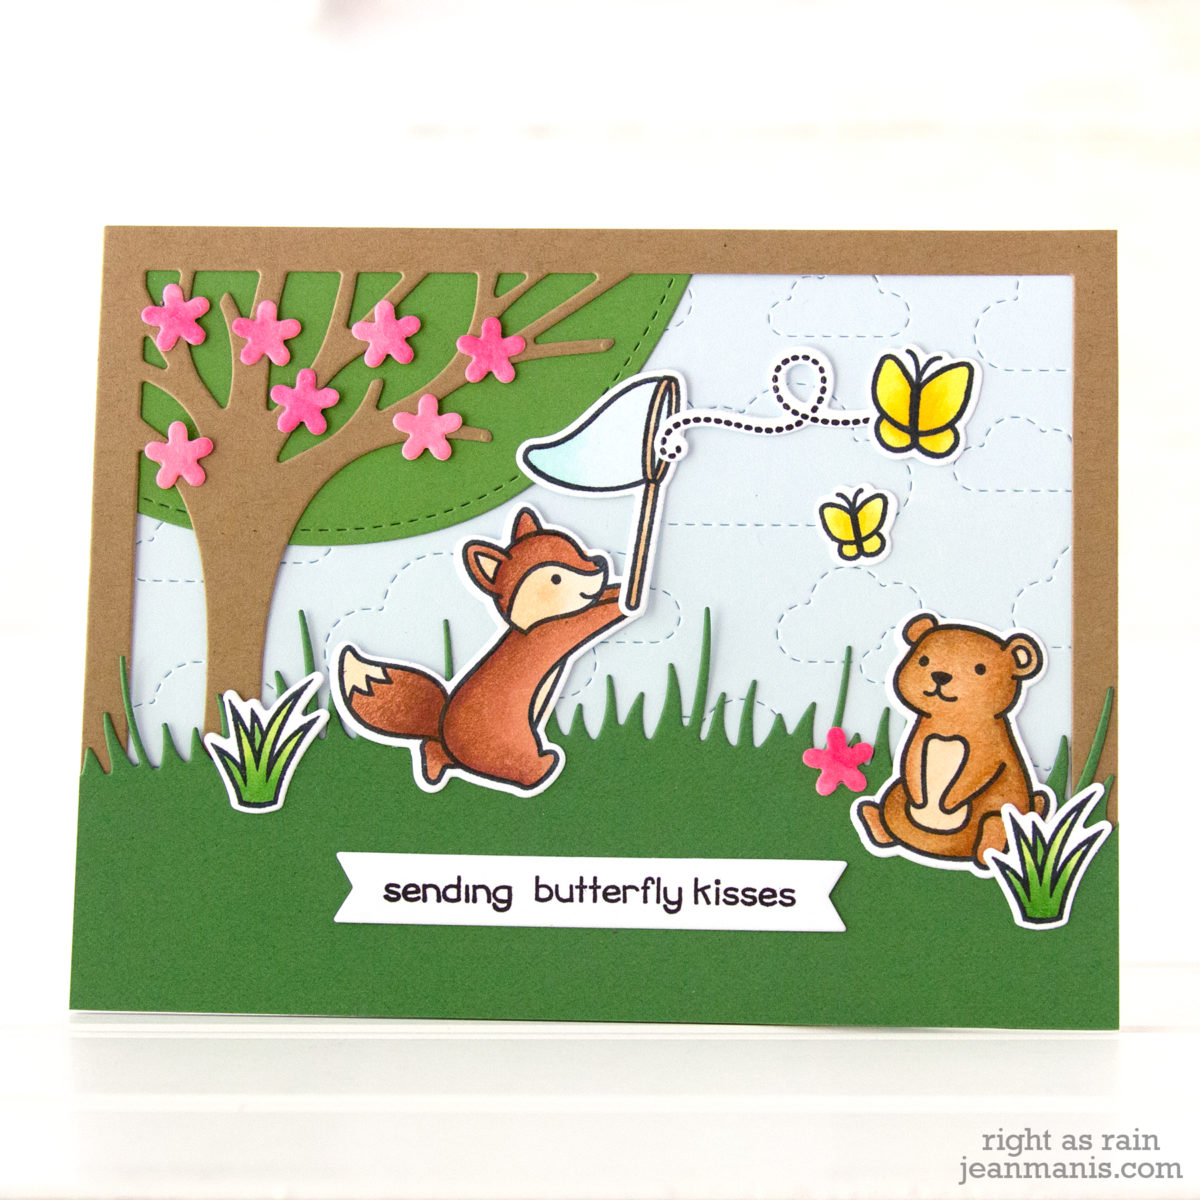
Hello! Today I am sharing a card created with the adorable Lawn Fawn “Butterfly Kisses” set. I bought the set as soon as it was released. Recently I had some time to Copic color (something that always takes a lot less time than I think it does.) I figured it was time to use the set since Lawn Fawn’s summer release is just around the corner! (I can’t believe that we are already through half of May!) I combined two of the critters from the “Butterfly Kisses” set with other Lawn Fawn products.

Lawn Fawn Butterfly Kisses

  • I stamped and colored the fox, the bear, the butterfly net, and several butterflies from the Butterfly Kisses set.
  • I cut the Leafy Tree Backdrop from Paper Bag cardstock.
  • I cut Noble Fir cardstock with one of the Meadow Border dies. I trimmed the piece and attached it to the front of the Leafy Tree frame.
  • I cut Icy Mint cardstock with the Stitched Cloud backdrop. I attached the piece behind the Leafy Tree frame.
  • I stamped the sentiment and cut it with the short Extra Sentiments banner die. I attached it to the grass.
  • I cut the flowers with the Spring Sprig die set from cardstock colored with Copic markers (I find that Copic-colored cardstock goes better with the Copic-colored images than solid cardstock). I attached these to the tree with liquid adhesive.
  • I added the Copic-colored images to the scene.

Lawn Fawn Butterfly Kisses

Supplies:

Paper Smooches Silhouette Flower Bouquet

Hello! Today I am sharing a CAS friendship card featuring Paper Smooches Silhouette Flowers. While this is an older die set, it’s a recent purchase for me. The card design is similar to the one here.

Paper Smooches Silhouette Flower Bouquet

  • I cut the flowers, foliage, and dragonfly from white 80 lb cardstock and colored them with Distress Oxide inks.
  • I used sticky notes to mask the flowers from the stems, and vice versa, while applying the inks.
  • I colored white cardstock with Tumbled Glass ink and cut it with the Mason Jar die set.
  • The background was colored with Scattered Straw ink.
  • I stamped one of my favorite Paper Smooches sentiment from the Lovely Thoughts set on to the background and added the assembled bouquet with foam adhesive.

Paper Smooches Silhouette Flower Bouquet

Supplies:

It’s Your Birthday – CAS Die-cut Birthday Cake

Hello! Today I am sharing a CAS birthday card featuring the My Favorite Things Birthday Cake die set. It’s a versatile set – you can easily change up the look just by changing the colors. How about coordinate the card colors to a birthday party’s color scheme? I went with a favorite combo of mine – yellow, orange, and teal blue.

It's Your Birthday - CAS Die-cut Birthday Cake

  • I cut the frame from Bazzill Marshmallow cardstock.
  • I cut the cake layers, cake plate, and decorations from Bazzill Marshmallow Chick, Circus Peanut, Candy Necklace, and Marshmallow cardstock. The decorative pieces were glued. I assembled the cake stack by taping the layers together on the back.
  • I stamped the sentiment with blackĀ  on to Bazzill Robin’s Egg cardstock and trimmed the panel slightly smaller than the A2-sized frame.
  • The assembled cake was added to the stamped panel with foam adhesive.

It's Your Birthday - CAS Die-cut Birthday Cake

Supplies:

Recipe for a Happy Home – Spellbinders Let’s Bake

Hello! Today I am sharing a CAS card featuring the Let’s Bake die set designed by Sharyn Sowell for Spellbinders. This isn’t a typical Mother’s Day card, although I did have that occasion in mind when I created it. I previously created a Christmas-themed card with this set.

Recipe for a Happy Home - Spellbinders Let's Bake

  • I created the sentiment on my computer and printed it on khaki cardstock.
  • I cut out the kitchen tools from various cardstock colors, backing the larger open areas by taping cardstock on to the back.
  • I added the kitchen items to the card base with foam adhesive.

Recipe for a Happy Home - Spellbinders Let's Bake

The Spellbinders FSJ Spring Super Sale is on through Thursday, May 9!

Spellbinders + FSJ Spring Sale

What’s Up Buttercup – Die-cut Picture Book Bear

Hello! Today I am sharing a CAS friendship card featuring the Simon Says Stamp Picture Book Bear die (one of my favorites!). I combined this cutie with flowers cut with the Simon Says Stamp Blooming Circle die and a computer-created sentiment.

What's Up Buttercup - Die-cut Picture Book Bear

  • I cut the bear and assembled him (her?) by taping the pieces on the backside.
  • I cut the flowers and added centers using the small circles cut with the Blooming Circle die.
  • I printed the sentiment on white cardstock and cut it with the Polaroid Shaker Frame.
  • I taped the bear to the frame and backed the scene with light-blue cardstock.
  • I added the frame and bear to the card base, which I had covered with Lawn Fawn patterned paper from my stash.
  • I assembled the flowers on the front to frame the sentiment.

What's Up Buttercup - Die-cut Picture Book Bear

Thanks for stopping by!

Supplies: