Penguin Valentine’s Day Card

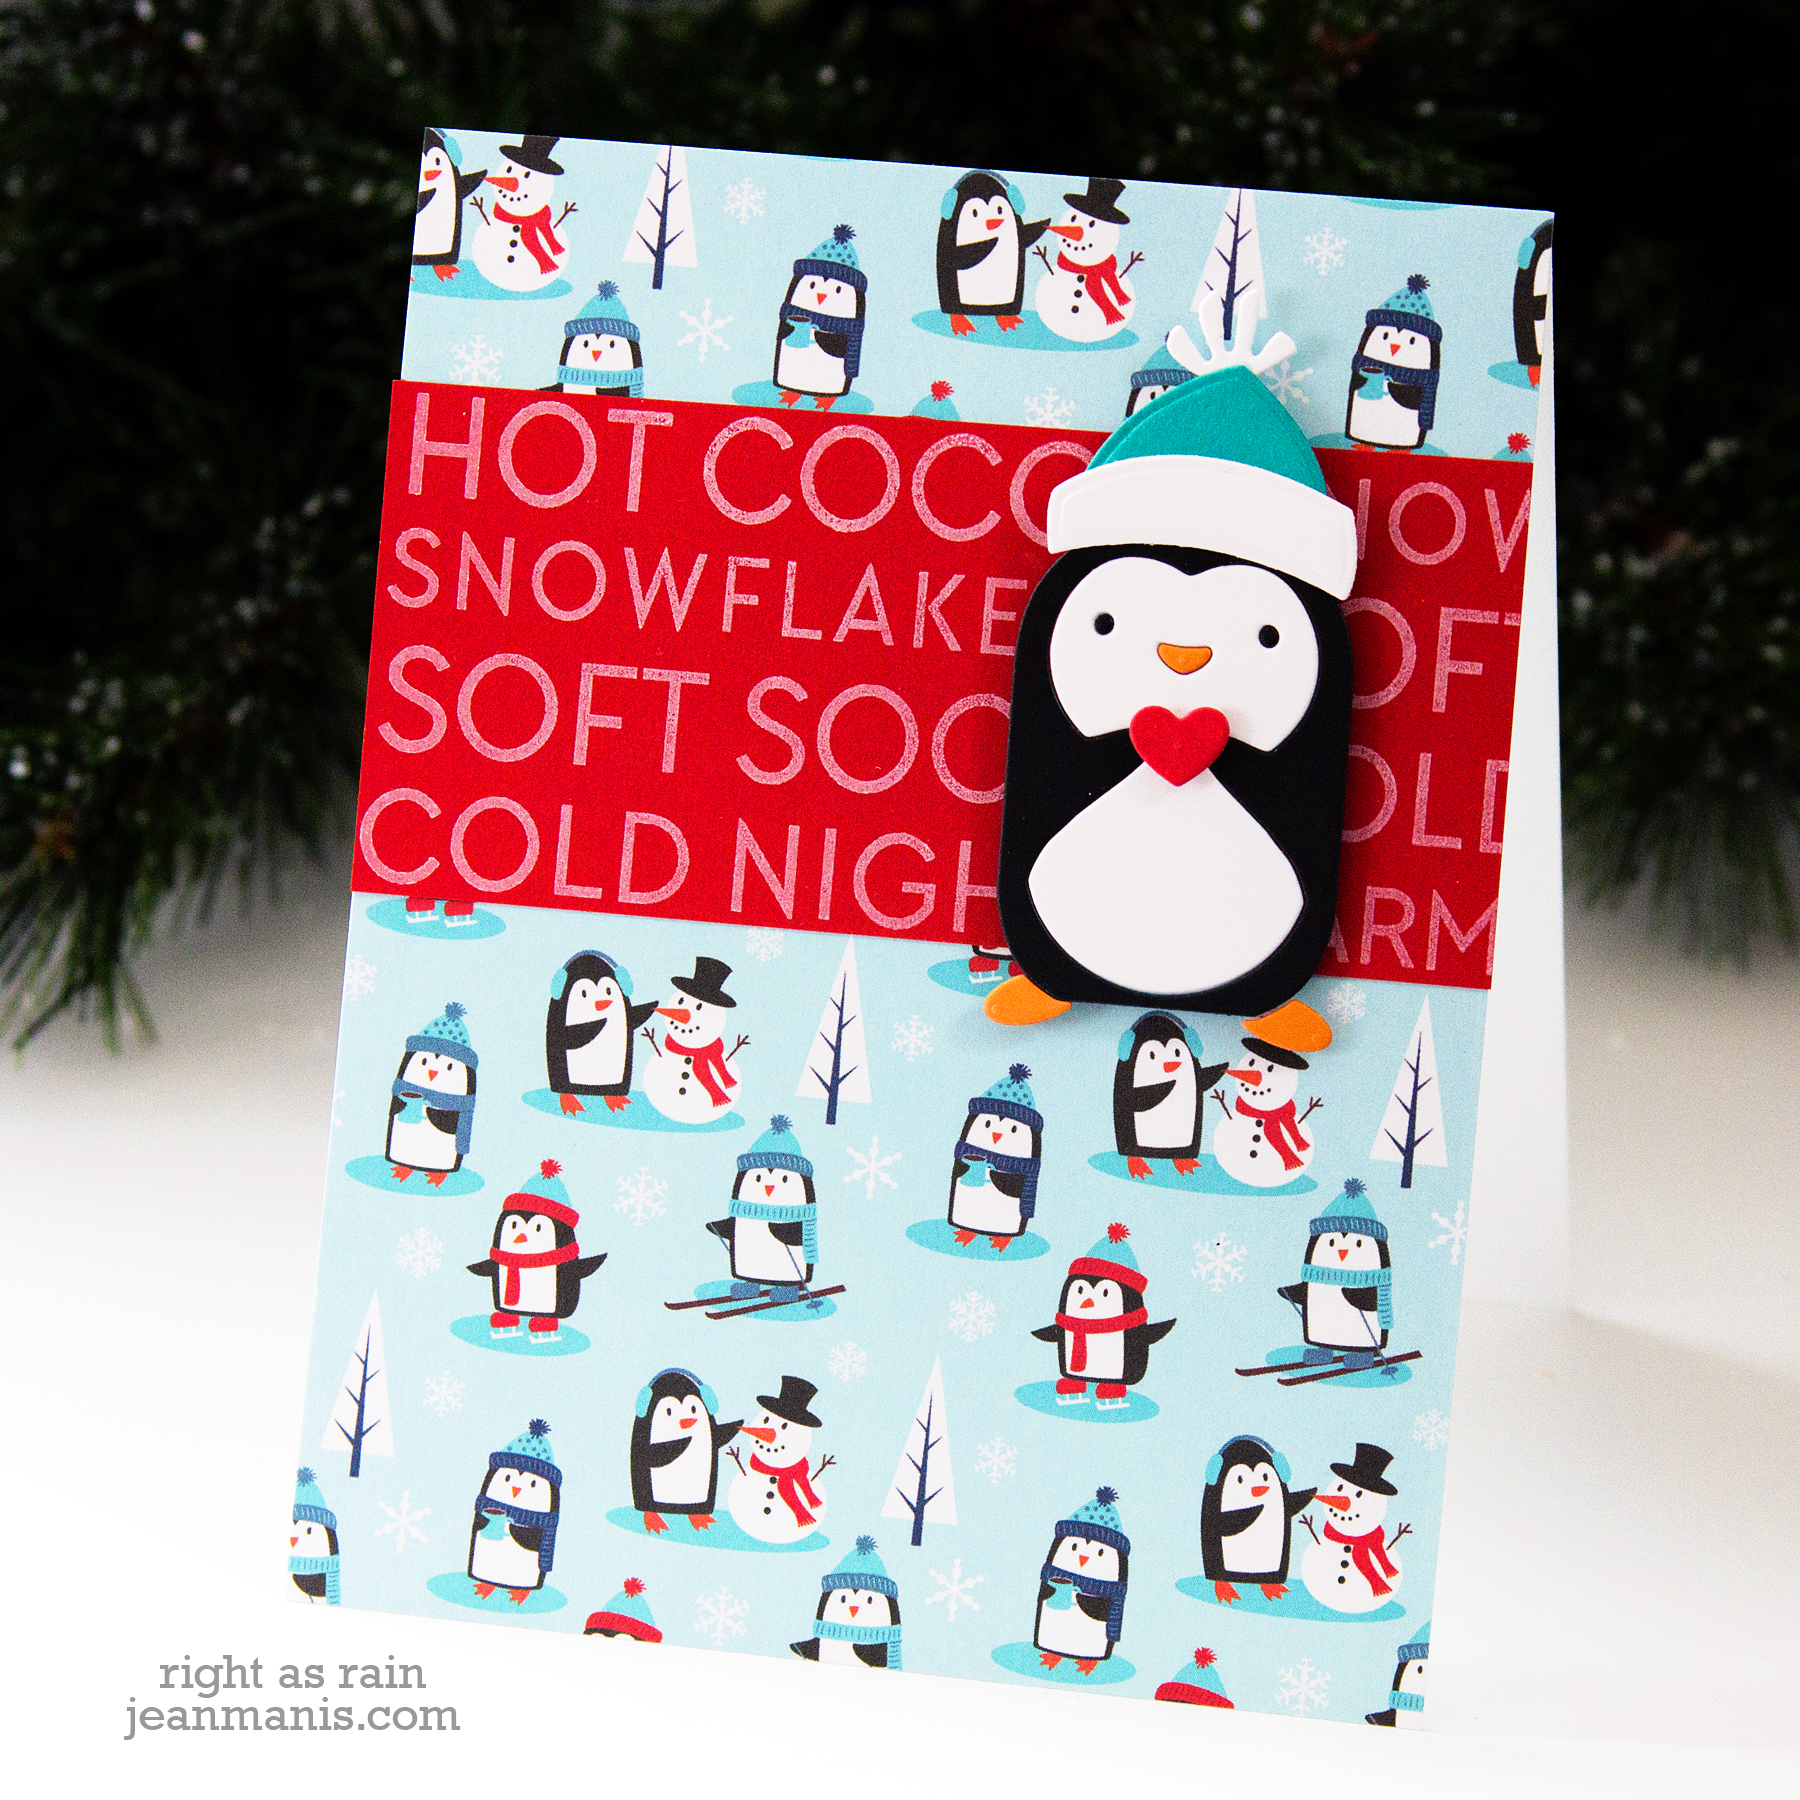
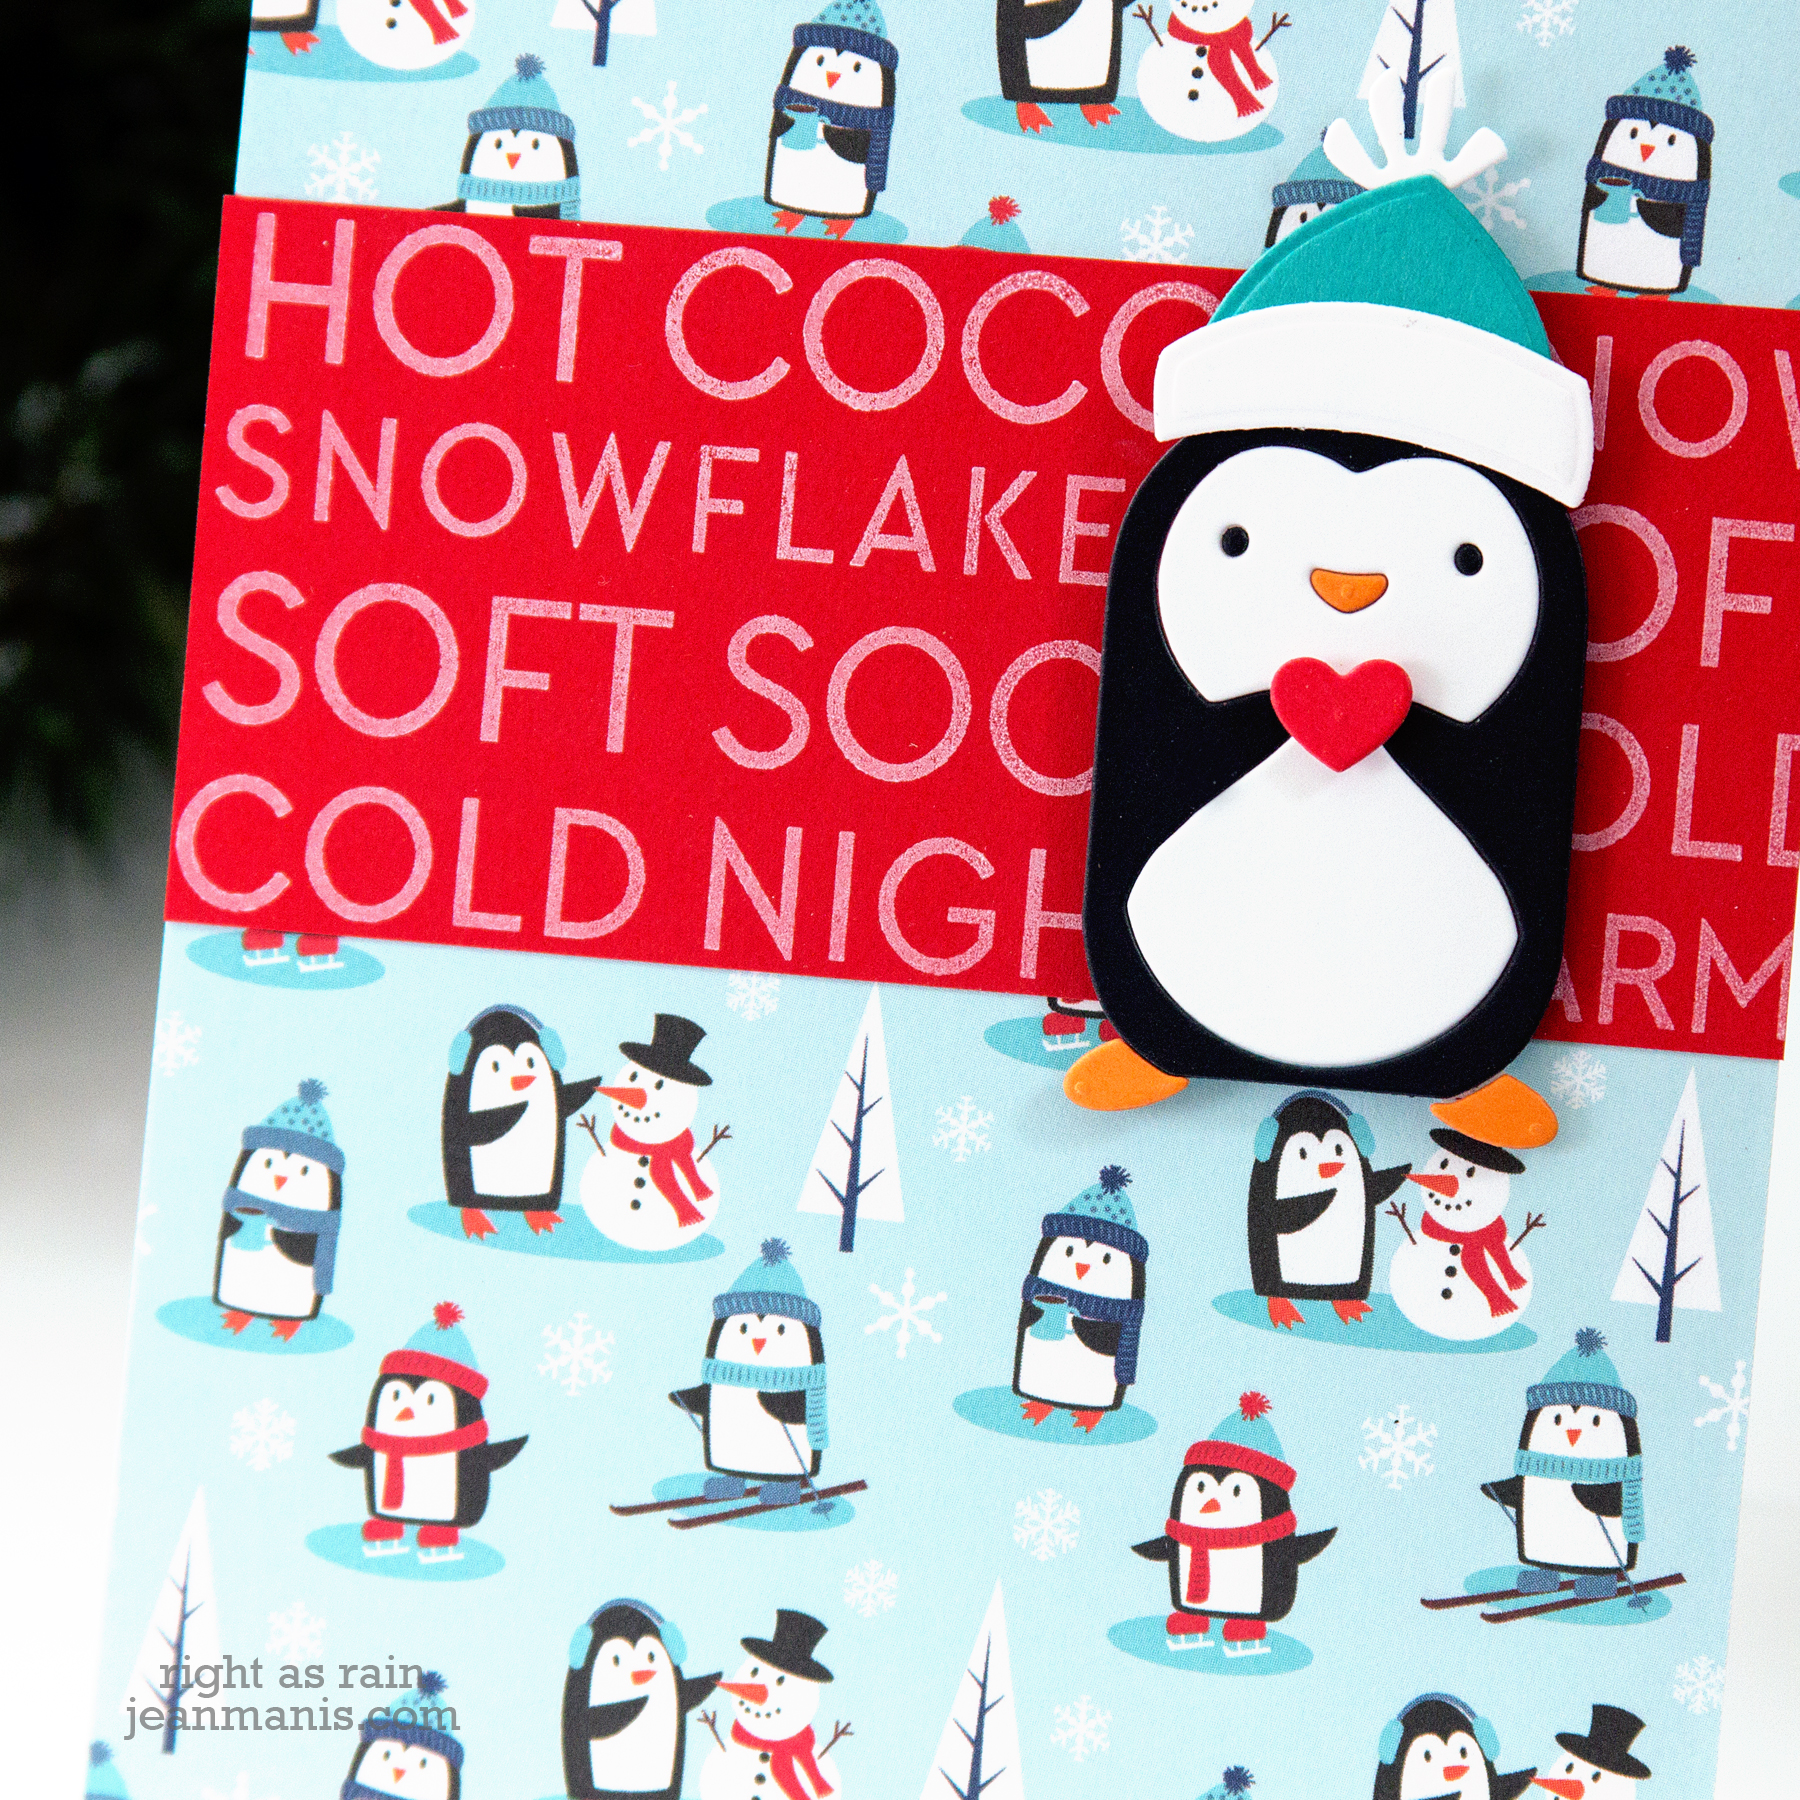
Hello! After curating a roundup of Valentine’s Day cards, I was inspired to create a card using some of supplies I rediscovered. Picture a snowbank setting, a sky adorned with heart-shaped cutouts, and a charming penguin holding a heart—a whimsical way to say “Love You.”

Penguin Valentine's Day Card

    • To begin, create a 4 1/4″ square card base from Lipstick Red cardstock.
    • Cut frame using a My Favorite Things square frame die (now retired) from Snowdrift cardstock. The outside measurement is 4″.
    • Cut Sea Glass cardstock with the Heart Sprinkle Trail die, trim to fit behind square frame, and set aside.
    • Cut Elizabeth Craft Designs Penguin from Onyx, Snowdrift, and Persimmon cardstock. (Note: the Elizabeth Craft Designs Penguin die is retired, however, at the time of writing, it is available at Frantic Stamper.) Assemble.
    • With the Drifting Stitches Border dies, cut snowbanks from Snowdrift cardstock. Layer and trim as required. Attach loosely at the bottom of the snowbanks so that the sentiment can be included in the assembly.
    • With the Simon Says Stamp On Edge Love You die set (now retired), cut sentiment from Lipstick Red cardstock.
    • Attach the snowbank assembly, with the sentiment in front of the back snowbank, to the frame. Add Heart Sprinkle Trail background to snowbanks. Add to card base. Slip penguin between the sentiment and back snowbank; adhere.

Penguin Valentine's Day Card

Supplies: Elizabeth Craft Designs Penguin, Simon Says Stamp On Edge Love You, My Favorite Things Square Frame


Freshly Made Sketches #411

Hello! I’m playing along with the Freshly Made Sketches Challenge this week with a CAS Christmas card.

Freshly Made Sketches #411

Fresh Made Sketches #411

  • I cut the penguin with the Picture Book Secret Penguin die from Simon Says Stamp and assembled him. The hat was cut with the Eline’s Winter Outfits set from Marianne Design.
  • I stamped the Neat & Tangled “Hello Winter” stamp (now retired) in white ink on the darker red cardstock. I stamped the sentiment twice; when I stamped the second time, I shifted down a line to create a more random pattern.
  • I used a heart die in the Lawn Fawn Speech Bubbles set to cut the heart in a brighter red cardstock.
  • The background paper is from the Echo Park Celebrate Winter collection.

Fresh Made Sketches #411

Freshly Made Sketches #401

Hello! I am playing along with the Freshly Made Sketches challenge this week. I really like sketch challenges as it forces me to think of new ways to use my supplies.

Freshly Made Sketches #401

Freshly Made Sketches #401

  • To begin, I stamped the Flower Explosion stamp in white pigment ink on So Saffron cardstock.
  • While the ink dried, I cut the two birds, flowers, and foliage with the A Little Birdie set. I used a hole punch to cut centers for the flowers.
  • I heat-embossed the Pinkfresh Studio sentiment on Poppy Parade cardstock.
  • I cut the stamped So Saffron piece with a circle die.
  • I used woodgrain cardstock in my stash to place behind the birds.
  • The background was cut with the Stitched Woodgrain Backdrop die.

Freshly Made Sketches #401

A couple of take-aways: I need to remember that foliage can be cut from vellum, white, metallic cardstock, … it doesn’t have to be green; a stitched circle, something that just cuts the outline, but not the center, would make a great addition to my stash.

Supplies:

Simon Says Stamp – Flower Cluster Die

Hello! Today I am sharing a “just because” card featuring the Simon Says Stamp Flower Cluster die. I shared a card with this same die (also using the inlaid technique) in this post.

Simon Says Stamp - Flower Cluster Die

  • I cut the outline from black cardstock.
  • I colored white cardstock with a variety of Distress Oxide  inks. I cut the colored cardstock with the die and inlaid the pieces into the frame. I placed tape across the back of the frame to hold the pieces.
  • I stamped the Every Moment sentiment on a 4″ x 5 1/4″ panel.
  • I added the assembled cluster to the sentiment panel and the panel to the card base, which I dry-embossed with a subtle texture.

Simon Says Stamp - Flower Cluster Die

Supplies:

Simon Says Stamp Hibiscus – Inlaid Die-Cut

Hello! Today, I am sharing a summer-themed, friendship card showcasing the Simon Says Stamp Hibiscus Frame die. I’ve previously shared cards created with this die set  here and here. This card using the inlaid technique – one of my favorites for die sets such as this.

Simon Says Stamp Hibiscus - Inlaid Die-Cut

  • I colored Canson XL watercolor paper with Peerless Watercolors in Turquoise Blue, Golden Yellow, Light Green, and Jackqueminot Red. I set the pieces aside to dry.
  • I cut the Hibiscus Frame from 80 lb. white cardstock and then cut it with the 4″ die in the Square Basics set. I did this a second time and adhered the two together to create a frame for my pieces. I adhered a square to the back to secure the pieces.
  • I cut the watercolored paper with the hibiscus die and inlaid the pieces into the frame.
  • I stamped the Gina K Key Lime cardstock with the Choose Joy sentiment and trimmed the panel to 4 1/2″ x 5 1/2″. I didn’t want to crowd the hibiscus so I gave it a 1/4″ border on the top and sides.
  • I attached the hibiscus frame to the stamped cardstock. I attached the assembly to a pre-scored card base.

Simon Says Stamp Hibiscus - Inlaid Die-Cut

Hope your day is full of sunshine!

Supplies: