The Adventure Begins – a Die-Cut Camping Scene

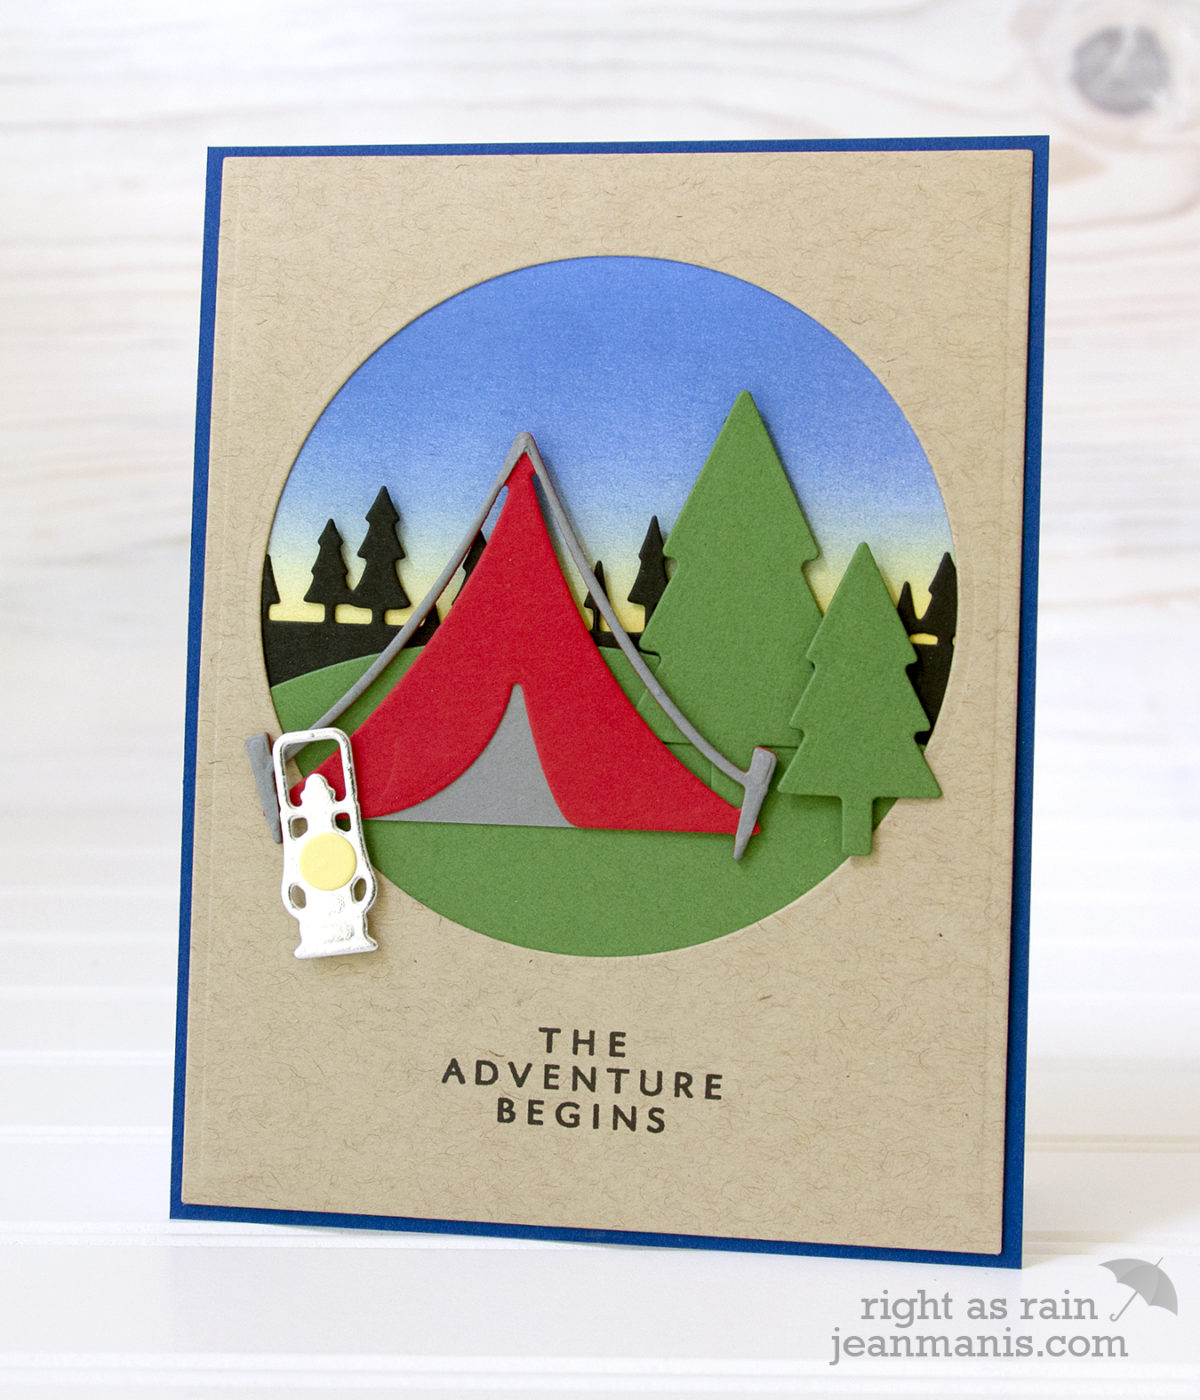
Hello! Today I am sharing a camping scene in which I have combined the Spellbinders Camping die set with a sentiment in the Hero Arts The Adventure Begins stamp set. With warmer weather here in the PNW, my thoughts turn to outside adventures.

Die-Cut Camping Scene | Jean Manis

To create the sky, I inked white cardstock with Distress Oxide inks in Fossilized Amber and Blueprint Sketch. I then added Chipped Sapphire Distress Ink to darken the sky.

Die-Cut Camping Scene | Jean Manis

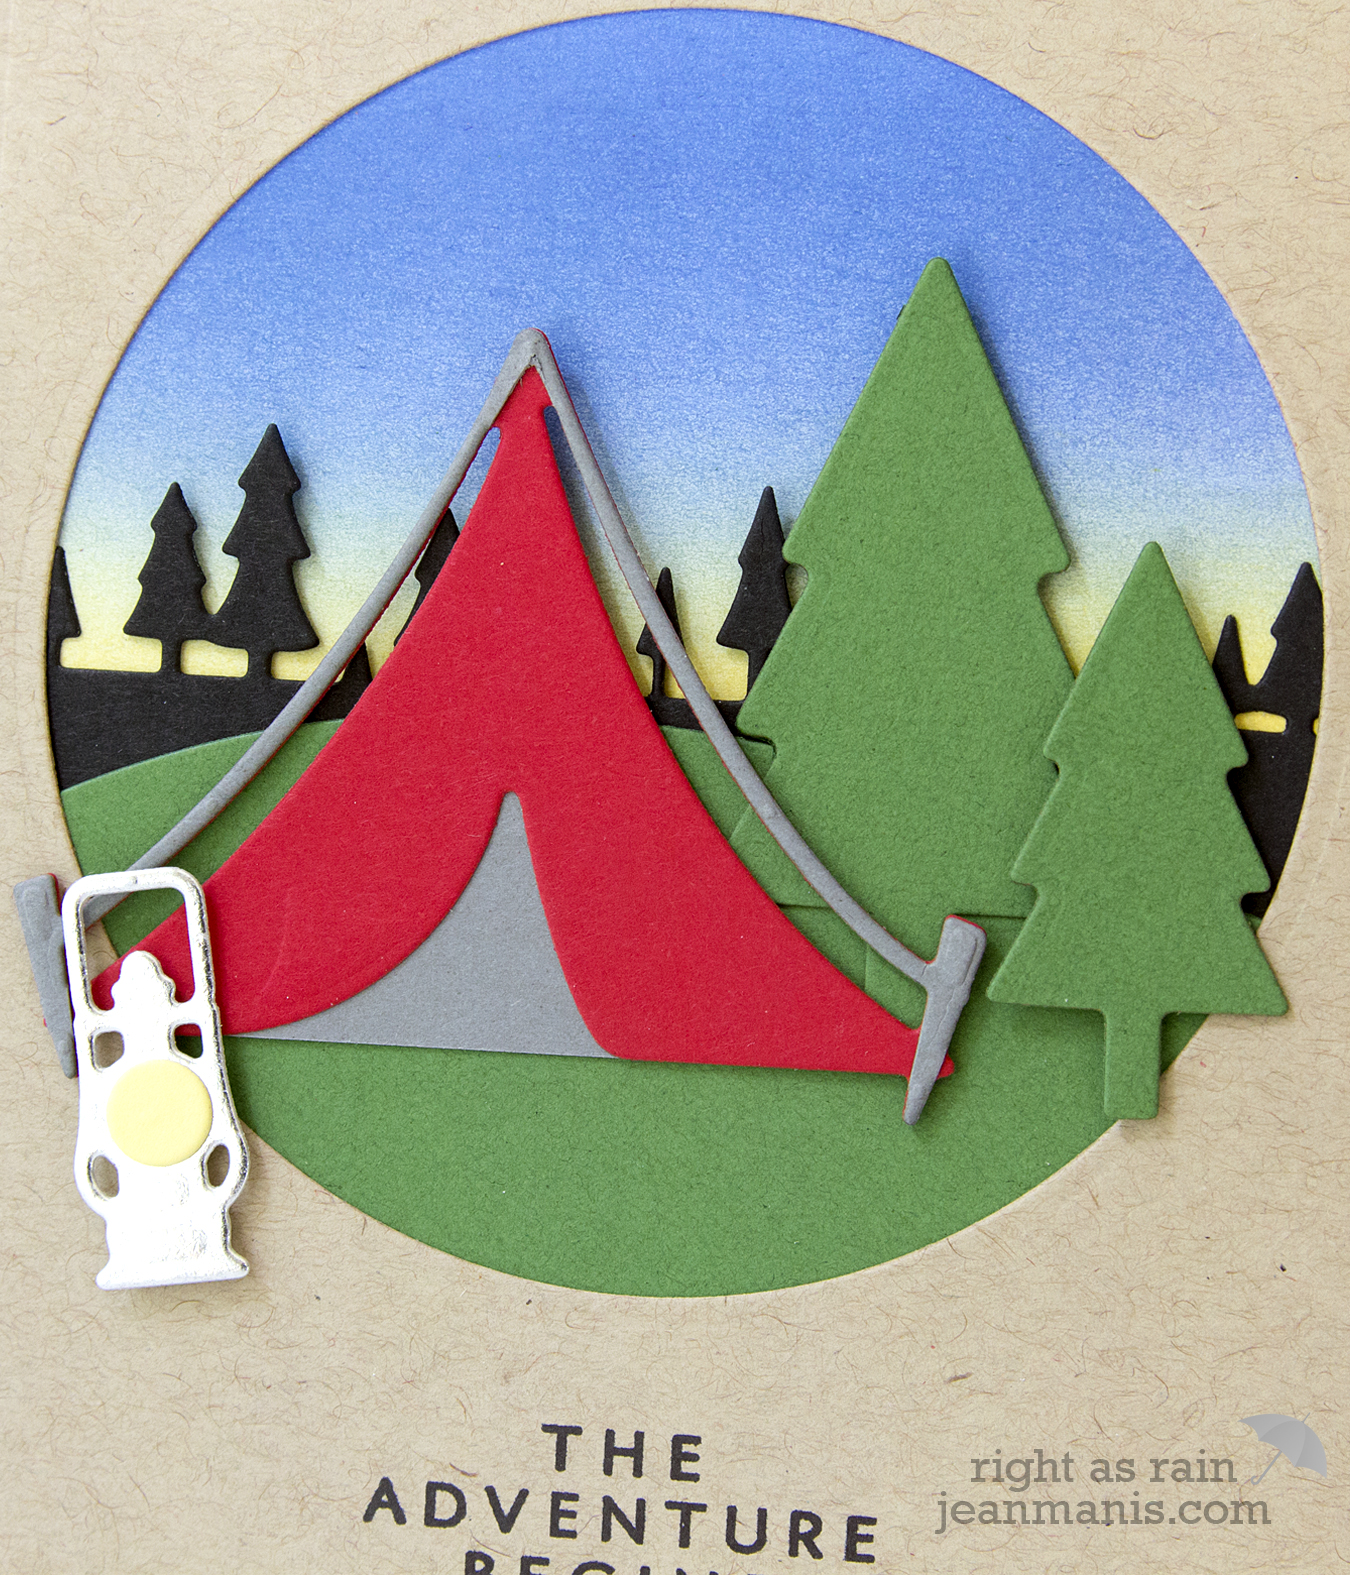
The back row of trees was cut with the Poppystamps Pine Tree Border from black cardstock. The tent was cut from Chili Pepper cardstock and Taylored Expressions Earl Grey cardstock. I trimmed away the tent portion of the piece I cut from the gray cardstock. I cut the ground (using the MFT Snow Drifts die set) and the trees (included in the Spellbinders Camping die set) from Lawn Fawn Noble Fir cardstock. I cut the lantern from TE Silver Foil Cardstock and added a tiny circle cut from TE Potato Chip cardstock.

The sentiment was stamped on a panel of Taylored Expressions Toffee cardstock from which I cut the circle in the center to create a frame. The card base was created with Lawn Fawn Blue Jay cardstock.

TE Sunshine Cutting Plate – Two Ways

Hello! Today I am sharing two CAS cards created with the Taylored Expressions Sunshine Cutting Plate. I cut the Sunshine Cutting Plate from Yupo paper which had been colored with alcohol inks in Sunshine Yellow, Watermelon, and Red Pepper. I saved both the positive and negative pieces.

TE Sunshine Cutting Plate - Two Ways

I adhered the positive image on to a Sugar Cube cardstock base.

TE Sunshine Cutting Plate - Two Ways

For the sentiment “sun” I colored Sugar Cube cardstock with Spiced Marmalade Distress Oxide ink and stamped the Tropical Trio Stamp & Die Combo sentiment in black ink. I used a circle die to cut the sentiment. I also cut a slightly larger circle from Sugar Cube cardstock and then another larger circle from the cardstock colored with the Spiced Marmalade ink. I added the assembled circles to the cutting plate, popping up the one with the sentiment using foam adhesive.

TE Sunshine Cutting Plate - Two Ways

For the second card, I inlaid the negative pieces into a frame cut from Sugar Cube cardstock.

TE Sunshine Cutting Plate - Two Ways

For the sentiment “sun” I colored Sugar Cube cardstock with Spiced Marmalade and Candied Apple Distress Oxide inks (which is why this sun is slightly darker than the one on the other card) and stamped the Tropical Trio Stamp & Die Combo sentiment in black ink. I used a circle die to cut the sentiment and added it to the frame with foam adhesive.. For a custom match, I created the card base from cardstock colored with Spiced Marmalade and Candied Apple Distress Oxide inks.

TE Sunshine Cutting Plate - Two Ways

Supplies:

A Thank You Bouquet

Hello! Today, I am sharing a square, CAS “thank you” card created with a combination of Simon Says Stamp products.

Simon Says Stamp - A Thank You Bouquet

To begin, I created the background by inking cardstock with Wild Honey, Worn Lipstick and Picked Raspberry Distress Oxide inks. I then stamped the inked cardstock with the Kaleidoscope Background stamp using Picked Raspberry Distress Ink (not Oxide). I used the same inks for the background as I used on this card. Next, I stamped foliage from the Choose Joy set, colored the blooms and leaves with Copic markers, and cut them out. I chose to color the flowers with colors similar to, but slightly brighter than, the background. I cut the background with a Lil’ Inker square die. I cut out the circle from the center to frame the sentiment, which I created with sentiments in the Big Thanks Words stamp set.

Simon Says Stamp - A Thank You Bouquet

I arranged the flowers around the circle and then lifted them with the Press ‘N Seal method. I applied adhesive to the backs of the flowers and placed them back on the card. Two of the flowers are popped up with foam adhesive.

Wishing you a wonderful Monday (or Tuesday, as the case may be)!

Llama Fiesta

Hello! Today, I am sharing a CAS card combining the Technique Tuesday Lorenzo the Llama sentiment with a die-cut llama created with the Spellbinders Hip Llama set.

Llama Fiesta

I deliberately chose bright colors with the black and white to give that fiesta flavor to the card. To begin, I die-cut, embossed, and assembled the llama. Next, using a stamp positioner, I stamped the tassel string from the Lorenzo the Llama stamp set with white pigment ink on a Stampin’ Up Melon Mamba cardstock panel. I attached the pink panel to a white cardstock base. I heat-embossed the sentiment on a black cardstock strip and adhered it to the base, adding the llama with foam adhesive.

Llama Fiesta

Have a great weekend!

Simon Says Stamp – Stitching Butterflies

Hello! Today, I am sharing another card created with the Simon Says Stamp Abstract Triangle stencil paired with the Stitching Butterflies dies, both from the FLUTTERING BY release.

Simon Says Stamp - Fluttering By Release

I stamped through the Abstract Triangle stencil, starting in the center, with the Versamark Cube Ink Pad and heat-embossed the inked section with Gina K Designs Gold Embossing Powder. Next, I stamped the sentiment from the Kind Flowers set with Hero Arts Black ink.

Simon Says Stamp - Fluttering By Release

I cut the butterfly pieces with the Stitching Butterflies dies from Yupo paper to which I had applied alcohol inks in StreamSail Boat Blue, and Citrus. I used foam adhesive to pop the assembled butterflies up off the heat-embossed stencil panel.