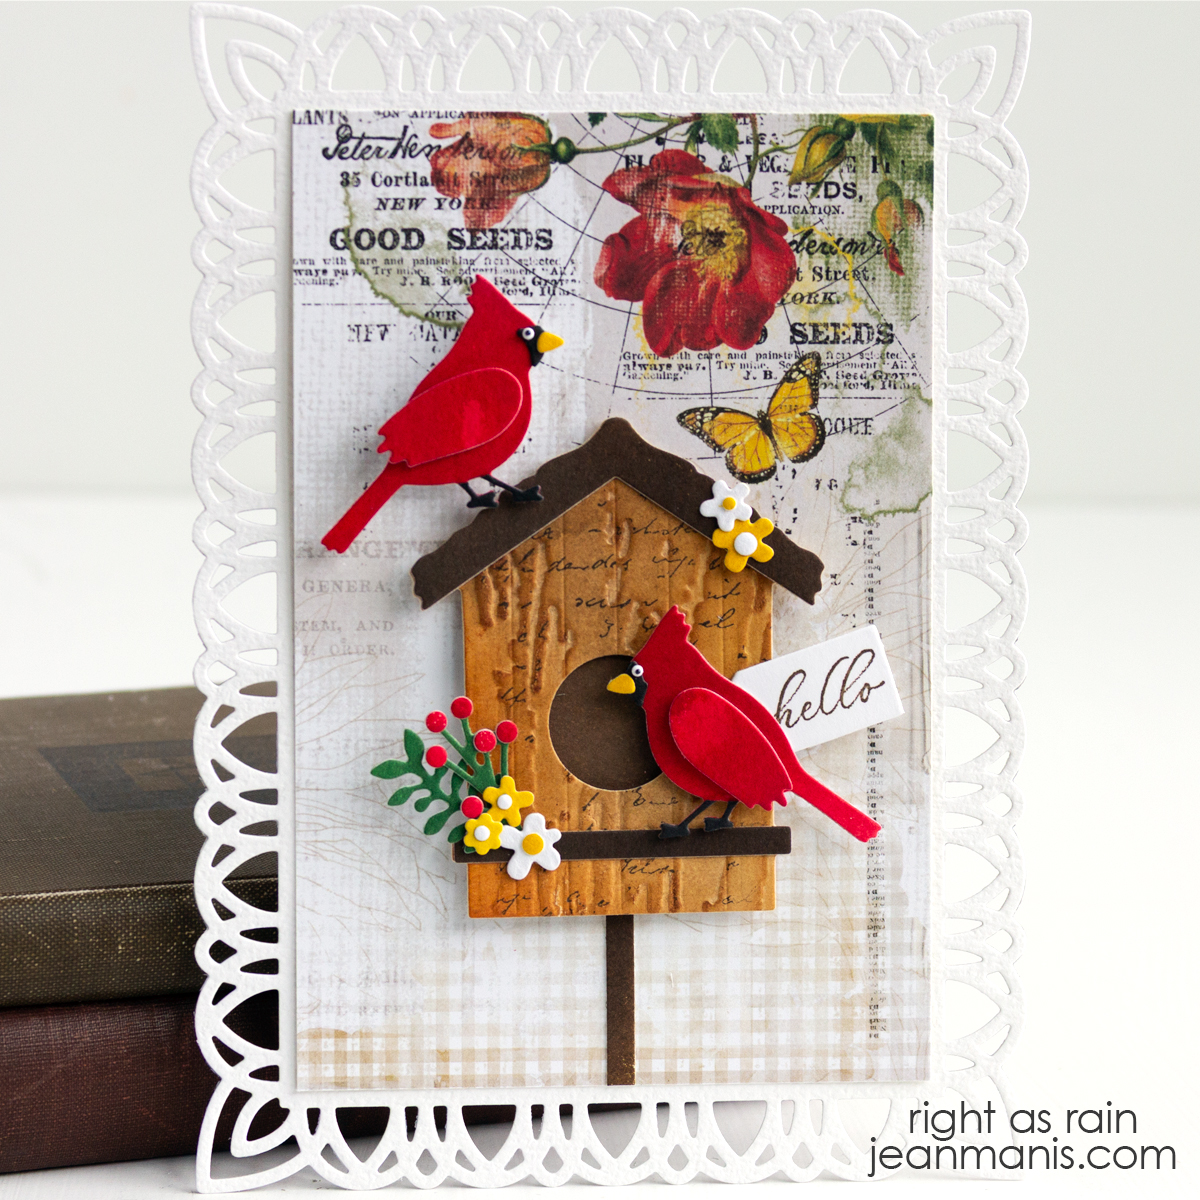
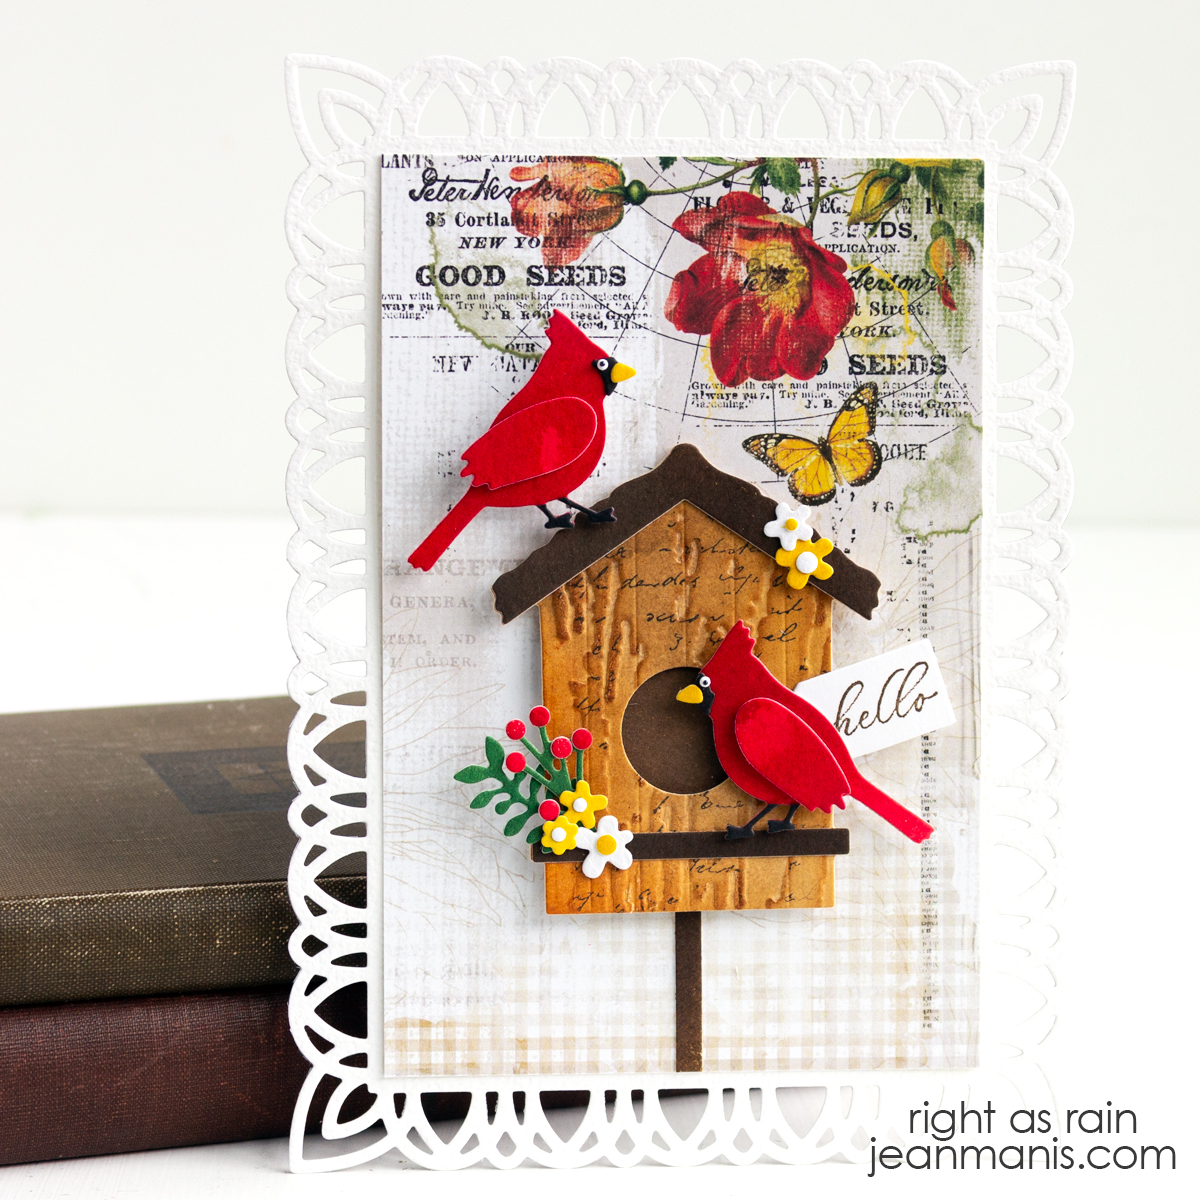
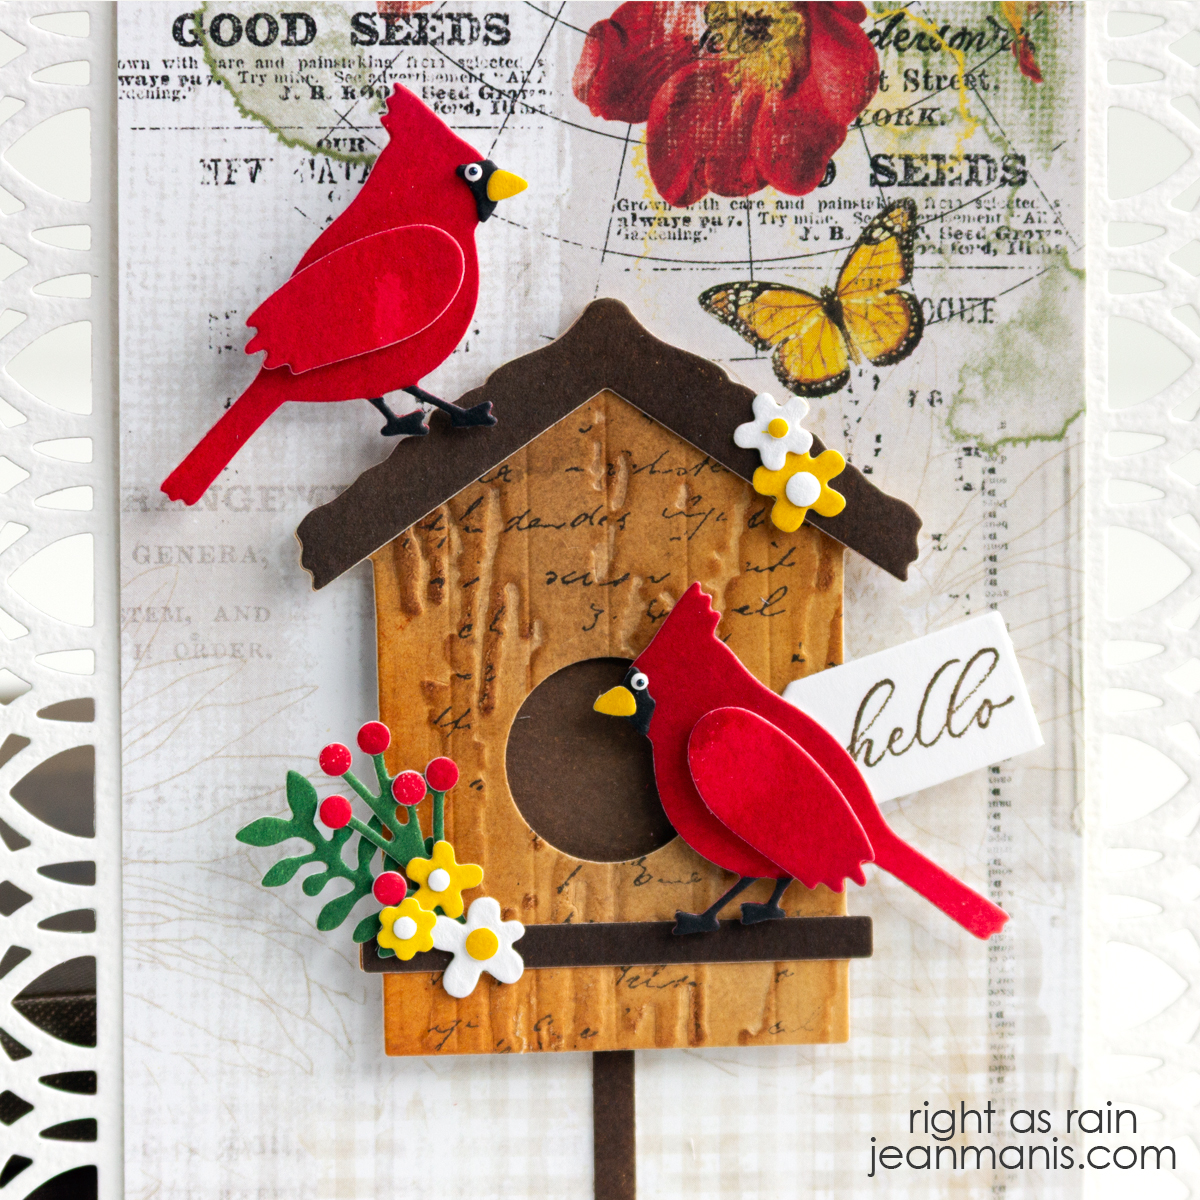
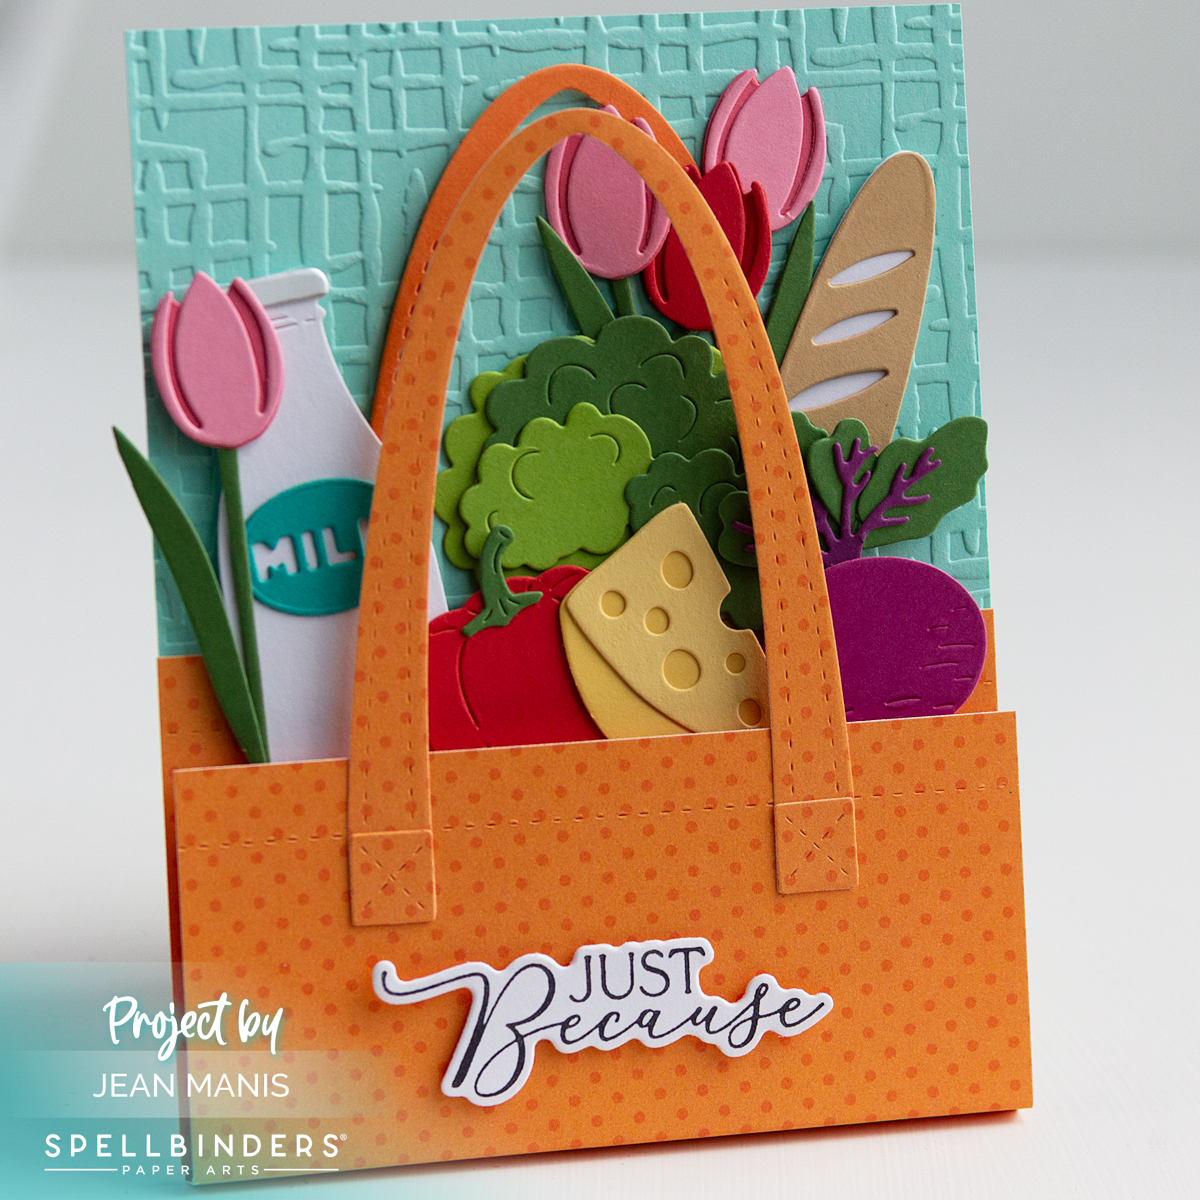
Triple the Cuteness Easter Card

Hello! Easter is a great time to embrace all things cute and colorful, and my latest card does just that! This playful creation features three Polaroid-style snapshots of adventurous bunnies behind the wheel, with each car in a different color combo — green, purple, and pink. The overlapping snapshots add a fun, dynamic feel, while the cheerful “hippity hoppity” sentiment makes it unmistakably Easter. I used a combination of Spellbinders products to bring this scene to life.

Triple the Cuteness Easter Card

    • Create a 5″ x 7″ card base and cover with patterned paper.
    • Cut the photo frames with the Memory Frames die. Back with Waterfall cardstock.
    • BetterPress the All Seasons Spring sentiment in black ink and cut with the coordinating die.
    • Cut bunnies, cars, and balloon with dies in the Go Kart Go set. Assemble as required. I shared a card featuring the Go Kart Go set HERE.
    • Adhere the bunnies inside the frames. Arrange frames on card base and adhere.
    • Embellish scene with the assembled Go Kart Go balloon and clouds cut with the On Cloud Nine set.
    • Add sentiment with foam squares.

Triple the Cuteness Easter Card

Now through March 19, save up to 30% on select Spellbinders die sets!

March 2025 Sale


Lucky Ride: Gnome Leprechaun

Hello! St. Patrick’s Day is almost here, and I couldn’t resist creating a playful card to celebrate! This festive design features a gnome, dressed like a leprechaun, cruising along in a cheerful little car. I used a combination of Spellbinders products to bring this whimsical scene to life, and I love how it captures the lighthearted spirit of the holiday.

Lucky Ride: Gnome Leprechaun

    • Create an A-2 size card base from yellow cardstock. Add a 1 1/2″ strip of dark gray cardstock along the bottom for the road.
    • Using dies in the Gnome Drive Holiday (this is the base kit that includes the car) and Gnome Drive Spring sets, cut the pieces for the shamrocks, gnome, lucky horseshoe, and car from a variety of cardstock colors. Assemble.
    • BetterPress the All Seasons Spring sentiment with black ink and cut with the coordinating die.
    • Add elements to card base and embellish with clouds cut with the On Cloud Nine die set.

The Gnome Drive Spring set also includes dies to create an Easter-themed card. You can see an example HERE – a guest post I wrote for the Spellbinders blog.

Lucky Ride: Gnome Leprechaun

Now through March 19, save up to 30% on select Spellbinders die sets!

March 2025 Sale


Stuck on You: Watercolored Hedgehog Card

Hello! I usually reach for dies when making cards, but sometimes it’s fun to switch things up with a bit of watercoloring. This adorable hedgehog from Art Impressions was the perfect chance to do just that! Since the stamp set does not have a coordinating die for the images, after watercoloring the stamped image, I masked the hedgehog and cactus to add the sky and ground.

Stuck on You: Watercolored Hedgehog Card

    • Create an A2-size card base from off-white cardstock. With the Burlap folder, dry-emboss a Chocolate Bar cardstock panel measuring 4″ x 5 1/4″. Add panel to card base.
    • Stamp the hedgehog in VersaFine ink on Arches Cold Press watercolor paper; heat set.
    • Watercolor the image with watercolor markers. I used Tombow markers and Derwent Inktense Watercolor Pencils. You can read more about watercoloring stamped images here. Tombow markers: Brown 879, Burnt Sienna 947, Rhodamine Red 725, Dusty Rose 772, Navy Blue 528, Dark Jade 177.
    • Once dry, mask image and add Distress Inks for sky and ground. Cut image with one of the Hexagon Double Stitched Dies. With the next larger die in the set, cut a larger hexagon from Blue Jay cardstock. Add stamped hexagon to mat.
    • Stamp sentiment in Potting Soil ink on off-white cardstock and cut with a 1 1/4″ circle die.
    • Add elements to prepared base.

Stuck on You: Watercolored Hedgehog Card

Masking might sound intimidating, but it’s actually a simple technique that makes a big impact. All you need is a bit of masking paper or a sticky note to cover your stamped image while adding the sky and ground. As for the watercoloring, don’t worry about being perfect — the beauty of watercolor is in its softness and unpredictability. A little practice goes a long way, and the results are so rewarding!


Hello Card with Floral Die-Cuts

Hello! If you’re a subscriber of the Large Die of the Month kit club at Spellbinders, or considering joining, you’re in for a treat! This month’s set–“Family & Friends Vignettes”– is packed with creative possibilities, including a versatile arch design, a playful dog, and even a fun dinosaur. For today’s project, I focused on the floral elements in the set, creating a “hello” card with a die-cut cluster. Whether you’re drawn to florals, critters, or something a bit more whimsical, this kit offers many ways to bring your creative vision to life!

Spellbinders | March 2025 Large Die of the Month

    • Create an A2-size card base from textured cardstock and add a 4 1/8″ x 5 3/8″ patterned paper panel (49 and Market – Vintage Artistry Countryside).
    • Use the set to cut the arch and floral elements from a variety of cardstock colors. Assemble floral elements.
    • Dry-emboss the inner arch with the Tiny Dots folder. Adhere to the outer arch.
    • Assemble floral elements on the arches and add to the card base.
    • Cut Hello Smile sentiment from vellum and Fern cardstock. Assemble and add to card base.
    • Embellish with Clear Enamel Dots.

Spellbinders | March 2025 Large Die of the Month


Fishing-Themed See You Soon Card

Hello! The Fairways & Fish Tales die kit at Spellbinders is packed with both fishing and golf-themed elements, making it a fantastic choice for creating masculine and outdoor-inspired cards. My card showcases the fishing side of this set. With die-cut figures of two men fishing on a dock and a dry-embossed background for texture, this card captures the peacefulness of a day by the water. Whether you are already receiving the Small Die of the Month kit or are considering subscribing this month, I hope this project inspires you to explore all the creative possibilities it offers!

Spellbinders Small Die of the Month kit

Spellbinders Small Die of the Month kit