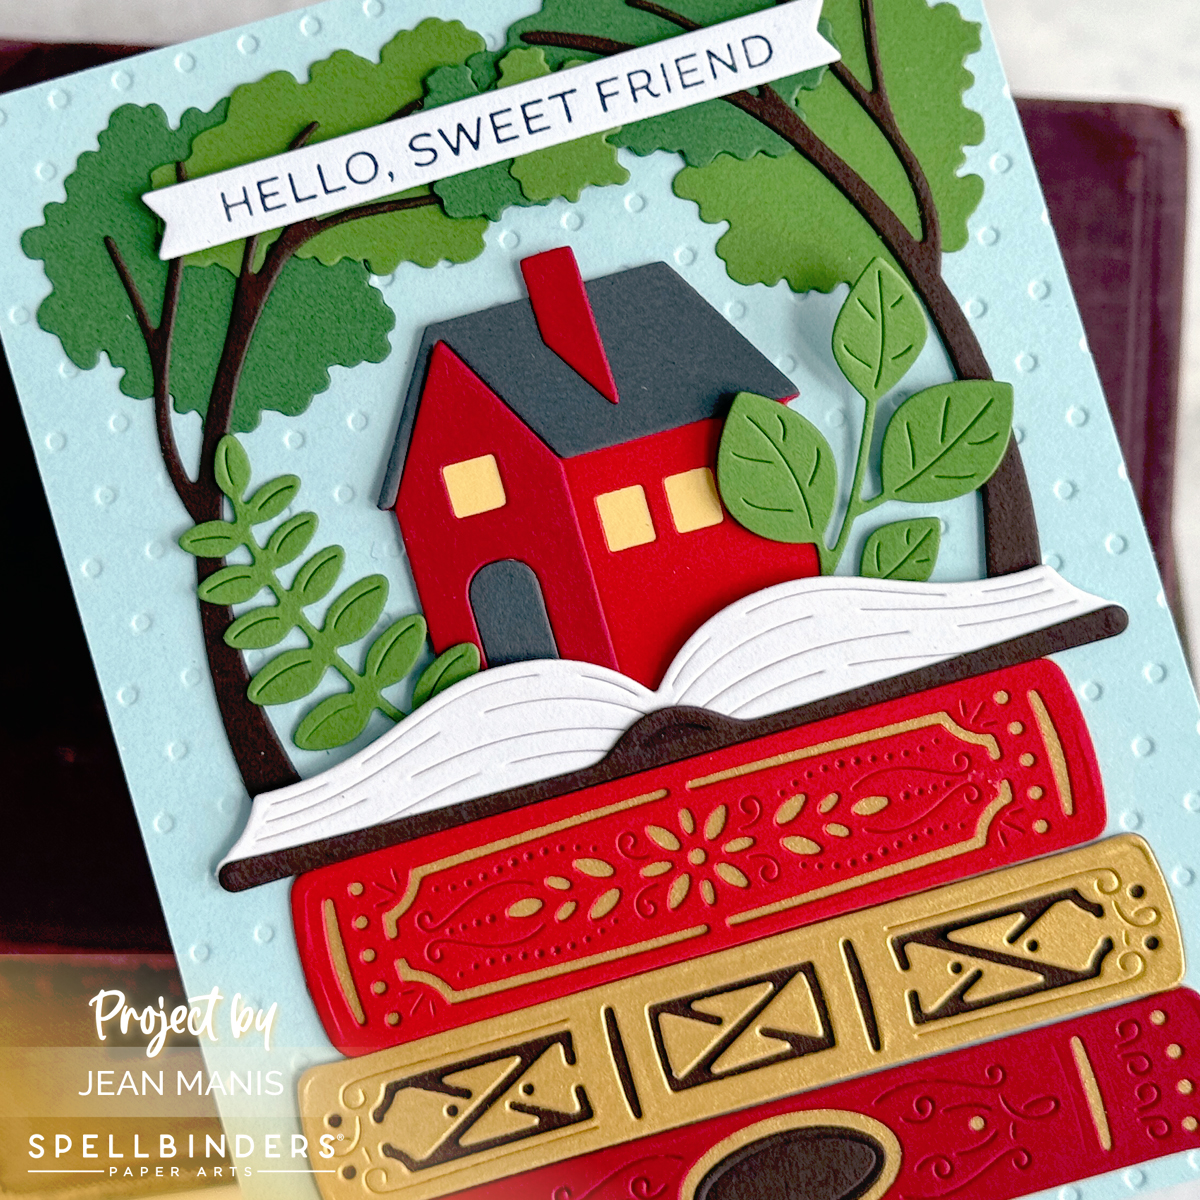
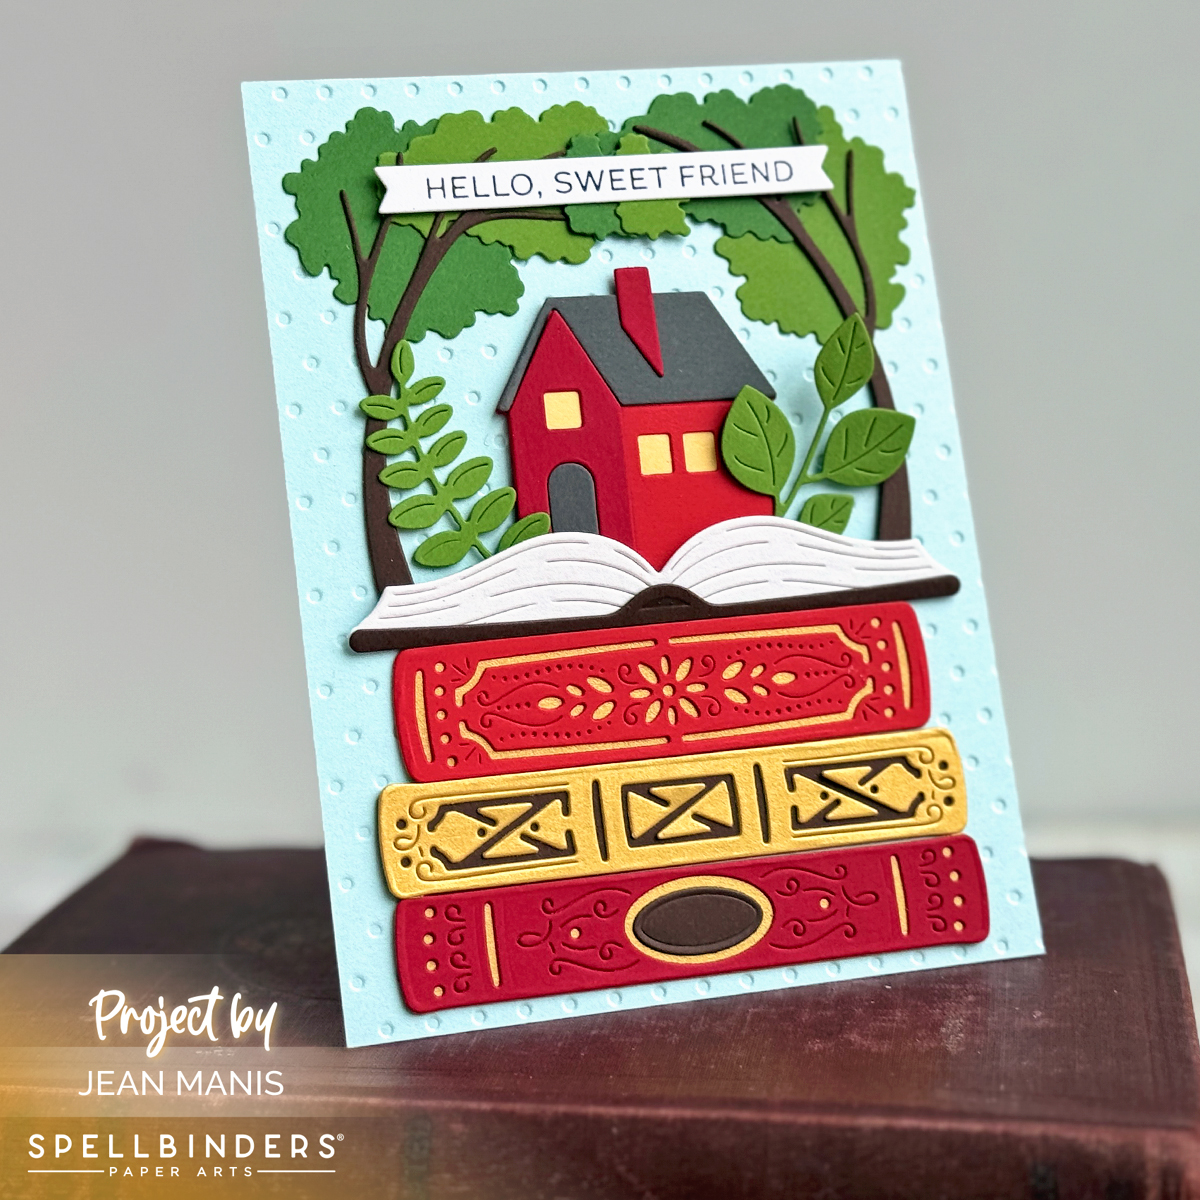
Spellbinders Small Die Kit – Sneaking a Kiss

Happy December! I am delighted to share a Valentine’s Day card featuring the Spellbinders December Small Die of the Month Club Kit – “Sneaking a Kiss.” Send this love-themed card to a friend or Valentine.

Spellbinders Small Die Kit – Sneaking a Kiss

Please note, in terms of the club subscriptions at Spellbinders: the sign-up window for new subscriptions now opens on the 6th of each month and closes on the 27th (once existing club members subscriptions have been processed). If there is additional inventory remaining, it will be made available for new subscriptions with limited availability.

Spellbinders Small Die Kit – Sneaking a Kiss

  • Dry-emboss A2-size panel of Chamomile cardstock with the Tiny Dots embossing folder. Add to a card base with the debossed side facing up.
  • With dies in the Small Die of the Month set, cut the umbrella, girl, and boy from cardstock. Assemble. Add white dimensional enamel dots to the umbrella. Attach the umbrella over the girl and boy. Embellish with hearts cut with dies in the Small Die of the Month set.
  • Cut the sentiment strips from navy cardstock using dies in the Small Die of the Month set. Glue to the bottom of the card base.
  • Add the umbrella assembly to the card.

Spellbinders Small Die Kit – Sneaking a Kiss

Spellbinders Small Die Kit – Sneaking a Kiss


Spellbinders Large Die Kit – Cheers to Us

Hello! Today, I am delighted to share a celebratory card featuring the Spellbinders December Large Die of the Month Club Kit – “Cheers to Us.” The die set includes dies to create a champagne or wine bottle, champagne glasses or wine glasses, and two sentiments.

Spellbinders Large Die Kit - Cheers to Us

Spellbinders Large Die Kit - Cheers to Us

Please note, in terms of the club subscriptions at Spellbinders: the sign-up window for new subscriptions now opens on the 6th of each month and closes on the 27th (once existing club members subscriptions have been processed). If there is additional inventory remaining, it will be made available for new subscriptions with limited availability.

  • Begin by dry-embossing light gray cardstock (measuring 5″ x 7″) with the Puff Dotty folder. Add to a card base covered with gold glitter foam.
  • Cut champagne glasses from acetate and vellum which has been adhered together with white liner sheets. Cut champagne from Brushed Gold and Mirror Gold. Cut hearts from dark red cardstock. Assemble.
  • Cut the champagne bottle pieces from a variety of cardstock colors including Brushed White, dark green, dark red, and Brushed Gold. Assemble.
  • Add assembled bottle and glasses to the card base with foam adhesive. Embellish with diamond shapes cut from gold glitter foam.

Spellbinders Large Die Kit - Cheers to Us

Spellbinders Large Die Kit - Cheers to Us


Spellbinders | Festive Christmas Ornaments

Hello! Today, I am delighted to share a Christmas card featuring the Festive Ornaments die set from the Merry Mugs & Circle Delights Collection at Spellbinders by Nichol Spohr. The ornaments take center stage against a backdrop of patterned paper. Previously, I shared a slimline card featuring this same die set HERE. Note: Now through November 30, save on many Spellbinders products with the Black Friday Sale!

Spellbinders | Festive Ornaments

With the Festive Ornaments set, cut ornament bases from red foil and green foil cardstock. With the same set, cut ornament holders from Brushed Gold and Brushed Silver. Cut the decorative elements from red glitter, green glitter, and Brushed Gold cardstock. Assemble.

After creating the ornaments, I went on the hunt for patterned paper on which to stamp a sentiment from the collection’s coordinating Santa’s Sippin’ Sayings stamp set. I stamped, as well as heat-embossed, one of the sentiments on several patterned papers and was not happy with the results; the sentiment simply did not show up enough. Going back to the drawing board, I found this patterned paper – Wonder of the Season – that was sold by Stampin’ Up! in 2020. I chose the paper because it had whimsical text on it, enabling me to forgo the sentiment. To embellish, I added snowflakes cut from Gold Glitter Foam with a die in the Holiday Decorations set.

Spellbinders | Festive Ornaments

Spellbinders | Festive Ornaments

Black Friday Sale 2023


52 Christmas Card Throwdown | Winter Countryside

Looking for the Spellbinders Blog Hop post? Head HERE.

Hello! A few weeks ago, I won the 52 Christmas Card Throwdown Theme Challenge. As the winner, I was invited to be a guest for the November Theme Challenge Winter Countryside.

The sight of a winter countryside evokes feelings of nostalgia with childhood memories of playing in the snow, building snowmen, and/or sledding. It offers a serene and idyllic backdrop creating a magical atmosphere that many people find irresistible!

52 Christmas Card Throwdown | Winter Countryside

To create the challenge card, I eagerly dug through my supplies. One of my favorite aspects of participating in card challenges – they provide an excuse to pull out favorite supplies and those that have never been used or used infrequently.

  • To begin, I stenciled and A2-size panel of Taylored Expressions Blue Corn cardstock with white paste through the Lawn Fawn Snow Flurries stencil. You can read more about stenciled backgrounds in my post HERE.
  • While the stenciled background dried, I cut the Memory Box Country Landscape (now retired) from Snowdrift cardstock. I used the Spellbinders Silent Night Make a Scene set to cut the red house and Santa and his reindeer. (The set is retired, however, I see that it is in stock at Frantic Stamper HERE. As I have mentioned before, Fran offers terrific customer service and has a large inventory.) I backed the houses with Blue Corn cardstock as I was depicting a nighttime scene.
  • With Hero Arts white powder, I heat-embossed the Essentials by Ellen Santa’s Flight set sentiment (released in 2015 and now-retired) on Pomegranate cardstock and cut it with a banner die.
  • I cut the frame from Snowdrift cardstock with the largest die in the MFT Stamps A2 Rectangle Frames set.
  • Once dry, I added the stenciled panel to the card base. I added the countryside landscape to the background, and then added the frame. Finally, Santa, the red house, and the sentiment were added.

52 Christmas Card Throwdown | Winter Countryside

I hope you are inspired to craft your own Winter Countryside card for the challenge!


Spellbinders | Fave Holiday Product Blog Hop

Hello! I am delighted to be participating in a Spellbinders blog hop featuring favorite holiday products released this year. You should have reached me from the blog of Lisa Mears. Scroll to the end of the post for the full list of participants. For the hop, I chose to create with the Snow Globe die set, part of the Simon’s Snow Globes Collection by Simon Hurley. The enchanting allure of snow globes lies in their ability to transport us to whimsical realms, evoking feelings of warmth and joy.

Spellbinders | Fave Holiday Products Blog Hop

To celebrate, Spellbinders is giving away a $25 gift certificate to 3 lucky blog readers – selected from the comments on our blog. Giveaway closes on Sunday, November 19, 11:59 pm MST. The winner will be announced on the Spellbinders blog hop post the following Wednesday. The winner is responsible for shipping costs, duties, and taxes. Please note, store credit (gift certificate) cannot be applied to Club Subscriptions. Store credit can be applied to shop past Club products, Club extras, and regular releases.

This card came together quickly. I limited my supplies to patterned papers, Snowdrift cardstock, and the Snow Globe die set. I previously used the set HERE.

  • Create an A2-size card base and add a patterned paper background.
  • With the circle die in the Snow Globe set, cut the night sky from patterned paper. Use the same die to cut two circles of Snowdrift cardstock. With the snowbank die in the set, cut two snowbanks. Add the snowbanks to the night sky.
  • Cut the snow globe base and sentiment from patterned paper and Snowdrift cardstock. Assemble and add to the globe assembly.
  • Cut the trees, houses, and Santa and reindeer from patterned paper and Snowdrift cardstock. Assemble and add to the snow globe with dot and foam adhesive.
  • Add entire assembly to the card base with foam adhesive.

Spellbinders | Fave Holiday Products Blog Hop

Spellbinders | Fave Holiday Products Blog Hop

Head next to the blog of Deepa Robbins.

Spellbinders Black Friday 2023


Spellbinders Blog
Yana Smakula
Tina Smith
Zsoka Marko
Sandi MacIver
Kristie Marcotte
Annie Williams
Nichol Spohr
Daniel West
Allison Frazier
Bibi Cameron
Lisa Mears
Jean Manis<–You are here
Deepa Robbins
Linh Van
Vicky Papaioannou
Heejung Hunsberger
Jennifer Kotas
Mindy Eggen
Joy Wilson
Bonnie Crane
Michelle Short
Lien Leysen