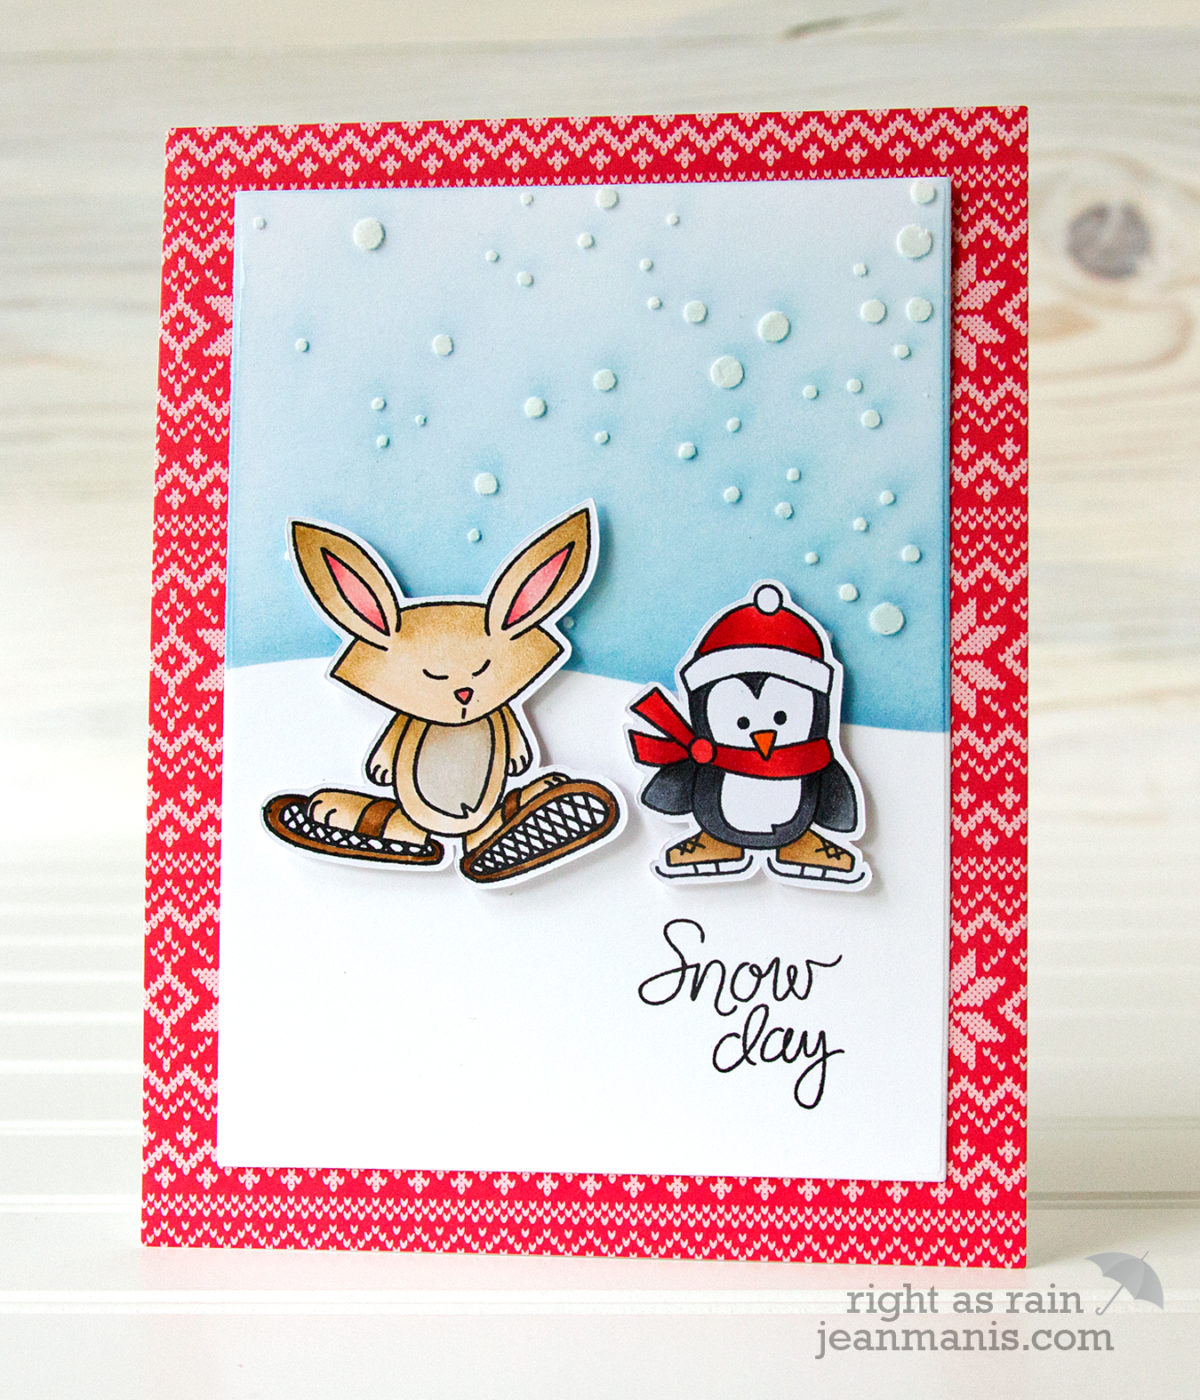
Newton’s Nook – Snow Day

Hello! As I mentioned in a previous post, I’ve been trying to embrace winter and create winter-themed cards as long as I can. (I have yet to put away my Christmas stamps and dies!) Today’s card features images and a sentiment from Newton’s Nook Designs Snow Day stamp set (now retired). I posted a card created with another image from this same set in November.

Newton's Nook - Snow Day

I stamped the rabbit and penguin images and colored them with Copic markers and colored pencils. I applied embossing paste to the background through the Simon Says Stamp Falling Snow stencil after stamping the sentiment. I wanted to keep layers to a minimum, so I used the MFT Drifts & Hills stencil to create a snow bank by applying several Distress Inks. The embossing paste resisted the ink. For the card base, I used a paper from the Lawn Fawn Knit Picky pad. The patterns in this pad are winter-themed rather than specifically Christmas.

Newton's Nook - Snow Day

Supplies:

Taylored Expressions – Bee Mine! – Die-cut Valentine

Hello! Today, I am sharing a Valentine which showcases the Taylored Expressions Roly Poly – Bee die set.

Taylored Expressions - Bee Mine!

I stamped the Brushed Hearts background with Strawberry Milkshake ink on Strawberry Milkshake cardstock (for a tone-one-tone look) and then stamped the sentiment from Simply Said – Valentine in Oreo ink. To reinforce the Valentine’s Day theme, I added hearts cut with Little Bits – Hearts, including some for the bee’s cheeks!

Taylored Expressions - Bee Mine!

Supplies: Taylored Expressions Roly Poly – Bee die set, Simply Said – Valentine stamp set, Brushed Hearts Background stamp, Little Bits – Hearts die set, Stitched Circle Stacklets die set, Oreo, Strawberry Milkshake, Cherry Pop, Lemon Meringue, Sugar Cube cardstock, Strawberry Milkshake, Oreo ink

Simon Says Stamp – Die-cut Valentine

Hello! Today, I am sharing a CAS die-cut Valentine featuring the Simon Says Stamp Coffee Love die. With snow and cold temperatures blanketing a lot of the country, a warm cup of coffee (or cocoa) seemed appropriate!

Simon Says Stamp - Die-cut Valentine

I cut a variety of cardstock colors with Coffee Love die and pieced them together. I added a sentiment cut with the On Edge Love You die, which I tucked behind a snowbank cut with one of the Drifting Stitches Borders dies. I cut hearts with the Heart Sprinkle Trail from the light-blue background allowing the card base to show through.

Simon Says Stamp - Die-cut Valentine

Happy Birthday Card – Echo Park Balloons Stencil

Hello! Today, I am sharing a CAS birthday card featuring the Echo Park Balloons Stencil,  provided to me by Paper-Garden.ca.

Happy Birthday Card - Echo Park Balloons Stencil

I recently shared a card created with the Echo Park Snowflakes #1 stencil, on which I used embossing paste. For this card, I applied Distress Inks with a Inkylicious Ink Duster brush. The top row of balloons is inked with Mermaid Lagoon, the middle row with Peacock Feathers, and the bottom row with Salty Ocean. I also applied Tumbled Glass to a separate piece of cardstock. I adhered that inked panel to the back of the stenciled panel so that the letters, which I knocked out with the My Favorite Things Happy Birthday to You die, would easily show through.

Happy Birthday Card - Echo Park Balloons Stencil

I plan to use this stencil again for another birthday or celebration card by coloring embossing paste with acrylic paint.

Let It Snow – Stencil and Die-cuts

Hello! Today I am sharing a CAS winter-themed card created with several Memory Box die-cuts and the Echo Park Snowflakes #1 Stencil,  provided to me by Paper-Garden.ca.

I like the Echo Park stencils because of their 6″ x 6″ size – it’s easy to create either a vertical or horizontal card. This particular stencil features a variety of snowflakes in a random pattern. When designing my card, I carefully considered which snowflakes would be visible in the scene.

Let It Snow - Echo Park Snowflakes #1 Stencil

I applied Wendy Vecchi embossing paste through the stencil and set it aside to dry for thirty minutes. Once dry, I applied Tumbled Glass Distress Ink over the embossing paste and directly to the cardstock with a sponge applicator. For the most part, the embossing resisted the ink. There was a little bit of ink on the snowflakes, which I simply removed with a wet paper towel.

I die-cut the Memory Box Let It Snow from a red cardstock rectangle, (the die does not cut the outer edges), and placed it over the embossing paste snowflakes background. I added Memory Box Playful Penguins and a snow bank to finish off the scene.

Let It Snow - Echo Park Snowflakes #1 Stencil

Other ways I considered using this stencil – apply Tumbled Glass Distress Ink or silver metallic ink, heat-emboss embossing paste with a metallic powder, or dry-emboss the cardstock (like an embossing folder) and add ink to the raised snowflakes.