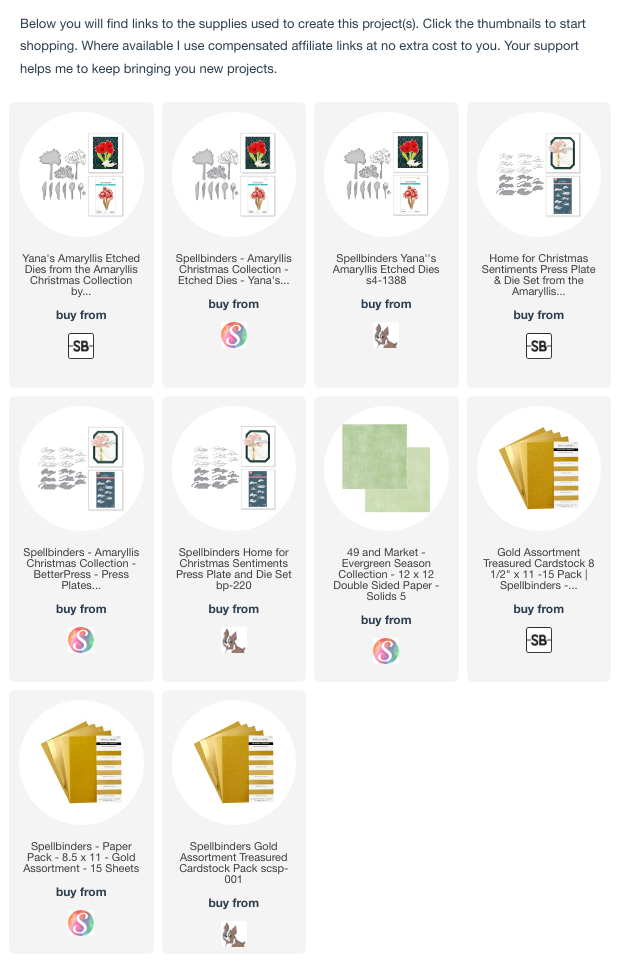
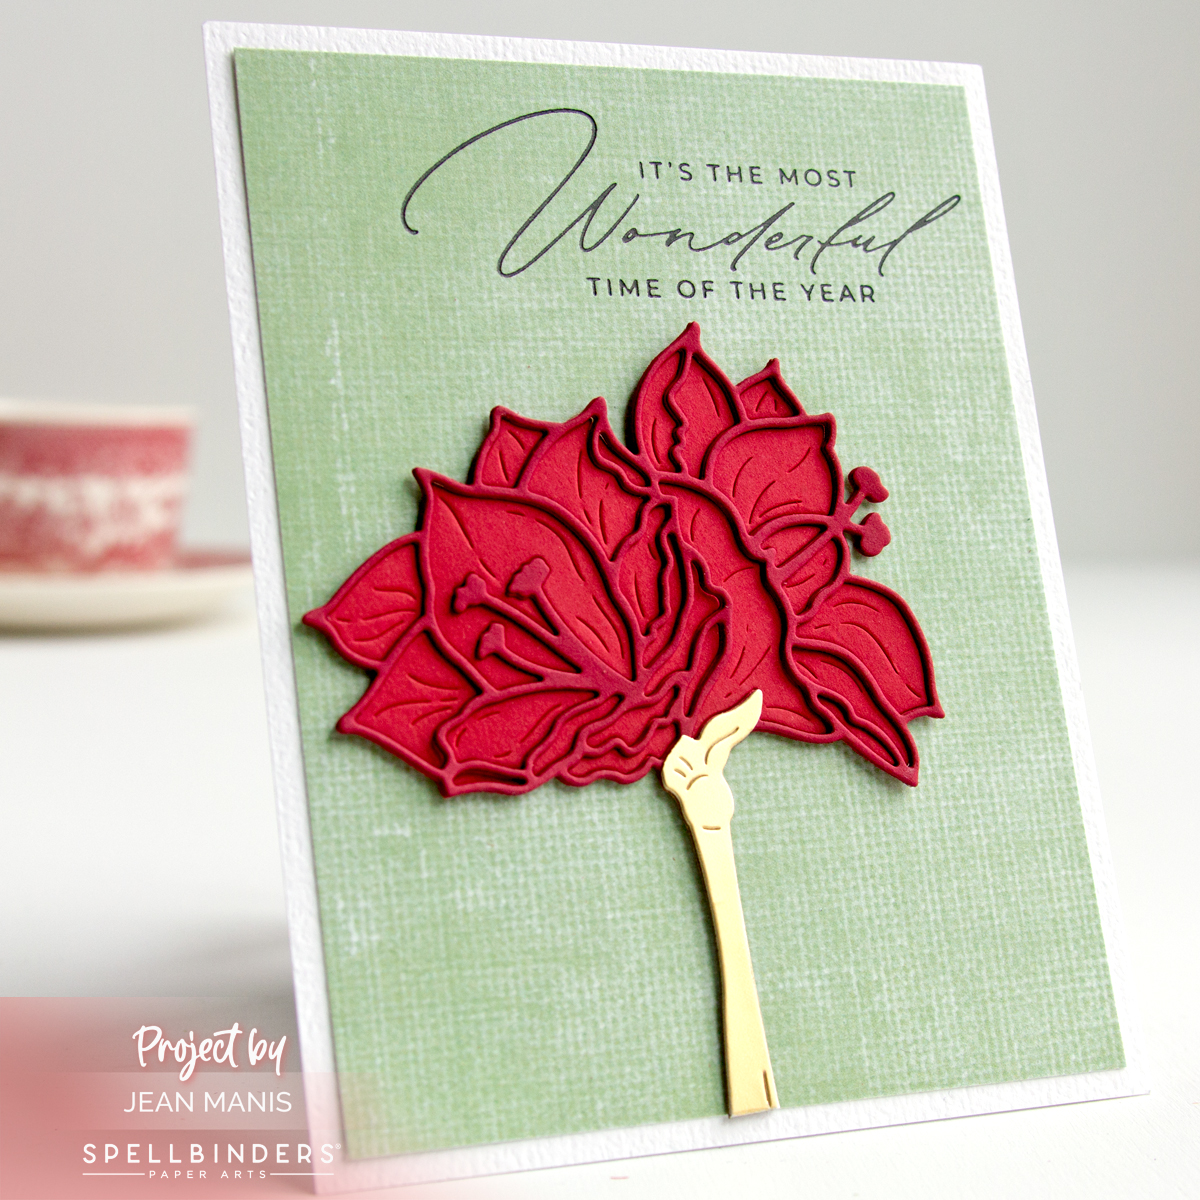
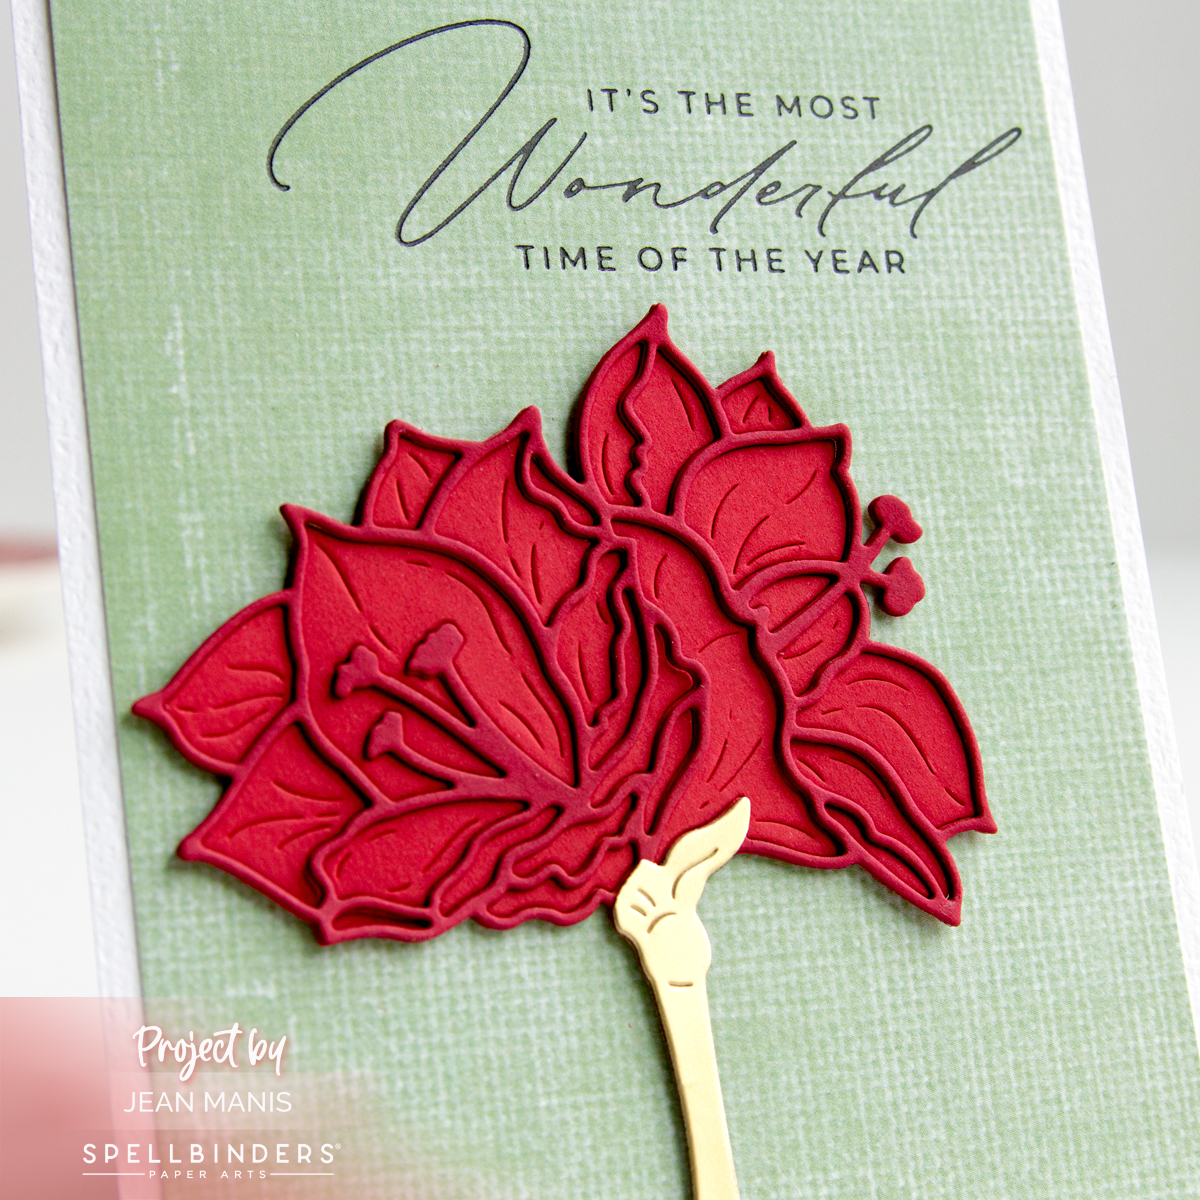
Elizabeth Craft Designs | Crafting Cozy Moments

Hello! Today, I am delighted to share a handmade card with a hot beverage theme featuring products from Elizabeth Craft Designs. Nestled on a snowflake-patterned paper, this card captures the essence of winter coziness. I recently posted about the hot beverage theme in cardmaking HERE.

Elizabeth Craft Designs | Crafting Cozy Moments

    • Create an A2-size card base and adhere patterned paper (I used the A2-size die in the Lawn Fawn Stitched Rectangles set to cut the paper). Patterned paper offers a quick and convenient way to create card backgrounds, which I discussed in this post.
    • Using the Warm Winter Mug die set, cut mug, gingerbread person, and candy cane from Snowdrift, Pomegranate, Paper Bag, and Fern cardstock. Assemble.
    • Stamp Holiday Treats sentiment on Snowdrift cardstock with Icing on the Cake ink. I masked the sentiment in order to stack it. Cut sentiment with a banner die. Add grommet (I used a die in the Lawn Fawn Tag, You’re It set), and punch a hole. Add twine (Lawn Fawn Peppermint Cord).
    • Add assembled mug and sentiment banner to card base.

Elizabeth Craft Designs | Crafting Cozy Moments

Looking for more inspiration? I previously posted a card with these sets here.


Coffee-themed Winter Wishes

Hello! While visiting my blog archive for my post on cardmaking with the hot beverage theme, I decided to do a mash-up of two of the cards shown HERE and HERE. I eagerly delved into my supplies, reigniting my passion for crafting with these products.

Coffee-themed Winter Wishes

To create the card, I used a number of now retired supplies. I’m calling this a “Shop Your Stash” post! I know there are a lot of shiny new products out there that I could easily buy. It is more of a challenge to use what I already own. The retired supplies are listed at the bottom. I have emboldened supplies that are currently available and included them in the LinkDeli list.

    • Dry emboss a white cardstock square (4 1/2″) with a folder for subtle texture. (Note: I used the now-retired SU Subtle Dynamic Textured Impressions folder. The shim required is the base platform, the folder with the cardstock inside, and one cutting plate.) Add to card base.
    • Stamp Lawn Fawn Kraft cardstock with the Hero Arts Candy Stripe Bold Prints background stamp in red pigment ink. Once dry, cut with the Lil’ Inker 4 1/4″ stitched square. Add to card base.
    • Cut a 3″ circle from Waterfall cardstock and add white embossing paste through the Snowy Sky stencil. Set aside to dry.
    • Stamp Hero Arts Winter Wishes sentiment in black on white cardstock. Cut with the 3″ circle die and again with a die in the MFT Snow Drifts set. (I bought this set of hills in November 2012; the set was one of my first ever die purchases.) Add sentiment hill to the stenciled circle and add assembly to the card.
    • Cut mittens with dies in the My Favorite Things Warm & Fuzzy set from red cardstock and dry-emboss with the Taylored Expressions Cable Knit embossing folder. Cut to-go coffee cup with dies in the Mini Café All Day set. Assemble and accessorize with a snowflake cut with a Mini Snowflakes die from white glitter foam. Add cup and mittens to card.

Coffee-themed Winter Wishes

Retired Supplies: My Favorite Things Warm & Fuzzy; My Favorite Things Snow Drifts; Lil’ Inker 4 1/4″ stitched square; Hero Arts Candy Stripe Bold Prints; Taylored Expressions Cable Knit embossing folder; Colorbox red pigment ink; Hero Arts Winter Wishes; SU Subtle Dynamic Textured Impressions embossing folder


Scarecrow Sweater: Papercrafted Fall Fashion

Hello! Today, I am showcasing Elizabeth Craft Designs products – the Sweater Season and Scarecrow die sets and Autumn Words stamp set – on a fall-themed card. I don’t own a fall novelty sweater, however, I can always craft one from paper!

Scarecrow Sweater: Papercrafted Fall Fashion

  • To begin, dry-emboss a Persimmon cardstock panel, measuring 4 1/2″ square with cable folder (I used Cable Knit from Taylored Expressions). Attach to card base.
  • Cut sweater with dies in the Sweater Season set. Dry-emboss sweater body with SU Subtle folder (now retired). Alternatively, cut the sweater from textured cardstock. Add neckline, bottom hem, and cuffs, cut from white cardstock, to the sweater. Cut circles with a small circle die and add to sweater body for adornment.
  • Die-cut pieces for the Scarecrow head and hat from colored cardstock. Assemble. To create the mouth on the scarecrow, I cut a piece of cardstock with a 1/2-inch circle die. I used the negative portion to draw the mouth using a Faber Castell Pitt artist pen size XS pen. (I am writing this specifically so I will remember for next time.) Add assembled scarecrow face, with crow, to sweater front.
  • Stamp Autumn Words sentiment in black on to white cardstock and cut with the smallest die in the Small Stitched Rectangle Stackables set.
  • Add sentiment and assembled sweater to card front.

Previously, I used the Scarecrow die set on a fall-themed card HERE and the Sweater Season die set on a Christmas-themed card HERE.

Scarecrow Sweater: Papercrafted Fall Fashion


Spellbinders | Deco Holiday Embossing

Hello! Today, I am sharing a CAS, holiday card showcasing the Spellbinders Deco Holiday embossing folder, used to dry-emboss a pattern of squares and paired with a glimmer-foiled sentiment.

Spellbinders | Deco Holiday Embossing

  • Using the 1″ die in the Everlasting Squares set, I cut twenty cardstock squares of purple, teals, and blues. I arranged the squares and taped them together on the back before dry embossing with the Deco Holiday folder. I added the panel to a Snowdrift cardstock base measuring 4 1/4″ x 5 1/4″.
  • Using one of the sentiments in the Christmas Mailbox Greetings set, I glimmer foiled Snowdrift cardstock in silver. I cut the sentiment with the 2″ die in the Everlasting Circles set and attached it to a circle cut from vellum with the 2 1/4″ die.
  • I attached the sentiment circle to the card center with foam adhesive and embellished with snowflakes cut with the Holiday Decorations set from white foam glitter.

Spellbinders | Deco Holiday Embossing

You can read more about card backgrounds created with embossing folders HERE.

Take advantage of the Spellbinders Fall Warehouse Sale that runs now through September 21!

Spellbinders Fall Warehouse Sale 2023


Lawn Fawn | Sailing with the Car Critters

Hello! Today I am sharing a whimsical, nautical-themed card that uses the Lawn Fawn Car Critters stamp set in a novel way. Strips of cardstock mimic a cruise ship, proudly named the SS CUBBY. Through five die-cut windows, the Car Critters take center stage, offering a twist on their traditional use. This mini slimline card not only showcases the versatility of the Car Critters set but also demonstrates how simple techniques, like using strips of paper, a circle die, and an alpha die set, can yield a unique card.

Lawn Fawn | Sailing with the Car Critters

  • Stamp Car Critters on Arches Cold Press watercolor paper with VersaFine ink; heat set.
  • Color bears with watercoloring mediums of choice.
  • Create card base for a mini-slimline measuring 6 1/2 x 3 1/2 inches from Snowdrift cardstock.
  • Create portholes by cutting a Snowdrift cardstock panel, measuring 6 1/2 inches wide, five times with a 3/4 inch circle die.
  • Adhere the watercolored bears to the back of the porthole section.
  • Add strips of cardstock to card base to resemble cruise ship along with the porthole section.
  • Die-cut Journal Letters from Snowdrift cardstock and foam. Adhere foam to the back of the letters. Adhere letters to card front.

Lawn Fawn | Sailing with the Car Critters

I used the Car Critters in a car in this post.