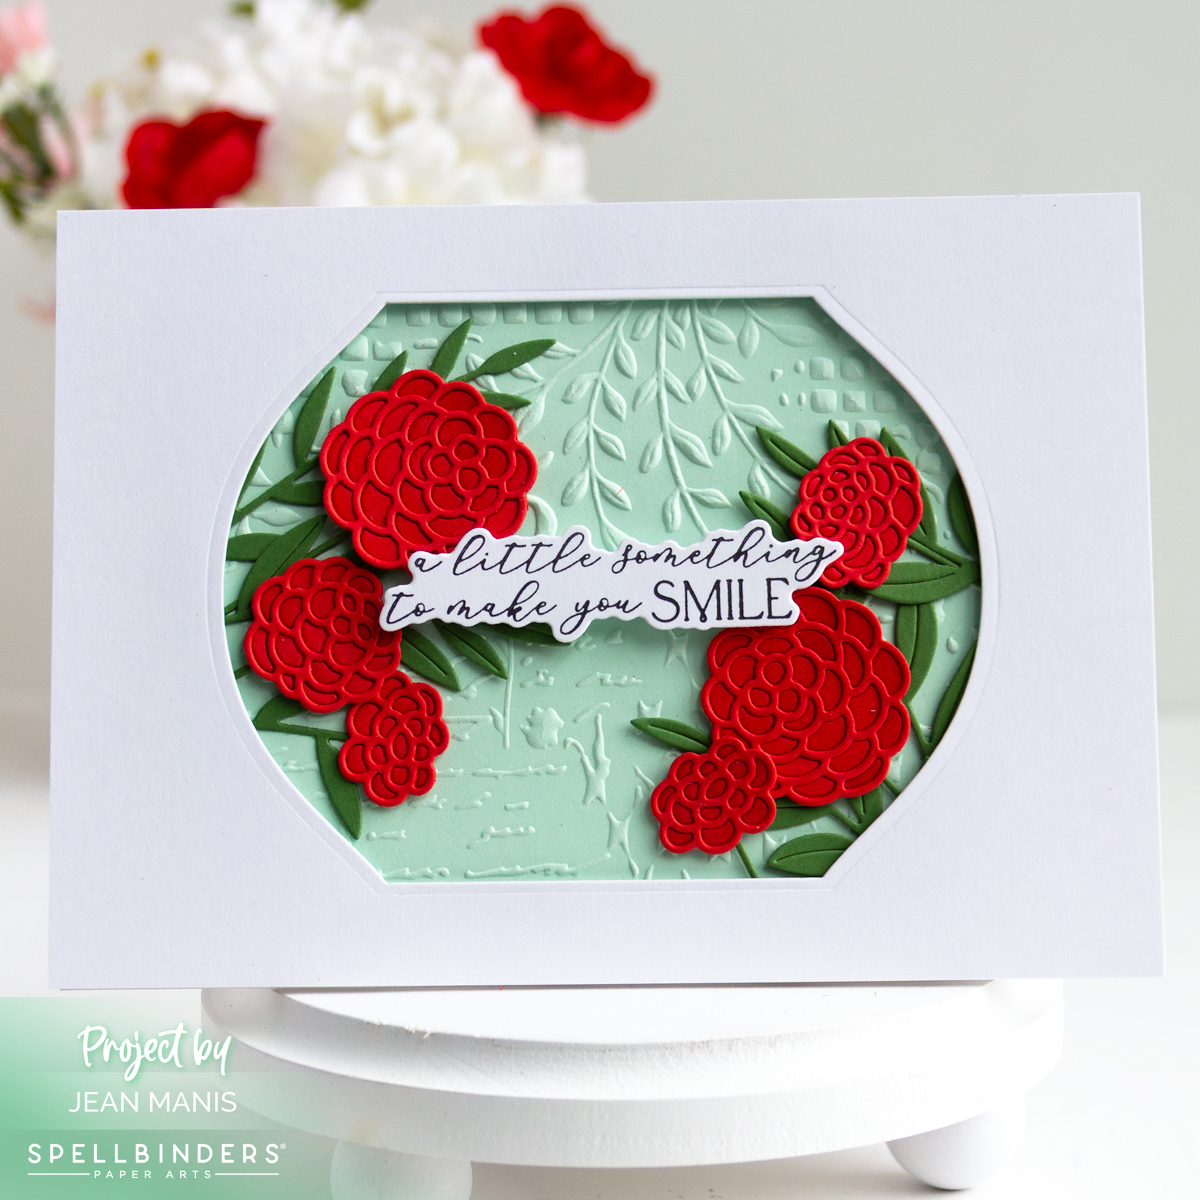
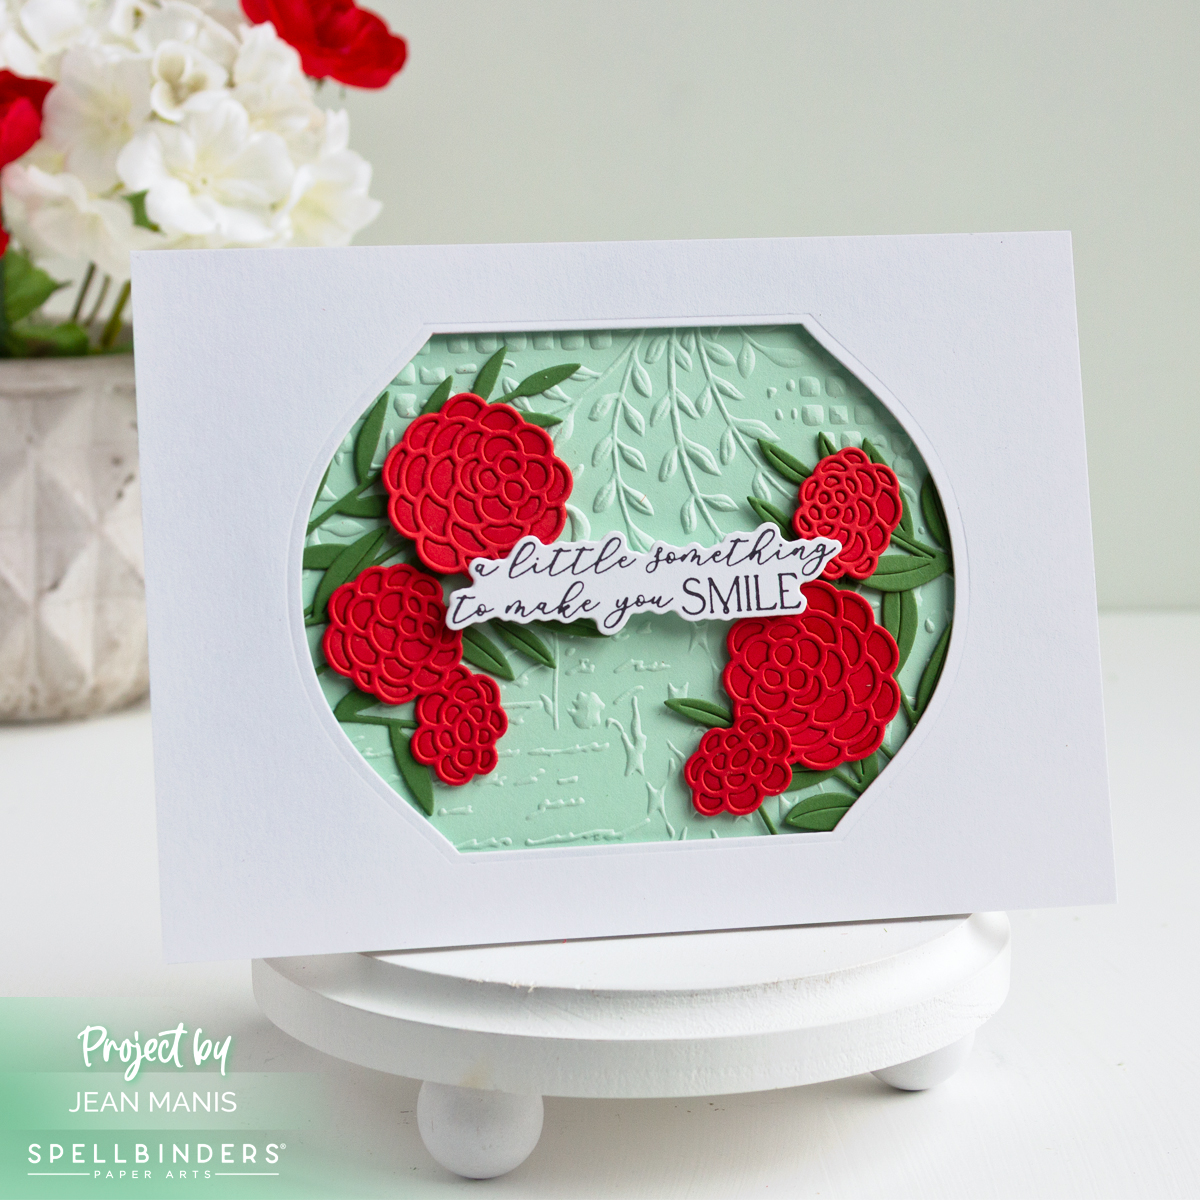
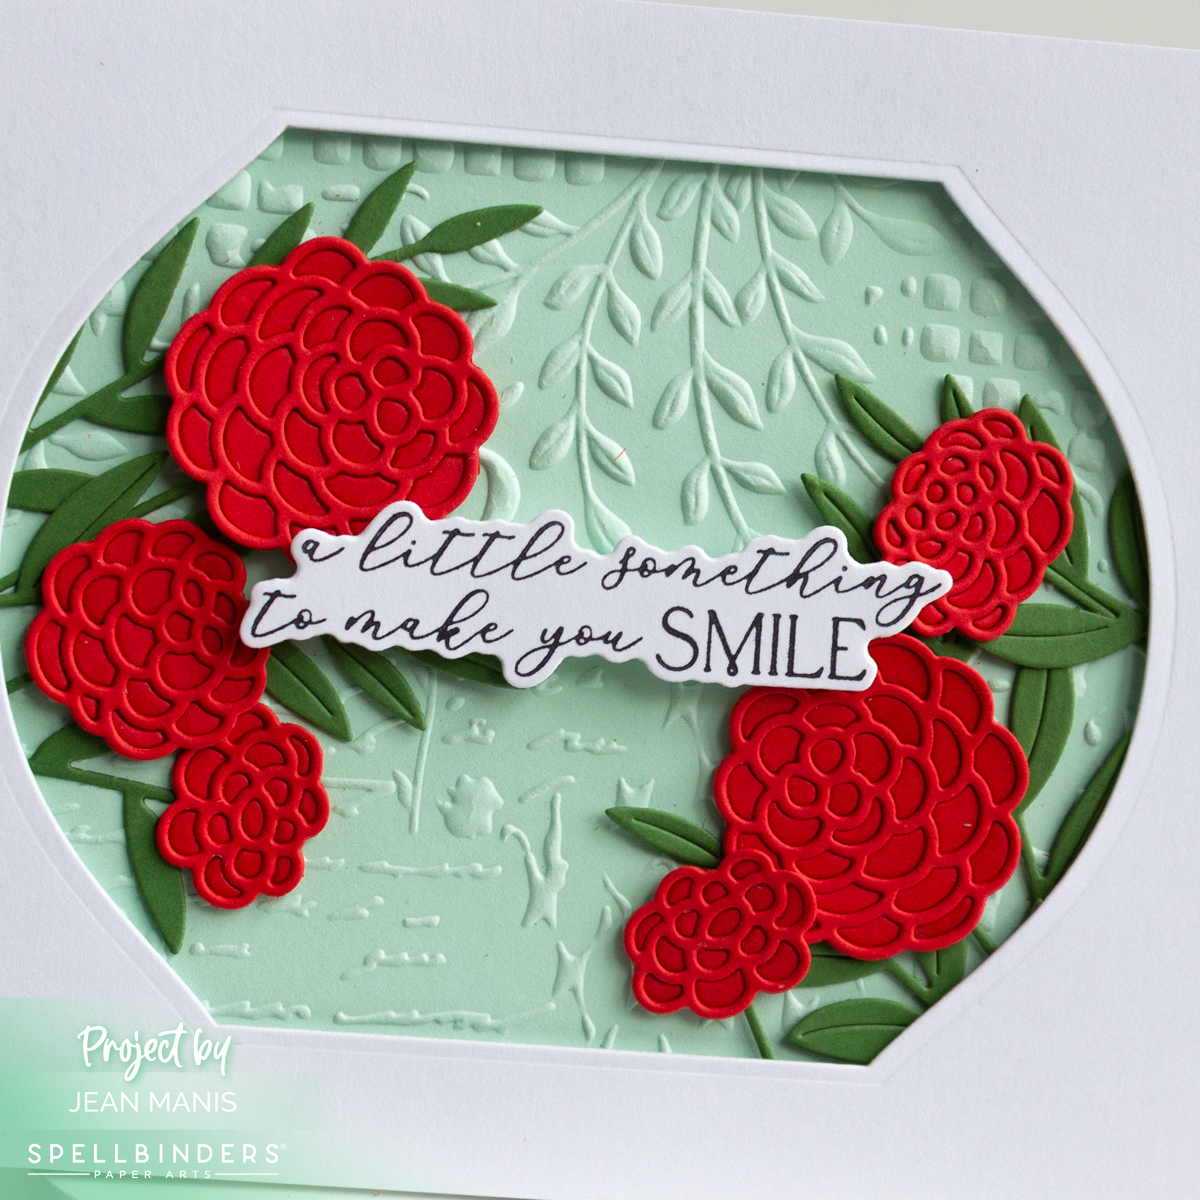
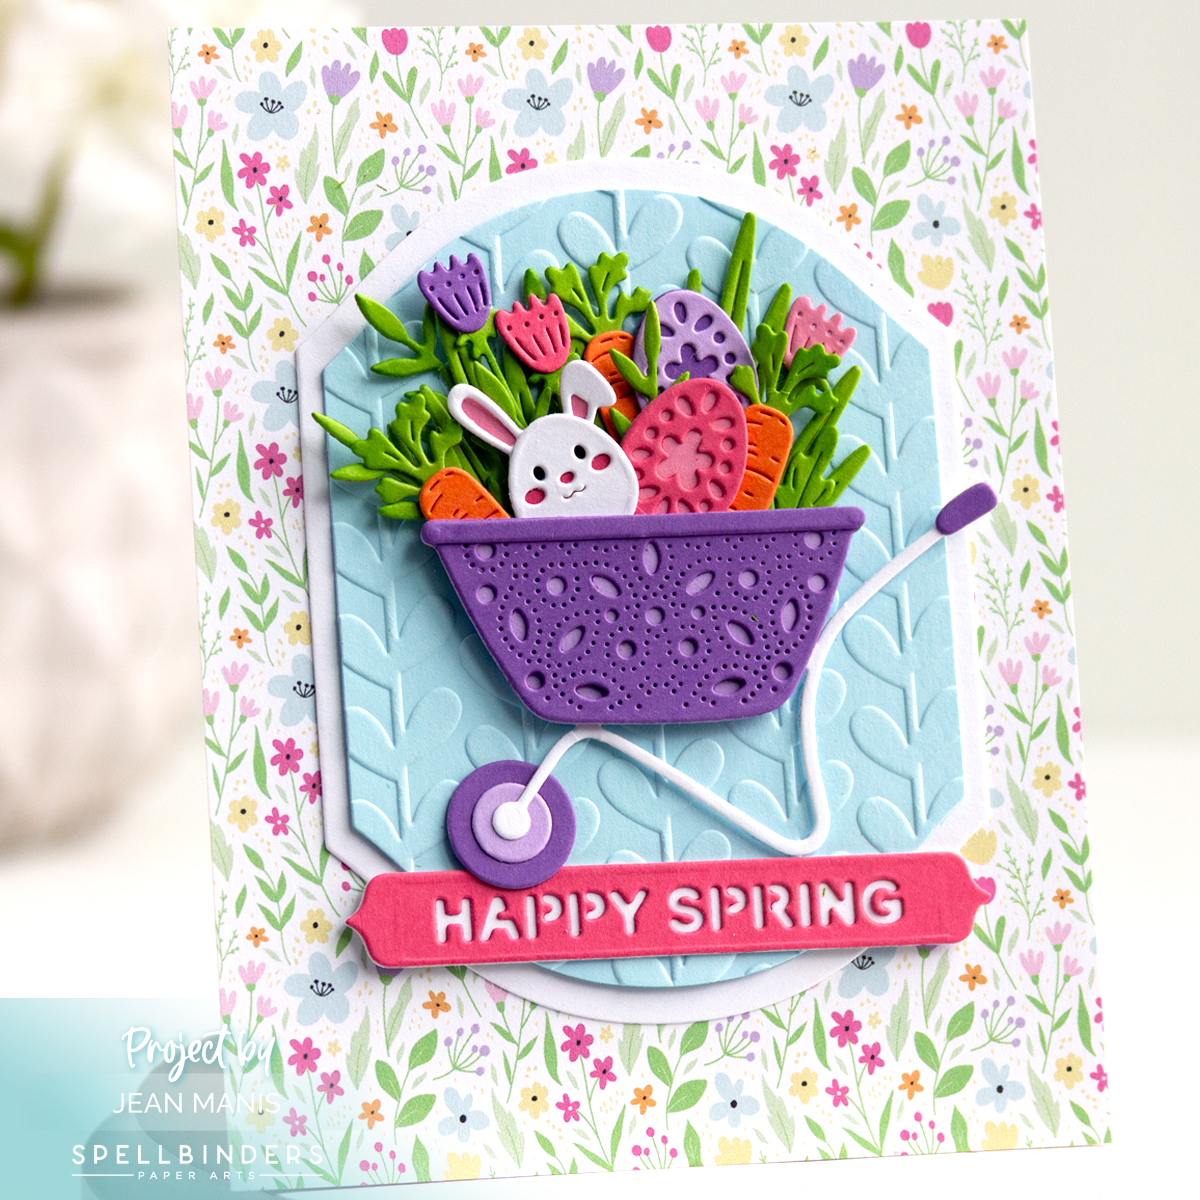
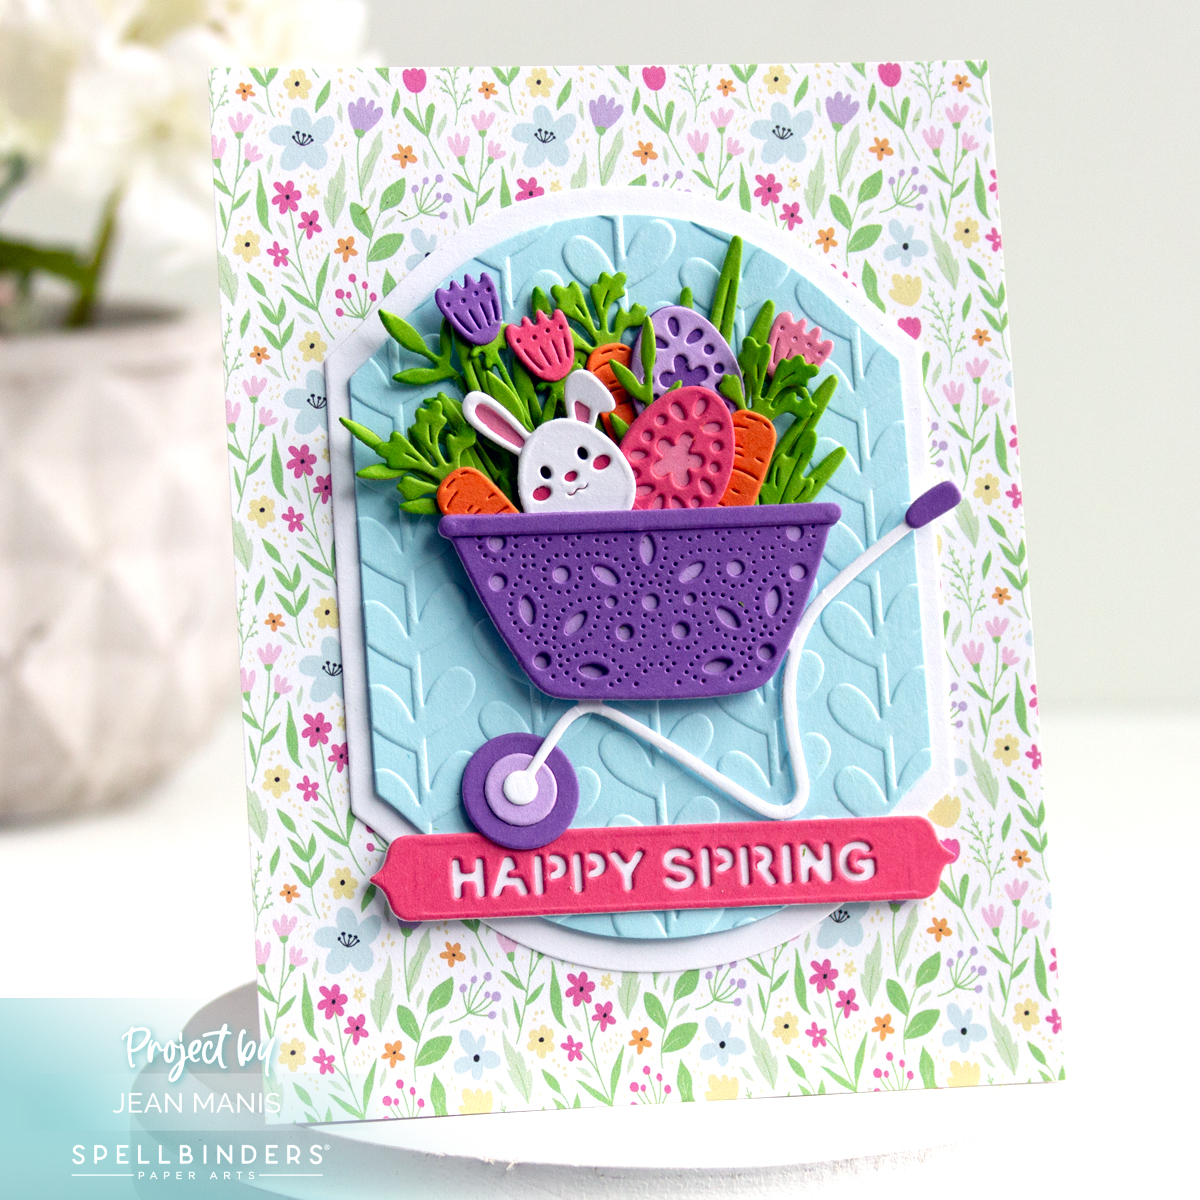
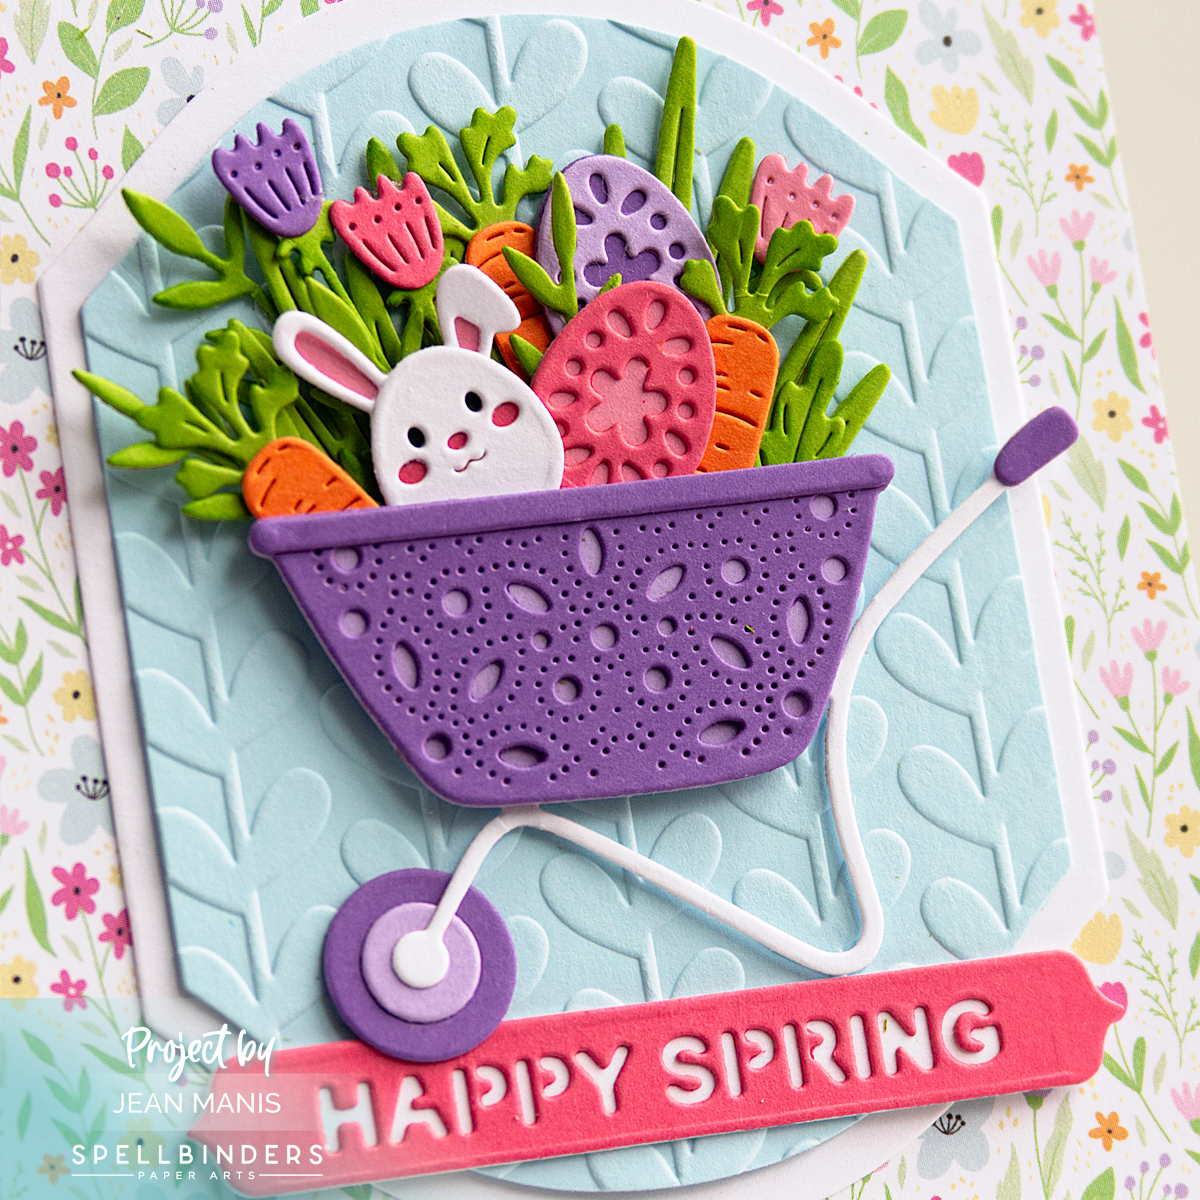
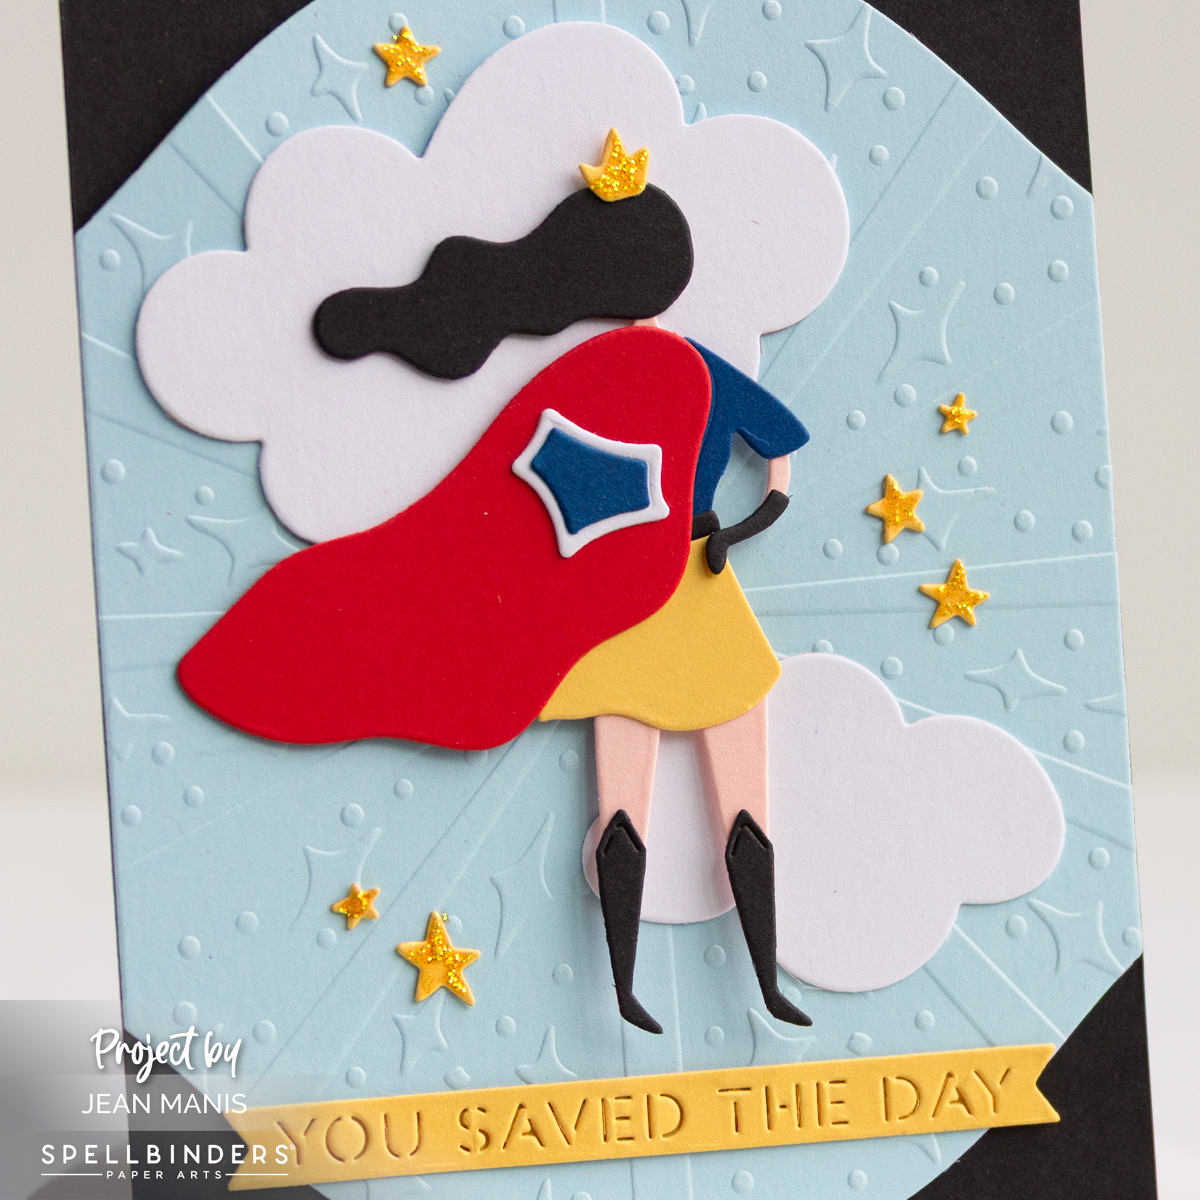
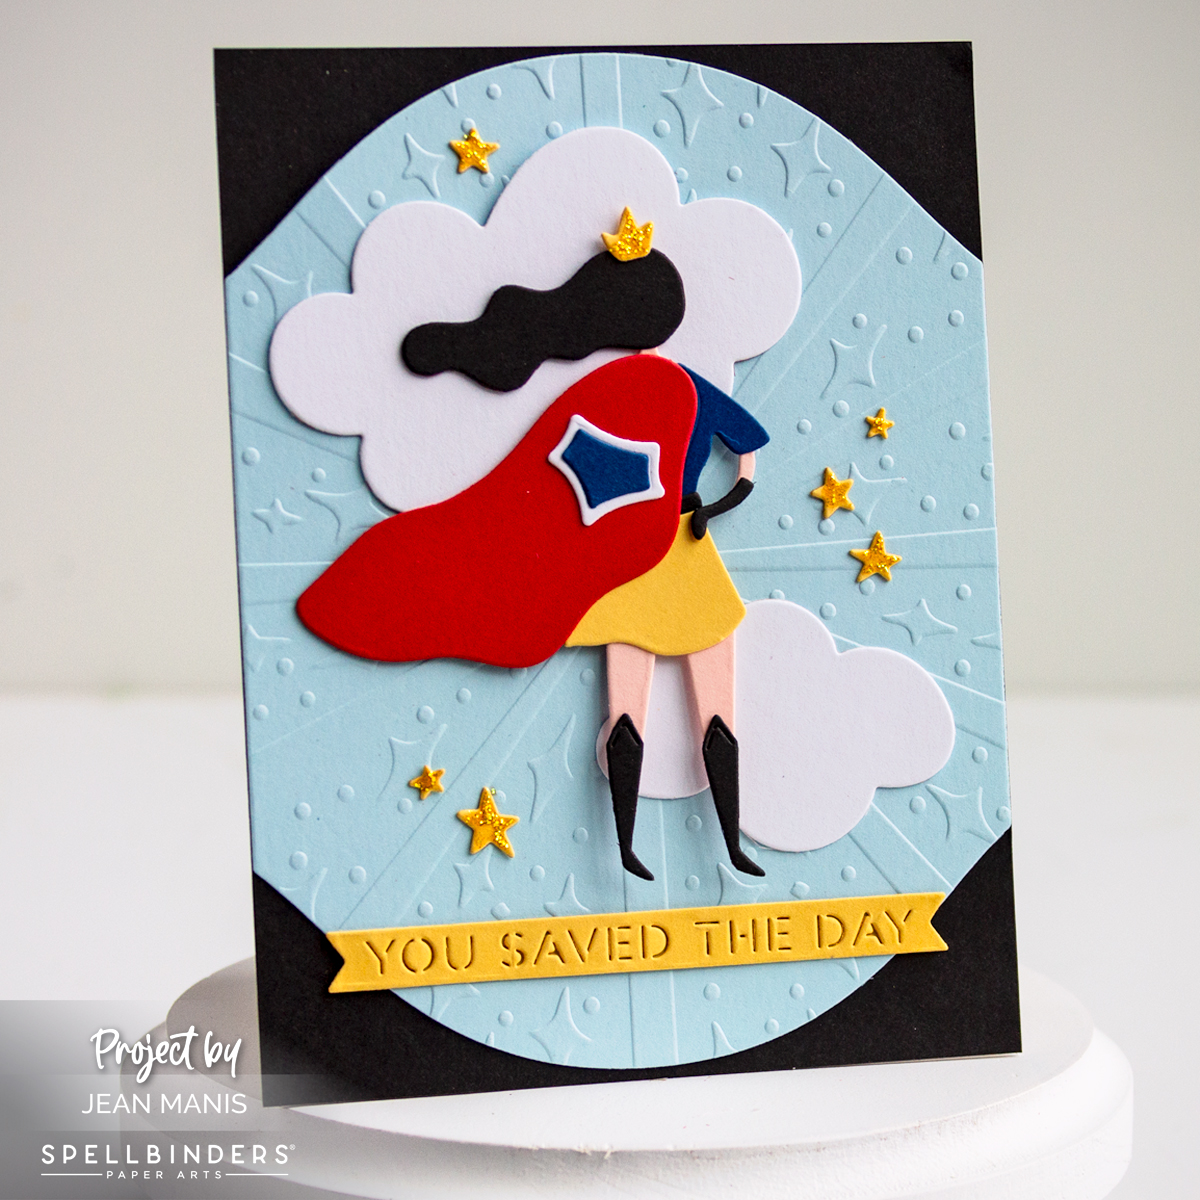
Spellbinders | Set Sail Die-Cut Card

Hello! There’s nothing quite like the calming rhythm of waves and a sailboat on the open water–and that’s the feeling I aimed to capture with this nautical handmade card. Using products from Spellbinders, I created an scene framed by a Polaroid-style die cut. The sentiment “Relax and enjoy!” adds to the vibe, while the rope-textured dry embossed card base reinforces the theme. It’s a card that invites the recipient to take a breath and imagine the salty breeze.

Spellbinders | Set Sail Die-Cut Card

    • Dry-emboss an A2-size cardstock panel with the Cast Away folder and add to a card base.
    • Cut the sailboat with this month’s Caboodle offering–the “Set Sail” die set. Assemble.
    • Cut the waves, three times, with dies in the Large Die set. Assemble. Find more Large Die inspiration HERE.
    • Cut a frame with the Memory Frames die.
    • Stamp the Fair Winds sentiment on to a cardstock panel and trim to fit behind the frame.
    • Adhere the frame, waves, and sailboat together and add assembly to the sentiment panel. Trim waves before adding to the sentiment panel.
    • Add assembly to the prepared card base.

Spellbinders | Set Sail Die-Cut Card


Spellbinders | Whimsical Nautical Card

Hello! If you’re craving a bit of whimsy and salt air, today’s card delivers both with a playful nautical scene. Created with the Spellbinders “Shipmates” die set – the June 2025 Small Die of the Month offering – the card stars a walrus and a seagull in a charming, storybook-like style. You can find more inspiration for the set HERE.

Spellbinders | Whimsical Nautical Card

The sentiment “Seas the Day” sets a cheerful tone, and the dry-embossed fishing net background adds texture and reinforces the maritime theme. Whether you’re crafting for a beach lover or just love ocean-inspired designs, this card is sure to bring a smile!

    • Dry-emboss an A2-size cardstock panel with the Cast Away folder. Add to a card base.
    • Cut the Small Die of the Month elements and assemble. Add assemblies to the prepared card base.
    • Stamp the Fair Winds sentiment and cut with coordinating die. Add to the card.

Spellbinders | Whimsical Nautical Card

Hero Arts Blast from the Craft SaleSave up to 25% off Past Hero Studio. Ends 6/9/2025

Hero Arts Past Hero Studio Sale

Spellbinders Make It Pop Sale – Features up to 25% on embellishments, inks and more. Ends 6/8/2025.

Spellbinders Make It Pop Sale


Spellbinders | Floral Beauty

Hello! There’s something timeless about a card full of beautiful blooms, and today I’m sharing a floral design created with several Spellbinders die sets. One of the featured sets was originally the January 2023 Large Die of the Month Club kit; it’s available for individual purchase—perfect if you missed it the first time around! I love combining die sets to build unique arrangements.

Spellbinders | Floral Beauty

    • Dry emboss a cardstock panel with the Flowers & Foliage folder. Add to a 5″ x 7″ card base.
    • Cut the Club Blooms pieces from a variety of cardstock colors. Assemble as required.
    • Cut the pot with dies in the Azalea and Garden Pot set and assemble as necessary.
    • Adhere the pot, blooms, and foliage to the card base.
    • Stamp the Message Strips sentiment with blue ink and cut with a banner die in the set. Add sentiment across the pot.

Spellbinders | Floral Beauty


Spellbinders | Susan’s Azaleas

Hello! Today, I’m excited to share a card that captures the beauty of azaleas nestled in a charming garden pot. Following Susan Tierney-Cockburn’s step-by-step video, I was able to assemble the azaleas and pot, available as a set at Spellbinders. This project was a delightful learning experience.

Spellbinders | Susan's Azaleas

    • As explained in the video, with dies in the Azalea and Garden Pot set, cut the leaves from watercolor cardstock. To color the leaves, I used Copics E27, YG63, and YG67. Form the leaves with Susan’s tools and then paint on glaze. Set aside to dry. I don’t know what brand glaze Susan used on hers; I used JudiKins Diamond Glaze.
    • With dies in the Azalea and Garden Pot set, cut the petals and stamens from Susan’s Garden Specialty Cardstock and color. To color, I used Copics RV23, RV25, and R39. Following Susan’s directions, I cut the stamens, glued them, and added pollen. I formed the flowers with tools in the kit and then glued the petals and stamens.
    • With dies in the Azalea and Garden Pot set, cut the pot from Classic White cardstock and color by heat-embossing Fired Brick Distress Embossing Glaze. I added several coats. Assemble pot.
    • Dry-emboss a 5 1/2″ square panel of Seaside cardstock with the Flowers and Foliage folder and add to a card base.
    • Stamp the sentiment on Classic White cardstock and cut with a die in the Assorted Tags set, masking the “there” so that only “hello” is stamped.
    • Add the pot, leaves, and flowers to the prepared card base. Tuck the sentiment tag into the finished arrangement.

Spellbinders | Susan's Azaleas

While there are numerous steps involved in creating this card, Susan Tierney-Cockburn’s tutorial breaks down the process into manageable parts, making it achievable even for beginners like me.


Spellbinders | You’re Wonderful

Hello! Today, I’m sharing an elegant handmade card inspired by a recent visit to the stunning RoozenGaarde tulip garden in Washington. The vibrant tulips I saw there were unforgettable, and they became the heart of this card design, brought to life with Spellbinders supplies. The sentiment “You’re Wonderful” makes this card perfect for expressing appreciation, celebrating someone special, or simply brightening someone’s day.

Spellbinders | You're Wonderful

    • Dry-emboss an A2-size panel of Seaside cardstock with the Flowers & Foliage folder. Add to a card base.
    • With the Tulip Trio die set, cut the stems, leaves, and blooms. Assemble the blooms. Affix the elements to the card base and trim along the bottom.
    • Press the You are Everything sentiment and cut with the coordinating die. Add to the card with foam adhesive.

Spellbinders | You're Wonderful