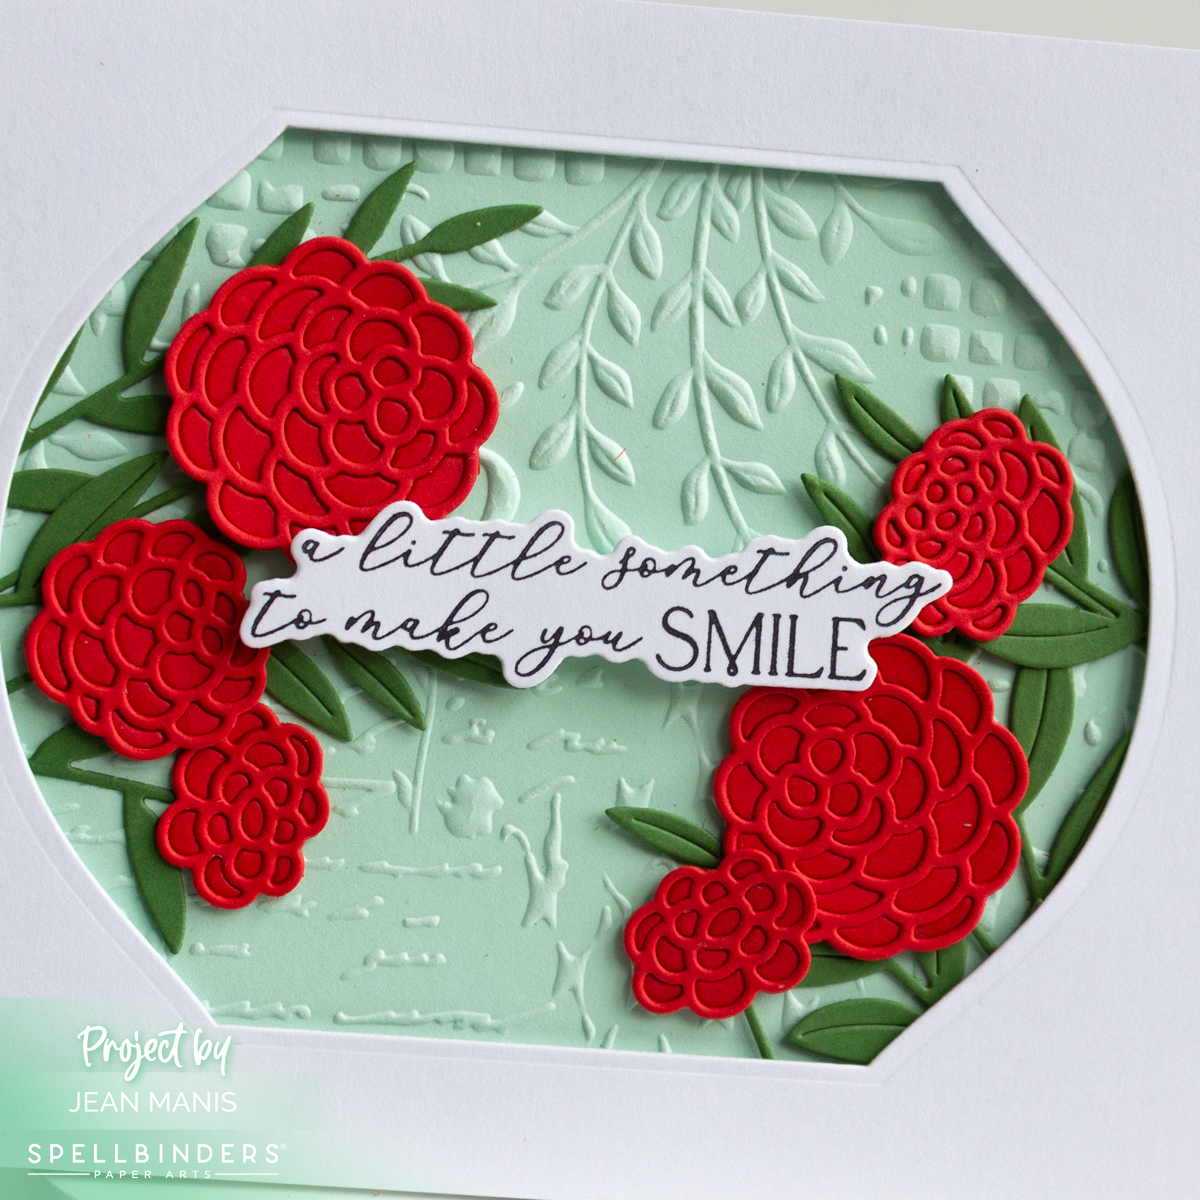
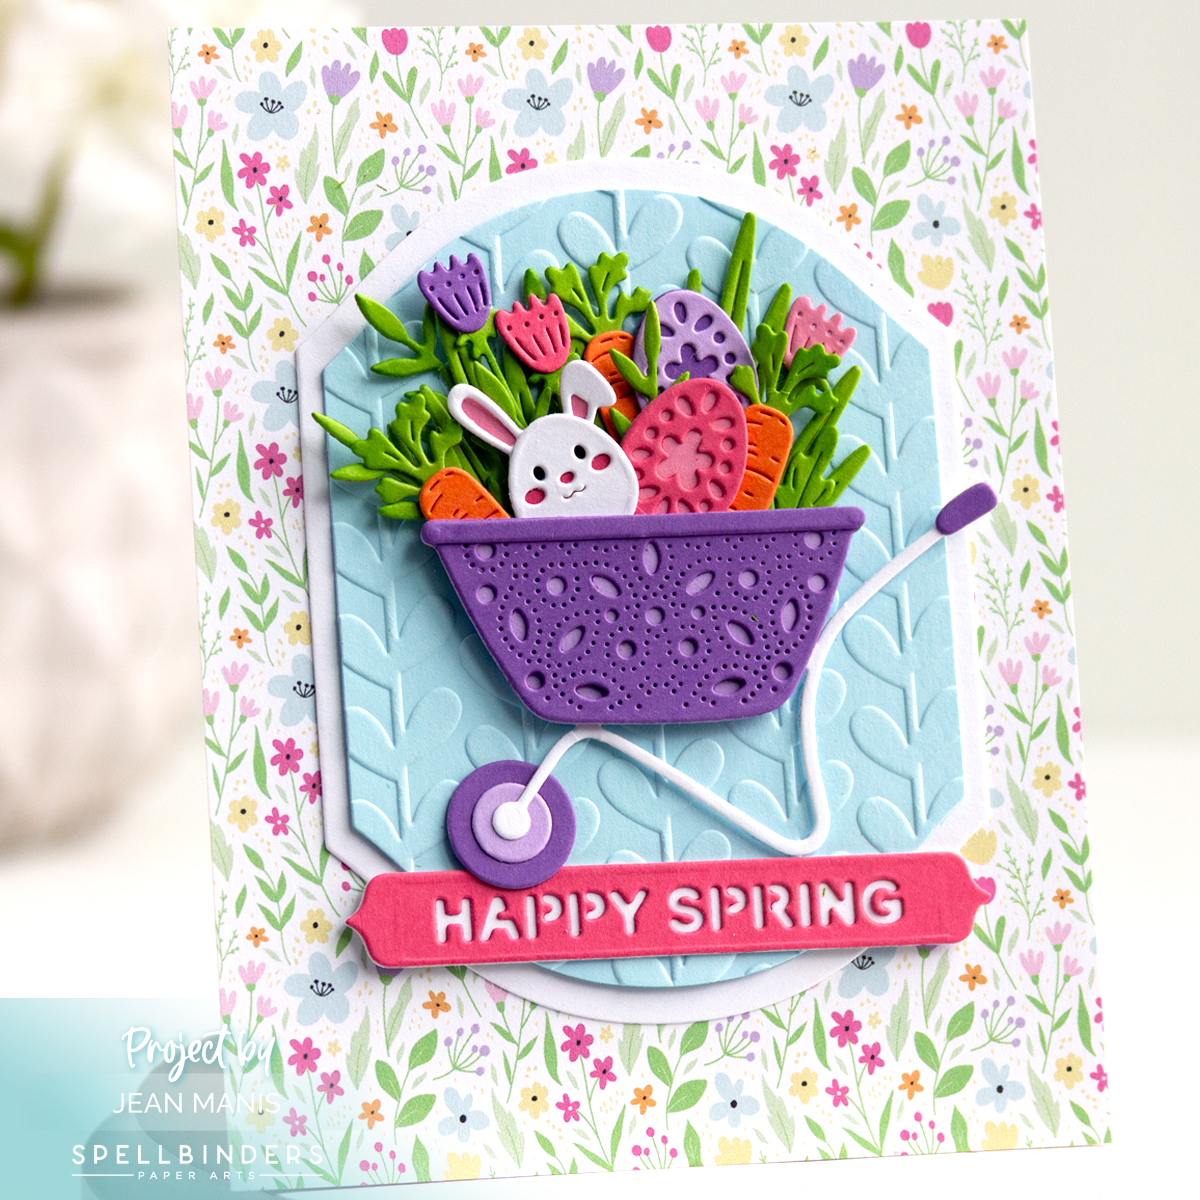
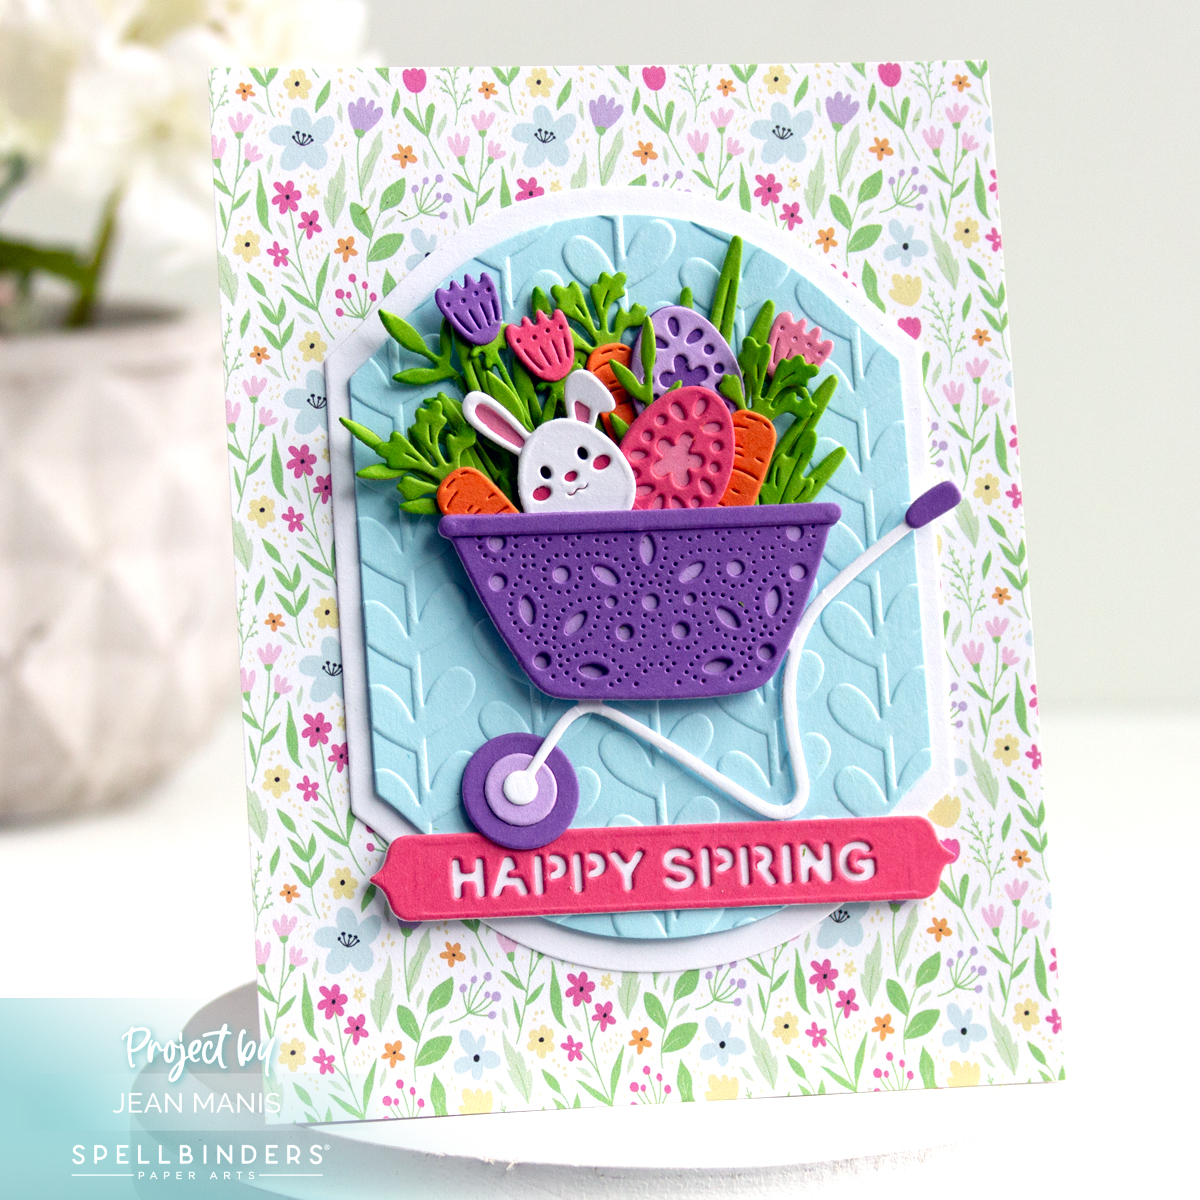
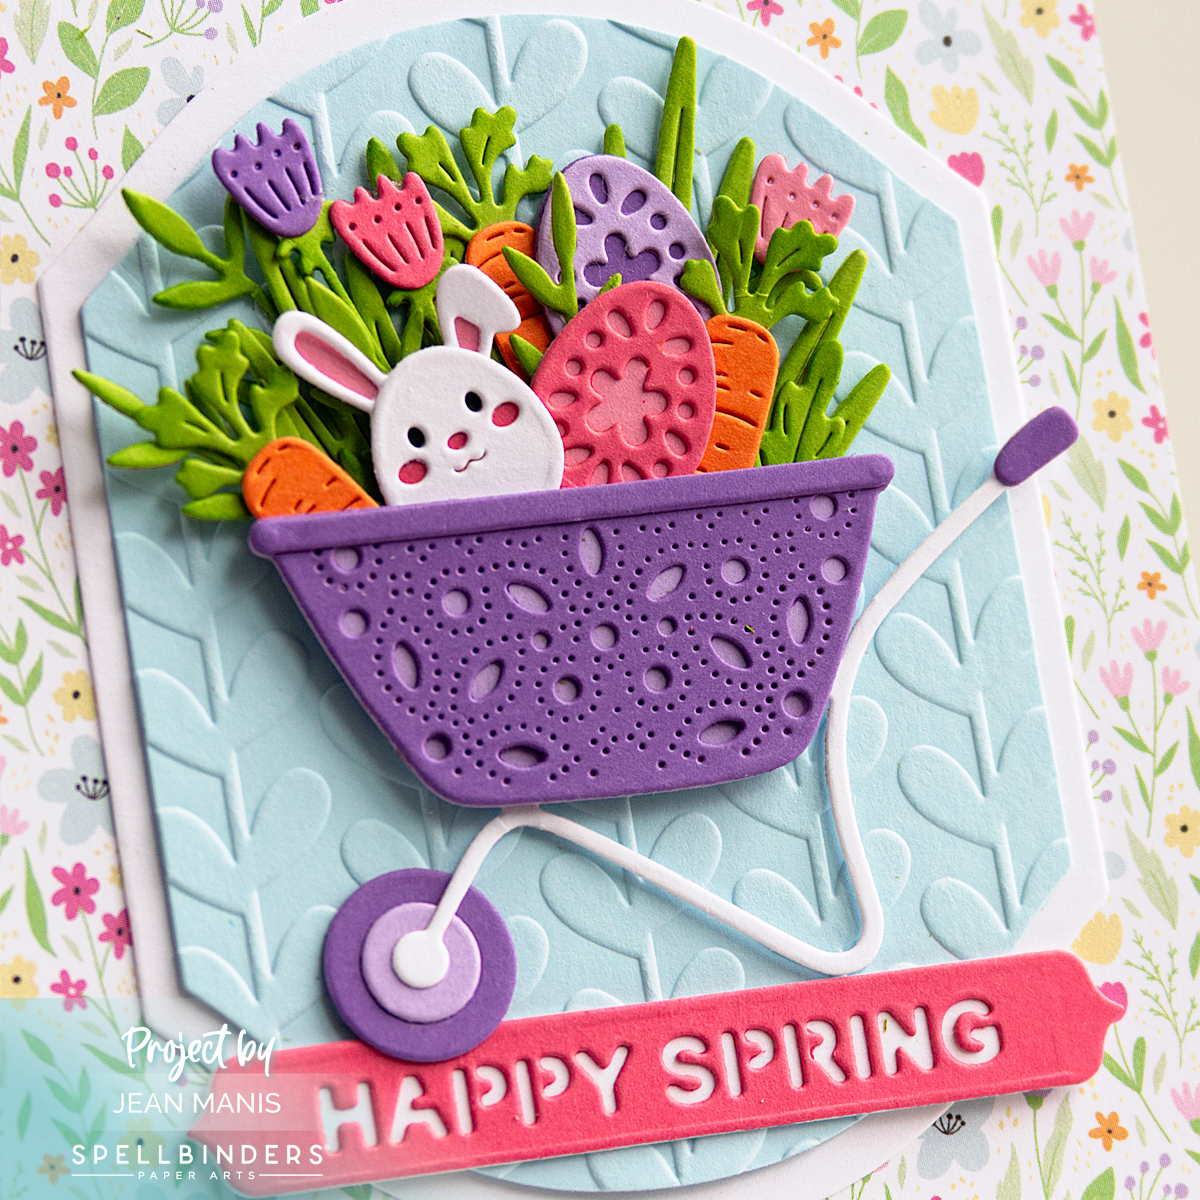
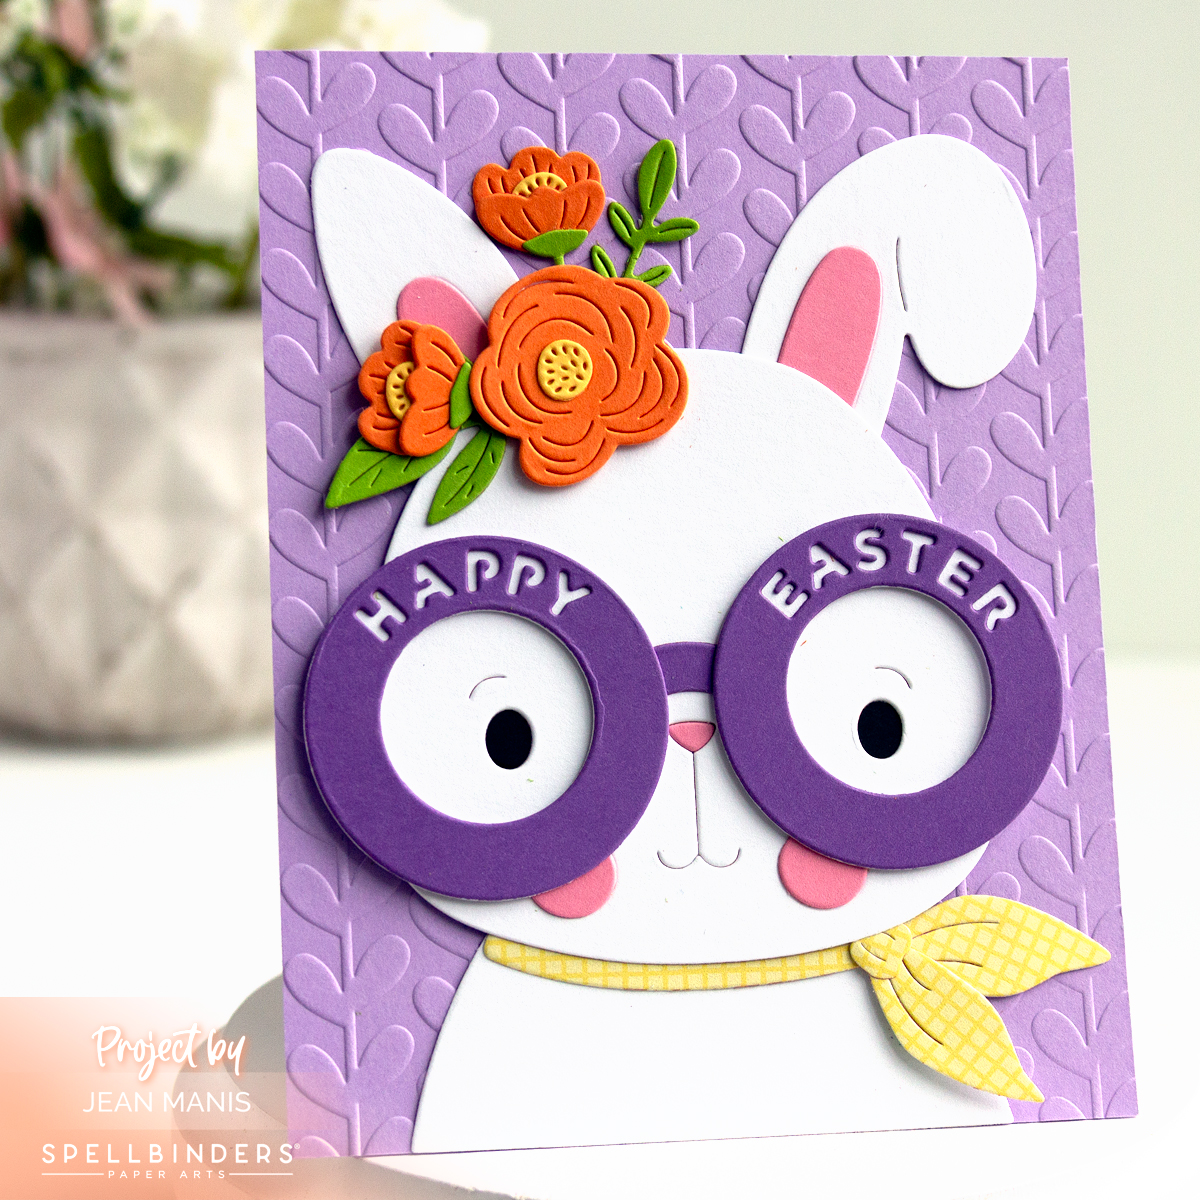
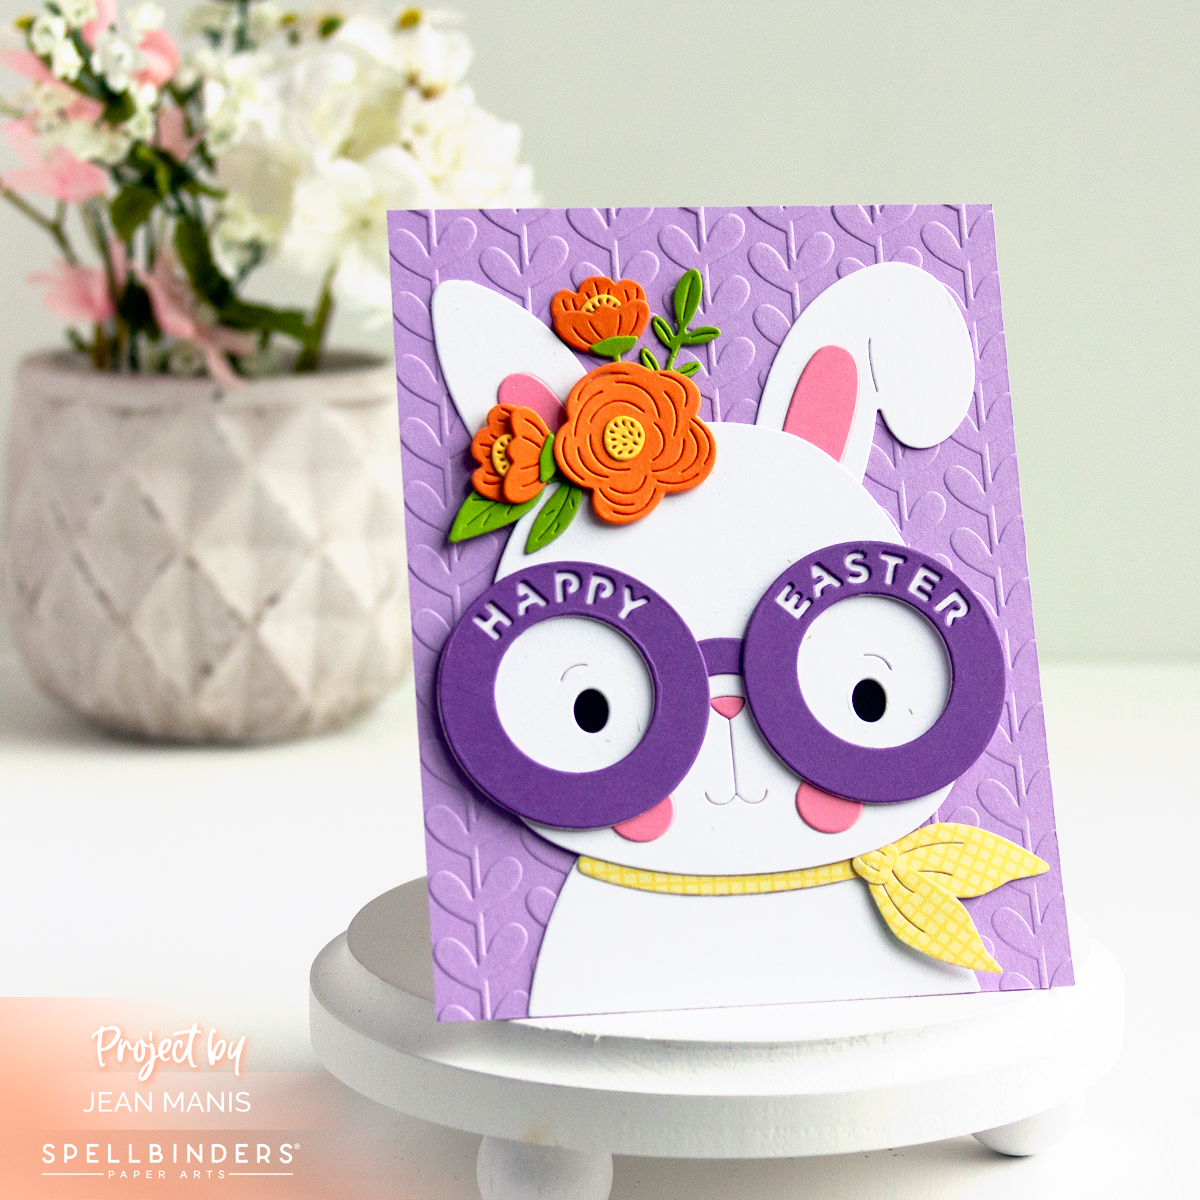
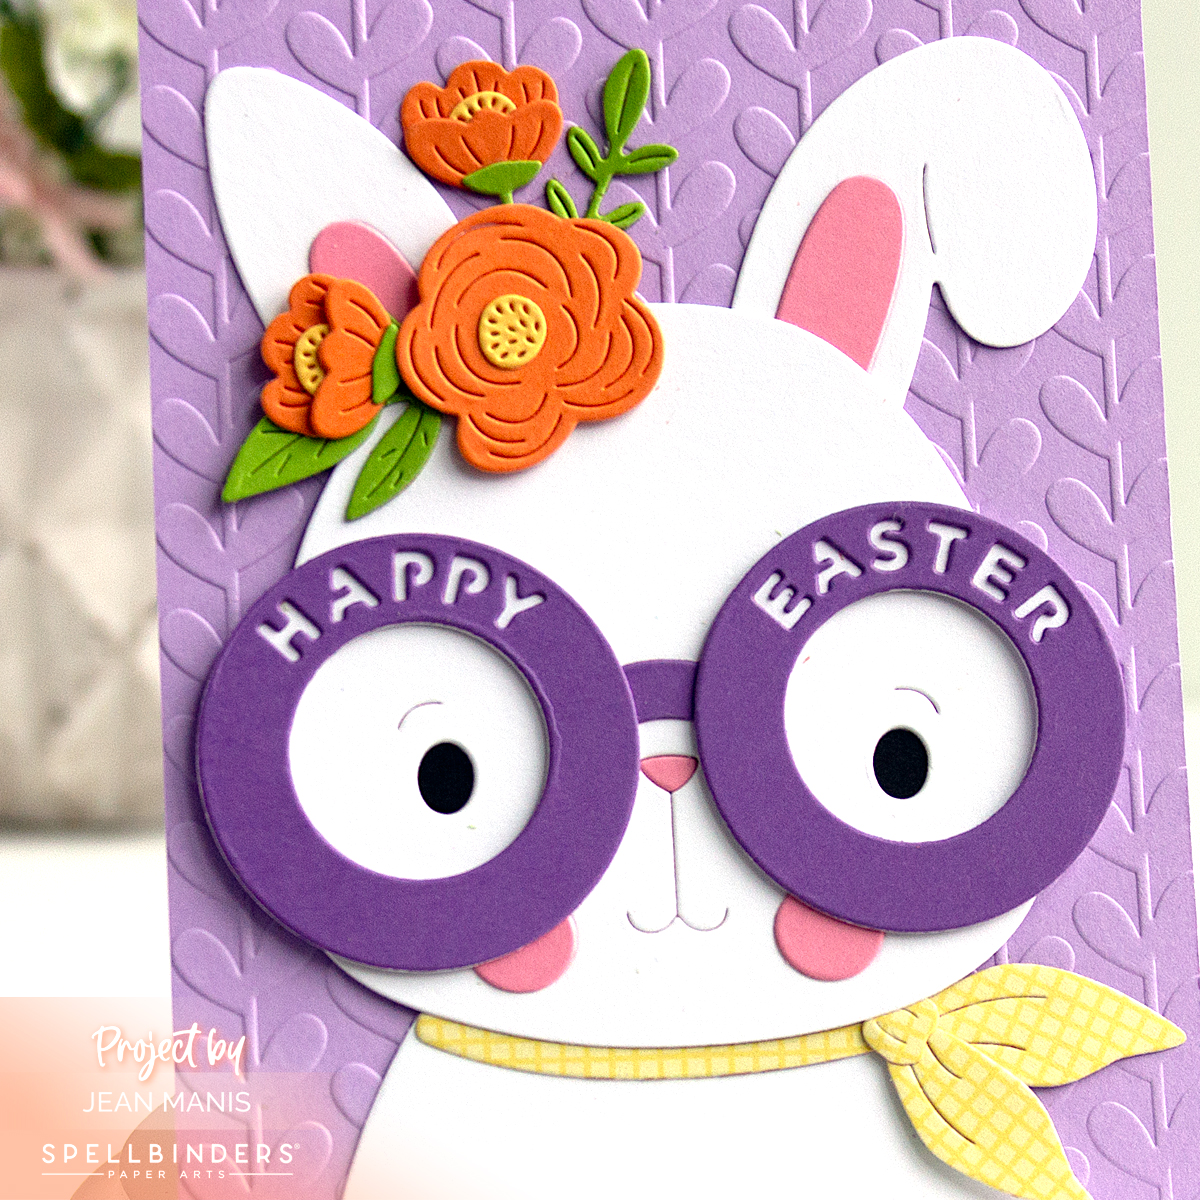
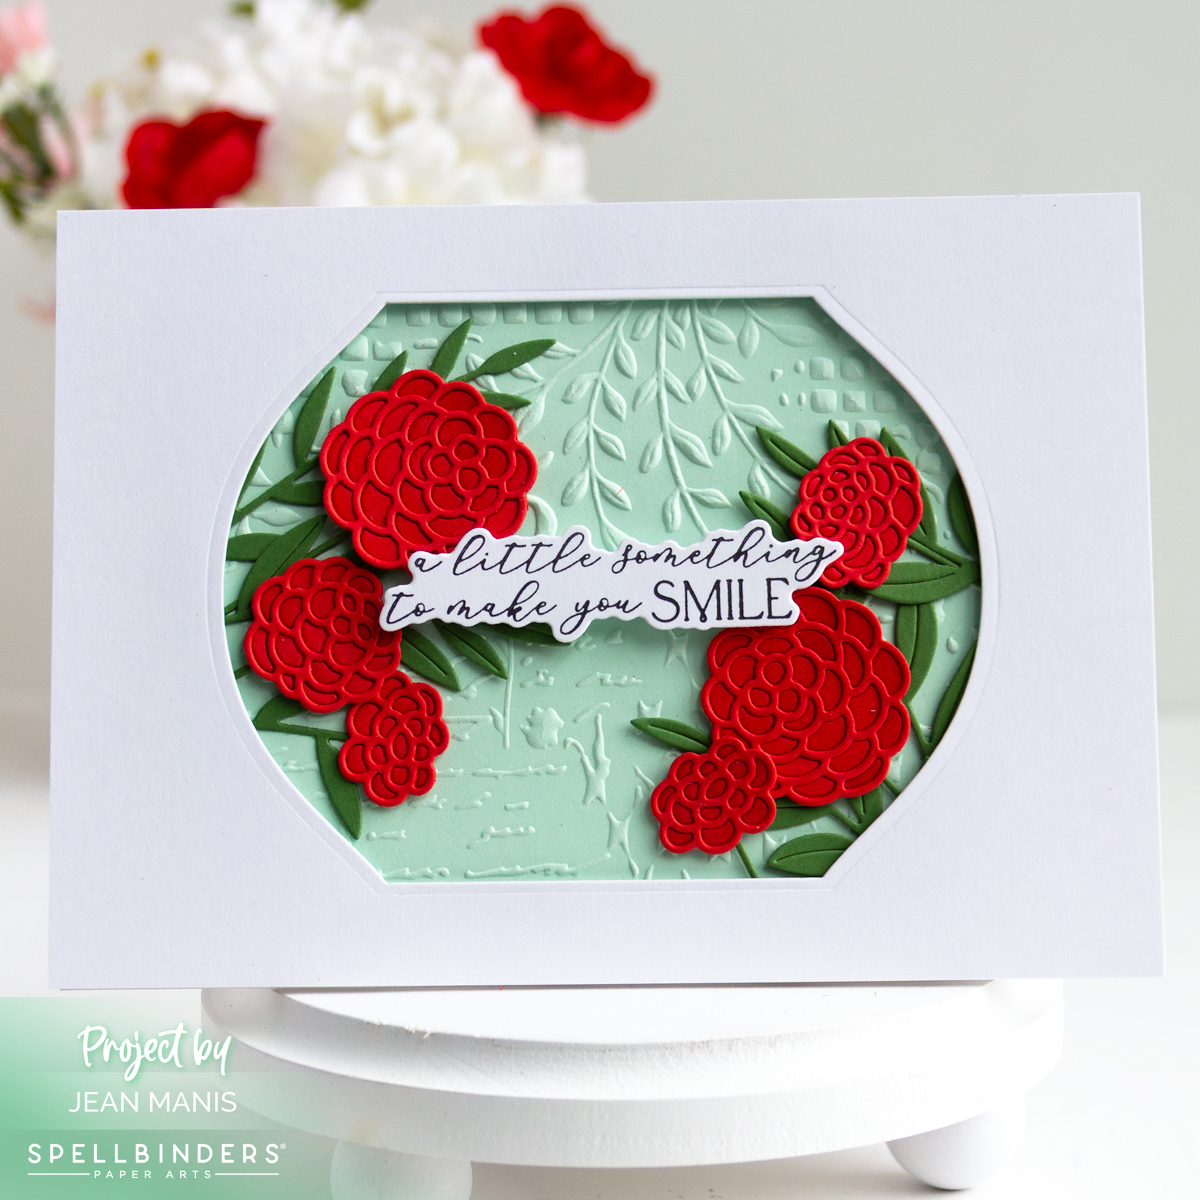
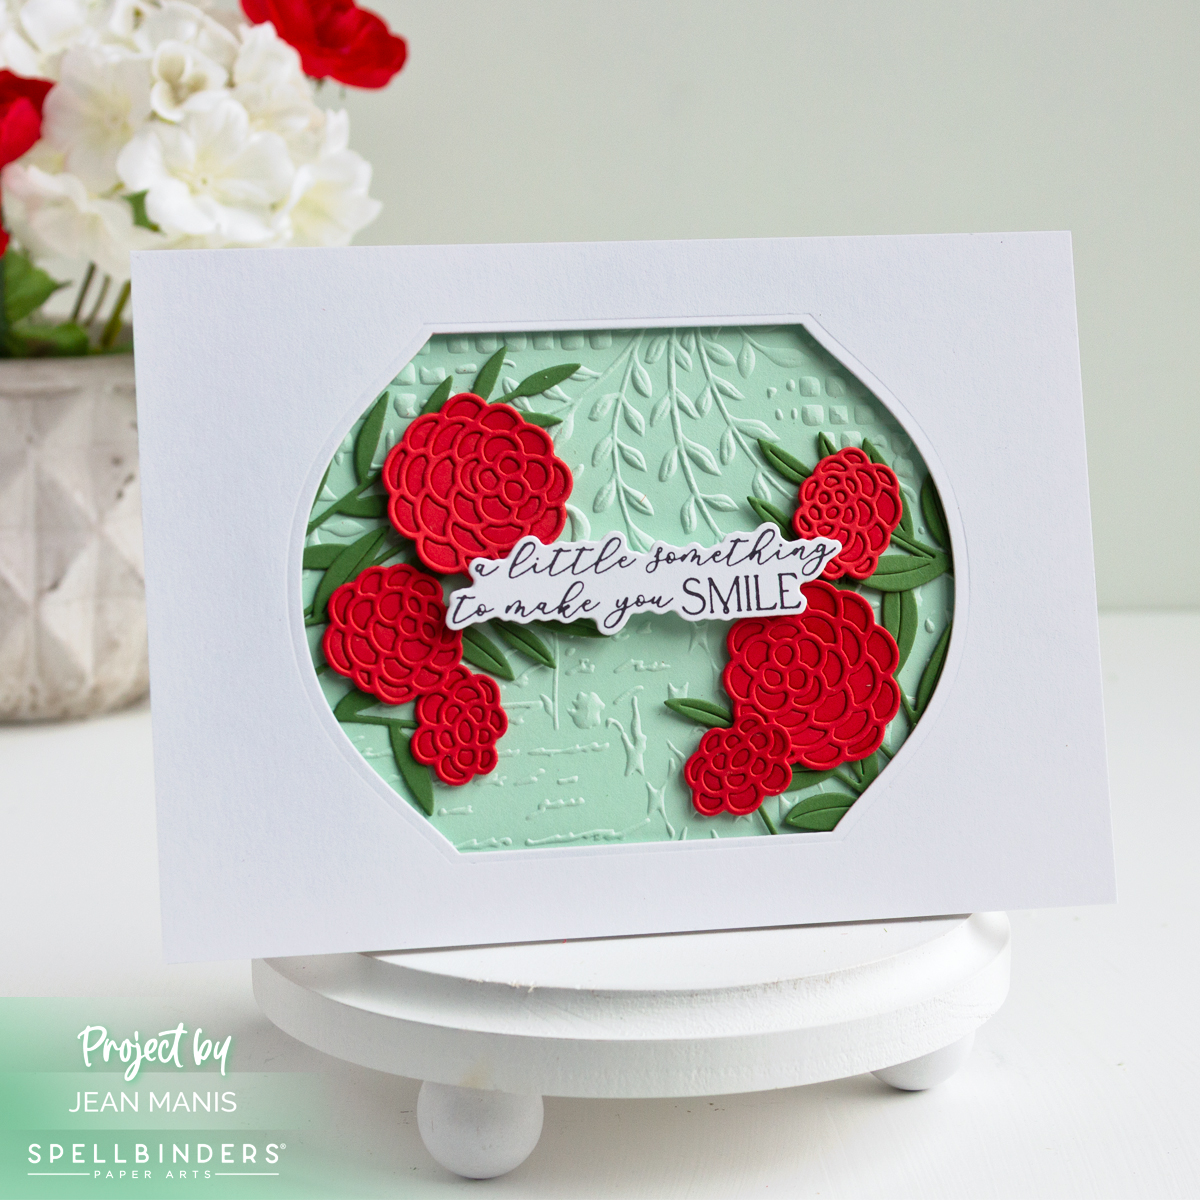
Relaxing Card to Brighten Winter

Hello! Today, I am sharing a card created with the January Die of the Month for Spellbinders. The structure of the die did most of the work. The set cuts a graceful fan shape, and I dry-embossed the individual fan pieces to add subtle texture before layering them together. The floral elements sit on top of the fan. I chose a rich palette of deep, saturated colors from the ColorWheel cardstock that feel especially welcome this time of year. A simple sentiment is included at the bottom of the frame, keeping the emphasis on the design and texture of the card.

Spellbinders | January 2026 Die of the Month

    • Create an A-2 size card base from Violet cardstock.
    • Use the Sunny Stems set to cut the fan pieces from Gold Treasured cardstock. Emboss the interior pieces of the fan with the Cloud Nine folder, the January 2026 embossing folder offering, and add to the fan frame. Add the assembly to the card base.
    • Cut the Sunny Stems from a variety of cardstock colors and assemble. Add to the frame.
    • Heat-emboss in gold the Fair Winds sentiment and cut with the coordinating die. Add to the card with foam squares.

Spellbinders | January 2026 Die of the Month


Spellbinders | Hummingbirds Birthday Card

Hello! Birthdays are one of those card-sending occasions that never go out of style, and that’s part of what makes them so satisfying to create. For this card, I used the Spellbinders January Large Die of the Month, Hummingbirds Delight, and leaned fully into color, which is a welcome change this time of year. The die set includes a beautiful frame, which makes it easy to anchor the design and add a sentiment along the bottom.

Spellbinders | Hummingbirds Birthday Card

While I chose a birthday greeting here, this design easily adapts to many occasions including thank you or thinking of you, by swapping out the sentiment.

    • Create an A2-size card base from Blue Spruce cardstock.
    • Using the Large Die set frame die, cut the frame, leaves, flowers, and hummingbirds from a variety of cardstock colors. Assemble as necessary.
    • Add the floral piece to the backside of the frame.
    • Dry-emboss Seaside cardstock with the Cloud Nine folder and secure to the bottom portion of the frame. Place the assembly on to the card base. You need the top to be open to tuck the elements under the frame.
    • Add the elements to the top and sides of the frame. Secure frame to the dry-embossed background.
    • Press the You are Everything sentiment and add to the frame.
    • Add hummingbirds with foam squares.

Spellbinders | Hummingbirds Birthday Card


Tim Holtz | Winter Skates

Hello! This mixed-media Christmas card was created using Tim Holtz supplies and features a pair of die-cut ice skates filled with festive holiday greenery. A classic sentiment completes the design, giving the card a timeless winter feel that’s both nostalgic and elegant.

Tim Holtz | Winter Skates

    • Dry-emboss an A2-size panel of watercolor cardstock colored with Tumbled Glass Distress Spray with a snowflake embossing folder. (I used the now-retired Sizzix Tim Holtz Simple Snowflakes 662432 folder.) Add to a card base.
    • Heat-emboss in silver the Mixed Media 32 (aka Sketch Greenery) sentiment on watercolor cardstock and cut with a label die (from the now-retired Tag Collection set 658784). Add to the prepared base.
    • With the Vault Winter Wishes set, cut the skates. Color, assemble, and add crochet thread for the laces.
    • With the Vault Holiday Greens and Christmas Minis sets, cut greenery and berries from watercolor cardstock color with Distress Sprays. Assemble. Add Snowfall Grit paste to some of the greens.
    • Add the assembled skates to the card base with the greenery arranged in the skates.

Tim Holtz | Winter Skates


Tim Holtz | Vintage Holiday Card

Hello! Today’s card leans into the vintage style of Tim Holtz, which is a departure from my usual look. I used the Tim Holtz sled die as the focal point, cutting it from cardstock that I inked and distressed for a worn, mixed media feel. The snowflake-embossed background adds texture, and the “Merry and Bright” sentiment brings in holiday cheer. I loved playing with layers, texture, and inky color to create that signature Tim Holtz weathered charm.

Tim Holtz | Vintage Holiday Card

    • Dry-emboss and A2-size panel of textured cardstock with a snowflake embossing folder. I used the now-retired Sizzix Tim Holtz Simple Snowflakes 662432 folder. Add to card base.
    • Cut the Vintage Sled from a variety of cardstock colors and textures. Assemble.
    • Stamp the Tiny Text Christmas sentiment in Potting Soil ink on off-white cardstock that has been colored with Antique Linen ink. Cut with a banner die.
    • Add assembled sled to the card base with foam adhesive. Add sentiment to sled with foam adhesive.

Tim Holtz | Vintage Holiday Card


Spellbinders | Brunch-Themed Friendship Card

Hello! Today, I’m sharing a playful friendship card created with the Spellbinders November Small Die of the Month set, which is all about brunch! The set includes the cutest breakfast items, each complete with arms, legs, and sweet expressions. I’ve used the waffle, a strip of bacon, and a sunny-side-up egg. The card is a fun and friendly way to invite someone to catch up, share a meal, or simply brighten their day.

Spellbinders | Brunch-Themed Friendship Card

    • Create a 5″ x 7″ card base.
    • Cut a 4″ x 6″ panel of patterned paper.
    • Cut the focal items from a variety of cardstock colors with the Small Die of the Month set. Assemble. (Note: I trimmed the banner sentiment on either end to shorten it.)
    • With a circle die, cut three circles in coordinating colors and dry-emboss with the Tiny Dots folder. Attach the circles to the patterned paper and trim. Mat the panel on to a slightly larger panel of black cardstock. Add assembly to the prepared card base.
    • Add items to the circles with adhesive foam squares.

Spellbinders | Brunch-Themed Friendship Card