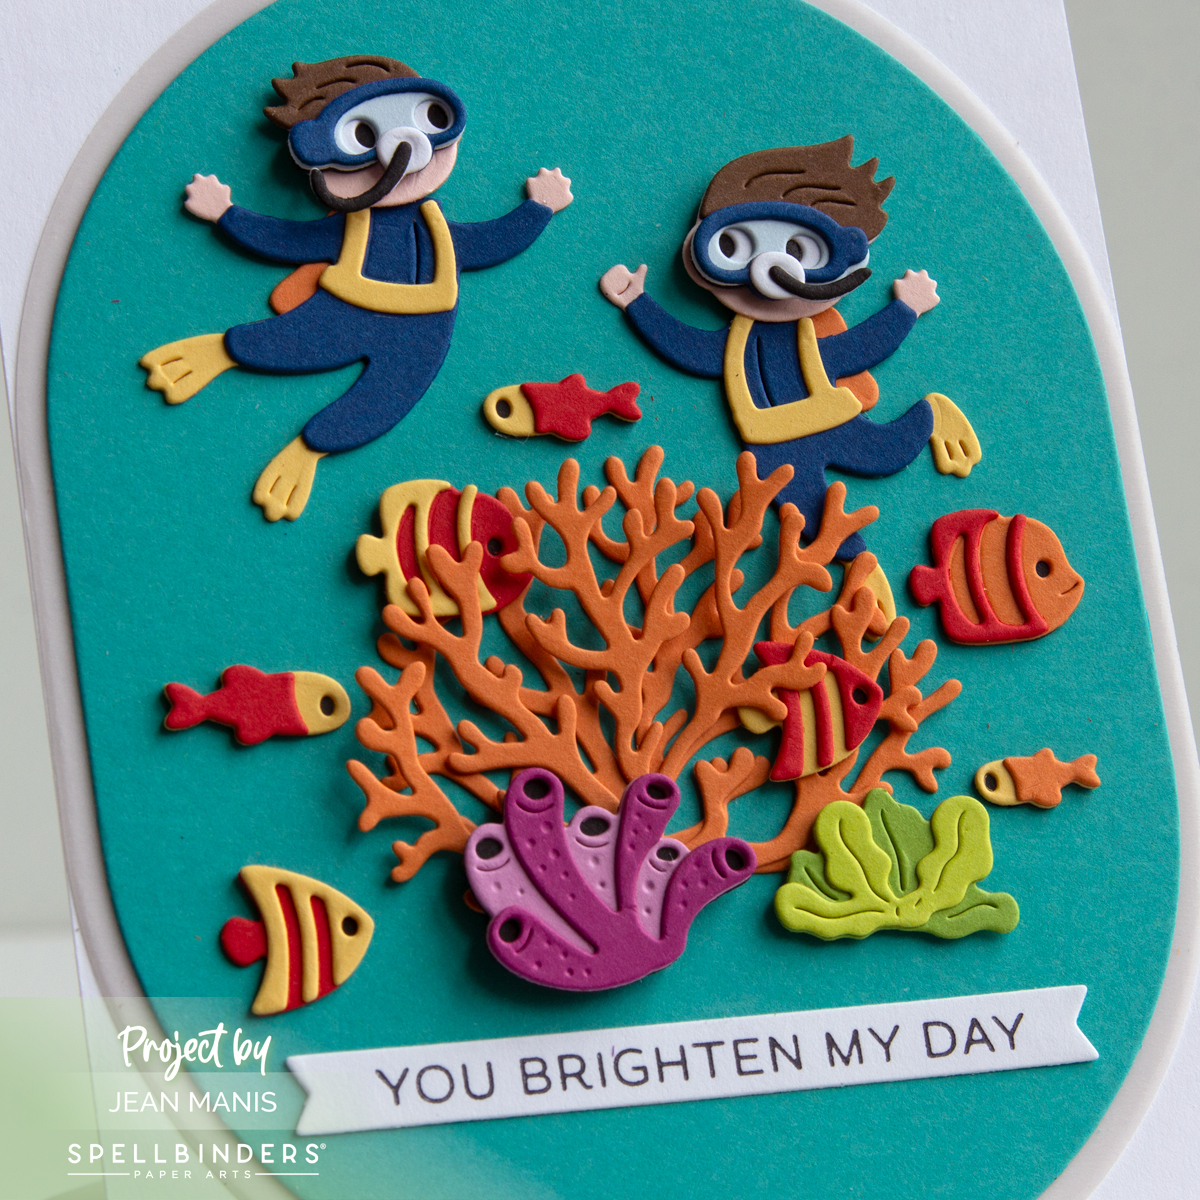
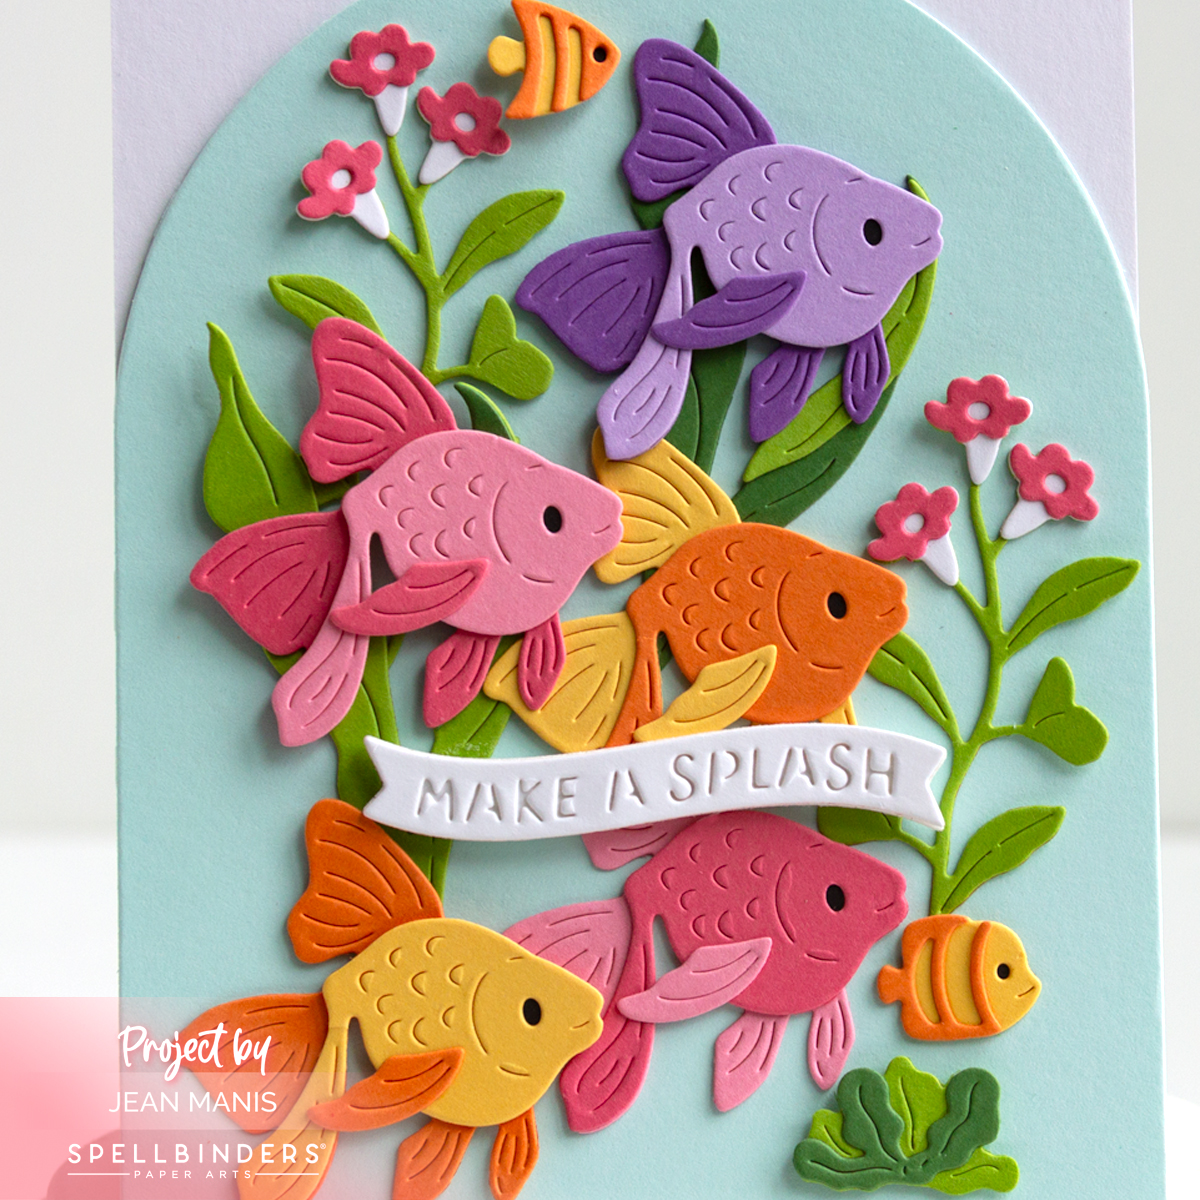
Monster Love: Easy Valentine’s Day Card

Hello! Valentine’s Day is the perfect time to get creative, and what’s more charming than a playful monster spreading love? This card, made with the Spellbinders December 2024 Large Die Kit Club Monster Love Pop set, combines an adorable die-cut monster, a heart accent, and the simple sentiment “Be Mine.” With a patterned paper background and a die-cut frame to spotlight the monster, this card is as easy to make as it is delightful to give.

Spellbinders December 2024 Large Die Kit Club Monster Love Pop

Monster Love: Easy Valentine's Day Card

    • Create a patterned paper frame (Love Notes) with a die in the Underwater Tunnel set. Add to an A2-size card base with foam adhesive.
    • Cut the monster, heart, and sentiment with dies in the Monster Love Pop set from a variety of cardstock colors. Also cut glitter foam with the heart and monster body. Assemble. The glitter foam provides dimension.
    • Add heart, monster, and sentiment to center of card.

Monster Love: Easy Valentine's Day Card

With its whimsical design, easy assembly, and the use of patterned paper to add visual interest, this card is perfect for crafting a heartfelt Valentine with minimal effort!


Bear, Santa & Reindeer Gift Tags

Hello! Adding a handmade touch to holiday gifts makes them even more special! Today, I’m sharing a set of three Christmas gift tags I created using Spellbinders dies. The tags feature a bundled polar bear, a classic Santa, and a festive reindeer—all designed to coordinate with the gift wrap for presents I’ve prepared for my granddaughter. Whether you’re crafting for loved ones or adding a personal flair to your own gift-giving, these tags are sure to inspire!

Scroll for Early Black Friday sales at Spellbinders and Hero Arts!

I used three sets from the Merry Mug & Circle Delights Collection, (introduced in 2023)—Festive Ornaments, Whimsical Winter Critters, and Santa’s Festive Circle Crew—to cut the pieces for the gift tags.

Polar Bear Gift Tag

Santa Gift Tag

Reindeer Gift Tag

Hero Arts Early Black Friday 2024


Sugarplum Wishes Card with Santa Slippers

Hello! The versatility of Cozy Toes Slippers set shines again in my latest creation! The October 2024 Large Die of the Month offering at Spellbinders is now available for individual sale.  This time, I’ve crafted a festive card featuring Santa slippers, paired with the whimsical sentiment “Sugarplum Wishes.” This is the third card I’ve made with this set, showcasing how easy it is to use the same overall design while creating different looks. Check out my earlier blog posts to see how I used this versatile set to create cards featuring penguin and reindeer slippers for more cozy inspiration!

Sugarplum Wishes Card with Santa Slippers

    • Cover an A-2 size card base with patterned paper.
    • With the Cozy Toes Slippers set, cut slippers, legs, and pajamas from a variety of cardstock colors, prints, and textures. Assemble.
    • Add elements to the card front with adhesive. Trim as necessary.
    • Press the sentiment in black ink on Snowdrift cardstock and cut with the coordinating die. Add to the card with foam adhesive.

Sugarplum Wishes Card with Santa Slippers


Penguin Card with Let It Snow Sentiment

Hello! After sharing a roundup of snowy techniques for handmade cards in this post, I couldn’t resist using those ideas to create my own! This whimsical penguin card, complete with a “Let It Snow” sentiment, brings together some of my favorite methods for capturing the magic of winter. Scroll for Early Black Friday sales at Spellbinders and Hero Arts!

Penguin Card with Let It Snow Sentiment

    • To begin, create an A2-size card base from textured white cardstock.
    • Cut Snowdrift cardstock with the Large Emerald Cut Scored die in the Emerald Cut Labels set and add to the card base.
    • Use the Large Label Insert die in the Emerald Cut Labels set to cut patterned paper for the snowy sky.
    • Use that same die to cut white glitter cardstock.
    • To create a snowy ground for the scene, cut the white glitter cardstock piece along the top with one of the Color Block Scenic Scape dies. Adhere to the patterned paper insert and add assembly to the card base.
    • Cut Dancin’ Penguin from a variety of cardstock colors and assemble.
    • Press the sentiment in black ink on Snowdrift cardstock and cut with the coordinating die.
    • To create the snowflakes, cut white glitter foam with dies in the Christmas Wreath Add-Ons set.
    • Add penguin to card with foam squares, adhere the sentiment and snowflakes with glue.

Penguin Card with Let It Snow Sentiment

This card combines die-cut snowflakes, snowflake-patterned paper, and a glitter cardstock hill to create a layered, snowy scene full of winter charm.

Hero Arts Early Black Friday 2024


Traditional Christmas Mantel Card

Hello! A decorated mantel embodies the warmth and joy of the holiday season, making it the perfect inspiration for a Christmas card. Mantels are often the focal point of a home, traditionally adorned with garlands, stockings, and festive decor to set the tone for cozy holiday gatherings. This handmade card captures that charm with a beautifully crafted Christmas mantel, created entirely with Spellbinders products. The embossed background adds depth and elegance.

FYI – Black Friday Savings have begun at Spellbinders!

Traditional Christmas Mantel Card

    • To begin, create an A2-size card base with glitter gold cardstock.
    • Cut a rectangle from Snowdrift cardstock with the largest die in the Nestabilities set.
    • Dry-emboss the rectangle with the 3D Vintage Ornaments folder and adhere to the card base.
    • With dies in the Mantel Village and Mantel Decorations sets, cut the mantel, houses, reindeer, banner, trees, and greenery from a variety of cardstock colors. Assemble individual elements.
    • Cut foam with the mantel die and adhere to the back of the die-cut mantel.
    • To create depth on the mantel, attach the assembled houses and sentiment banner to the back of the mantel. Adhere the greenery to the reindeer and then attach that assembly to the front of the mantel.
    • Finally, add the assembly to the card base, adding the trees to the card base on either side of the houses.

Traditional Christmas Mantel Card

I previously shared a card created with these products HERE.