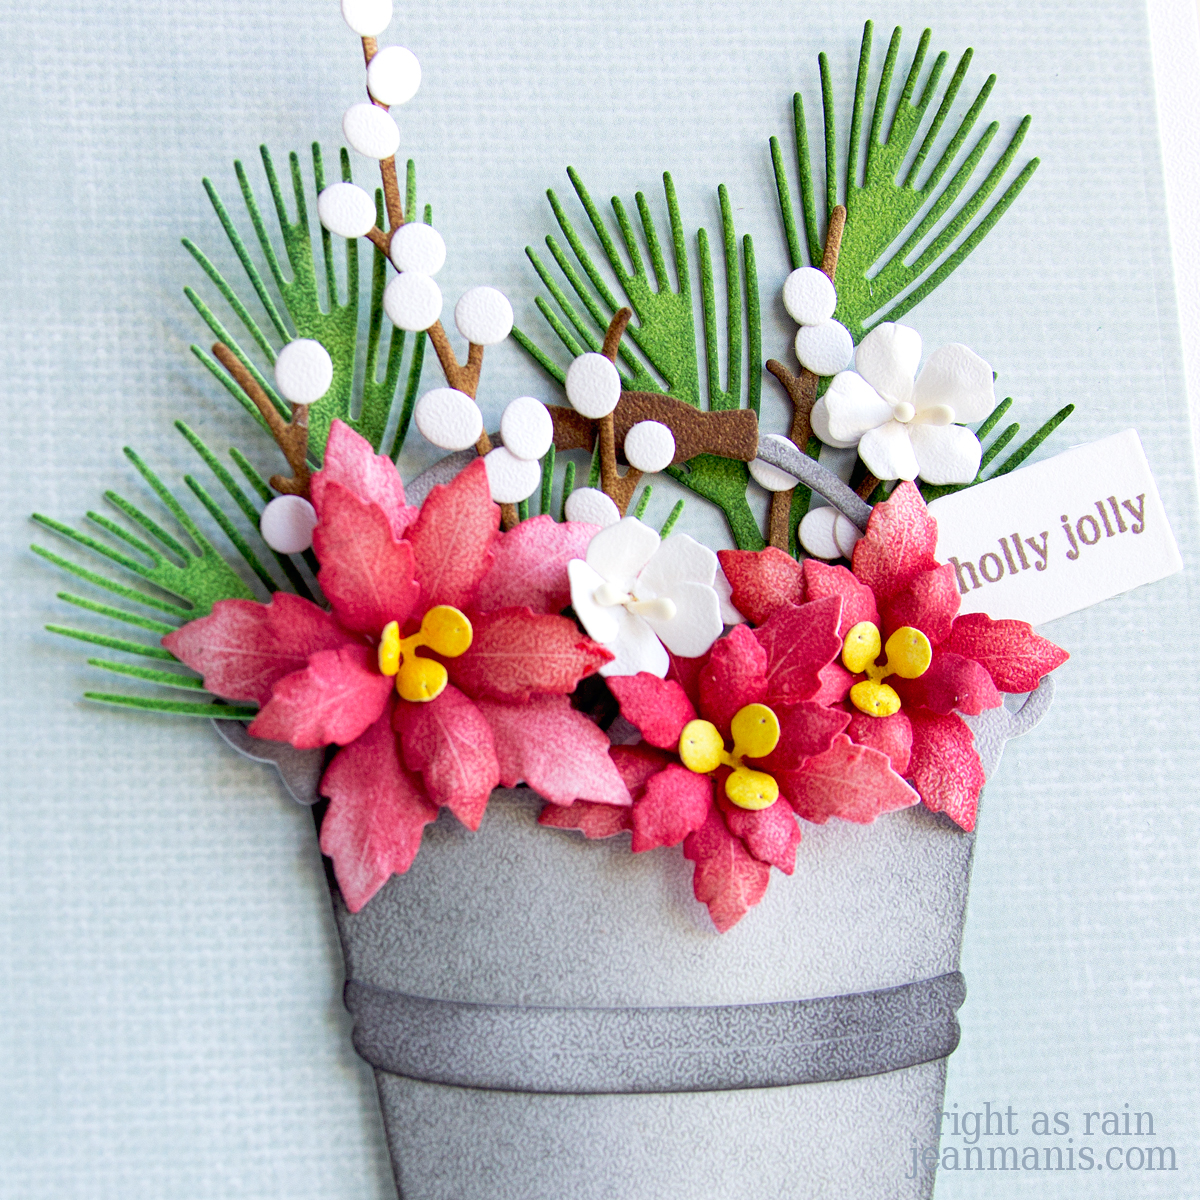
Spellbinders | October 2023 Large Die of the Month

Hello and happy October! Today, I am sharing a Christmas card crafted with the Spellbinders October Large Die of the Month set – “Christmas Boutique” – slightly modified to make a charming house (rather than a storefront) adorned with Christmas florals. Read on to discover how to create the card. You can also head HERE for a tutorial on how to use the set.

Spellbinders | October 2023 Large Die of the Month

    • Glimmer foil blue cardstock in Gold with a sentiment in the Glitter Wishes set. The Large Die of the Month set includes a sentiment die to create the word “Noel.” I decided to use the glimmer-foiled sentiment at the base of the card front and consulted my post Prepping for Christmas Card Making for sentiment options. Trim panel to 5 1/2″ wide by 4 7/8″ tall and add to a card base.
    • With a die in the Large Die of the Month set cut the house (boutique) base from green cardstock. Cut again from red cardstock and trim off the foliage on top. Cut floral and house pieces from a variety of cardstock colors. Add Rustic Wilderness ink to green cardstock elements (holly leaves, other leaves, Christmas trees) to differentiate from the green base color. Add enamel dots in red and white to the Christmas trees. Assemble.
    • Add assembled house to card front.

Spellbinders | October 2023 Large Die of the Month


Spellbinders | Deco Holiday Embossing

Hello! Today, I am sharing a CAS, holiday card showcasing the Spellbinders Deco Holiday embossing folder, used to dry-emboss a pattern of squares and paired with a glimmer-foiled sentiment.

Spellbinders | Deco Holiday Embossing

  • Using the 1″ die in the Everlasting Squares set, I cut twenty cardstock squares of purple, teals, and blues. I arranged the squares and taped them together on the back before dry embossing with the Deco Holiday folder. I added the panel to a Snowdrift cardstock base measuring 4 1/4″ x 5 1/4″.
  • Using one of the sentiments in the Christmas Mailbox Greetings set, I glimmer foiled Snowdrift cardstock in silver. I cut the sentiment with the 2″ die in the Everlasting Circles set and attached it to a circle cut from vellum with the 2 1/4″ die.
  • I attached the sentiment circle to the card center with foam adhesive and embellished with snowflakes cut with the Holiday Decorations set from white foam glitter.

Spellbinders | Deco Holiday Embossing

You can read more about card backgrounds created with embossing folders HERE.

Take advantage of the Spellbinders Fall Warehouse Sale that runs now through September 21!

Spellbinders Fall Warehouse Sale 2023


Spellbinders | You’re on My Mice List

Hello! Today, I am sharing a whimsical Christmas card featuring a charming mouse dressed in hot pink and white winter clothing, complete with a present in her hands. The background showcases an art deco-inspired dry-embossed pattern, adding a touch of timeless sophistication to the design. The Spellbinders Dancin’ & Giftin’ Mouse set is part of the Dancin’ Christmas Collection, which includes four die sets (mouse, penguin, gingerbread people, and figgy pudding), an embossing folder, and a sentiment stamp set. Read on to discover how to create the card.

Spellbinders | You're on My Mice List

Spellbinders | You're on My Mice List


Spellbinders | Cruising into Christmas Cheer

Get ready to smile, because here comes Santa… in gnome form! As the holiday season draws near, we’re steering into the festive spirit with a card featuring the Spellbinders Gnome Drive Holiday die set, part of the Gnome Drive Collection. The charming gnome dressed for Christmas has taken the wheel of a red velvet sports car.

Spellbinders | Gnome Drive Holiday

I paired the Gnome Drive Holiday set with a glimmer-foiled sentiment from the Glitter Wishes set in gold, cut with a snowbank die in the Warm Wishes Camper set. As I discussed in this post – “Prepping for Christmas Card Making” – this set of sentiment foil plates was one of my most used.

To create texture, I dry-embossed gray cardstock with the Stargazer folder for the background and added it to a card base. Note: unless otherwise stated, my cards are A2-size.

Once the gnome, car, package, and tree assembly were in place, I embellished the card with snowflakes cut from white glitter foam.

Spellbinders | Gnome Drive Holiday

Spellbinders | Gnome Drive Holiday

Looking for Halloween inspiration from the Gnome Drive Collection? Check out this post.

Spellbinders Save $25 Off $125 Order


Winter Wonderland | Lawn Fawnatics Challenge

Hello! I am delighted to be participating in the Lawn Fawnatics’ Christmas in July Challenge for which I have created a winter-themed card.

Winter Wonderland | Lawn Fawnatics Challenge

Lawn Fawnatics #153

  • For the challenge, I created a winter scene background featuring the Lawn Fawn Build-A-Cabin perched upon a gentle snowbank and a night sky adorned with stenciled snow. I previously shared cards showcasing the Build-A-Cabin HERE and HERE. Crafting the cabin from Sugar Plum cardstock added playfulness to the scene.
  • I stamped images from the adorable Lawn Fawn Snowball Fight set and brought them to life with watercolors. Mice throwing snowballs adds whimsy to the scene.
  • After applying white paste through the Snow Flurries Background, I sprinkled on Sparkle Dust Glitter and set the panel aside to dry.
  • When I assembled the scene, I used foam adhesive to add depth to the elements.
  • To embellish, I added Mini Snowflakes cut from Pop Up white glitter foam.

Winter Wonderland | Lawn Fawnatics Challenge