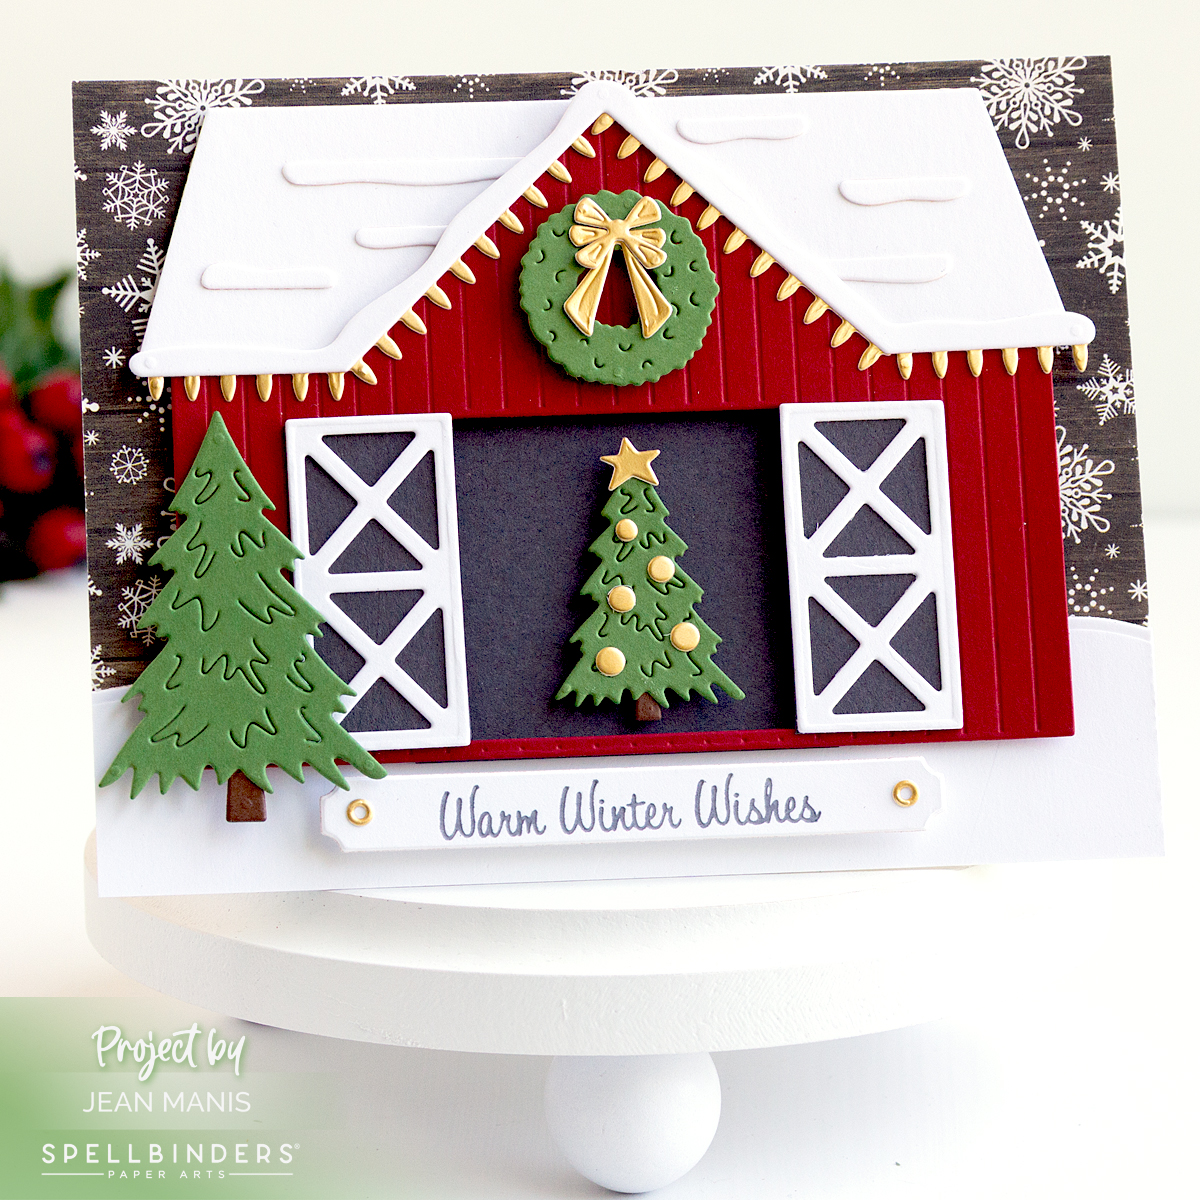
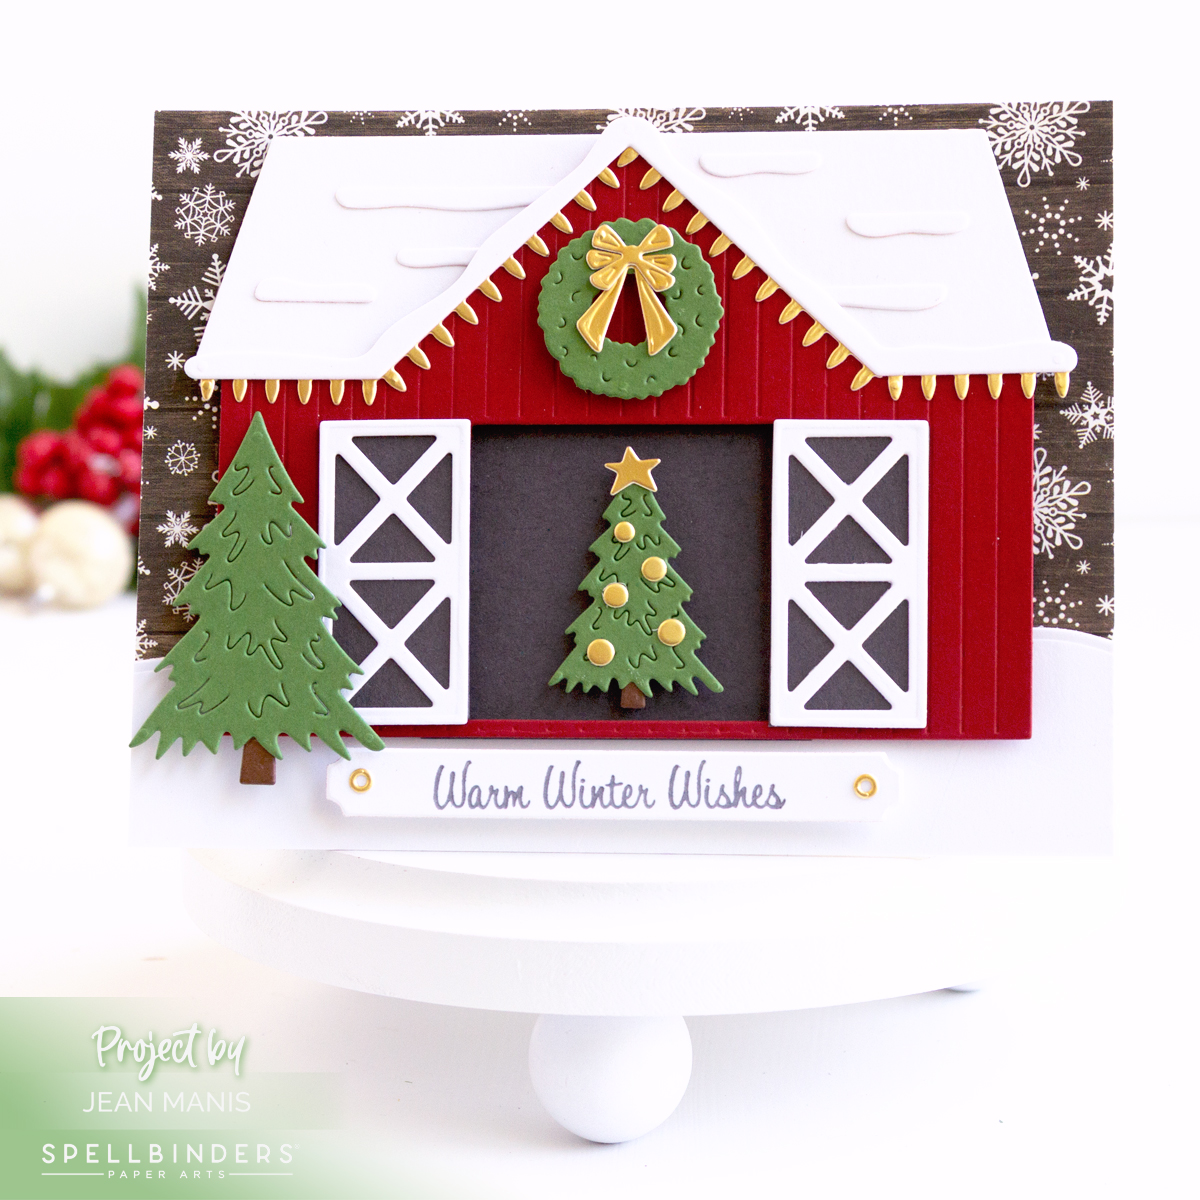
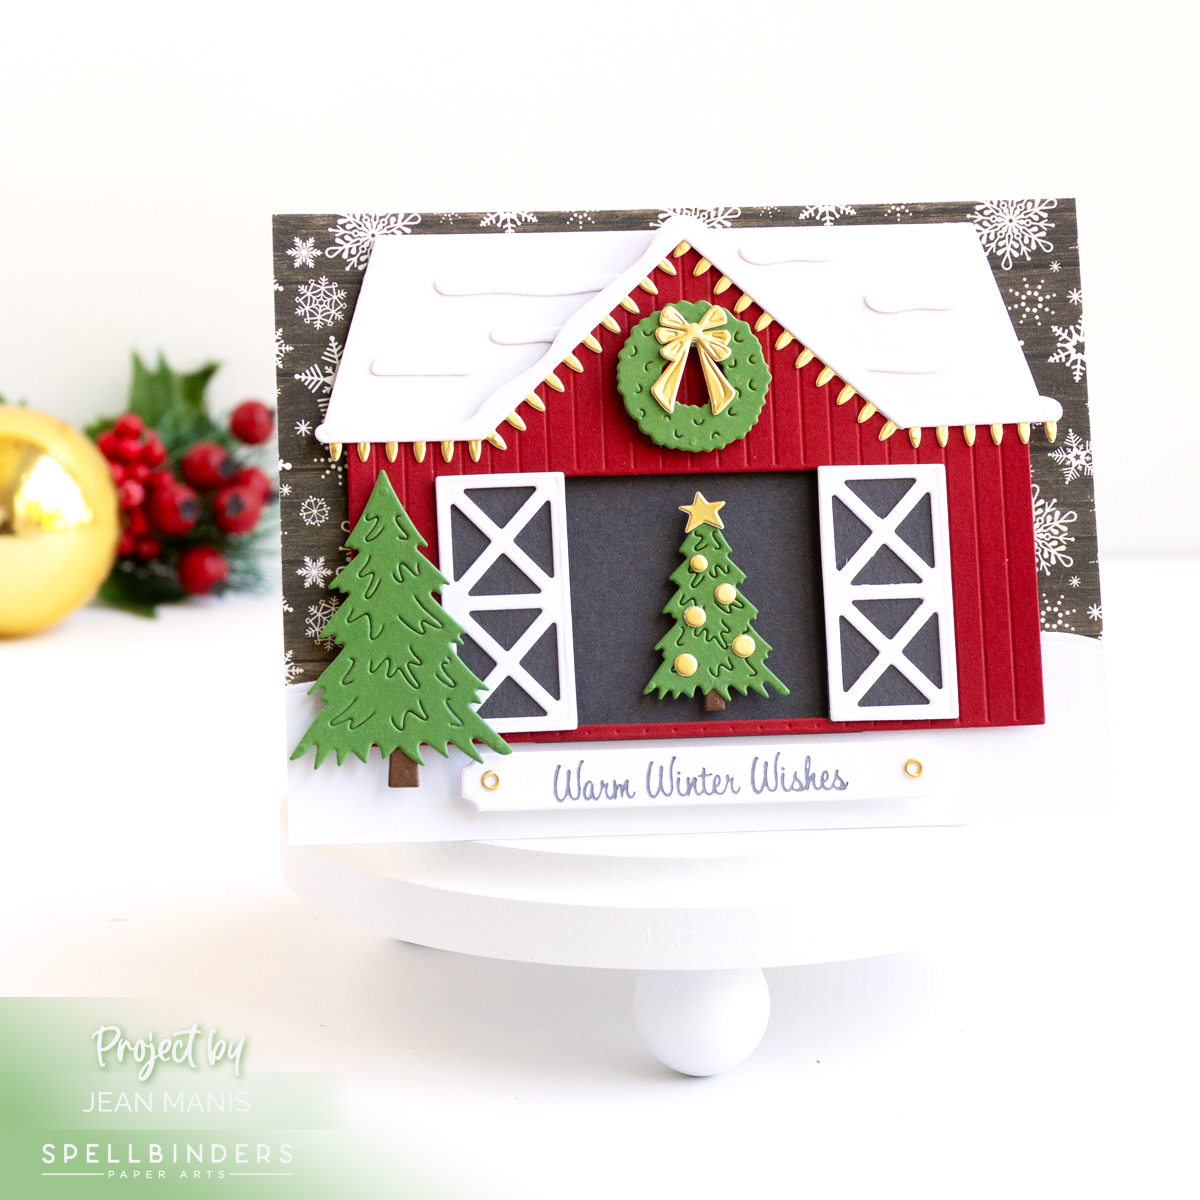
Spellbinders | Reindeer Mug Christmas Card

Hello! There’s nothing like a warm drink on a winter day, and this handmade card captures that feeling with a festive reindeer-shaped mug, created with the July Small Die of the Month Club kit at Spellbinders. The sentiment “snuggle season” perfectly sets the tone, while the background patterned paper adds to the holiday theme. The versatile Cocoa Greetings” kit also includes dies to create Santa and penguin mugs—plenty of options for festive creativity!

Spellbinders | Reindeer Mug Christmas Card

    • Cover an A2-size card base with a patterned paper panel.
    • Cut the mug with dies in the Cocoa Greetings” set. Assemble.
    • Press sentiment and cut with its coordinating die.
    • Add assembled mug and sentiment to card base with foam adhesive.

The Christmas mug makes an adorable and substantial focal point, and the creative fun comes in deciding which mug to build, what colors to use, and how to tie everything together with background and accents for a festive, personal touch.

Spellbinders | Reindeer Mug Christmas Card


Spellbinders | Warm Cocoa Wishes

Hello! I’m embracing the spirit of Christmas in July with a cozy winter-themed card created with the July 2025 Large Die of the Month kit from Spellbinders. The “Mugs & Mittens” die set includes several winter motifs for the cocoa topping including a snowman, Santa, and snowflake. The sentiment “Warm Cocoa Wishes” sets the tone for the season-to-come, while a snowflake dry-embossed background adds texture and depth.

Spellbinders | Warm Cocoa Wishes

    • Dry-emboss an A2-panel of Breeze cardstock with the Flurry of Snowflakes 3D folder. Add to a card base.
    • With the die set, cut cardstock for mittens, sweater sleeves, sentiment, mug, cocoa, and cocoa snowflake. Assemble.
    • Add assembled items to card base.

Spellbinders | Warm Cocoa Wishes


Winter Wonderland: A-Frame House Card

Hello! Are you embracing the magic of the winter season? This winter-themed card showcases an A-frame house set in a serene, snowy forest. The festive sentiment “Fa La La La” adds holiday cheer.

Winter Wonderland: A-Frame House Card

I revisited a previous design but gave it a fresh twist by using different colors and changing how I added snow to the scene. I explored a variety of techniques for adding snowy details to cards HERE.

    • Dry-emboss light-teal cardstock with a snow folder. I used an embossing folder made by Sizzix, now retired. Add panel to A2-size card base.
    • Cut a snowbank from Snowdrift cardstock and add to the background. I used a die in the now-retired Spellbinder Camper Life set.
    • Cut the Layered Narrow Pines from Snowdrift cardstock. Each tree has two parts. To create a snow effect, apply Cosmic Shimmer – Fluffy Stuff – White to the overlay pieces and heat set. Assemble.
    • Cut the A Frame House from a variety of cardstock colors. I used a Taylored Expression brick embossing folder to add texture to the chimney. Add Cosmic Shimmer – Fluffy Stuff – White to the top of the chimney and the roof and heat set.
    • With dies in the Lawn Fawn Build-A-House Beach Add-On and Build-A-Cabin sets, cut windows and a light. Assemble and add to the house.
    • Press the sentiment in Thunder ink (Jet Set ink set) with the Mistletoe Greetings plate and cut with the coordinating plate.

Winter Wonderland: A-Frame House Card

I am entering this card into the Simon Says Stamp Challenge with a theme of Cold & Frosty.


Simon Hurley | Deck the Halls

Hello! Today, I’m sharing a festive card created with Simon Hurley’s layering stencil – Mod Christmas Trees. This design features three inked Christmas trees adorned with gold decorations, adding depth and shimmer. The “Deck the Halls” sentiment ties the design together, complementing the trio of decorated trees.

Simon Hurley | Deck the Halls

    • Create an A-2 size card base from Pomegranate cardstock.
    • Stencil the first layer of trees with Later Gator green ink.
    • Next, add Rustic Wilderness ink to all three trees with the half tree portion of the Mod Christmas Trees stencil.
    • Stencil gold pigment ink (I used Color Box) through the stencil for the tree trunks.
    • Next add the three gold pastes (left to right) – Slippery When Wet Astro Paste, Slippery when Wet Lunar Paste, and Golden Hour Solar Paste. Once dry, trim the panel and mat with gold cardstock. Add assembly to card base.

Simon Hurley | Deck the Halls

This Clean and Simple card design shines with its simplicity, but achieving that effortless look takes attention to detail and a steady hand.


Snow Much Fun | Waffle Flower

Hello! Today, I am sharing a winter-themed, holiday card created with one of the Postage Collage stencils offered at Waffle Flower. I have seen creations with these stencils for months now and wanted to give the products a try. The Waffle Flower Postage Collage Snowy stencil set makes it easy to layer winter mountain scenes with its multi-part stencil design. You can customize the colors for a different look, and the “stamps” can be separated for more creative possibilities.

Snow Much Fun | Waffle Flower

    • To begin, I swatched a number of different inks in my collection looking for purple, red, two shades of green, and two shades of blue. Knowing which inks I would use for the elements saved a lot of time. Scroll for the entire list of inks I used.
    • I cut the stenciled scenes with the Postage Collage die. Next time I will probably cut the cardstock first and then stencil. If you have used these products, what did you do – stencil first or cut the collage first?
    • I finished the card with one of the Snow Cheer Sentiments, which I cut with its coordinating die. I was particularly impressed that the sentiments are numbered on the packaging and the coordinating dies are etched with the corresponding number. All in all, I was very impressed with all of the Waffle Flower packaging.

Snow Much Fun | Waffle Flower

Ink List – Mountains: Taylored Expressions Jelly Donut; Sky: Distress Ink Tumbled Glass; Lake: Taylored Expressions Sprinkles; Trees: Simon Hurley Later Gator, Distress Ink Rustic Wilderness; Cardinals: Memento Love Letter, Distress Ink Aged Mahogany, Distress Ink Black Soot