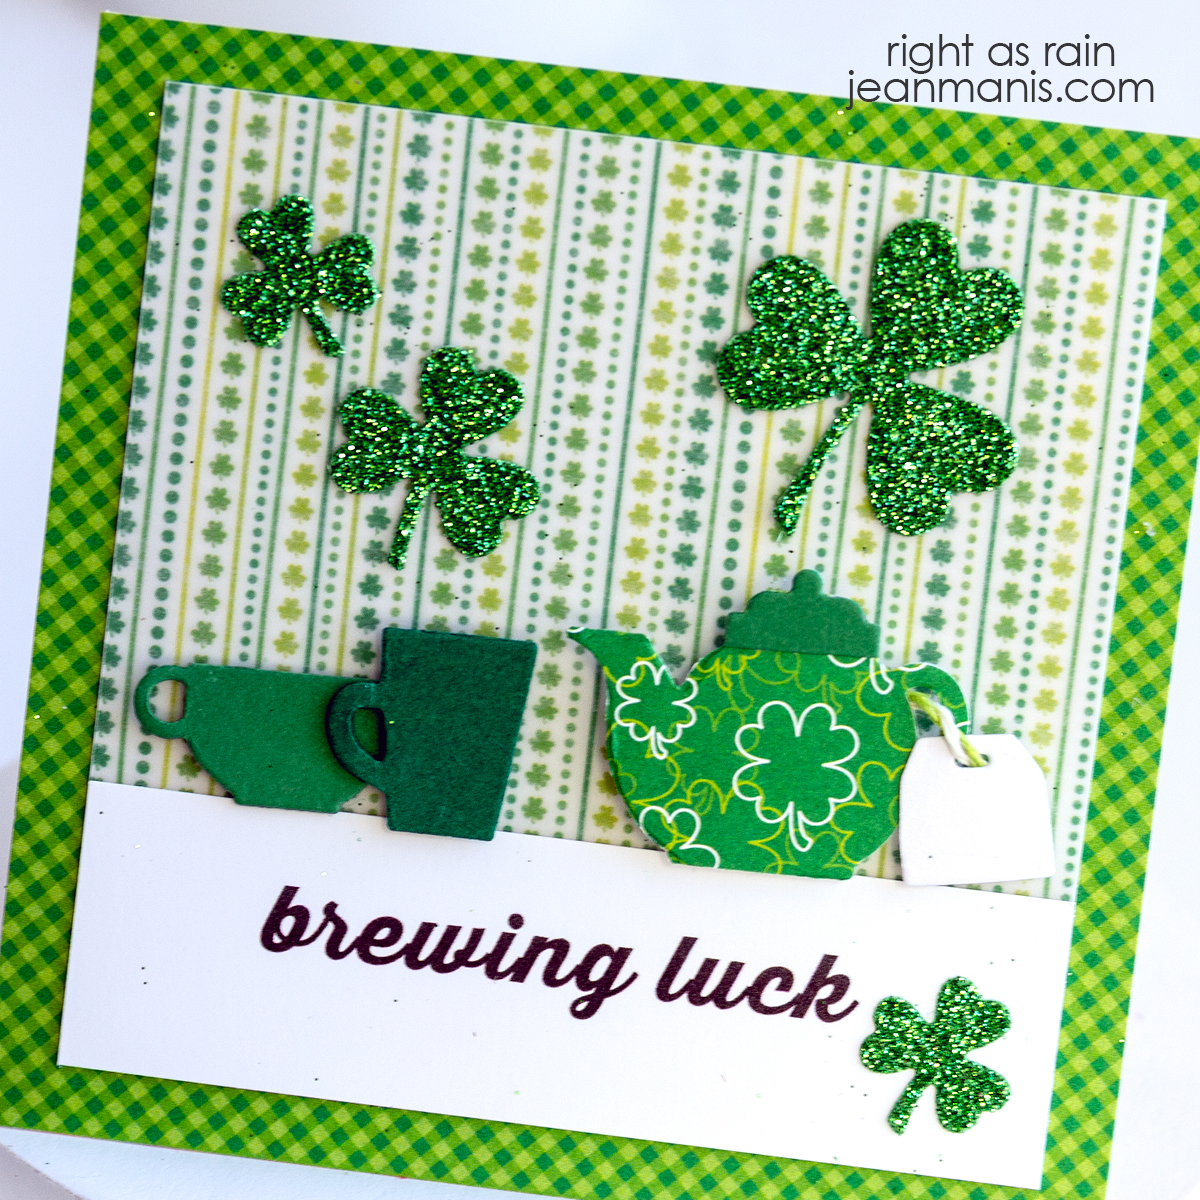
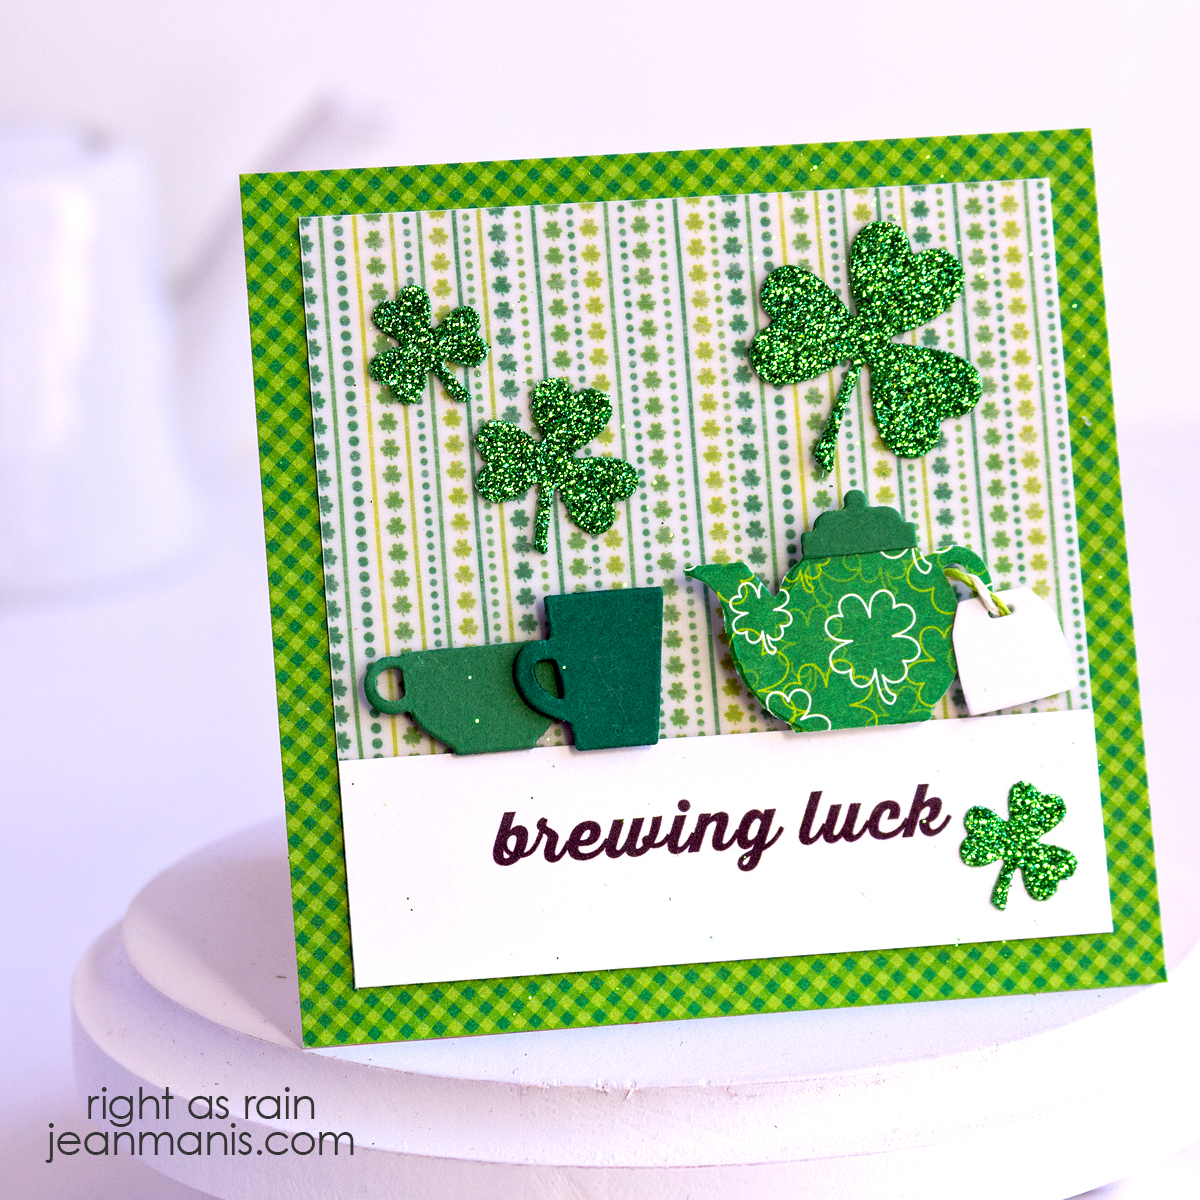
Spellbinders | Window Wonderland

Hello! The Spellbinders October Large Die of the Month, Window Wonderland, is all about capturing nostalgic charm. The card reminds me of something out of “A Christmas Story” (which was set in 1940).

Spellbinders | Window Wonderland

    • Cover an A2-size card base with patterned paper.
    • Cut the bay window structure twice with the Window Wonderland set. Using the window die outlines, cut out the windows from the front panel. This enables the drapes and tree to go inside the windows.
    • Cut drapes and tree with the set and attach to the inside panel. Cut the detailed window frames and inlay to the frame created in the previous step. Adhere the two layers. Add additional details (trim, string of lights, snow on top of the window) using dies in the Window Wonderland set.
    • Using the Window Wonderland set, cut the child, sled, and gifts from cardstock and assemble. Use the same set to create the snowbank.
    • Use the sentiment die in the North Pole Sentiments set to cut “Merry Christmas” from the snowbank. Back with Pomegranate cardstock and add to the base of the card, providing enough room at the top to slide in the window assembly. Attach the child and sled with foam squares.

Spellbinders | Window Wonderland


Hero Arts | Twinkle Lights Christmas Tree

Hello! Today’s card captures the holiday magic of a Christmas tree, sparkling with lights, in die-cut form. I featured the Twinkle Lights die set from Hero Arts, the October Hero Studio Die Set of the Month, as the star of the design and paired it with additional supplies from Hero Arts and Spellbinders to complete the scene.

Hero Arts | Twinkle Lights Christmas Tree

    • Cover an A2-size card base with patterned paper.
    • Dry-emboss Classic White cardstock that has been cut with an arch with the Sparkling Snow folder. With the Festive Tree Die set, cut a tree shape from the center of the arch.
    • With the Twinkle Lights set, cut light strands and bulbs from cardstock. Trim as necessary to fit within the tree shape. Assemble.
    • Add a Fern cardstock panel behind the ornaments. Add the assembly to a Poppy cardstock arch and adhere to card base.
    • Cut sentiment with dies in the North Pole Sentiments set. Add to the card.

Hero Arts | Twinkle Lights Christmas Tree

October 2025 Hero Studio


Spellbinders | Snowmen at the North Pole

Hello! Today I’m sharing a festive holiday card featuring two cheerful snowmen gathered at the North Pole created with Spellbinders dies, from the playful snowmen to the sentiments placed right on the pole. Snowy patterned paper background sets the wintry mood, and the arch shape helps frame the scene.

Spellbinders | Snowmen at the North Pole

    • Cover an A2-size card base with patterned paper. I used the colors in the patterned paper pad for color choices on the card.
    • Cut an arch with snowy patterned paper from the same pad. Add to the prepared base.
    • Cut Classic White cardstock with the same arch die and then with the hill die in the Landscape Edges set. Add the snowbank to the prepared base with foam adhesive.
    • Cut the pole, signs, and snowmen with dies in the North Pole Sentiments set. Assemble.
    • Add assembled elements to the prepared base with foam squares and glue.

Spellbinders | Snowmen at the North Pole


Hero Arts | Apple Frame

Hello! Today I am sharing a fall-themed card that highlights the Hero Arts I Pick You Collection, which includes the Apple Frame die set designed to create a frame of layered apples, leaves, and flowers. I die-cut the pieces from Bristol cardstock and colored the pieces with Distress Oxide inks. The design is finished with a stamped sentiment, “You’re So Golden,” for an uplifting touch.

Hero Arts | Apple Frame

    • To begin, cut the Apple Frame, leaves, apples, flowers, and flower centers from Bristol cardstock.
    • Color frame with Distress Oxide inks, masking areas for different colors as needed.
    • Apply blue ink to a Bristol cardstock A2-size panel. Add to the back of the inked frame panel. Attach assembly to card base.
    • Color leaves, flowers, flower centers, and apples with Distress Oxide inks. Assemble flowers as needed. Add elements to the card front.
    • Stamp the You’re Golden sentiment and cut with the coordinating die. Add to the card with foam adhesive.

Hero Arts | Apple Frame

Just like apple picking brings a wave of nostalgia and marks the cozy arrival of fall, this apple vine border card celebrates the simple joys of the season.


Spellbinders | Santa Mug

Nothing says Christmas quite like Santa himself, and this handmade card brings him to life in the most festive way—a Santa-shaped mug created with the Cocoa Greetings die set (Spellbinders July 2025 Die of the Month kit). A Christmas-themed patterned paper background and a seasonal sentiment complete the design.

Spellbinders | Santa Mug

You can see other cards created with the Cocoa Greetings die set HERE and HERE.