Spring-Themed Window Scene

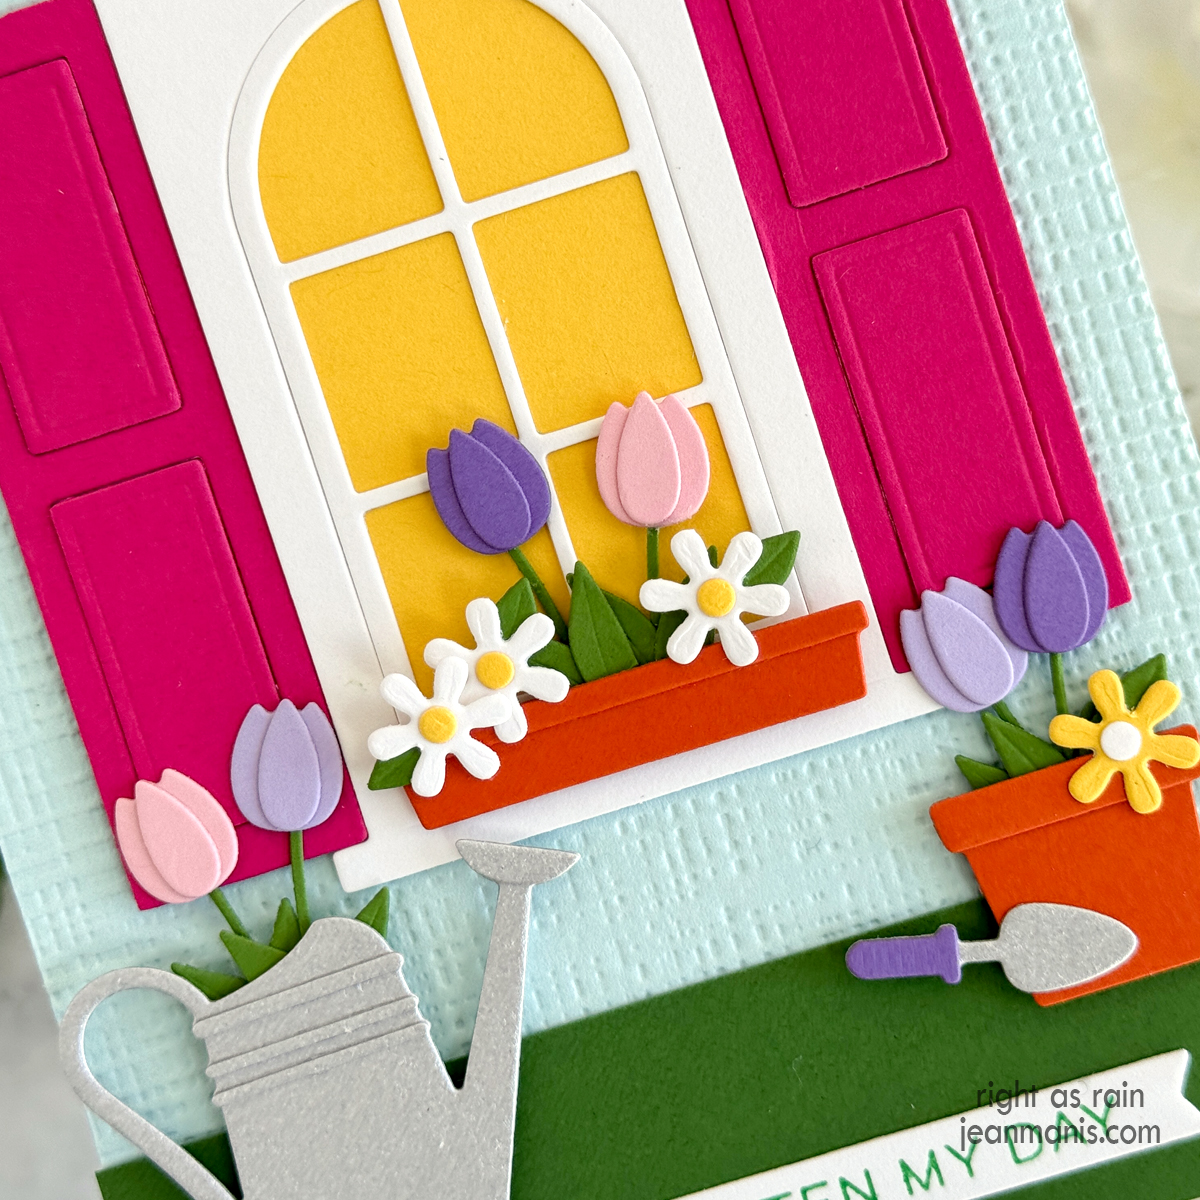
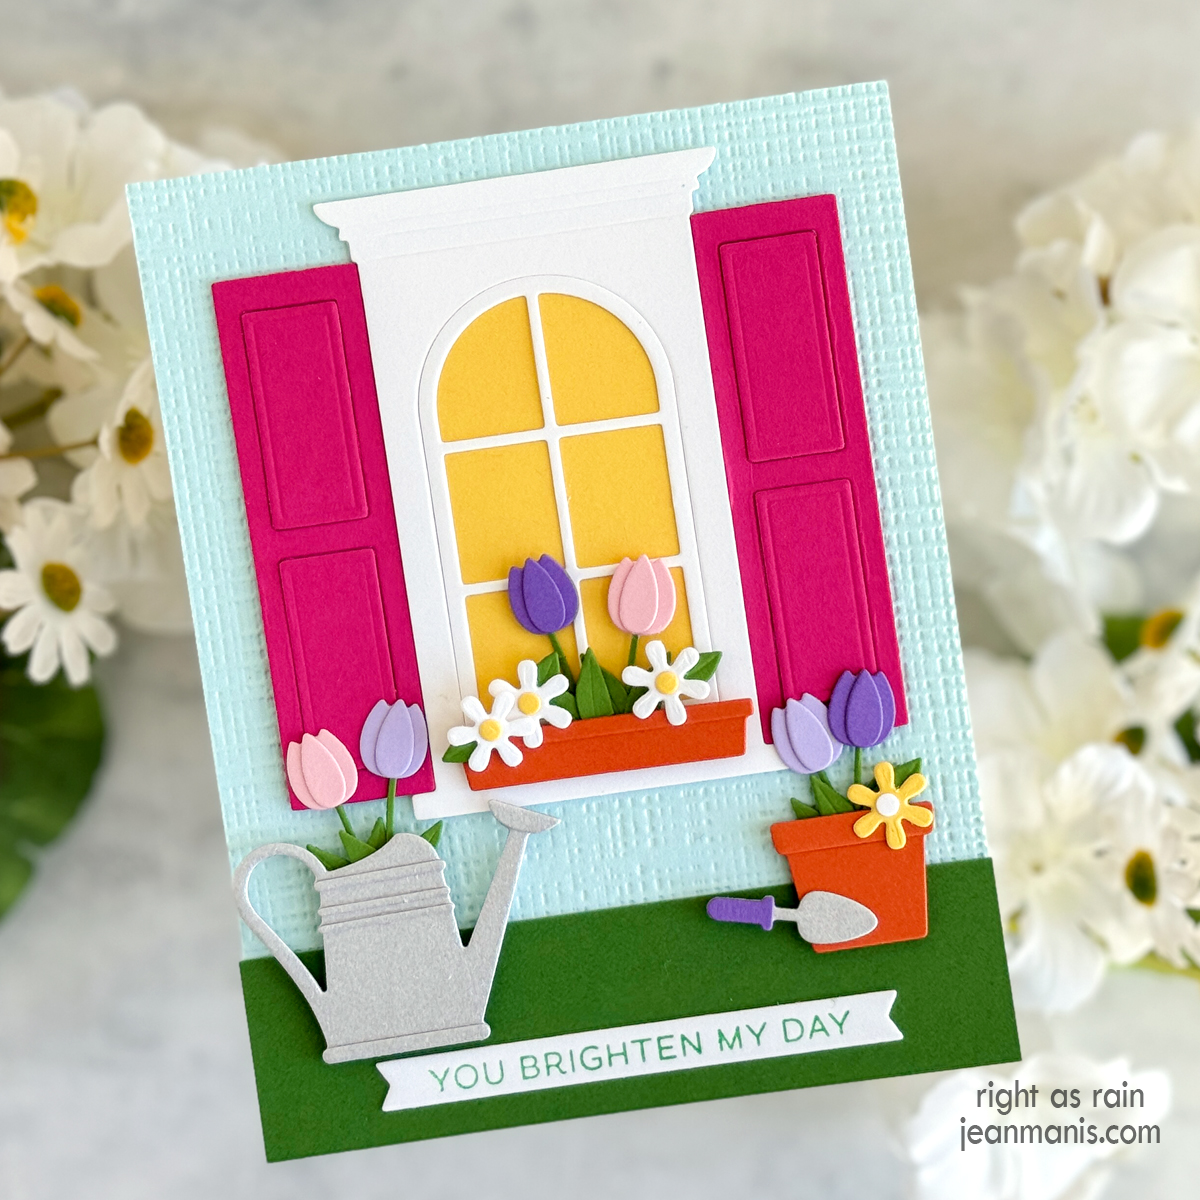
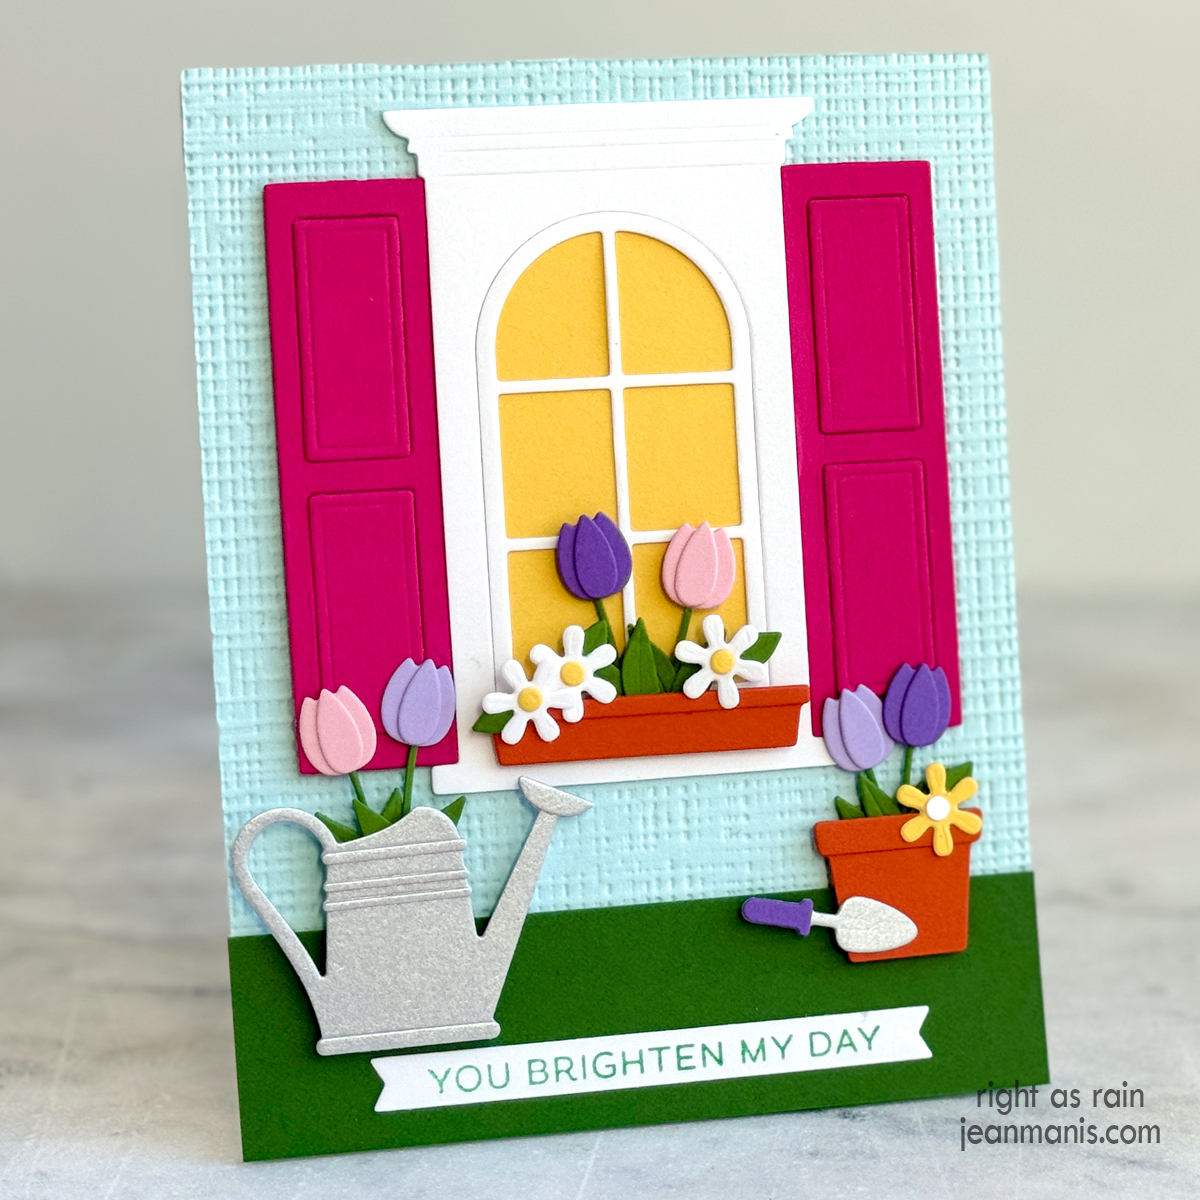
Hello! I am sharing a spring-themed friendship card featuring several Sunny Studio Stamps die sets. This scene captures the essence of the spring season with charming elements like window box flowers and garden tools. The sentiment “You Brighten My Day” encapsulates the joy and warmth this card aims to convey. I recently posted a round-up of spring-themed cards HERE.

Spring-Themed Window Scene

    • Dry-emboss A2-size Sea Glass cardstock with the Burlap folder. Add to the card base. Cut a strip of green cardstock to represent grass and add to the card base. (Alternatively, you could use a grass die to cut the top of this piece.)
    • Cut the window, window box, and shutters from a variety of cardstock colors with the Wonderful Windows die set. Assemble. Back window with yellow cardstock. (I previously used the Wonderful Windows set on a card HERE.)
    • Cut flowers, garden pots, and gardening tools with dies in the Spring Garden Dies set from a variety of cardstock colors. Assemble.
    • BetterPress the sentiment in Leaf ink with the Always and Forever Press Plate. Cut with coordinating die.
    • Add window assembly, sentiment, flowers, pots, and garden tools to the card front, using foam adhesive where appropriate.

Spring-Themed Window Scene


Sunny Studio Stamps | Valentine Truckload

Hello! Today, I am sharing a Valentine’s Day card featuring the delightful Sunny Studio Stamps Truckloads of Love stamp set with coordinating dies. You can see a similar fall-themed card that I created with the set HERE.

Sunny Studio Stamps | Valentine Truckload

    • To begin, dry-emboss an A2-size panel of Dahlia cardstock with the Burlap embossing folder. Add to card base. You can read more about dry-embossed card backgrounds HERE.
    • Stamp Truckloads of Love pickup, hearts (twice), and two of the critters with Versafine on Arches Cold Press watercolor paper and heat set. Color the images with watercoloring mediums of choice (I used Tombow markers). Once dry, cut the images with the dies in the coordinating set. (Check out my “Resources for Watercoloring Stamped Images” HERE.)
    • Cut scallop mat from white cardstock with the Mini Mat and Tag 3 set.
    • Stamp sentiment on white cardstock and add Distress Oxide Inks to sky and road (using vellum to mask while applying the inks). I created the sentiment on my computer.
    • Trim inked sentiment panel to fit inside the Mini Mat and Tag 3 scallop mat. Add inked panel to mat.
    • Adhere truck, hearts, and critters. Add assembly to card base.

Sunny Studio Stamps | Valentine Truckload

Looking for more inspiration? You can see a roundup of Valentine’s Day cards that I created with a variety of products HERE.


Sunny Studio Stamps | Snowman Kisses

Hello! Today I am sharing a winter-themed card featuring the Sunny Studio Stamps Snowman Kisses stamp set, with coordinating die set, brought to life with watercoloring. I used the Lawn Fawn Say Cheese, Again Polaroid-style frame for my scene. In this post, I discussed the use of frames and mats in cardmaking.

Sunny Studio Stamps | Snowman Kisses

  • Create A2-size card base and cover with patterned paper in the Gingham and Linen pack. I chose my colors for the scarves and hats of the snowmen based on the colors I used from the patterned paper pack. It would be fun to choose colors for the snowmen’s accessories based on a favorite sports team of the recipient.
  • Stamp the Snowman Kisses snowmen images with Versafine on Arches Cold Press watercolor paper and heat set it. Color the images with watercoloring mediums of choice. I used Zig May Green (47), Zig Turquoise Green (42), Zig Orange (70), and Tombow Glacier Blue (491) markers. Once dry, cut the images with the dies in the coordinating set. (Check out my “Resources for Watercoloring Stamped Images” HERE.)
  • From white cardstock, cut the snowbank with a die in the Slimline – Nature Borders set.
  • Add snowbank behind the frame and back with patterned paper from the Gingham and Linen pack.
  • Add sentiment to the bottom of the Polaroid frame cut from white glitter foam using dies in the Journal Letter set.
  • Add frame assembly to card base. Add snowmen with foam adhesive. Embellish with snowflakes cut with the Lawn Fawn Mini Snowflakes set from white glitter foam.

Sunny Studio Stamps | Snowman Kisses

Sunny Studio Stamps | Truckload of Pumpkins

Hello! Today I am sharing a fall-themed card featuring the delightful Sunny Studio Stamps Truckloads of Love stamp set, with coordinating dies. Envisioning a visit to the pumpkin patch, I created a pumpkin-picking scene with the set’s pickup truck, pumpkins, and two of the cute critters.

Sunny Studio Stamps | Truckload of Pumpkins

  • To begin, dry-emboss an A2-size panel of rust cardstock (I used SU Cajun Craze) with the Buffalo Plaid embossing folder. Add to card base. You can read more about dry-embossed card backgrounds HERE.
  • Stamp Truckloads of Love pickup, pumpkins (twice), and two of the critters with Versafine on Arches Cold Press watercolor paper and heat set. Color the images with watercoloring mediums of choice (I used mini Distress Inks). Once dry, cut the images with the dies in the coordinating set. (Check out my “Resources for Watercoloring Stamped Images” HERE.)
  • Cut scallop mat from white cardstock with the Mini Mat and Tag 3 set.
  • Stamp sentiment on white cardstock and add Distress Oxide Inks to sky and road (using vellum to mask while applying the inks). I created the sentiment on my computer as I wanted to specifically reference a pumpkin field.
  • Trim inked sentiment panel to fit inside the Mini Mat and Tag 3 scallop mat. Add inked panel to mat.
  • Adhere truck, pumpkins, and critters. Add assembly to card base.

Sunny Studio Stamps | Truckload of Pumpkins


Sunny Studio Stamps | Pick of the Patch

Hello! I have crafted a picturesque fall scene with die-cut pumpkins using supplies from Sunny Studio Stamps. For more information on scene building, you can check out this post, when I discuss how to start a scene building collection with Sunny Studio Stamps products.

Sunny Studio Stamps | Pick of the Patch

The background, measuring 4 1/4″ square, boasts subtle texture thanks to dry embossing with the Buffalo Plaid folder. The background was added to a 4 1/2″ square card base, covered with white canvas cardstock.

I colored Soft Finish cardstock with a variety of inks from which to cut the pumpkins, sun, and grass. The Pumpkin Patch set includes dies with which to cut layered pumpkins and jack o’lantern faces. The grass die is included in the Picket Fence Border set. The fence was cut from white cardstock, as were the clouds. I created the sentiment “Pick of the Patch” on my computer and cut it with the larger cloud die.

Sunny Studio Stamps | Pick of the Patch