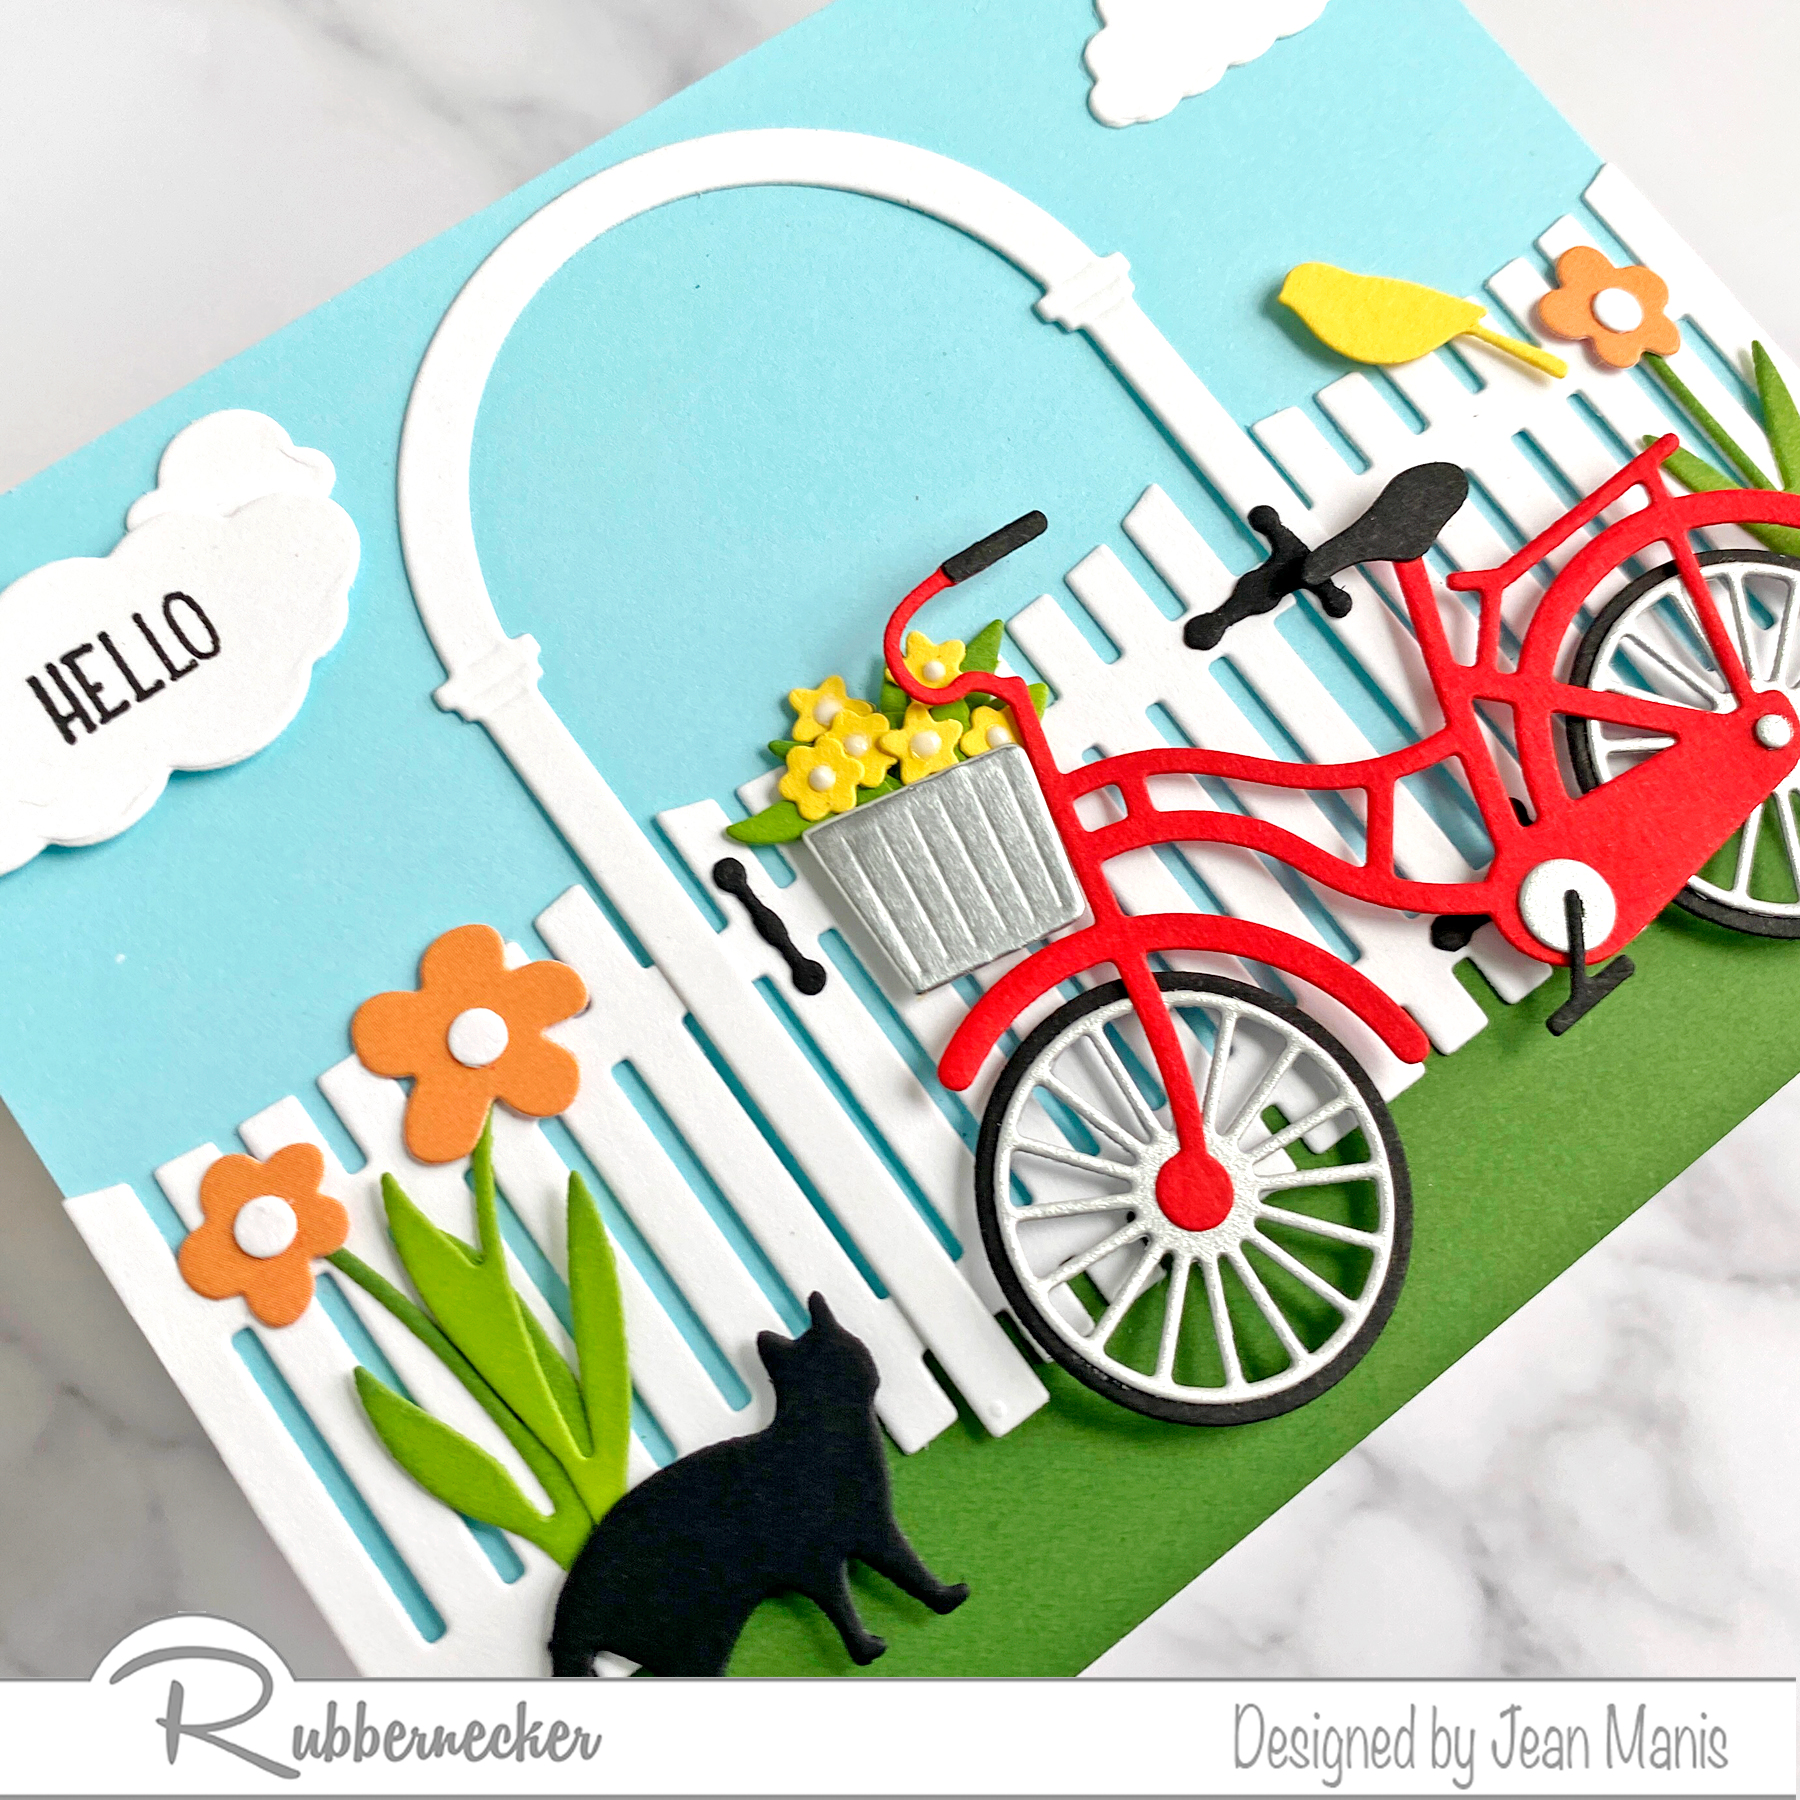
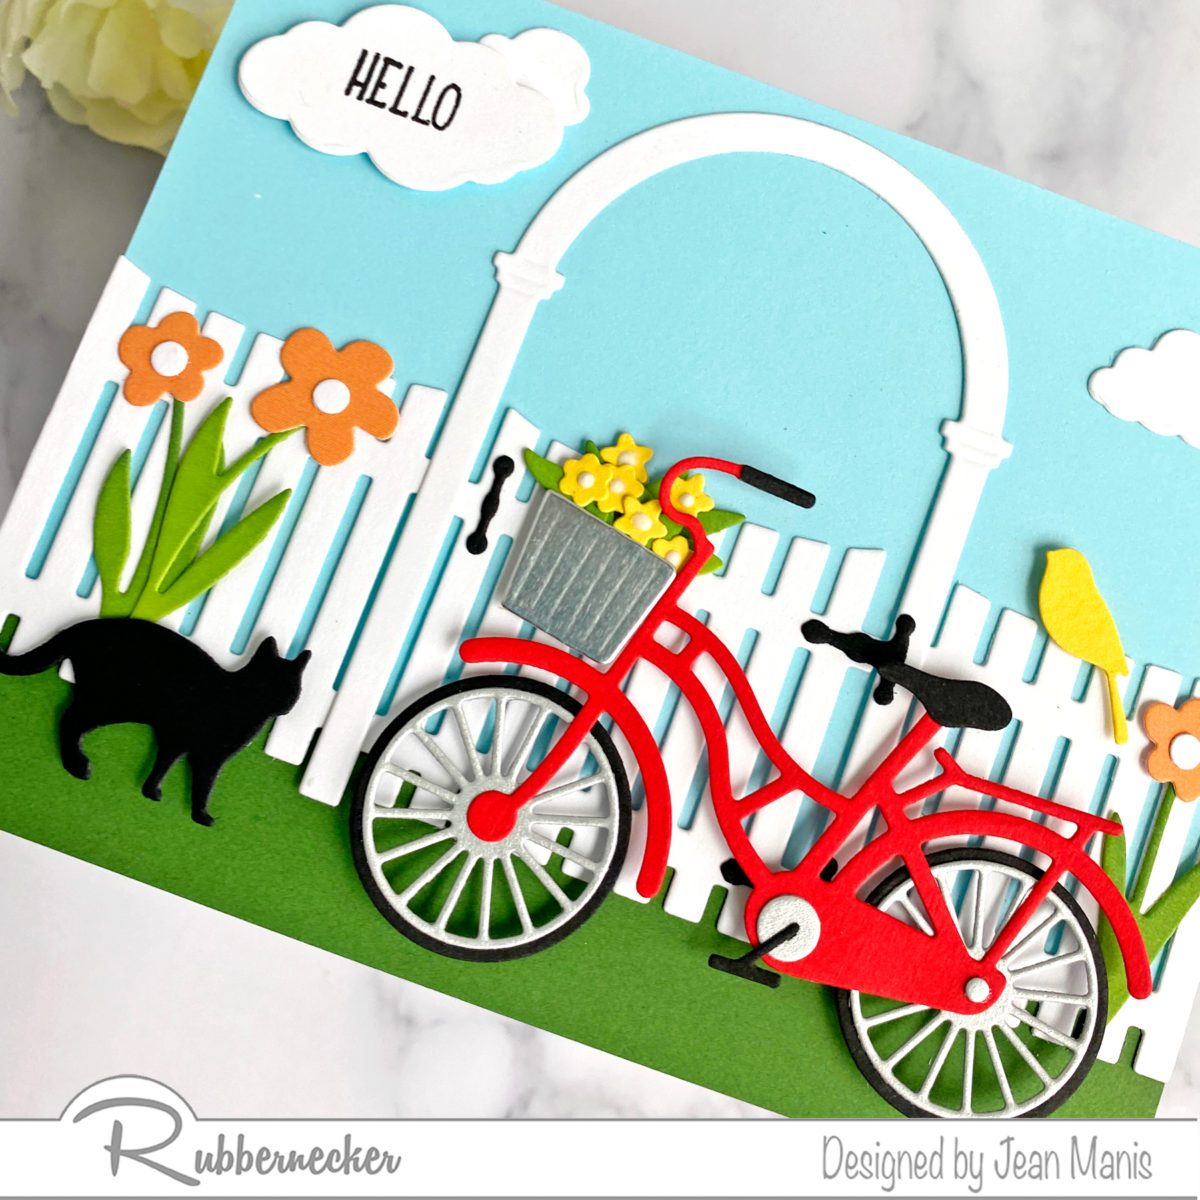
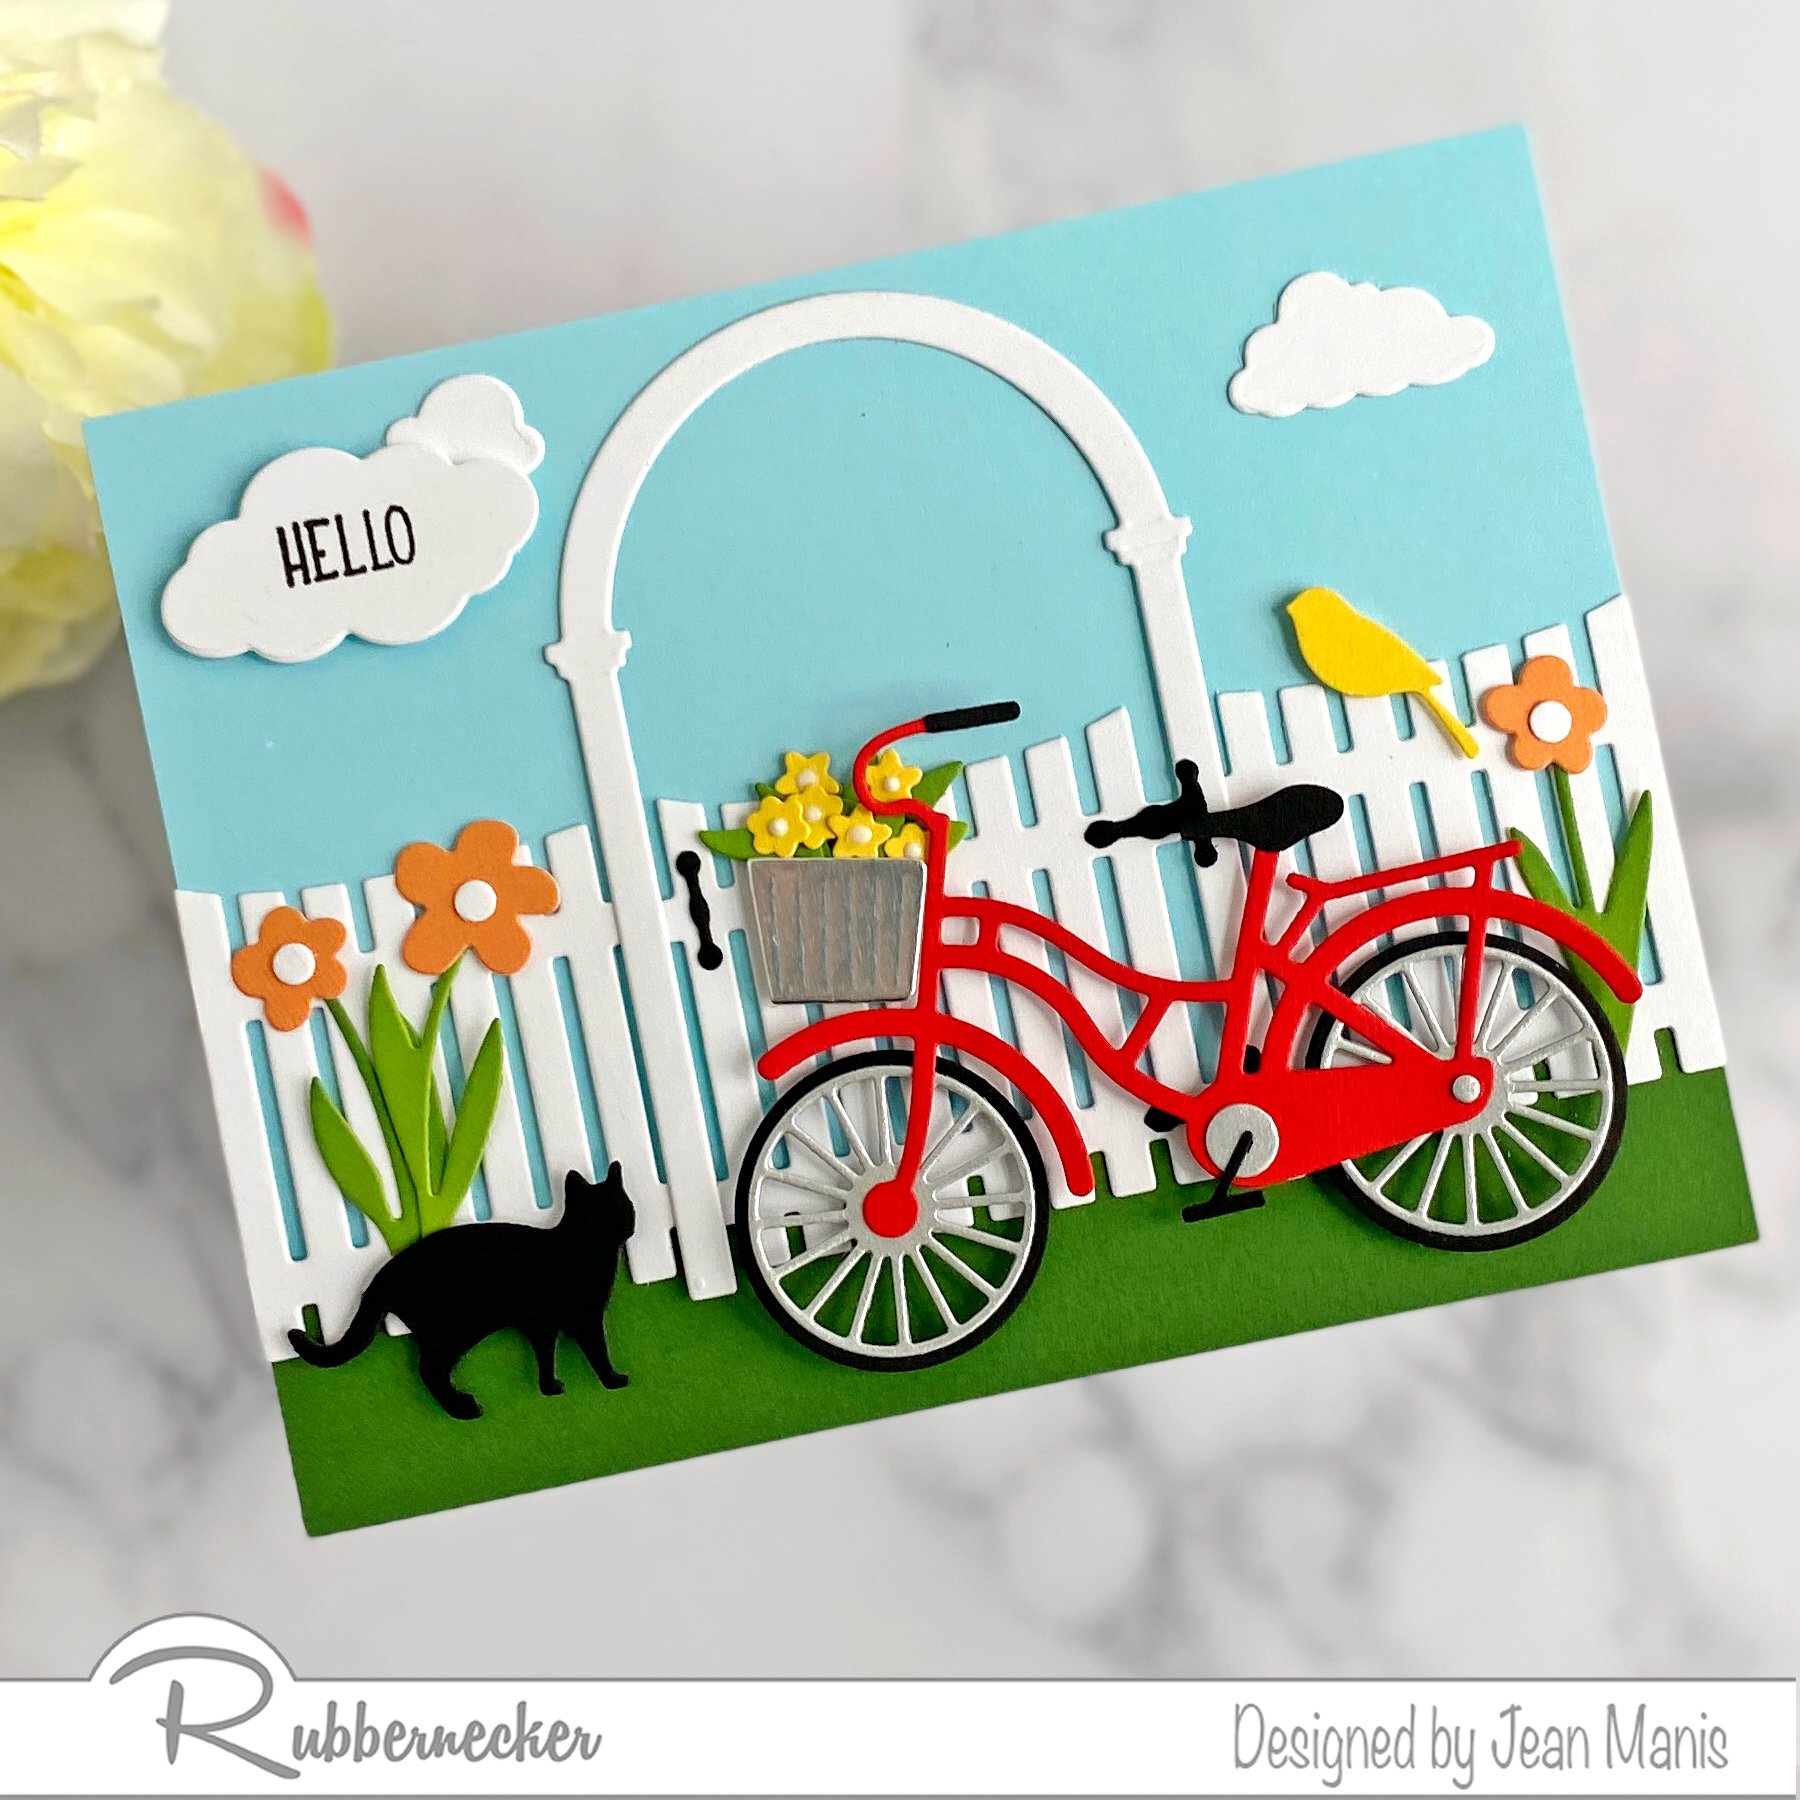
Rubbernecker | Die-cut Mini Slimline Scene

Hello! Today, I am sharing a summer-themed, mini-slimline card created with Rubbernecker dies and stamp set. There are a number of occasions for which this card would work.

Rubbernecker | Die-cut Mini Slimline Scene

Create focal elements
  • Die-cut Beach Chairs and Macrame Planters from white and colored cardstock. (I am fond of Adirondack chairs and have used them as a focal element on many cards!)
  • Glue pots to rope hangers.
Create frame, sentiment, and background
Assemble and Embellish

Rubbernecker | Die-cut Mini Slimline Scene


Rubbernecker | Die-cut Underwater Scene

Hello! Today, I am sharing a friendship (or love) card created with Rubbernecker dies and stamp set. There are a number of occasions for which this card would work.

Rubbernecker | Die-cut Underwater Scene

Create focal elements
  • Die-cut Tropical Fish from colored, white, and black cardstock; assemble. To inlay the eyes, remove eye of the fish body color, add tape to the back of the fish, and drop in black cardstock eye.
  • Die-cut small fish with the Sea Animals set from colored cardstock.
  • Die-cut the Submarine from colored and black cardstock. Only die-cut the portion of the submarine visible in the frame.
  • To add textural interest, heat-emboss pieces with clear embossing powder. With tweezers holding the die-cut piece, press piece into VersaMark ink pad, apply clear embossing powder, and heat emboss. (Technique used on fish stripes, fish fins, small fish, and submarine’s glass windows.)
  • Die-cut underwater vegetation from two shades of green cardstock with the Sea Kelp and Seaweed/Coral die sets.
Create frame and background
  • Die-cut the Slimline OPC Squares frame from white cardstock.
  • Stamp the Under the Sea #2 sentiment in VersaFine Onyx Black ink on teal cardstock panel.
  • Add foam adhesive strips to frame. Trim sentiment panel and attach to the back of the frame.
  • Create slimline card base in dark teal cardstock.
  • Cut black cardstock 8 2/8 inches wide by 3 3/8 inches tall. Attach to card base.
  • Attach frame with sentiment panel to card base.
Assemble
  • Add elements – fish, seaweed, submarine – inside frame with dot adhesive and foam adhesive; trim elements as needed.

Rubbernecker | Die-cut Underwater Scene

Rubbernecker | Die-cut Underwater Scene


Rubbernecker | April 2022 Release Day Two

Hello! I am back sharing two more cards that feature the Rubbernecker April release. See my previous post here.

My first card showcases the Model A Truck on a masculine card.

Rubbernecker | April 2022 Release

I paired the Model A Truck with the Barn and a fun sentiment in the Dad Phrases set.

The scene background was created with the Peak Fence #4 and Slimline Grass.

Rubbernecker | April 2022 Release

My second card features one of the new cover plates – the Circle Stitch Cover die – on a CAS birthday card.

Rubbernecker | April 2022 Release

I paired the Circle Stitch Cover die with a heat-embossed sentiment in the Birthday Vase set.

After inlaying the colored panels in the white cardstock frame, I embellished the card with hearts cut with a die in the Shed Bird House set.

Rubbernecker | April 2022 Release


Rubbernecker | April 2022 Release

Hello! I am delighted to share two CAS cards created with new dies in the April Rubbernecker release, which includes cover plates, garden dies, and stamp sets.

Rubbernecker | April 2022 Release

The Shed Bird House Add-On die works with the Shed die to create a large birdhouse.

I paired the birdhouse with birds created with the Spring Birds die.

Rubbernecker | April 2022 Release

On both cards, I used a sentiment from the Kittie Says Springtime set.

Rubbernecker | April 2022 Release

The Shed Bird House Add-On die set includes several options for the birdhouse opening and a smaller heart die. I sprinkled several hearts on the patterned-paper background to reinforce the theme.

Rubbernecker | April 2022 Release


Rubbernecker | Farmyard Birthday Card

Hello! Today, I am sharing a farm-themed birthday card created with Rubbernecker dies and stamp set.

Rubbernecker | Farmyard Birthday Card

Create focal elements
  • Cut cows with the Farm Animals die from cardstock. Back nostrils with black cardstock. Glue bell to female and nose ring to bull. Optional: Cut eyes from black cardstock using die in the Submarine set and glue to faces.
  • Cut barn building, doors, and window with Barn set from white, gray, and dark red cardstock; assemble.
Create background and frame
  • Cut grass from green cardstock with a die in the Slimline Grass set.
  • Cut frame with largest die in the Outside Scallop Frame set from white cardstock.
  • Stamp Birthday Vase sentiment in VersaFine Onyx Black ink on light blue cardstock panel.
  • Cut Peak Fence #4 twice from white cardstock. Tape together on back allowing enough fence to span the dimensions of the frame.
Assemble
  • Trim grass and glue to the bottom of frame from the back.
  • Trim fence assembly and add to back of frame.
  • Trim stamped background and affix to the back of the frame.
  • Add frame to yellow, A2-size card base.
  • Add barn and cows to scene.

Rubbernecker | Farmyard Birthday Card

Embellish
  • Cut sun from yellow cardstock with Sun Moon die and tuck behind barn.
  • Cut cloud from white cardstock with Clouds die and add to scene with foam adhesive.
  • Cut small flowers from yellow cardstock with Small Flowers #3 die set. Shape flowers with shaping stylus in the Paper Blossom Tool Kit. Add white crystal drops to centers. Once dry, glue to fence.

Rubbernecker | Farmyard Birthday Card