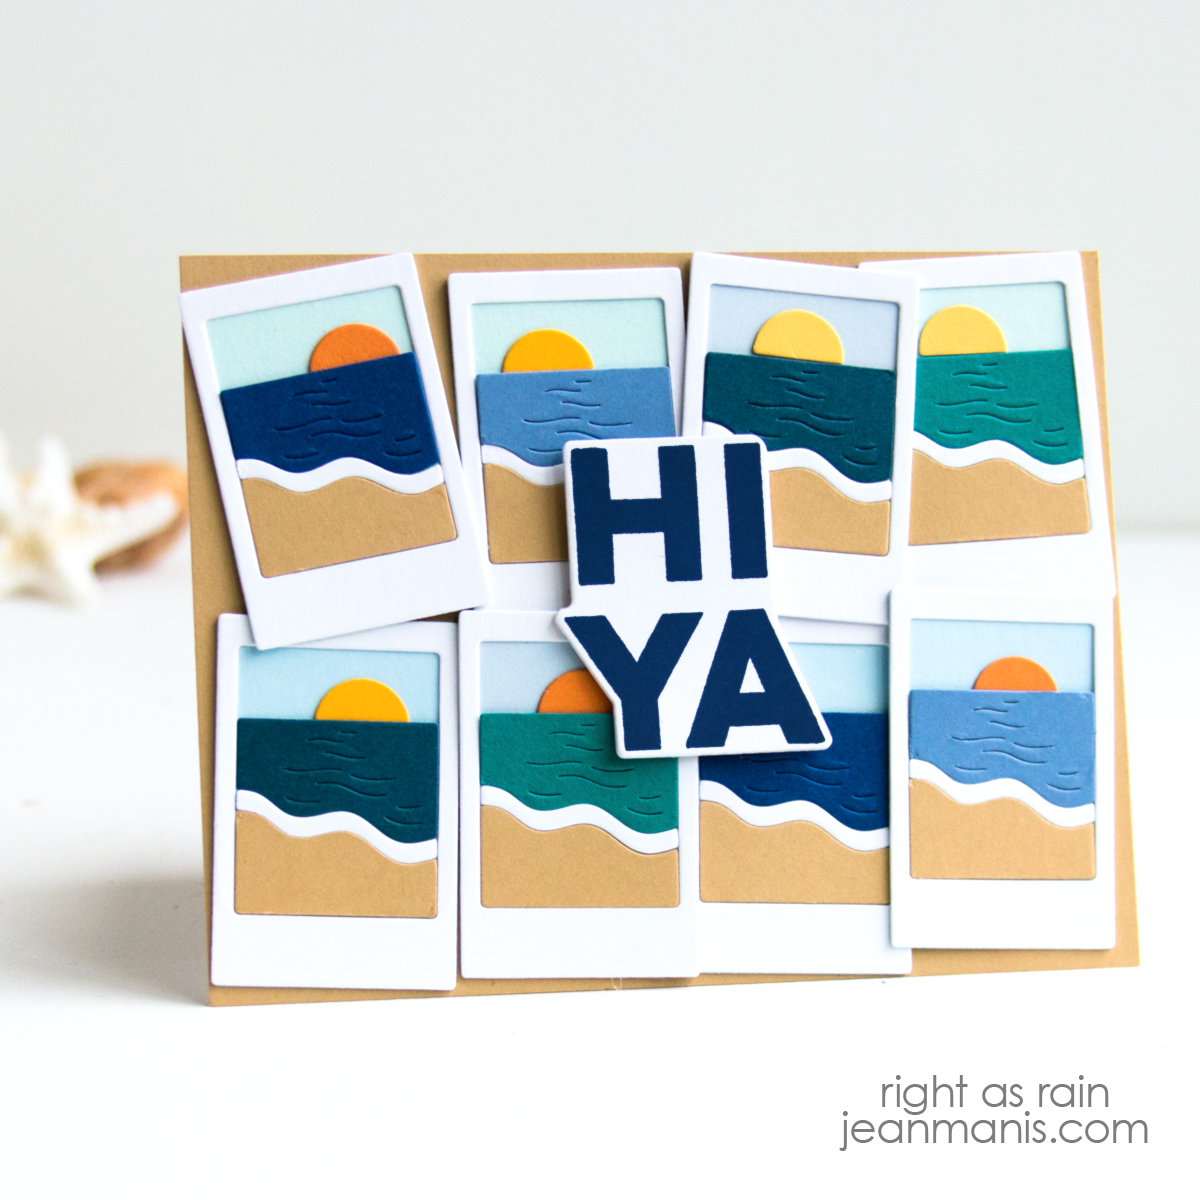
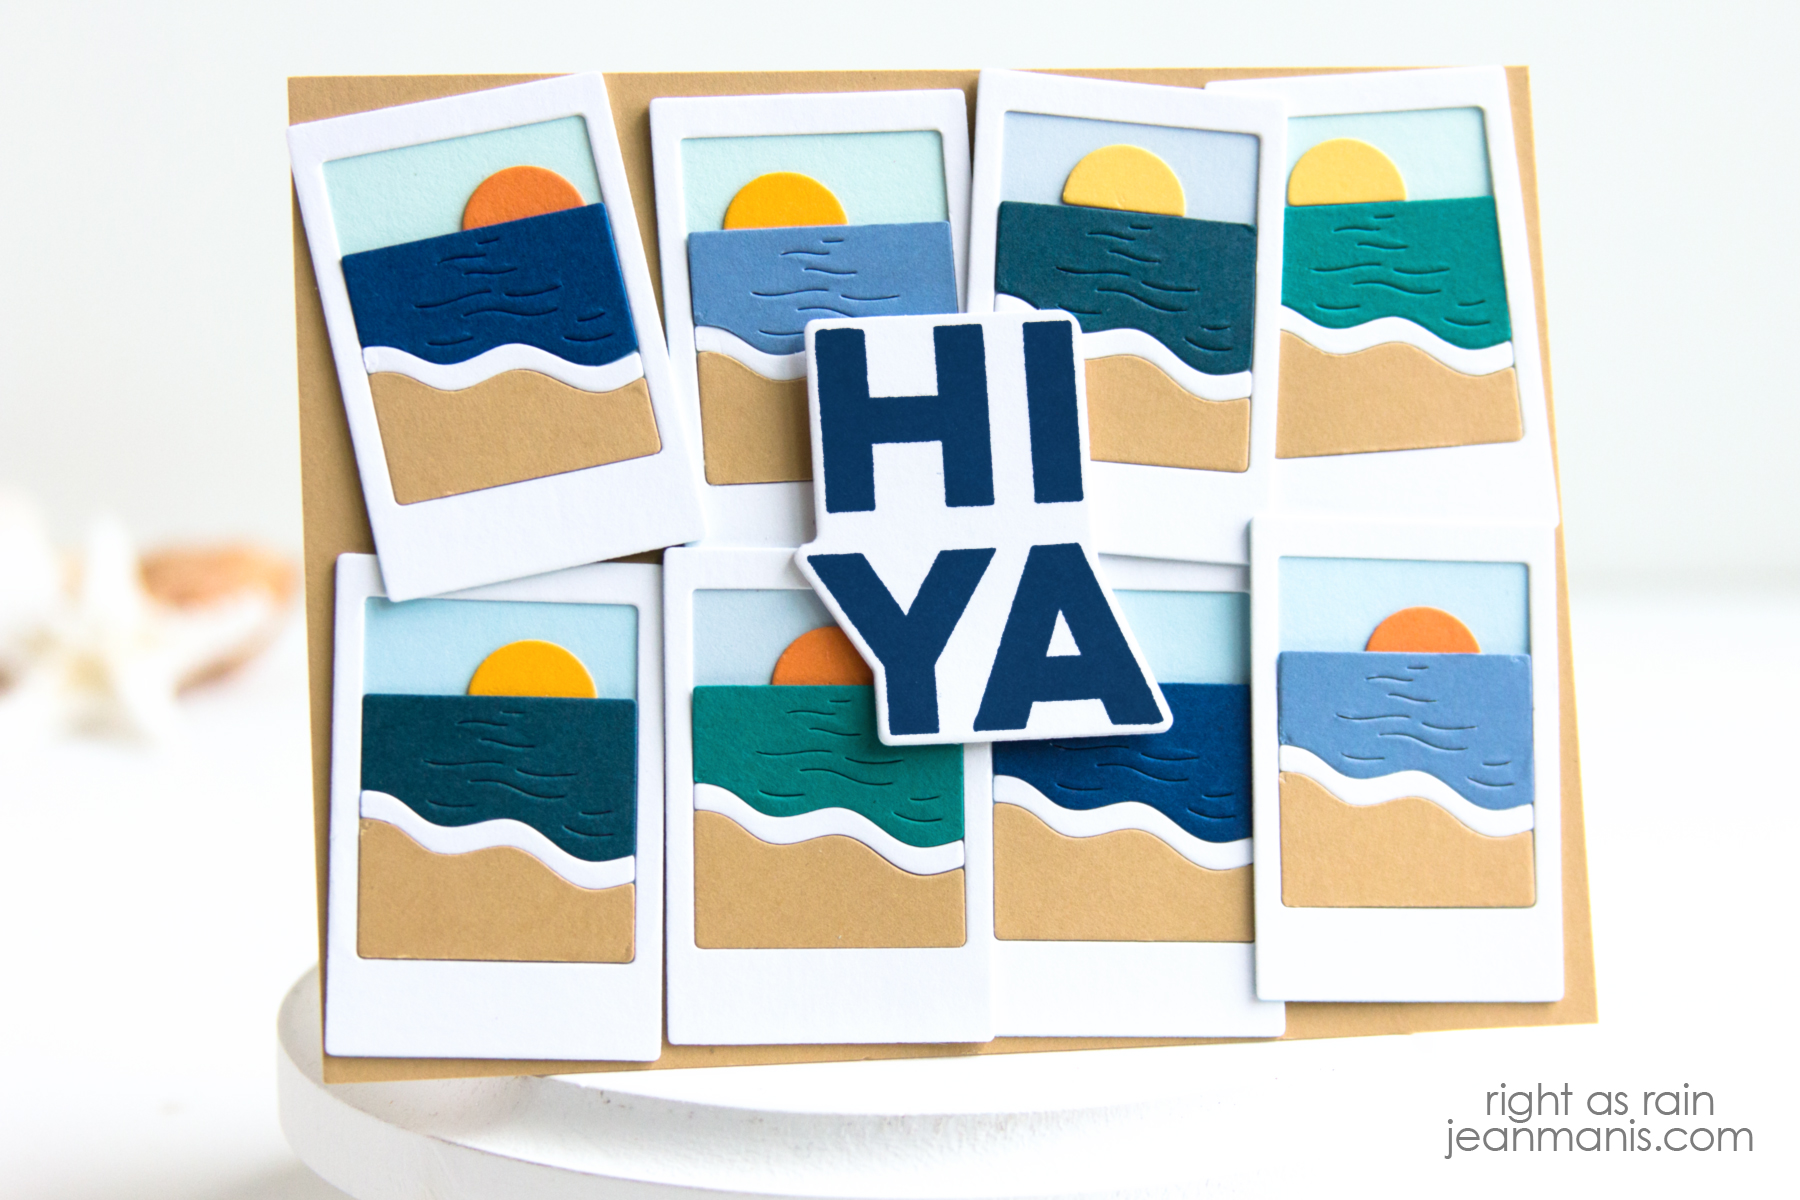
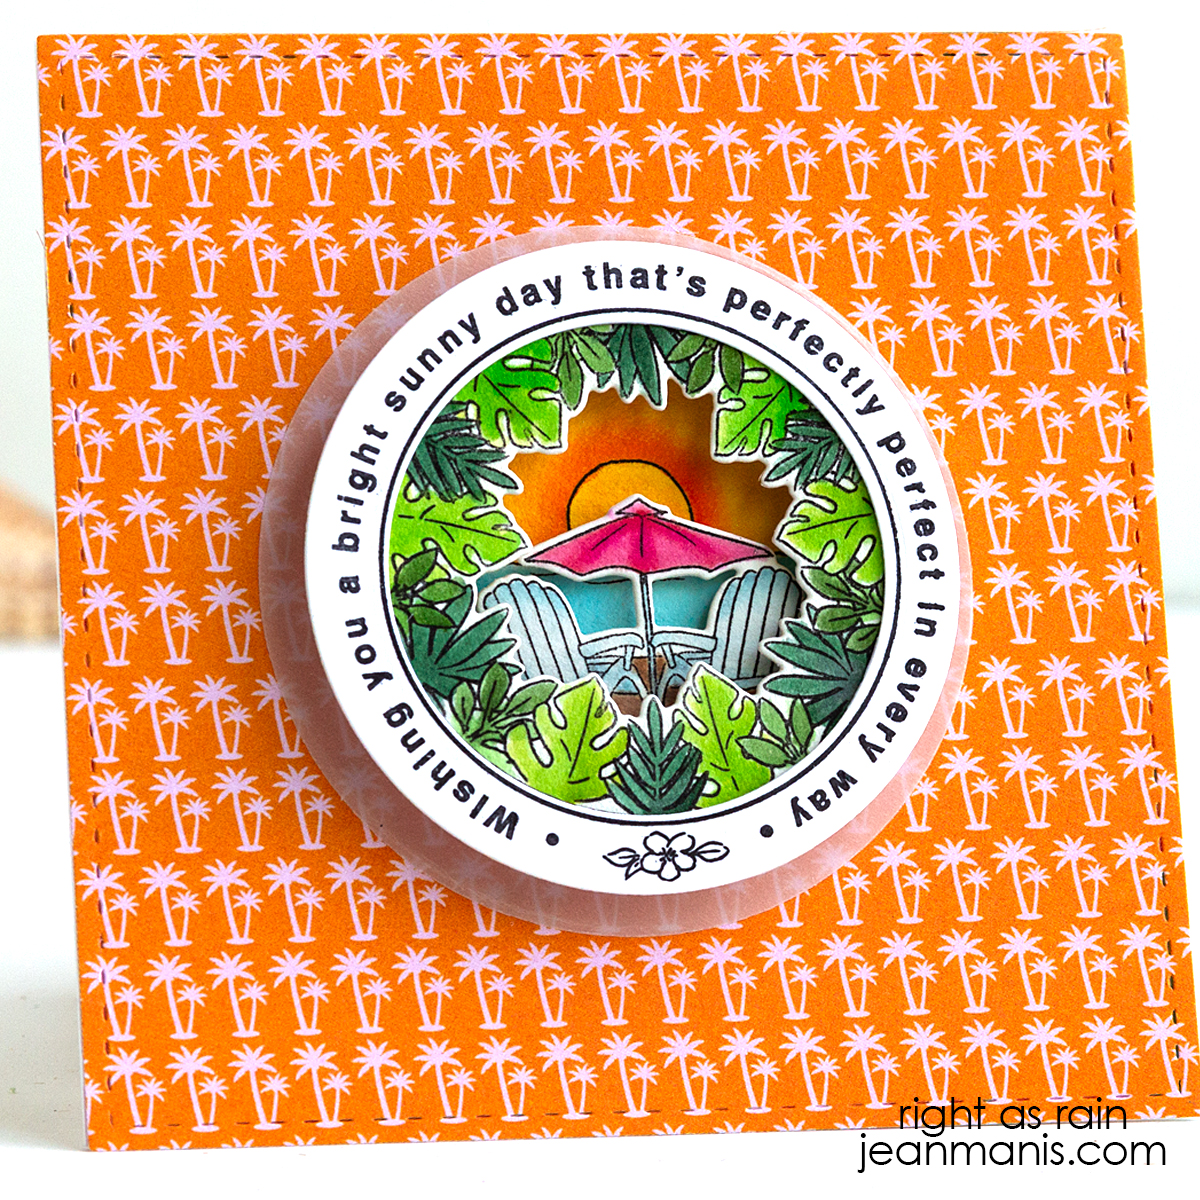
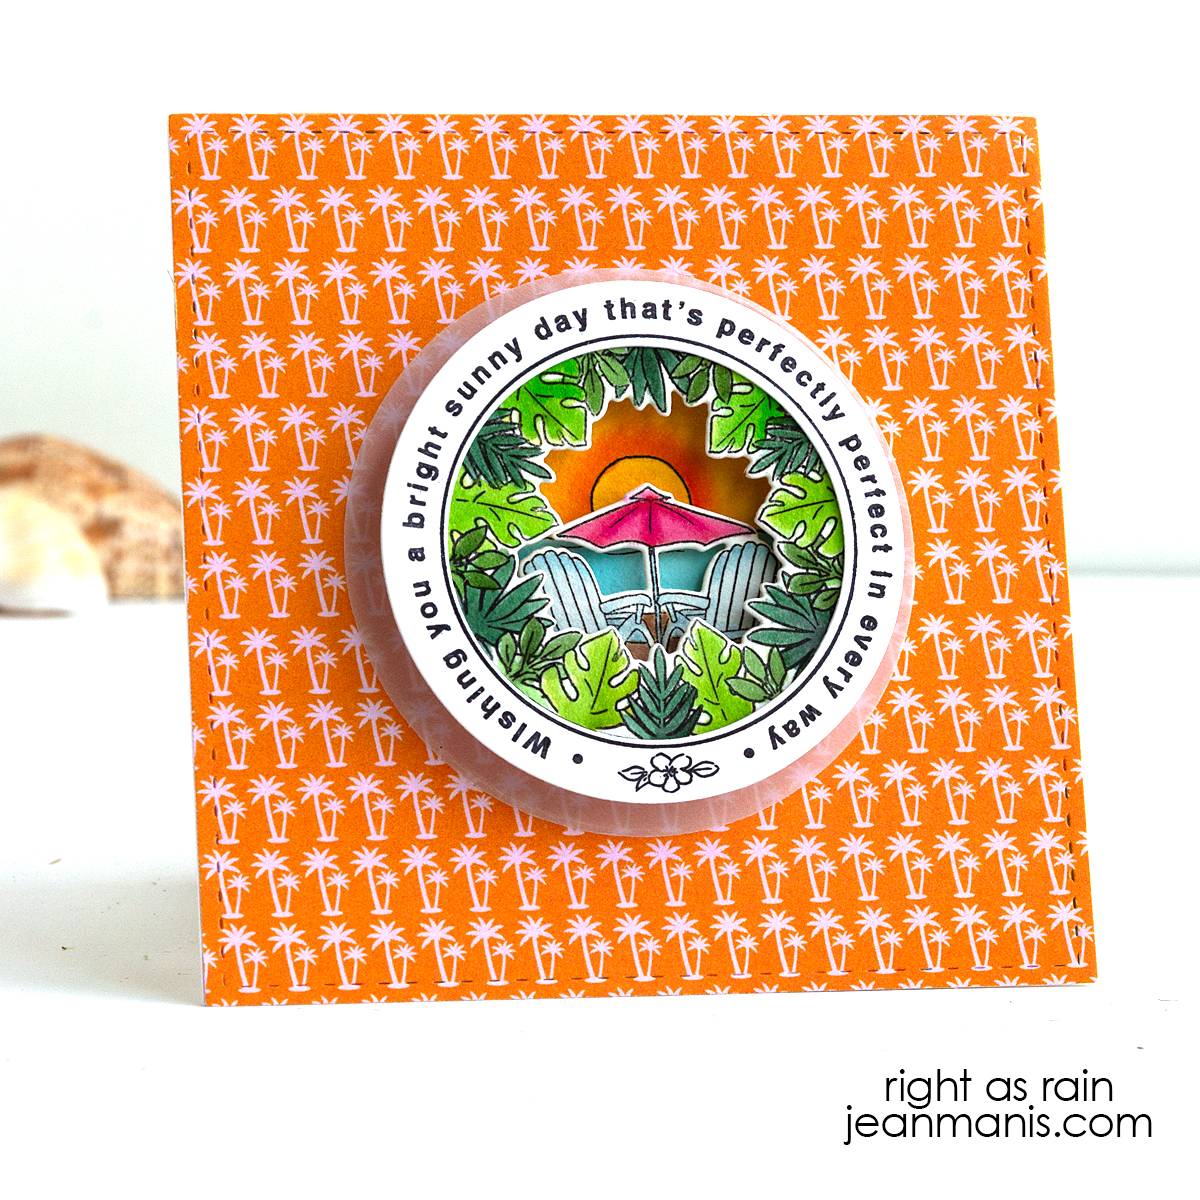
Newton’s Nook | Purrfect Day

Hello! There’s nothing like a beach day to capture the spirit of summer—and that includes our furry friends! Today I’m sharing a sunny, beach-themed card created with the Happy Meowr stamp set from Newton’s Nook. I watercolored the cat and paired the image with a summer-patterned paper to complete the sunny vibe. This fun and easy design is purrfect for sending warm wishes—or just because.

Newton's Nook | Purrfect Day

    • Cover an A2-size card base with patterned paper from the Simple Stories Just Beachy pad.
    • Stamp the Happy Meowr image and watercolor. I used a combination of Zig Real Brush markers and watercolor pencils. Once dry, cut with the coordinating die.
    • Color white cardstock with Tumbled Glass and Antique Linen Distress Inks. Stamp the sentiment with a stamp in the Seashell Roundabout set.
    • Cut with a circle die in the Hero Arts Circle Infinity set. Cut a white cardstock circle with the next biggest die in the set. Adhere the two and add the assembly to the card base.
    • Add the cat to the circle with foam adhesive.

Newton's Nook | Purrfect Day


Hero Arts | Underwater Scene

Hello! Today I’m sharing a handmade card that brings the underwater world to life! Using a Hero Arts die set, I created a vibrant ocean scene filled with sea creatures—a turtle, a seahorse, and a crab. The layered die cuts add depth and movement, while the simple “hello there” sentiment keeps things light and friendly.

Hero Arts | Underwater Scene

    • Blend Distress Inks on to an A2-size card panel using vellum to mask a 5 1/4″ x 4″ area. Trim the panel and add to an A2-size card base.
    • Apply Distress Inks to cardstock and cut marine life with the Sea Creatures set.
    • Heat-emboss with white powder the Message Strips sentiment on black cardstock. Cut with the set’s coordinating die.
    • Add elements to the card base with glue and foam squares trimming the coral as needed to fit within the ink masked area.

Hero Arts | Underwater Scene

Spellbinders Pre-Summer Super Sale– Up to 50% Off – Ends 5/31/2025


Soaring High | Spellbinders Up and Away

Hello! Celebrate life’s big and small victories with a card that soars! Created with the Up and Away die set, part of the Sky’s the Limit Collection by Simon Hurley at Spellbinders. This design captures the joy of a carefree day as a boy flies his kite against a bright, open sky. With the sentiment “The Sky’s the Limit,” this card is a perfect way to encourage a grandchild who’s reached a new milestone—whether it’s finishing a school year, winning a big game, or accomplishing a personal goal. Let them know their potential is endless!

Soaring High | Spellbinders Up and Away

      • Cut an arch of Cascade cardstock with the largest Essential Arches die. Dry-emboss the arch with the Head in the Clouds folder. Add to an A2-size card base.
      • Cut the kite and boy with dies in the Up and Away die set. Assemble.
      • Press the Soaring Sentiments plate in blue ink and cut with the coordinating die.
      • Add the kite, boy, and sentiment to the prepared card base with foam and dot adhesive.

Soaring High | Spellbinders Up and Away


Sunny Studio Stamps | July 4th Truckload

Hello! Today, I am sharing a Fourth of July card featuring the delightful Sunny Studio Stamps Truckloads of Love stamp set, with coordinating dies. The set features a vintage pick-up truck along with a choice of critters and seasonal items to include in the truck. I shared a Valentine’s Day card created with these supplies HERE and a fall-themed card HERE.

Sunny Studio Stamps | July 4th Truckload

    • To begin, cover an A2-size card base with patterned paper. I used a piece from an Echo Park pad.
    • Stamp Truckloads of Love pickup, banner, flag, rail, and critter with Versafine on Arches Cold Press watercolor paper and heat set. Color the images with watercoloring mediums of choice (I used Tombow markers). Once dry, cut the images with the dies in the coordinating set. (Check out my “Resources for Watercoloring Stamped Images” HERE.)
    • Cut scallop mat from white cardstock with the Mini Mat and Tag 3 set.
    • Stamp sentiment on white cardstock and add Distress Oxide Inks to sky and road (using vellum to mask while applying the inks). I created the sentiment on my computer.
    • Trim inked sentiment panel to fit inside the Mini Mat and Tag 3 scallop mat. Add inked panel to mat.
    • Add assembled truck to the scene.

Sunny Studio Stamps | July 4th Truckload


Spellbinders | July 4th Fireworks Bouquet

Hello! I’m excited to share a July 4th friendship card created with several dies in the Out & About Collection at Spellbinders. I am a big fan of a red, white, and blue color palette for summer cards. The card features a watering can filled with a bouquet of red, white, and blue flowers, set against fireworks-patterned paper (an Echo Park pad from several seasons ago).

Spellbinders | July 4th Fireworks Bouquet

    • Cover an A2-size card base with patterned paper. To quiet the pattern, I inked a portion of the center with white pigment ink.
    • Cut Sprinkle & Grow pieces (watering can, flowers, foliage) from cardstock; assemble. I additionally cut one of the flowers in the Garden Buddies set.
    • Tape flowers and foliage to watering can. Back the opening with darker cardstock.
    • Press the Always and Forever sentiment in Cosmic Sky ink on white cardstock. Cut with the coordinating die.
    • Add sentiment and assembled bouquet to base with foam adhesive.
    • Embellish with clear enamel dots.

Spellbinders | July 4th Fireworks Bouquet