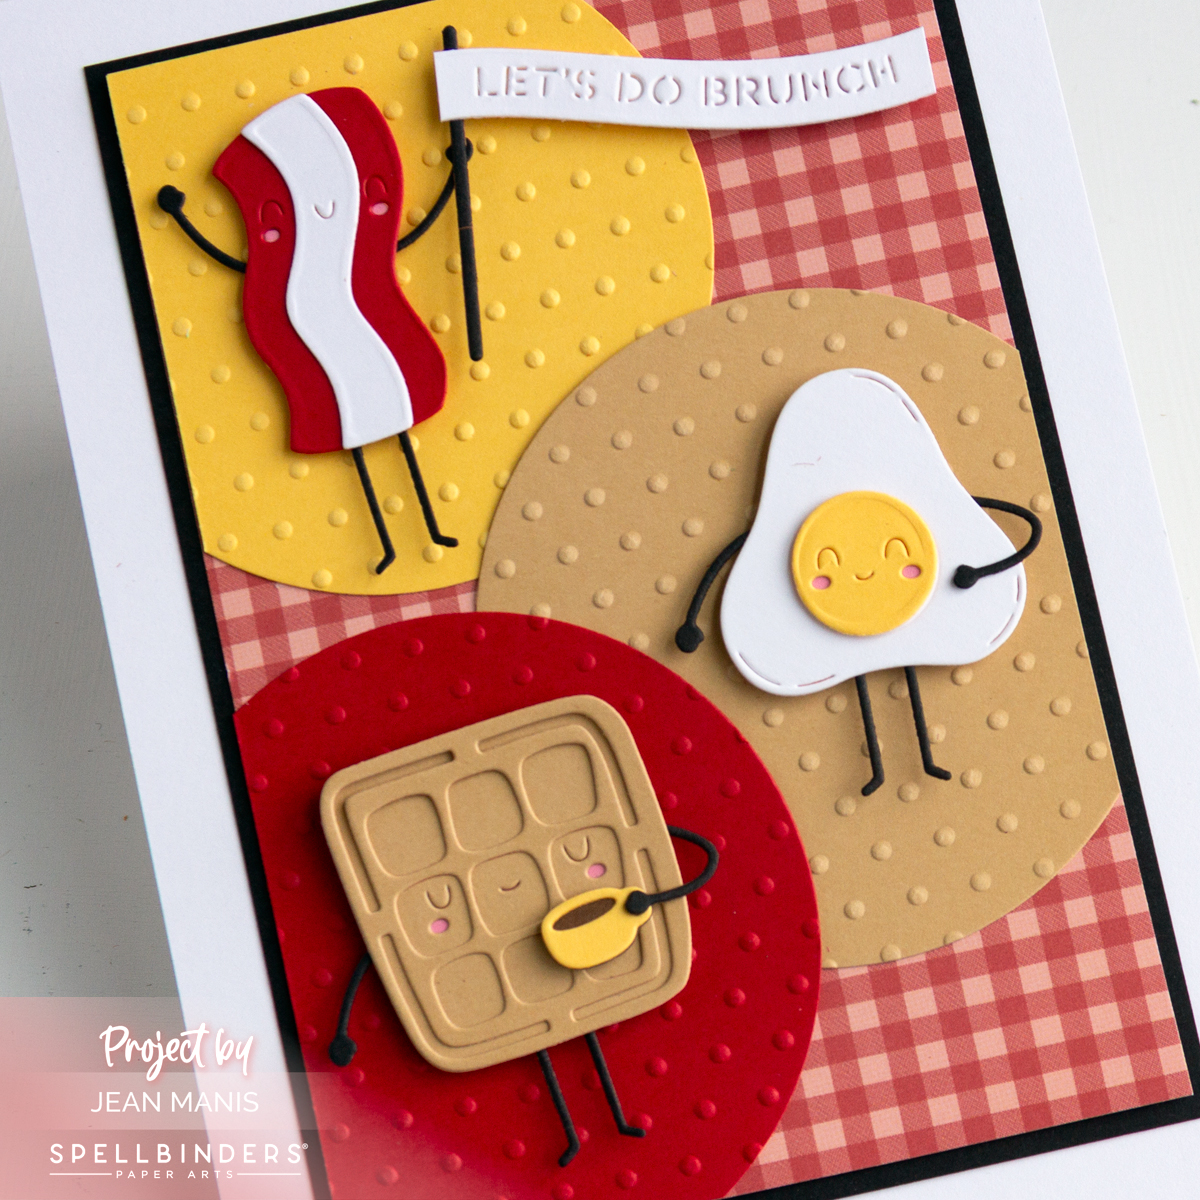
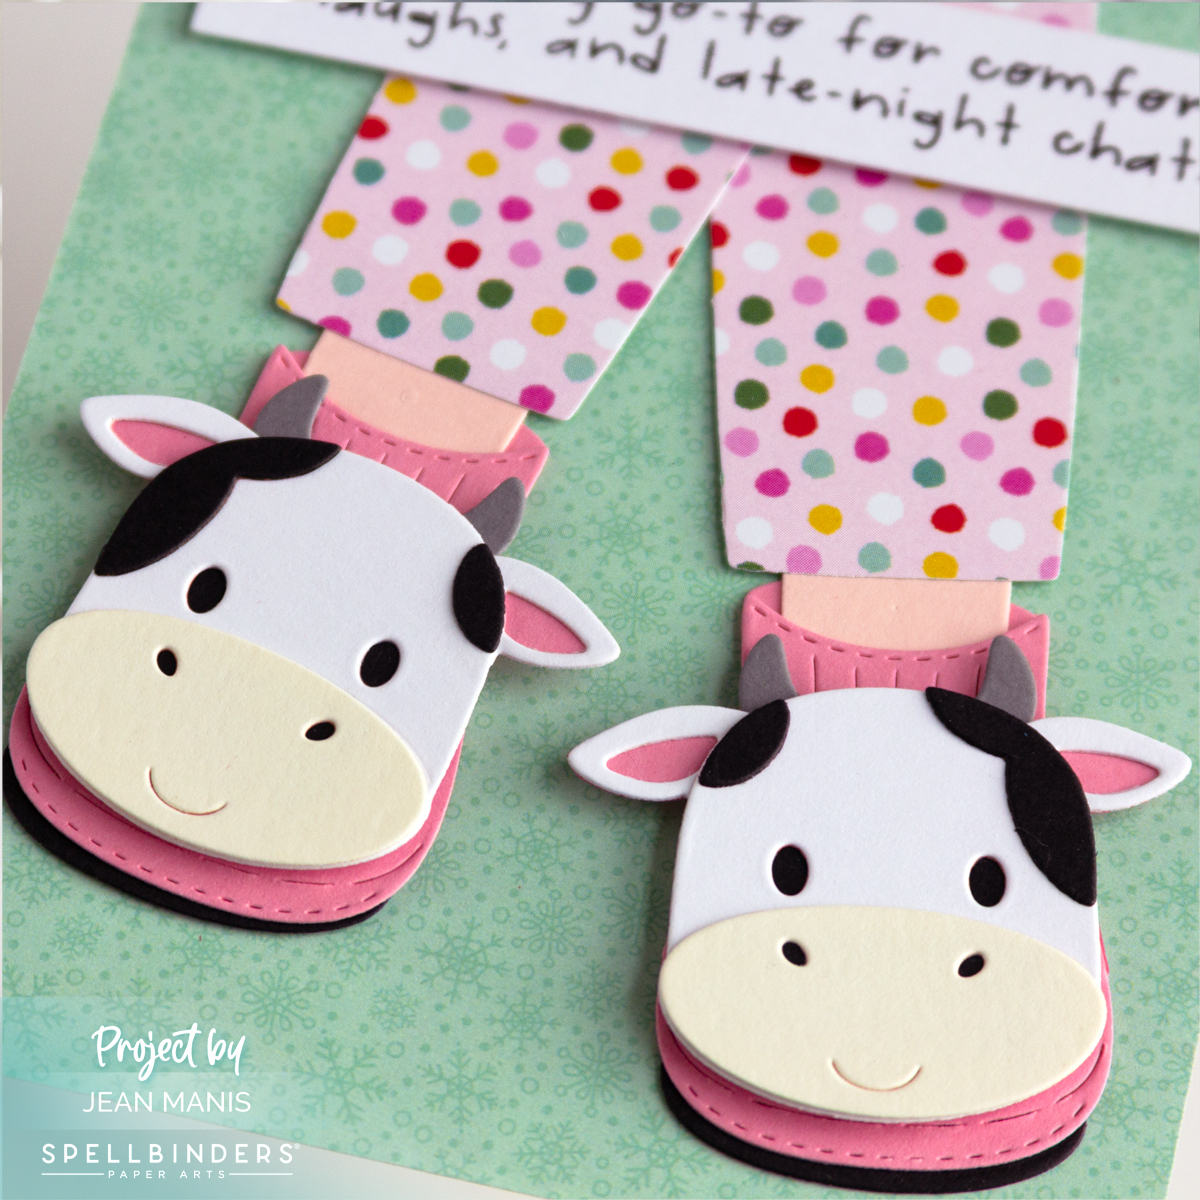
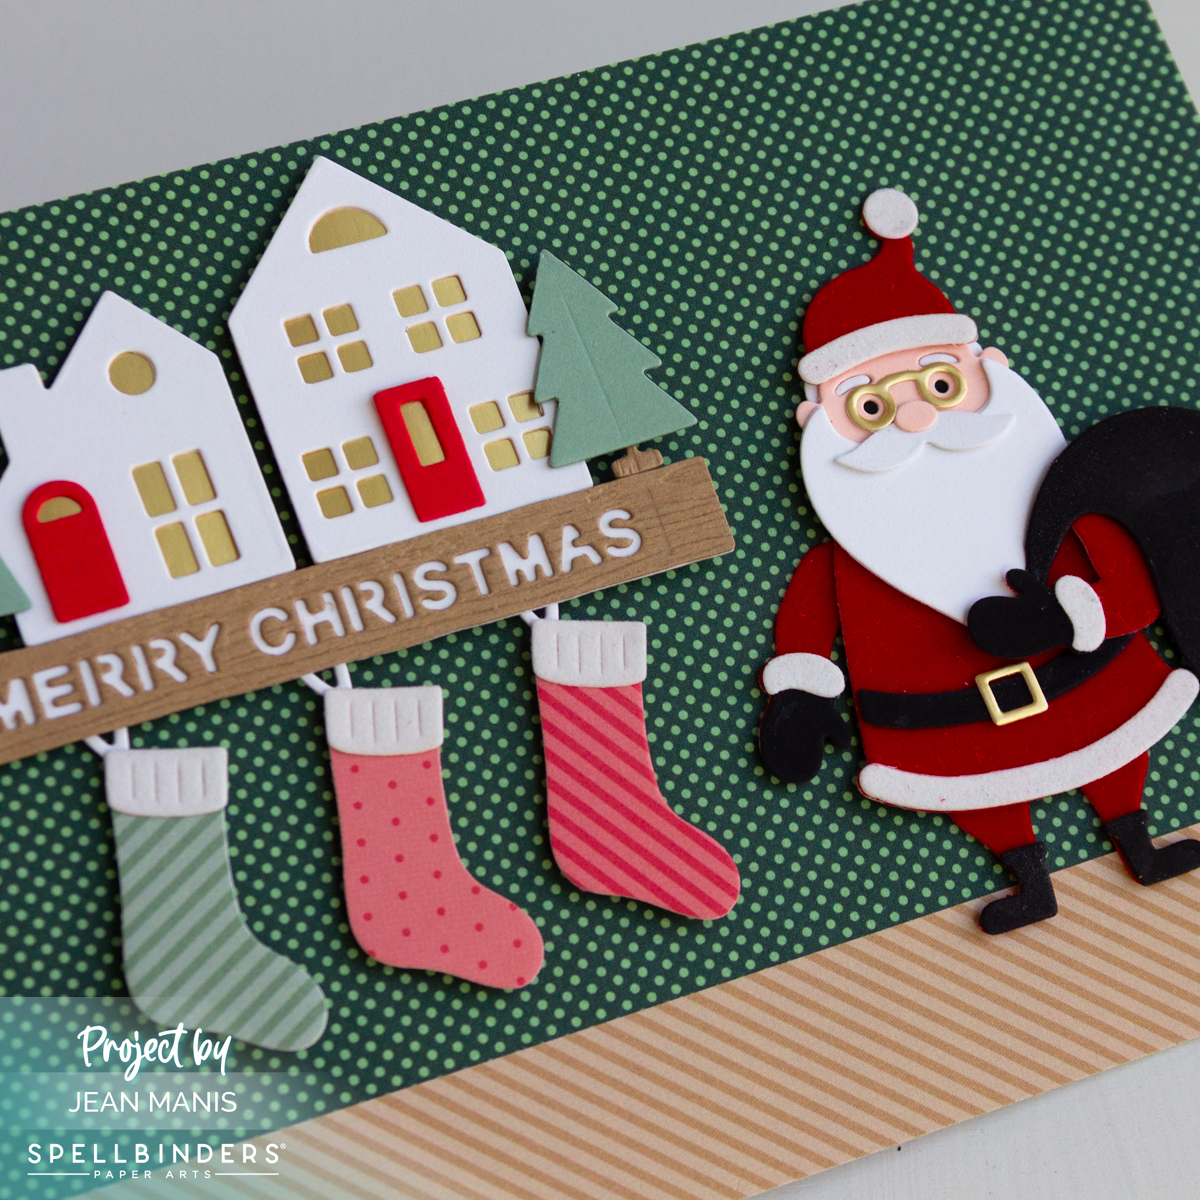
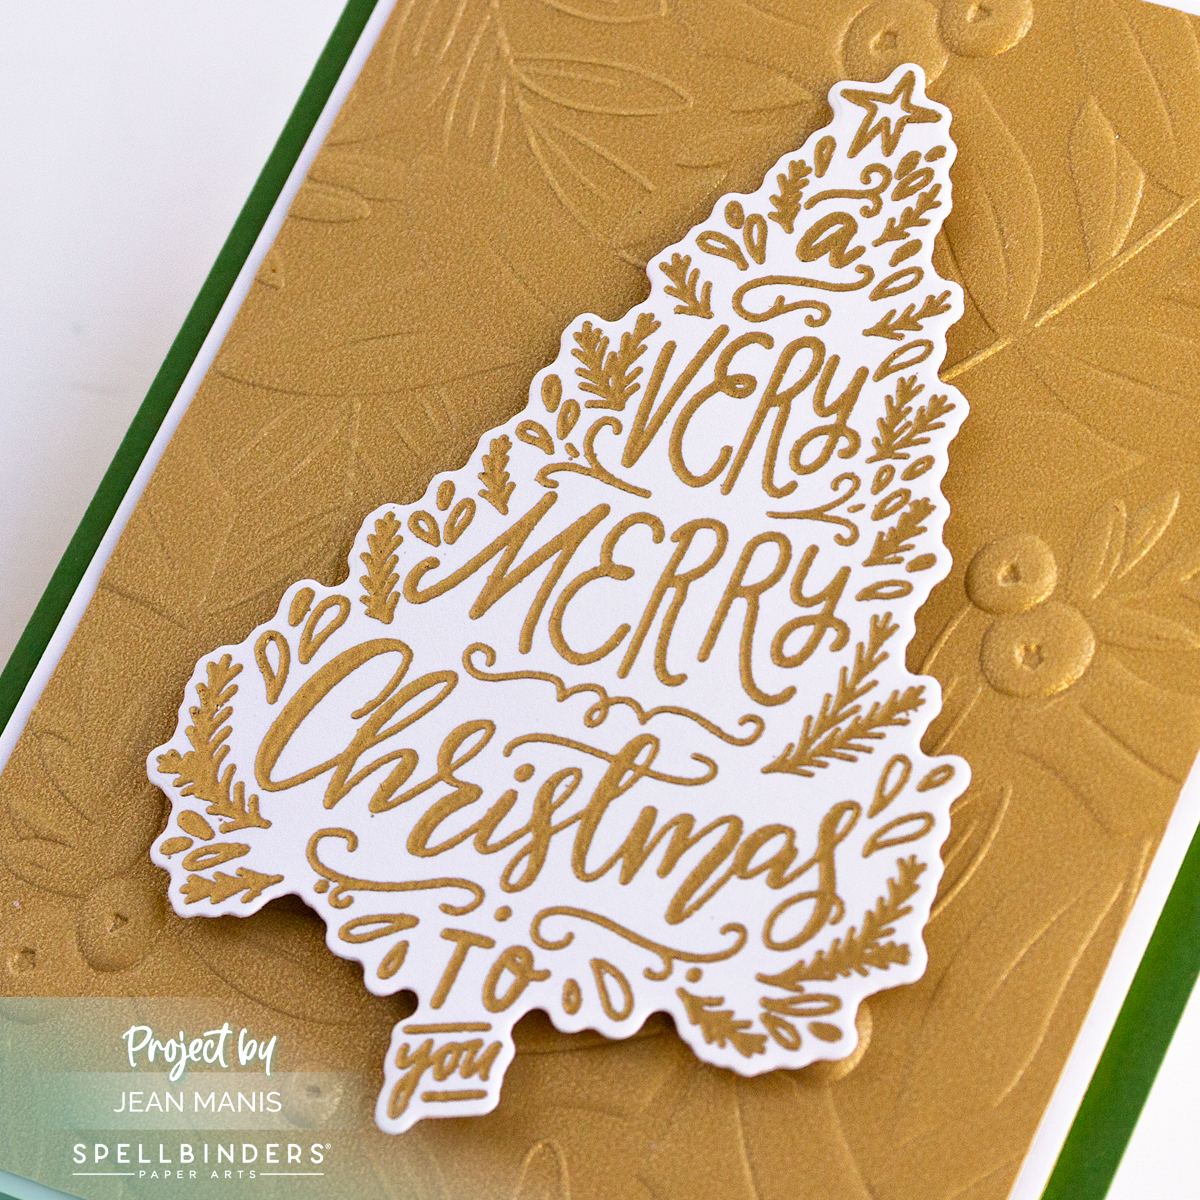
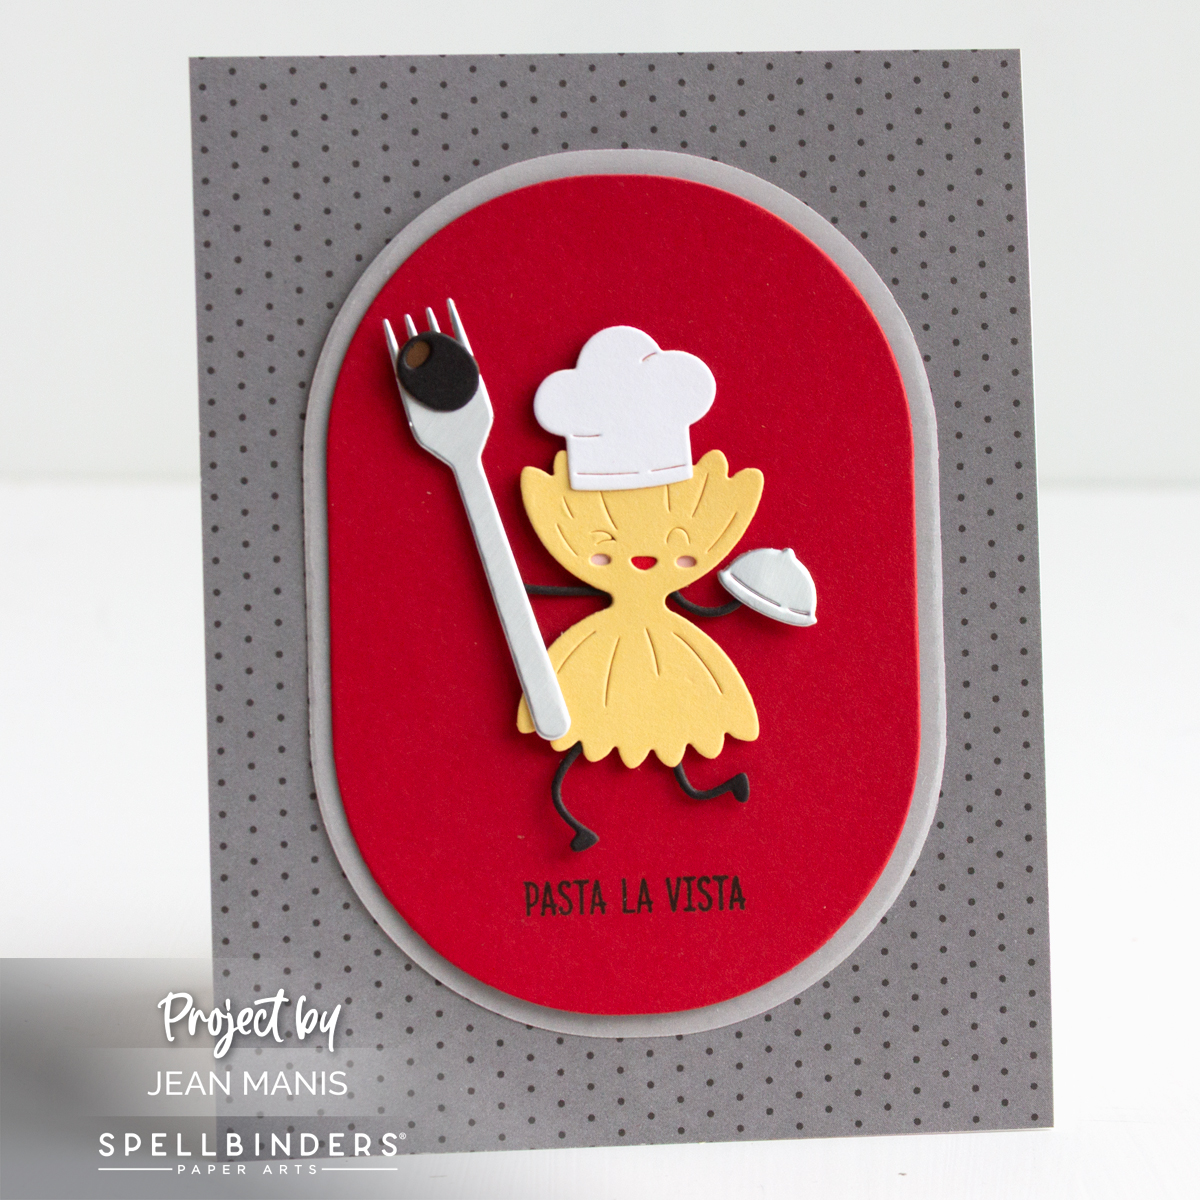
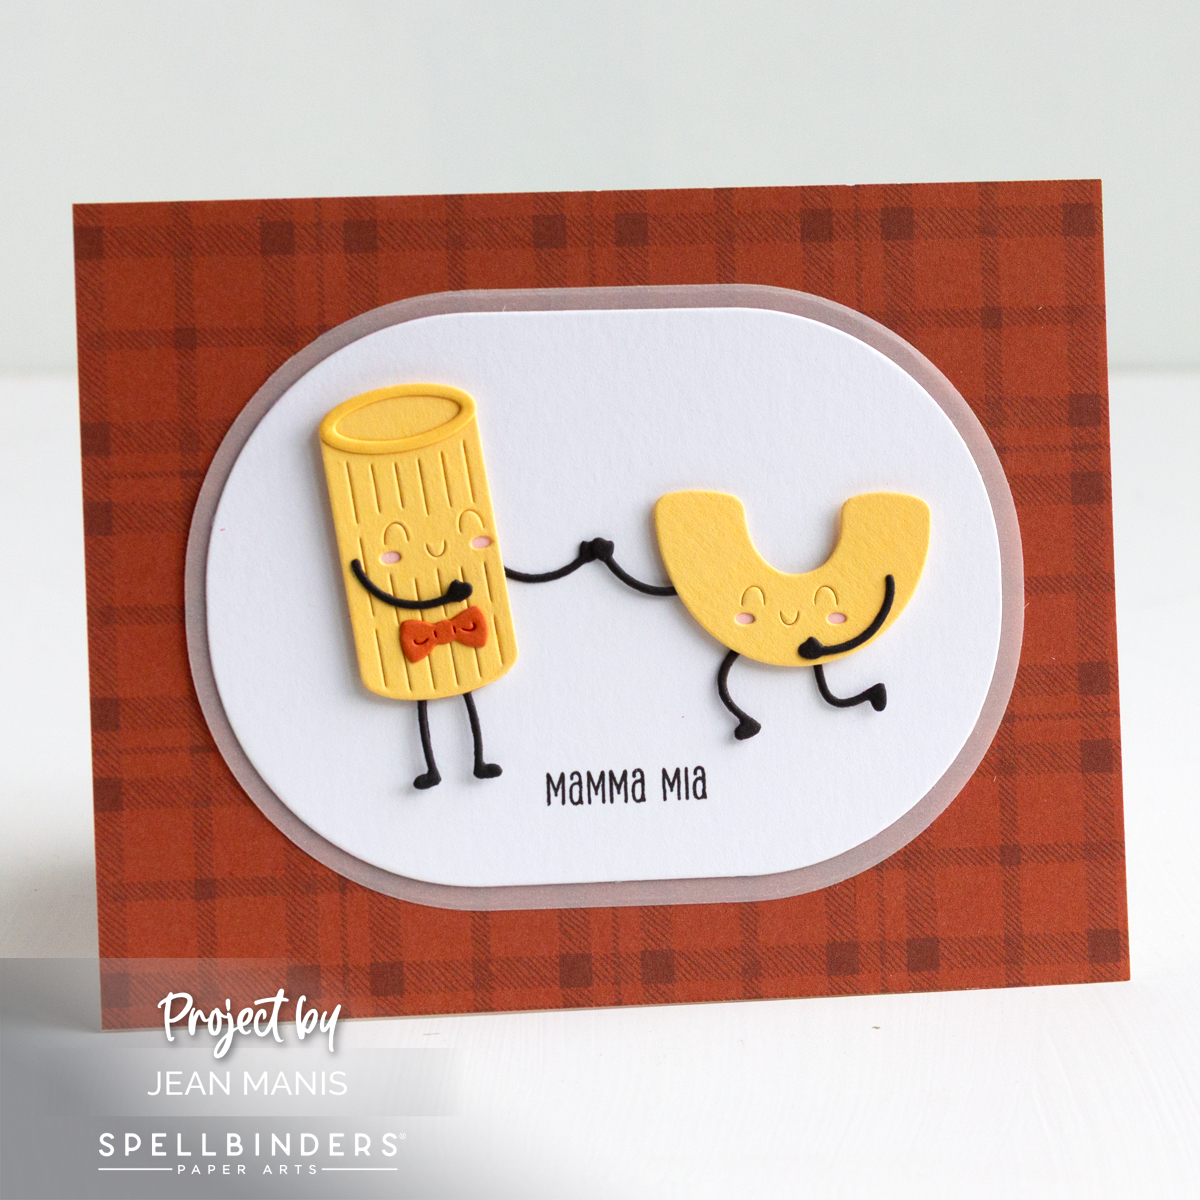
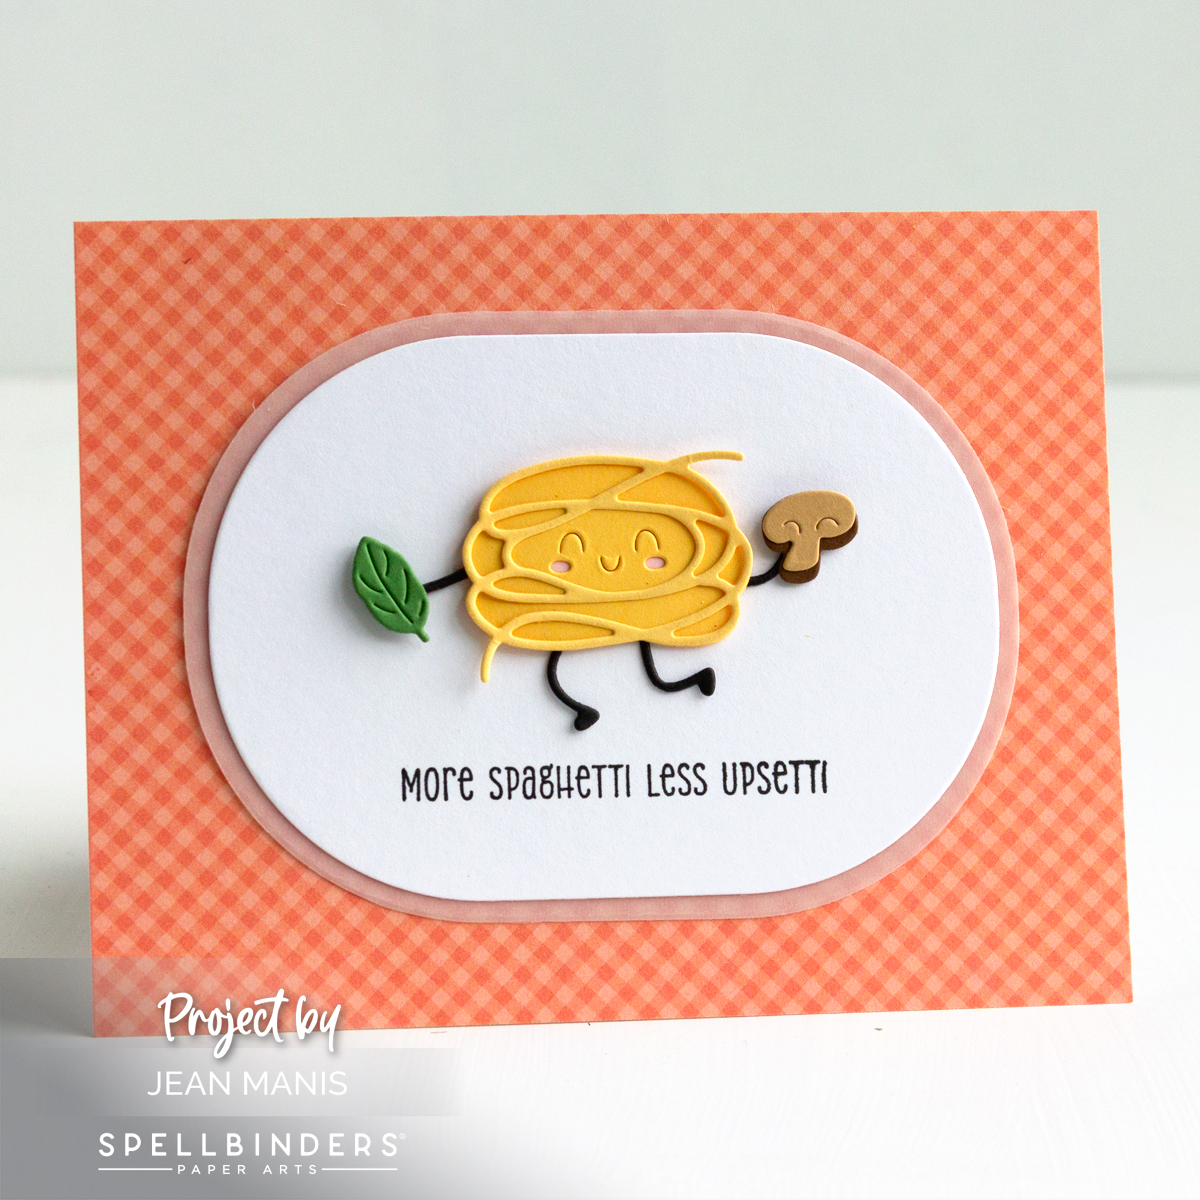
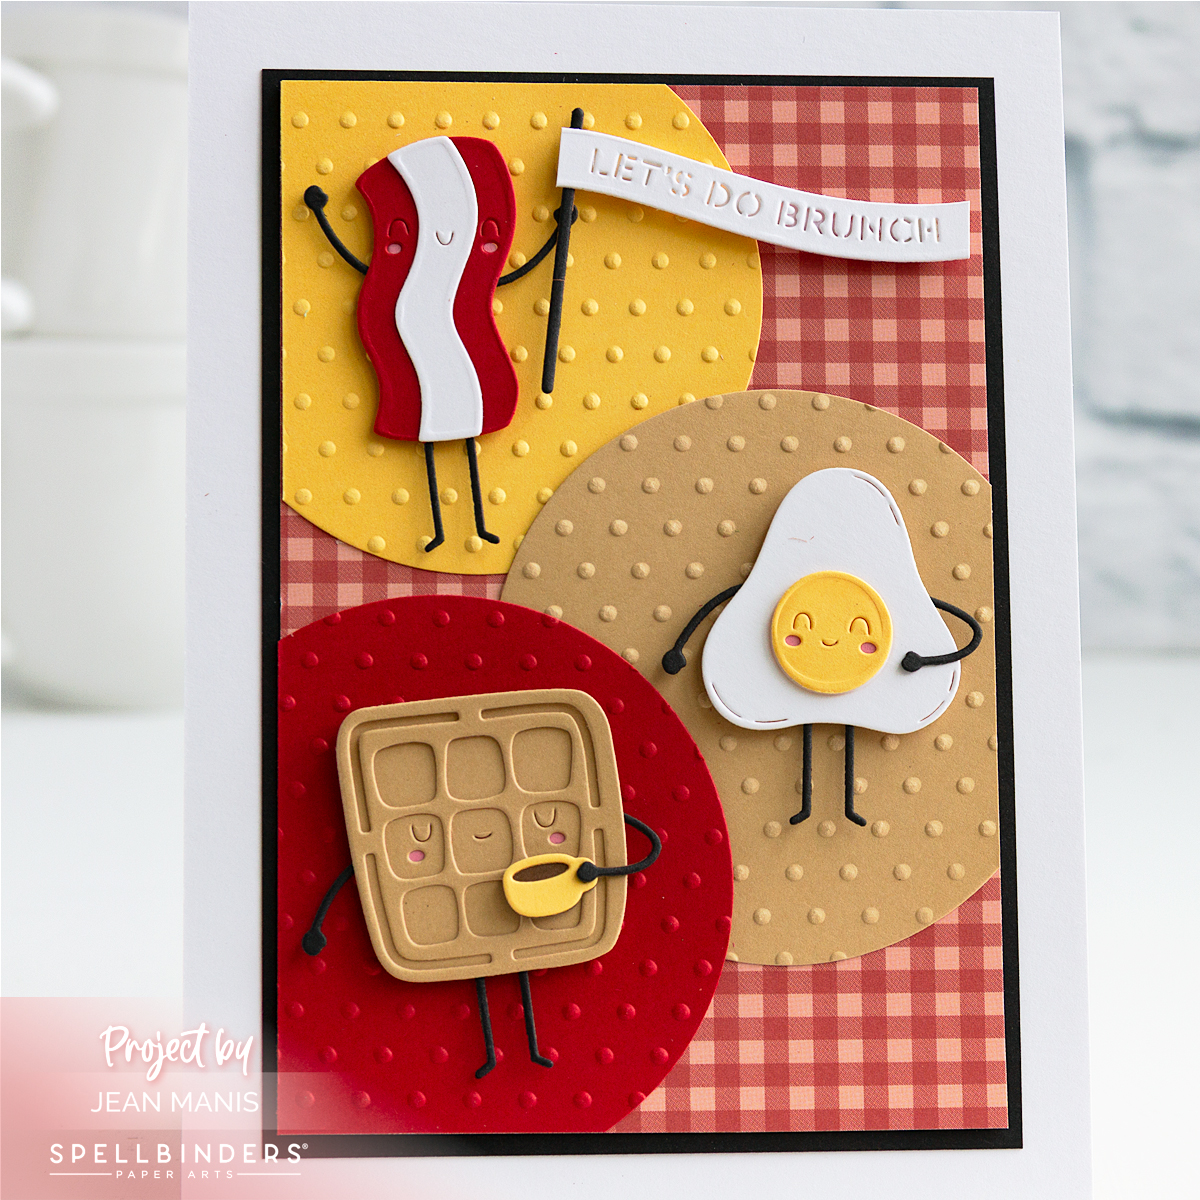
Spellbinders | Country Christmas Barn

Hello! If you love the nostalgic charm of White Christmas, this handmade card might just transport you there. Created with a die set and a BetterPress sentiment from the Country Christmas Collection at Spellbinders, this elegant design features a festively decorated barn with its doors open to reveal a Christmas tree inside. The refined palette—dark red, soft gray, crisp white, gold, and deep green—adds a touch of sophistication while keeping the rustic warmth. Finished with a snowflake-patterned background, this card captures the magic of a timeless country Christmas.

Spellbinders | Country Christmas Barn

    • Cover an A2-size card base with patterned paper.
    • Use a die in the Landscape Edges set to cut a snowbank from white cardstock. Trim and add to the prepared base.
    • Cut the barn pieces from a variety of cardstock colors and assemble. The product page has an image with assembly instructions. Cut the trees with the same set. I added a star and Christmas ornaments to the tree inside the barn using a die in the Cocoa Wonderland set.
    • Press the sentiment with Thunder ink on white cardstock. Cut with the coordinating die.
    • Add barn assembly and sentiment to base with foam adhesive.

While this card celebrates the season in classic holiday style, the barn die itself is incredibly versatile. With a quick change in color scheme, you could create a springtime farm scene, a fall harvest card, or even a patriotic Fourth of July barn. The traditional design elements from the Country Christmas Collection lend themselves beautifully to a range of occasions, making this set a timeless addition to your crafting stash.

Spellbinders | Country Christmas Barn

Spellbinders | Reindeer Mug Christmas Card

Hello! There’s nothing like a warm drink on a winter day, and this handmade card captures that feeling with a festive reindeer-shaped mug, created with the July Small Die of the Month Club kit at Spellbinders. The sentiment “snuggle season” perfectly sets the tone, while the background patterned paper adds to the holiday theme. The versatile Cocoa Greetings” kit also includes dies to create Santa and penguin mugs—plenty of options for festive creativity!

Spellbinders | Reindeer Mug Christmas Card

    • Cover an A2-size card base with a patterned paper panel.
    • Cut the mug with dies in the Cocoa Greetings” set. Assemble.
    • Press sentiment and cut with its coordinating die.
    • Add assembled mug and sentiment to card base with foam adhesive.

The Christmas mug makes an adorable and substantial focal point, and the creative fun comes in deciding which mug to build, what colors to use, and how to tie everything together with background and accents for a festive, personal touch.

Spellbinders | Reindeer Mug Christmas Card


Spellbinders | Warm Cocoa Wishes

Hello! I’m embracing the spirit of Christmas in July with a cozy winter-themed card created with the July 2025 Large Die of the Month kit from Spellbinders. The “Mugs & Mittens” die set includes several winter motifs for the cocoa topping including a snowman, Santa, and snowflake. The sentiment “Warm Cocoa Wishes” sets the tone for the season-to-come, while a snowflake dry-embossed background adds texture and depth.

Spellbinders | Warm Cocoa Wishes

    • Dry-emboss an A2-panel of Breeze cardstock with the Flurry of Snowflakes 3D folder. Add to a card base.
    • With the die set, cut cardstock for mittens, sweater sleeves, sentiment, mug, cocoa, and cocoa snowflake. Assemble.
    • Add assembled items to card base.

Spellbinders | Warm Cocoa Wishes


Spellbinders | Cheerful Bird Card

Hello! Today I’m sharing a bright and cheerful handmade card featuring a colorful bird framed within an arched frame. Using the same Spellbinders bird die set and sentiment set as a previous design, I gave this card a new twist by changing up the bird colors and using an arch. The sentiment, “Hope your day soars with laughter and fun,” brings an uplifting message suitable for birthdays, encouragement, or any joyful occasion. This card is a great reminder of how versatile a single die set can be!

Spellbinders | Cheerful Bird Card

    • Stamp the Spread Your Wings sentiment on a Waterfall cardstock panel. Cut with the second largest arch in the Essential Arches set and add to an arch cut from white cardstock with the largest die in the same set. Add assemble to an A2-size based covered with patterned paper. (I used Simple Stories Just Beachy.)
    • Cut the bird with dies in the Flying High set from a variety of colors. Assemble and add to card.
    • Embellish with Enamel Dots.

Spellbinders | Cheerful Bird Card


Spellbinders | Set Sail Die-Cut Card

Hello! There’s nothing quite like the calming rhythm of waves and a sailboat on the open water–and that’s the feeling I aimed to capture with this nautical handmade card. Using products from Spellbinders, I created an scene framed by a Polaroid-style die cut. The sentiment “Relax and enjoy!” adds to the vibe, while the rope-textured dry embossed card base reinforces the theme. It’s a card that invites the recipient to take a breath and imagine the salty breeze.

Spellbinders | Set Sail Die-Cut Card

    • Dry-emboss an A2-size cardstock panel with the Cast Away folder and add to a card base.
    • Cut the sailboat with this month’s Caboodle offering–the “Set Sail” die set. Assemble.
    • Cut the waves, three times, with dies in the Large Die set. Assemble. Find more Large Die inspiration HERE.
    • Cut a frame with the Memory Frames die.
    • Stamp the Fair Winds sentiment on to a cardstock panel and trim to fit behind the frame.
    • Adhere the frame, waves, and sailboat together and add assembly to the sentiment panel. Trim waves before adding to the sentiment panel.
    • Add assembly to the prepared card base.

Spellbinders | Set Sail Die-Cut Card