Spellbinders | Bibi’s Hummingbirds Collection

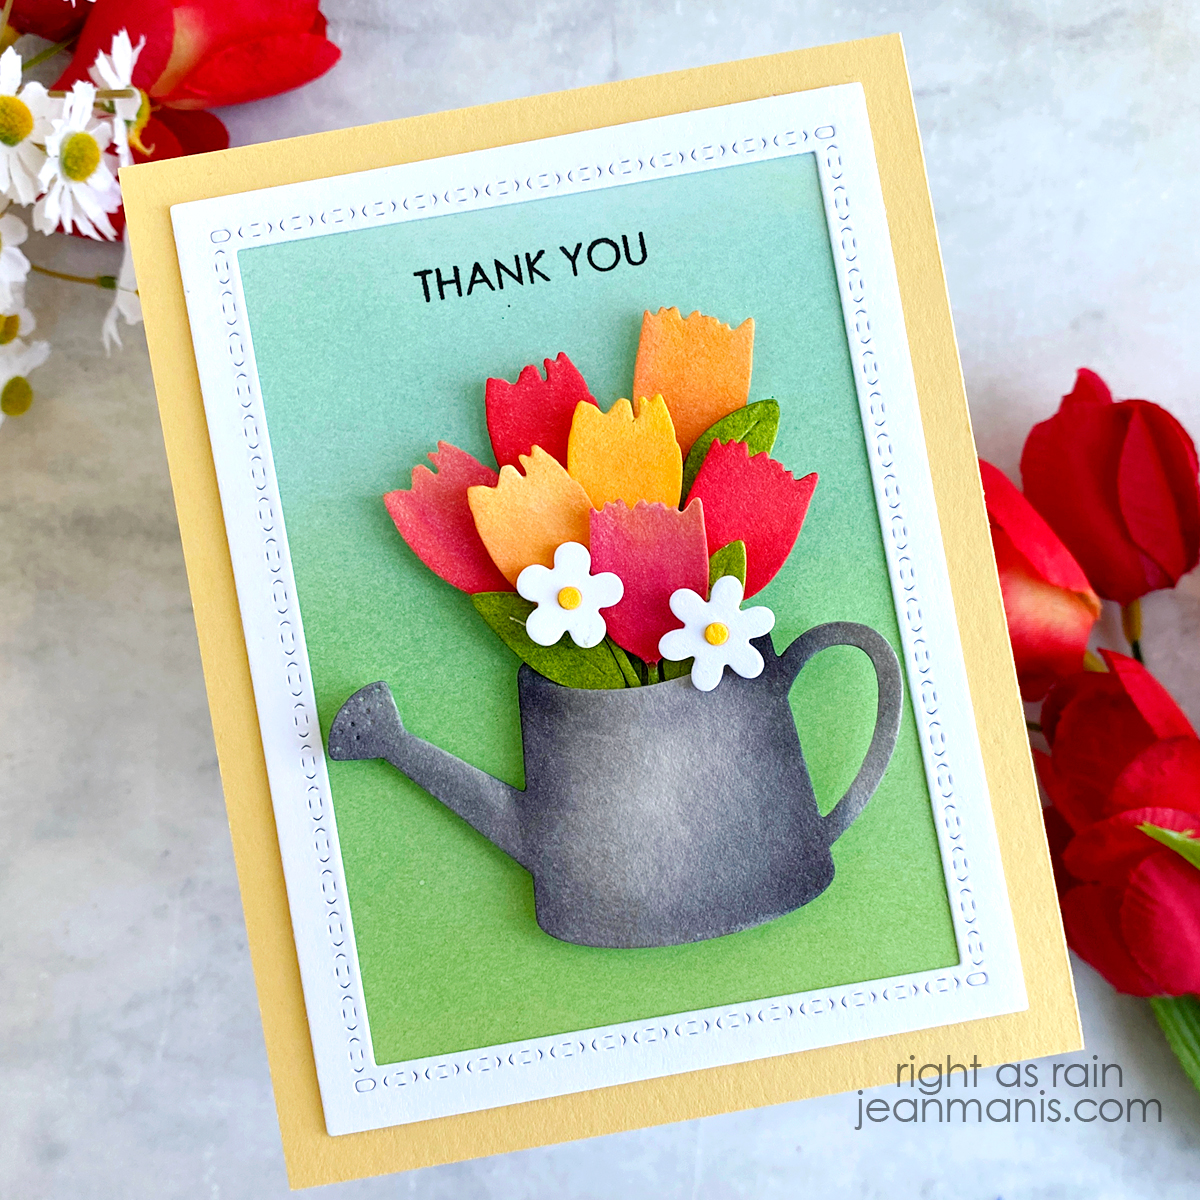
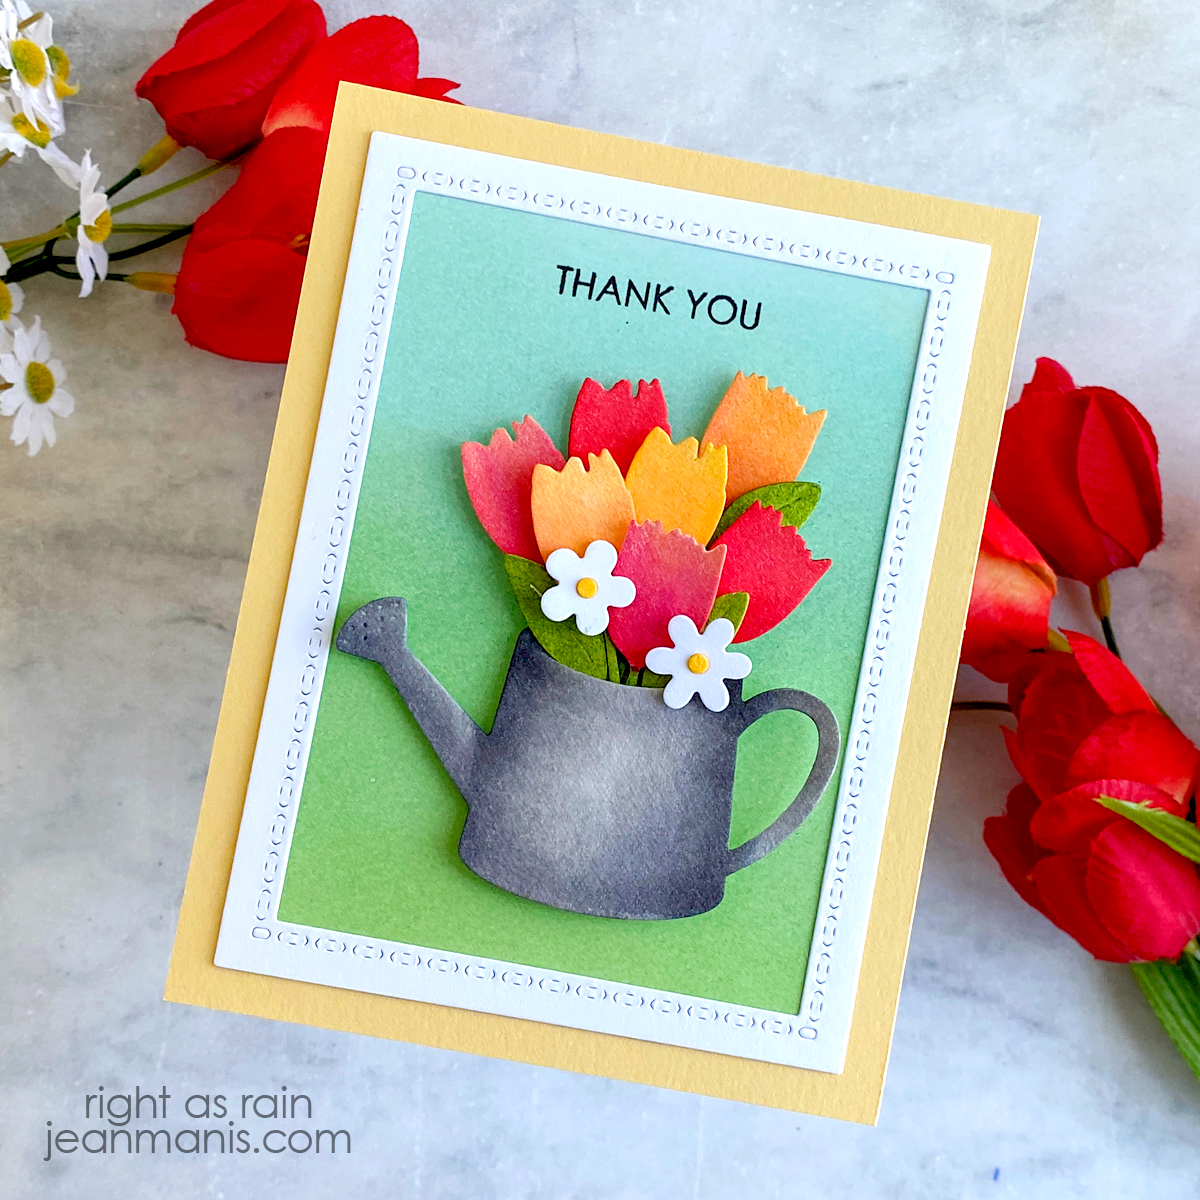
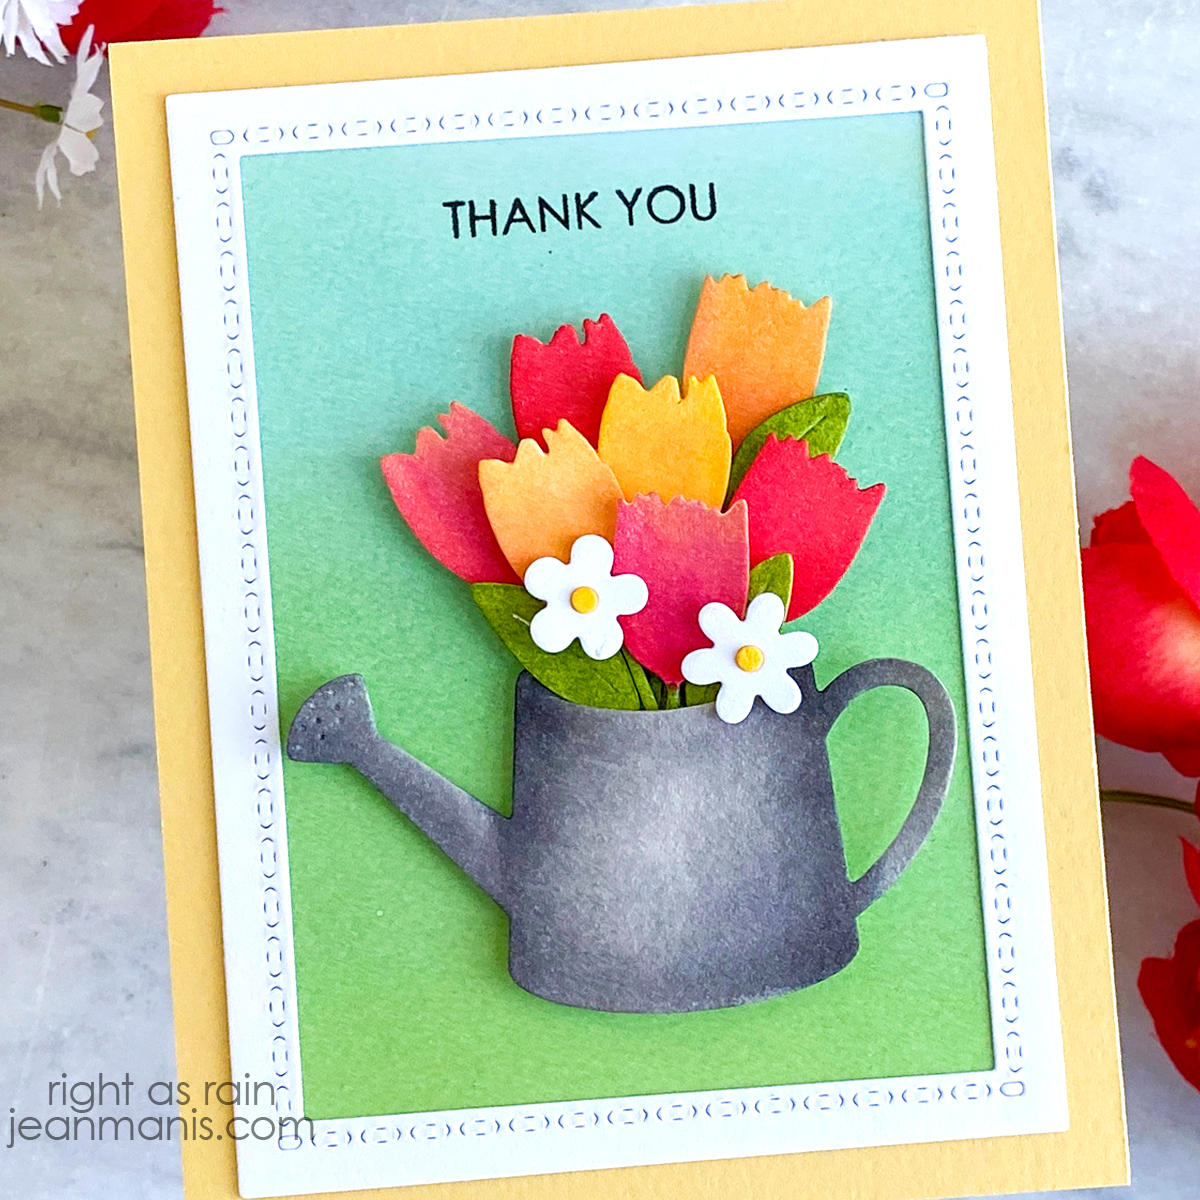
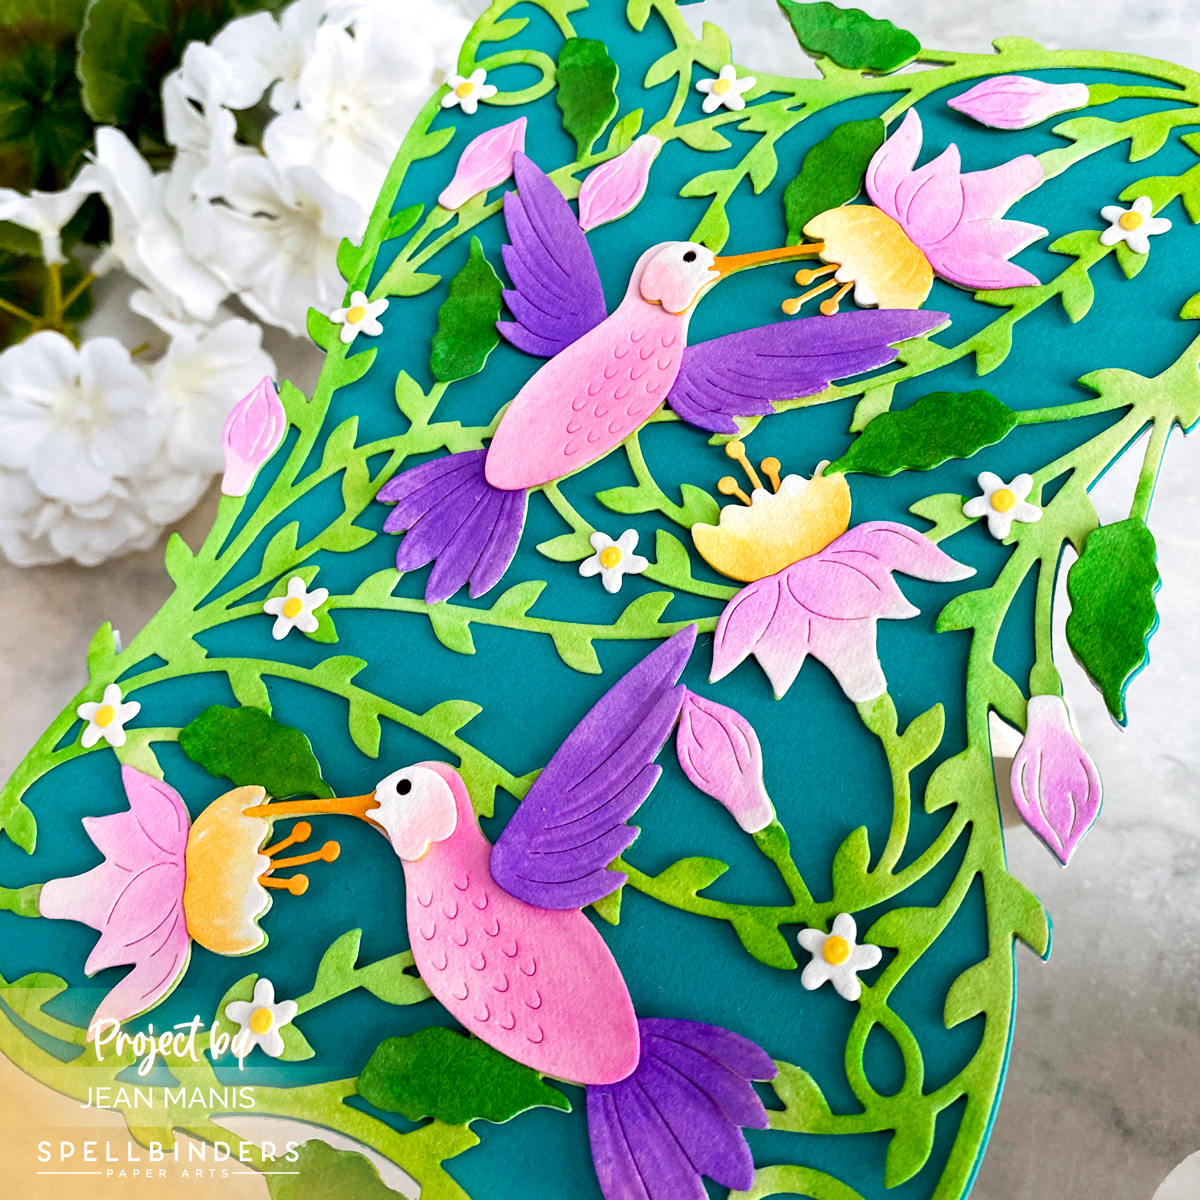
Hello! Today, I am sharing a card created with the stunning Spellbinders Delicate Floral Hummingbirds die set, part of Bibi’s Hummingbirds Collection. The design covers an A7 size (5 inches by 7 inches) card front.

Spellbinders | Bibi’s Hummingbirds Collection

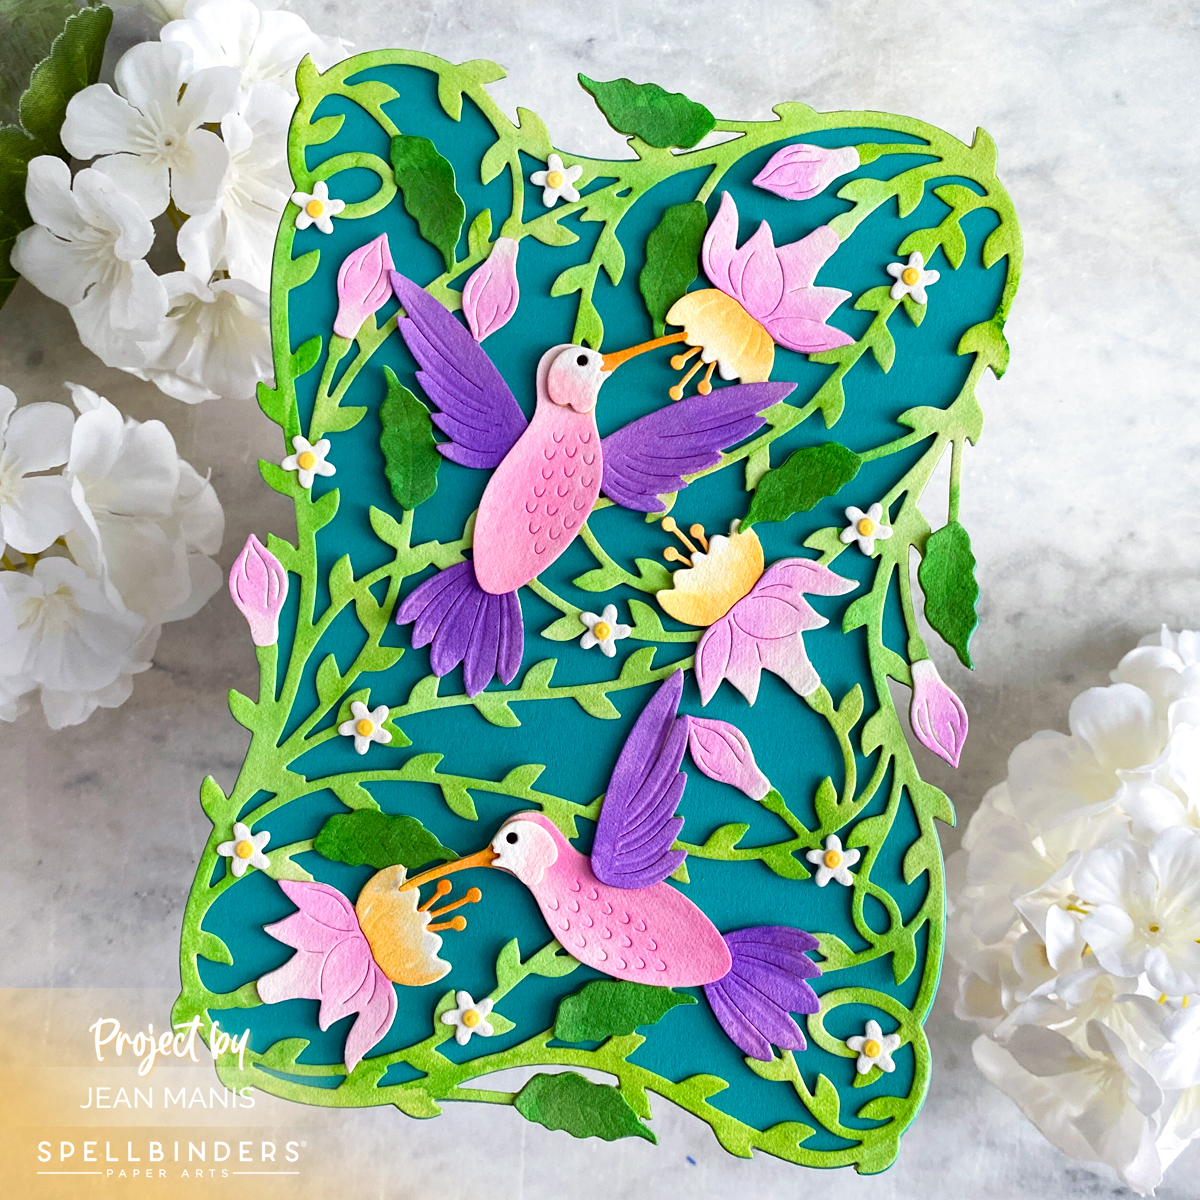
  • Using the Delicate Floral Hummingbirds rim die, cut base from Teal Topaz cardstock.
  • With the Delicate Floral Hummingbirds rim and insert dies, cut the background from watercolor paper. Watercolor with Zig markers in Light Green and May Green. (It took several applications to achieve the colors on my card.) Once dry, add to card base.
  • With the Delicate Floral Hummingbirds set, cut hummingbird pieces, floral pieces, and leaves from watercolor paper. Watercolor with Zig markers: Hummingbirds: Light Pink, Pink, Light Violet, Violet, Deep Violet; Leaves: May Green, Deep Green; Flowers: Bright Yellow, Orange, Light Violet; Small Flower Centers and Stamen: Bright Yellow.
  • Assemble elements and adhere to watercolored background.
  • Stamp one of the Hummingbird Sentiments on card interior.

Spellbinders | Bibi’s Hummingbirds Collection

Spellbinders has a 15% off $125+ sale available in the US through April 16th.

Spellbinders Bonus


Art Impressions | Tool Box Matchbook

Hello! Today I am sharing a project created with Art Impressions supplies. I have been familiar with the company for years, but I have never before crafted with their products; I re-discovered them while doing my recent deep dive into watercoloring. Their blog, Facebook page, and YouTube channel are full of inspiration, and their customer service is fantastic!

Art Impressions | Tool Box Matchbook

The Matchbook series has many different options. You can see an intro video here. The Tool Shed, with which I created, was released this year. I like the small size – it allows me to practice watercoloring with markers, learn the colors of the markers, and finish a watercoloring project in a relatively short amount of time. I am looking forward to crafting more of these projects. The series offers sets for Halloween, Christmas, birthdays, cat lovers, gardeners, …

Art Impressions | Tool Box Matchbook

  • Stamp Tool Shed images in VersaFine ink on Arches Cold Press watercolor paper.
  • Watercolor the images with color medium of choice. I used a combination of Tombow and Zig markers.
  • Once dry, cut the images with the dies included with the Tool Shed set. Stamp sentiment on white cardstock and cut with coordinating die.
  • Cut matchbook from patterned paper with the MB Template. Add Tool Shed elements.


Spellbinders | April 2023 Large Die of the Month

Hello and happy April! Today, I am sharing a “Hello” card created with the Spellbinders April 2023 Large Die of the Month “Punch and Pierce Frame and Sentiments” set. Check out more inspiration on this set here.

Spellbinders | April 2023 Large Die of the Month

Spellbinders | April 2023 Large Die of the Month


Penny Black | Watering Can and Blooms

Hello! Today I am sharing a spring-themed card created with Penny Black supplies, new and old. As I mentioned in this post, featuring a card of the same design, I have been watching the video series created by Jill Foster for Penny Black, which has been incredibly instructive.

Penny Black | Watering Can and Blooms

  • Using the two largest Stitched Frames dies, cut frame from white cardstock. (This set cuts on the inside and creates a cut pattern on the outside. By using the two dies together, I get a frame with the cut pattern on the frame.)
  • Ink white cardstock panel with Tumbled Glass and Mowed Lawn. Stamp Flower Teddy sentiment with VersaFine Onyx ink. Trim panel and adhere frame to top. Add assembly to yellow card base.
  • Cut Watering Can elements and tulips from Arches Cold Press watercolor paper. Color with watercoloring medium and colors of choice (some of the markers that I used to color the watering can and tulip blooms are listed below). I used the May Green Pitt Artist Pen to color the greenery and stems. Trim tulips as needed and add to inside of the watering can.
  • Add assembly to card with foam adhesive.

<img class="aligncenter size-full wp-image-22404" src="https://jeanmanis.com/wp-content/uploads/2023/03/JeanManis-PennyBlack-WateringCanandTulips-3.jpg" alt="" width="1200" height="1200" />


Spellbinders | March 2023 Clubs Inspiration Blog Hop

Hello! I am delighted to be participating in a blog hop celebrating the Spellbinders March 2023 Club Subscriptions. You should have reached me from the blog of Daniel West. (The entire list of participants is included at the end of my post.) For the hop, I created a card showing a different way to use the March 2023 Large Die of the Month. As designed, the set creates a three-dimensional card, which I showed here.

Spellbinders | March 2023 Clubs Inspiration Blog Hop

Spellbinders is giving away a $25 gift certificate to three lucky blog readers – selected from the comments on the Spellbinders blog. Giveaway closes on Sunday, March 26, 11:59 pm MST. The winner will be announced in the blog hop post the following Wednesday. The winner is responsible for shipping cost, duties and taxes. Please note, store credit (gift certificate) cannot be applied to Club Subscriptions; store credit can be applied to shop past Club products, Club extras, and regular releases.

Create a spring-themed friendship card with the Large Die of the Month using watercolored paper for the die-cut elements.

Spellbinders | March 2023 Clubs Inspiration Blog Hop

  • Apply reinkers and watercolor marker ink to watercolor paper. Once dry, cut tree base, flowers, and leaves from the watercolor paper using dies in the Large Die of the Month set.
  • Adhere leaves and flowers to tree. Cut flower centers from Snowdrift cardstock and adhere. Trim tab from bottom of the tree (the tab is needed for the 3D application of the die set).
  • Using watercolor paper to which Mowed Lawn reinker has been applied, cut hill with die in the Color Block Scenic Scape set. For background, apply Tumbled Glass ink to Snowdrift cardstock. Trim and add to card base. Add hill to background and trim as needed.
  • Add tree to scene with foam adhesive. Cut bird from watercolored paper using dies in the Sweet Birds on a Branch set. Assemble and add to tree with foam adhesive.
  • Stamp sentiment with stamp in Seasonal Motif set. Cut with die in the A Cut Above the Rest Sentiments Stamp & Die Set. Add to card below the tree.

Thanks for visiting! Head next to the blog of Jennifer Kotas. Scroll for the full blog hop list.


Spellbinders Blog

Yana Smakula

Sandi MacIver

Annie Williams

Daniel West

Jean Manis <–You are here

Jennifer Kotas

Lydia Fiedler

Bibi Cameron

Heejung Hunsberger

Rebecca Keppel

Mindy Eggen

Inge Groot

Jumi Baek