Spellbinders | Elegant Poinsettia Tree Christmas Card

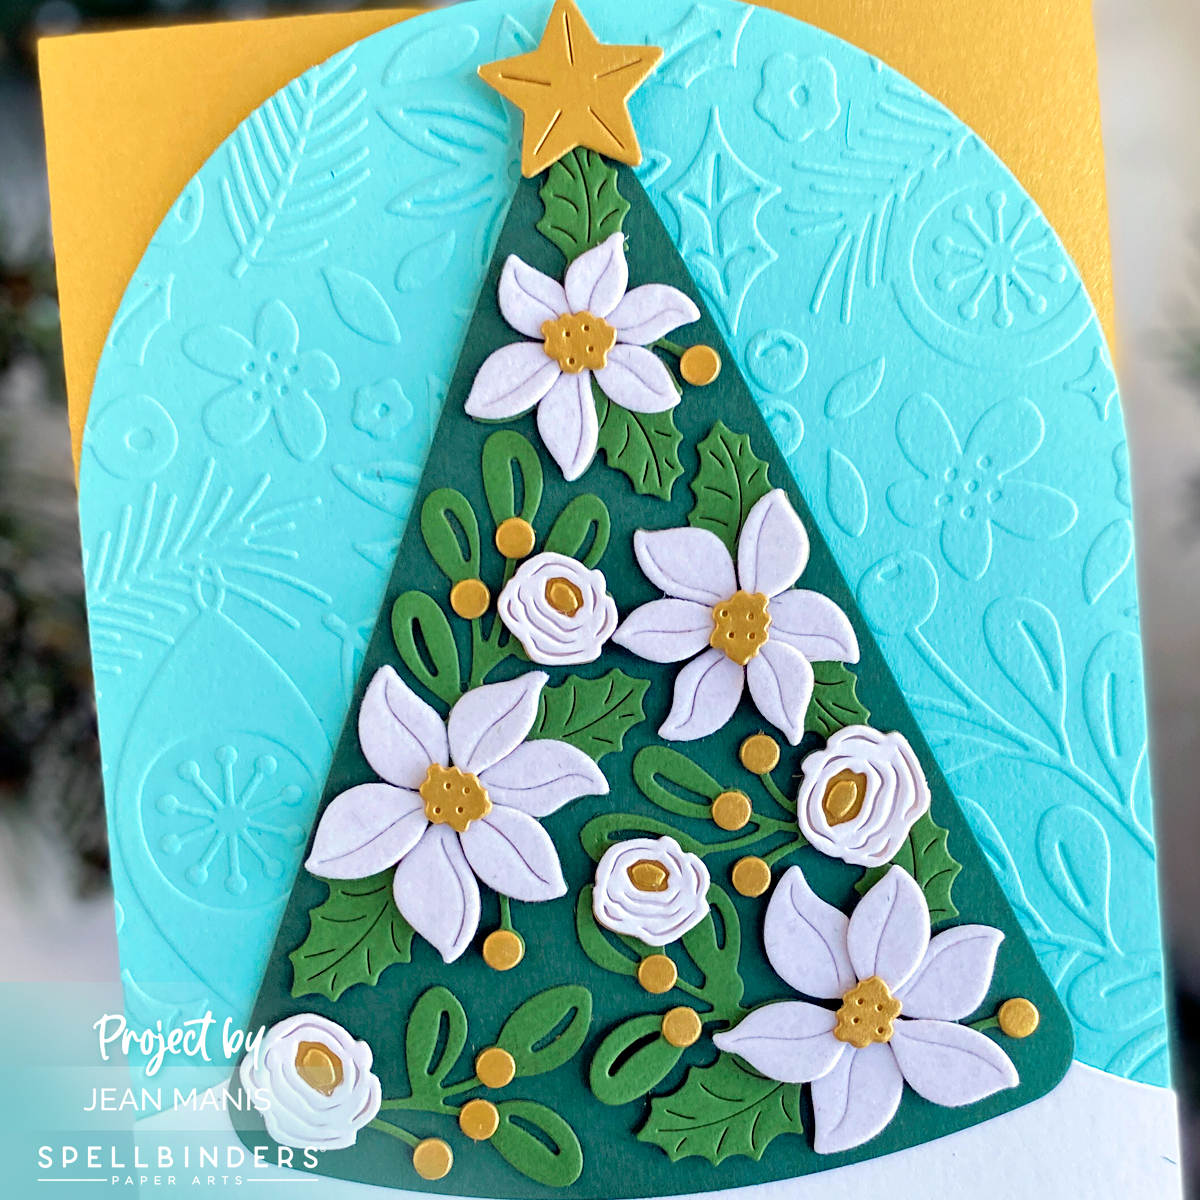
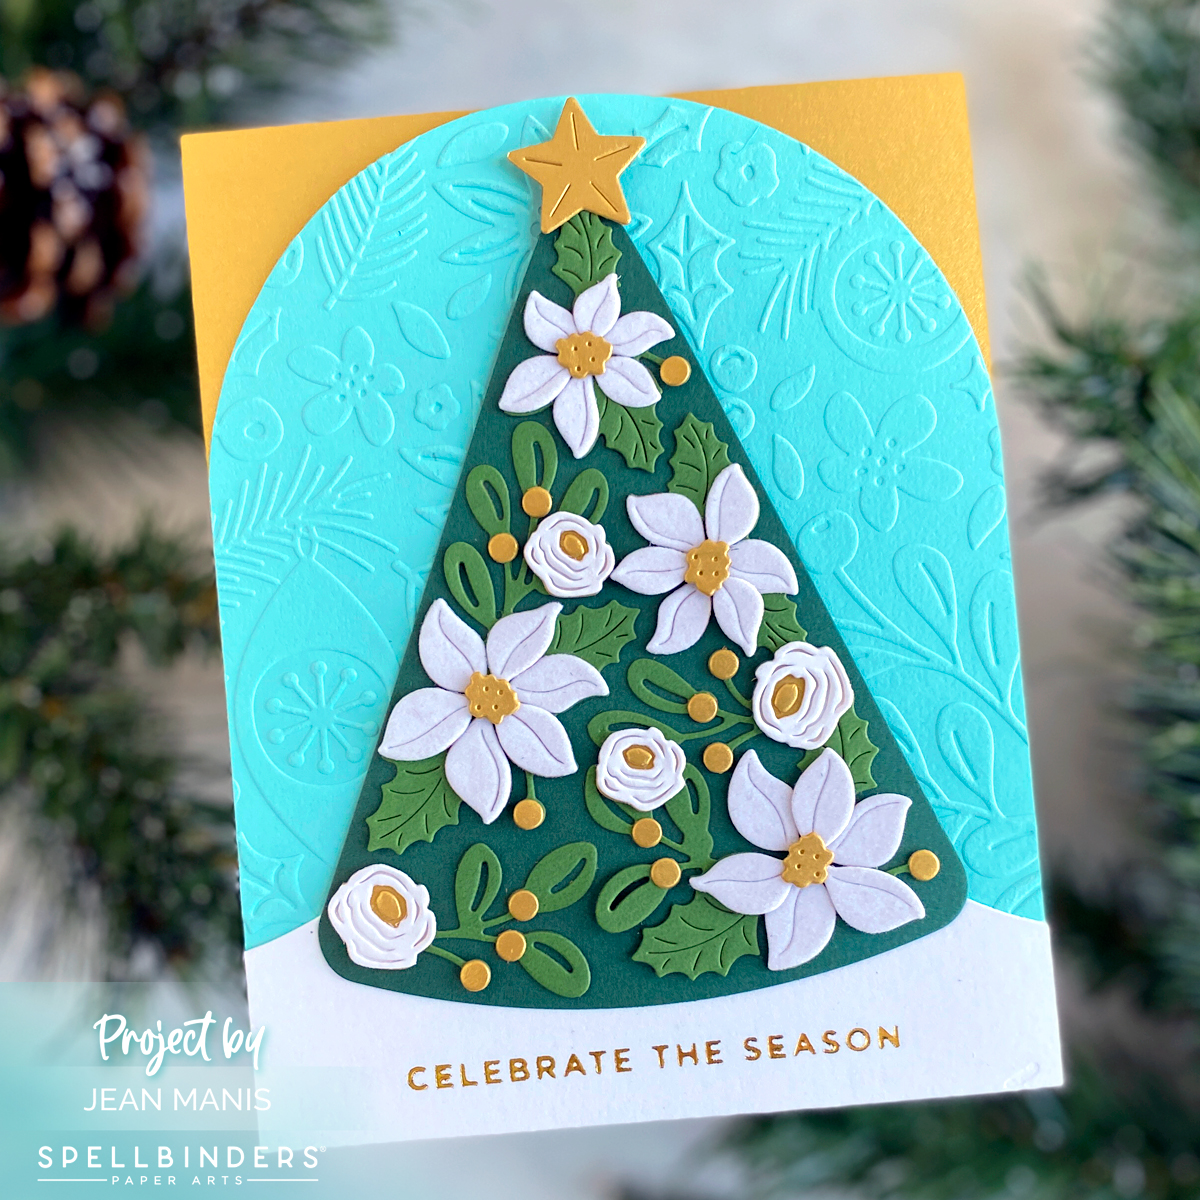
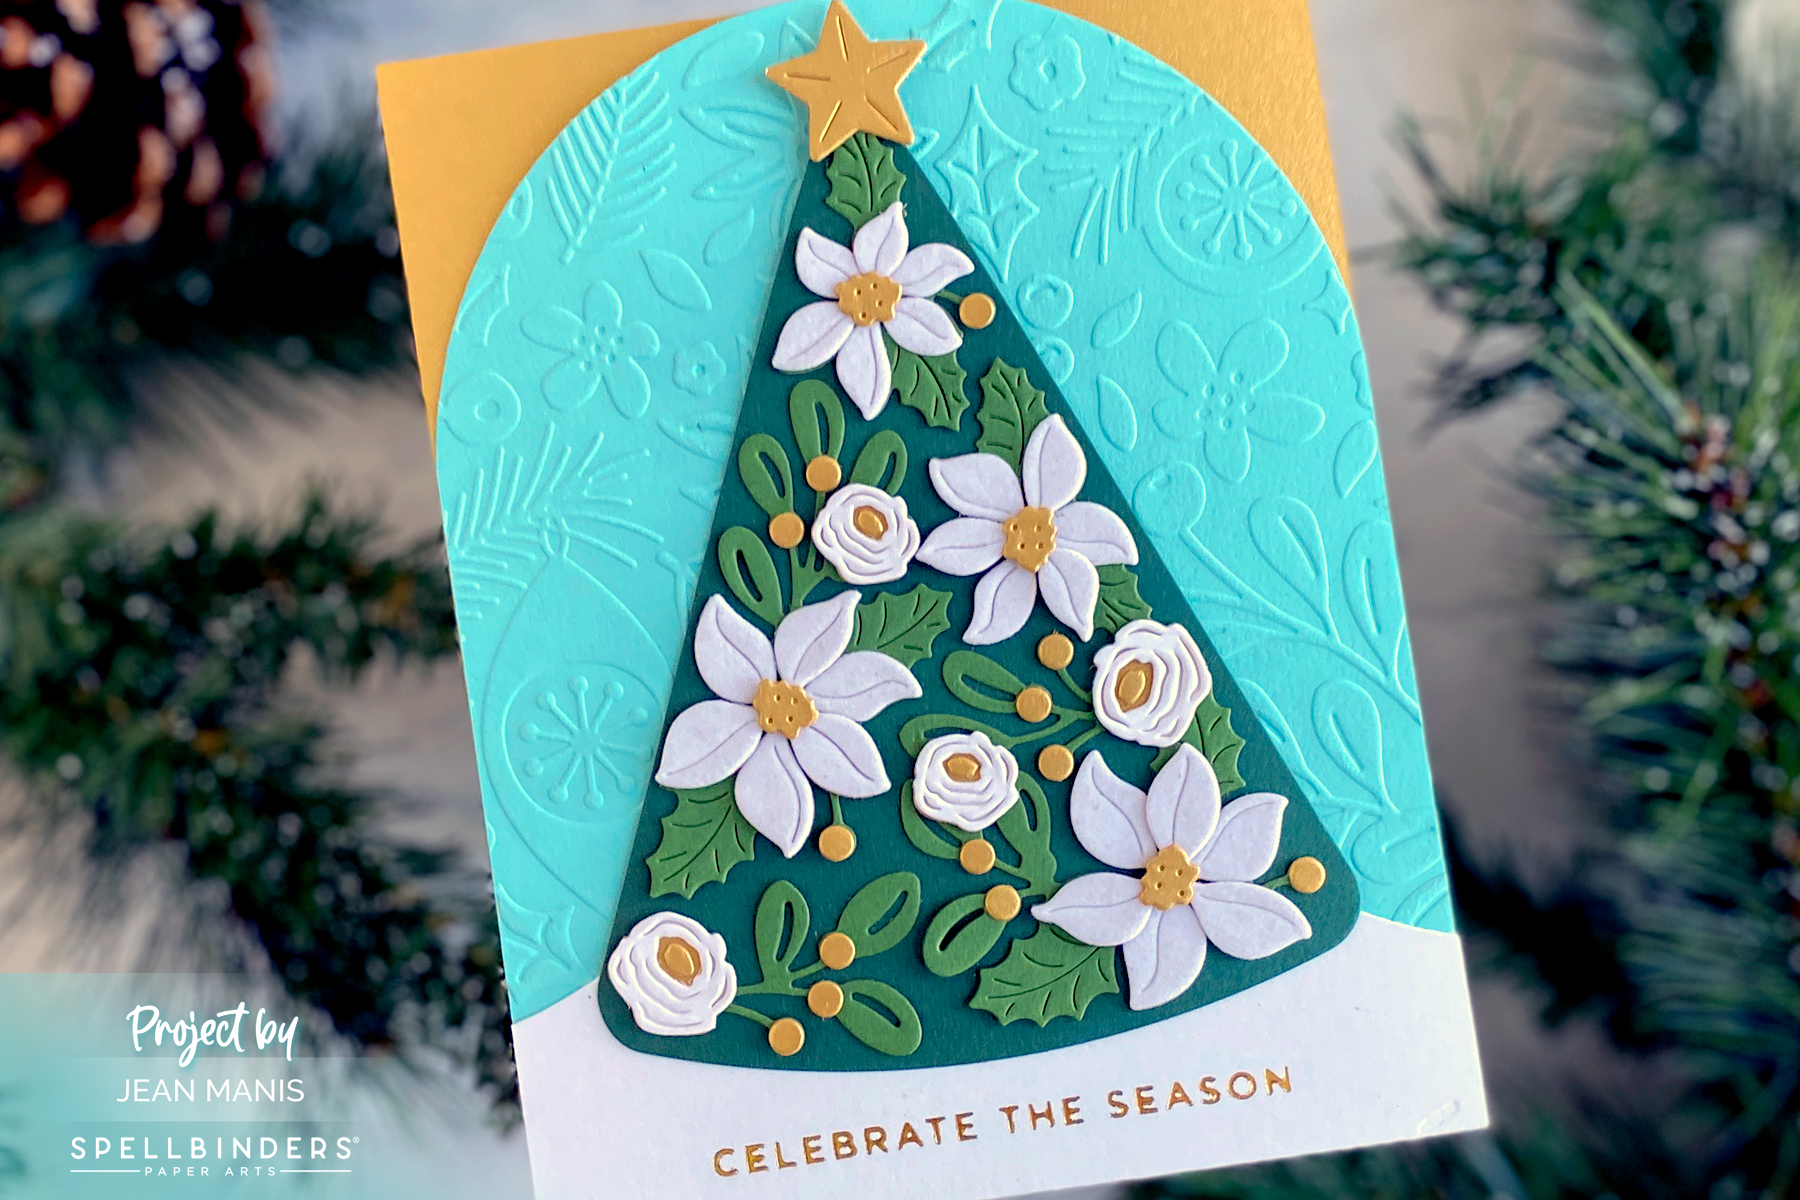
Hello! I am delighted to showcase the July 2023 Spellbinders Small Die of the Month Club set – “Layered Poinsettia Tree” – on an elegant Christmas card. The Christmas tree evokes a sense of timeless holiday tradition.

Spellbinders | Elegant Poinsettia Tree Christmas Card

    • With the “Layered Poinsettia Tree” set, I cut the tree, greenery, small flowers, poinsettias, and star from a range of materials including brushed white cardstock, brushed gold, and fern cardstock.
    • Enhancing the festive atmosphere, I dry-embossed an arch, cut with the largest die in the Essential Arches set from Waterfall cardstock, using the Scattered Christmas folder. (This folder was the October 2022 Embossing Kit offering.) The arch was added to an A2-size card base of brushed gold cardstock.
    • Completing the card is a Spellbinders Glitter Wishes sentiment (now retired), glimmer foiled in gold, which reads “Celebrate the Season.” The sentiment is positioned on a snowbank, cut with a die in the Color Block Scenic Scape set, serving as a grounding element for the tree.

Spellbinders | Elegant Poinsettia Tree Christmas Card


Spellbinders | Colorful Ocean Delight

Hello! Dive into a world of vibrant colors with a card showcasing the Spellbinders June 2023 Small Die Kit Club – “Dancin’ Octopus & Friends.” Send this card to celebrate special occasions, achievements, or simply to brighten someone’s day with a burst of color and cheer. For more inspiration, check out my Sending Hugs from the Sea post and the Spellbinders Project Round Up.

Spellbinders June 2023 Small Die Kit Club

    • I created the wave background, measuring 4 x 5 1/4 inches, with the Color Block Scenic Scape and Essential Rectangles die sets from cardstock colored with Tumbled Glass, Salvaged Patina, Mermaid Lagoon, and Peacock Feathers Distress Oxide inks. The assembled waves were added to an A2-card base covered with Bazzill Canvas cardstock.
    • I cut the pieces for the octopus with the Small Die Kit Club dies from cardstock colored with Abandoned Coral and Spun Sugar Distress Oxide inks and light gray cardstock.
    • I cut the pieces for the jellyfish with the Small Die Kit Club dies from cardstock colored with Wild Honey, Ripe Persimmon, Twisted Citron, Lucky Clover, Shaded Lilac, and Villainous Poison Distress Oxide inks, and vellum.
    • I added the assembled octopus and jellyfish to the wave background with dot and foam adhesive.

Spellbinders June 2023 Small Die Kit Club

Add some sparkle to your projects at a discount! The Spellbinders Sparkles sale is available through June 25.


Sending Hugs from the Sea | Spellbinders Small Die Kit Club

Hello! Today I am sharing a mini-slimline, underwater scene card created with the Spellbinders June 2023 Small Die Kit Club – “Dancin’ Octopus & Friends”- with which I paired the sentiment of “Hey” (included in the kit) and “Sending Hugs.” Octopuses are visually interesting creatures with their distinctive and otherworldly appearance, tentacles, and vibrant coloration. This card would work for a number of occasions, whether to connect with a friend, brighten the day of someone feeling under the weather, or “just because.” Keep reading to learn how I created the card.

Spellbinders June 2023 Small Die Kit Club

Spellbinders June 2023 Small Die Kit Club

    • Create background by applying Distress inks – Salty Ocean, Mermaid Lagoon, and Blueprint Sketch – on Distress Watercolor cardstock. Trim to mini-slimline size of 6 1/2 x 3 1/2 inches and add to card base.
    • Glimmer foil the Sending Hugs sentiment from the Mini Sincere Sentiments set in black  on Snowdrift cardstock. Trim.
    • Cut June 2023 Small Die Kit Club pieces – octopuses and jellyfish – from light gray cardstock and cardstock to which Distress Oxide inks have been applied. Assemble. Note: The bottom layers of the octopus and jellyfish can move, hence the name “Dancin’ Octopus & Friends.” For my design, I did not leave that layer free to move.

Spellbinders June 2023 Small Die Kit Club

    • Add octopuses to card, trim edges as necessary. Add jellyfish and sentiment.

Spellbinders June 2023 Small Die Kit Club

Head to the Spellbinders blog for a tutorial with the Small Die Kit Club – “Dancin’ Octopus & Friends.”


Spellbinders December 2020 Small and Large Die Kit Clubs

Hello and happy December! Today, I am sharing cards created with this month’s Small Die of the Month kit (“Daydreaming”) and Large Die of the Month kit (“Look Behind the Curtain”) at Spellbinders.

Spellbinders December 2020 Small Die Kit Club

Spellbinders December 2020 Large Kit Club

My first card showcases the Small Die of the Month kit that is packed with dies with which to create window scenes.

Spellbinders December 2020 Small Die Kit Club

I cut the starry panes from dark blue cardstock and again (without the star insert) from light yellow. The set contains three sentiments. I chose the one that best works with the nighttime scene.

Spellbinders December 2020 Small Die Kit Club

I added the cat, the moon, and the potted plants to the scene, as well as gold sequins. I added the window assembly to a patterned paper background.

Spellbinders December 2020 Small Die Kit Club

On the second card, I have combined the Small Die of the Month kit named “Daydreaming” and Large Die of the Month, which contains dies with which to create an operable curtain. I created a daytime scene with the Small Die of the Month kit, using the rectangular window without the arch window.

Here’s the card with the curtains open:

Spellbinders December 2020 Large Die Kit Club

  • I assembled the scene, which includes two cats and potted plants, and set it aside.
  • Following the directions for the curtain assembly, I die-cut the curtain pieces from patterned paper and gold foil (finials).
  • I attached the curtains to a yellow panel which contains the slots for the curtain mechanism.
  • I then added the window scene.

Here’s what the card looks like with the curtains closed:

Spellbinders December 2020 Large Die Kit Club

Spellbinders December 2020 Large Die Kit Club

Supplies:

Spellbinders November Clubs Blog Hop

Hello! I am delighted to be participating in a blog hop sharing projects created with the Spellbinders November 2020 Club Subscriptions. You should have reached me from the blog of Virginia Lu. (The entire list of participants is included at the end of my post.) For the hop, I created a gift card holder showcasing the November Small Die of the Month kit from Spellbinders –  “Frankie Goes to the North Pole.” (I previously shared cards created with the November Small Die of the Month set in this post. I shared gift card projects using the the Festive Wreaths Slider Card die set here.)

Spellbinders November Clubs Blog Hop

To celebrate this release, Spellbinders is giving away a $50 gift certificate to five lucky blog readers, selected from the comments on the Spellbinders blog. Giveaway closes on Sunday, November 15, 11:59 pm EDT. The winner will be announced in the blog hop post the following Tuesday. The winner is responsible for shipping cost, duties and taxes. Please note, store credit (gift certificate) cannot be applied to Club Subscriptions. Store credit can be applied to shop past Club products, Club extras and regular releases.

Spellbinders November Clubs Blog Hop

  • To begin I die-cut and assembled Frankie. I set him aside.
  • I glimmer foiled the Glimmer Gift Border in Gold on Candy Apple cardstock. I foiled the entire plate on the left-hand side of the cardstock. I then moved the plate down to foil the bottom-right side and finally moved the plate up to foil the upper-right side. In doing so I created more of a random background than had I simply glimmer foiled the full image on the right-hand side.
  • I cut the top of the Festive Wreaths Slider Card using the foiled cardstock. (By the way, the Festive Wreaths Slider Card die set is one of the products in the Spellbinders BOGO sale!)
  • I created the insert with patterned paper from a past Spellbinders kit. I backed the assembly with Candy Apple cardstock.
  • To showcase the snowman, I cut a circle from Brush Gold cardstock and dry-embossed it with the Falala folder.
  • I added Frankie, along with snowflakes cut with the Festive Wreaths Slider Card, to the dry-embossed circle and added the circle to the gift card assembly.
  • Frankie is ready to be posted!

Spellbinders November Clubs Blog Hop

Head next to the blog of Marie Heiderscheit.

BOGO Holiday

Supply List:

Blog Hop List:
Spellbinders Blog
Tina Smith
Carrie Rhoades
Bibi Cameron
Sandi MacIver
Jill Hilliard
Jennifer Snyder
Kathy Clement
Sandra Nagel
Virginia Lu
Jean Manis
Marie Heiderscheit
Joy Baldwin
Zsoka Marko
Ilina Crouse
Jenny Colacicco