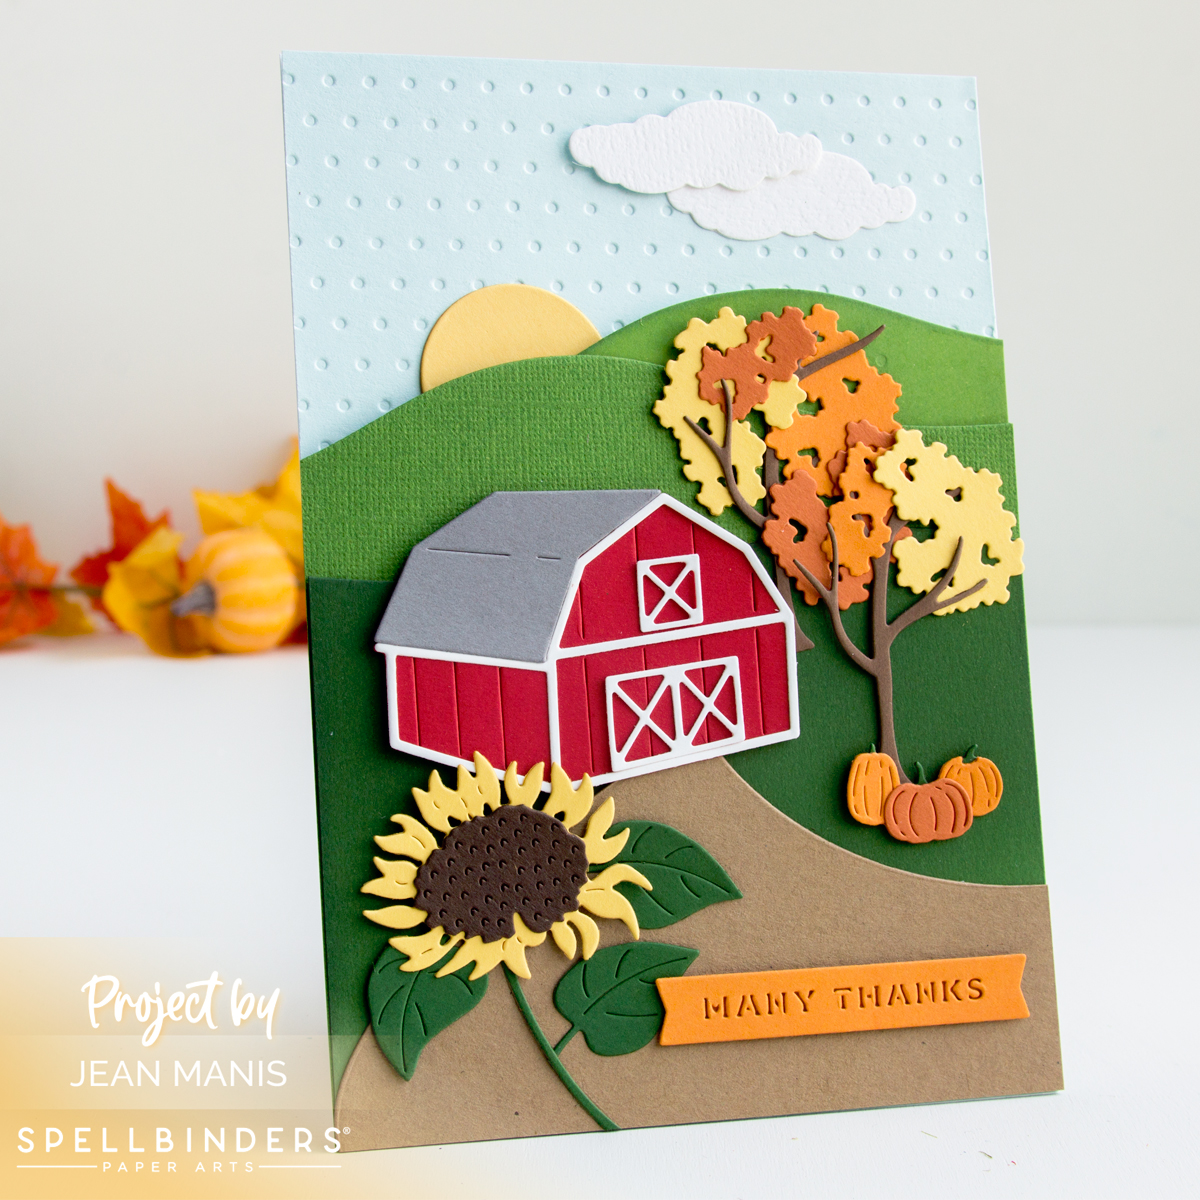
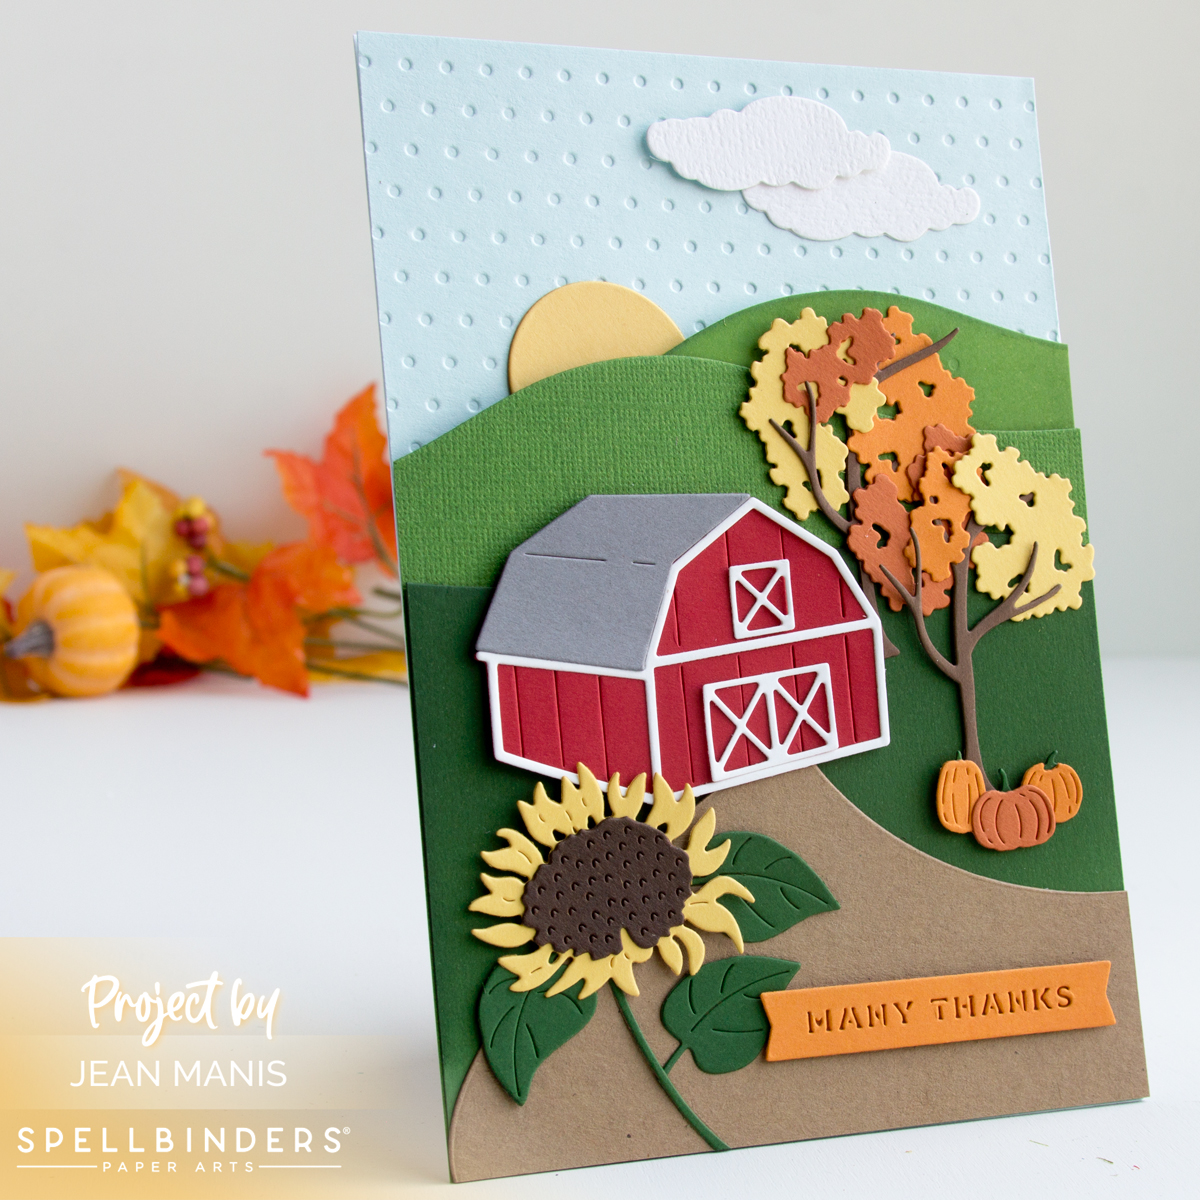
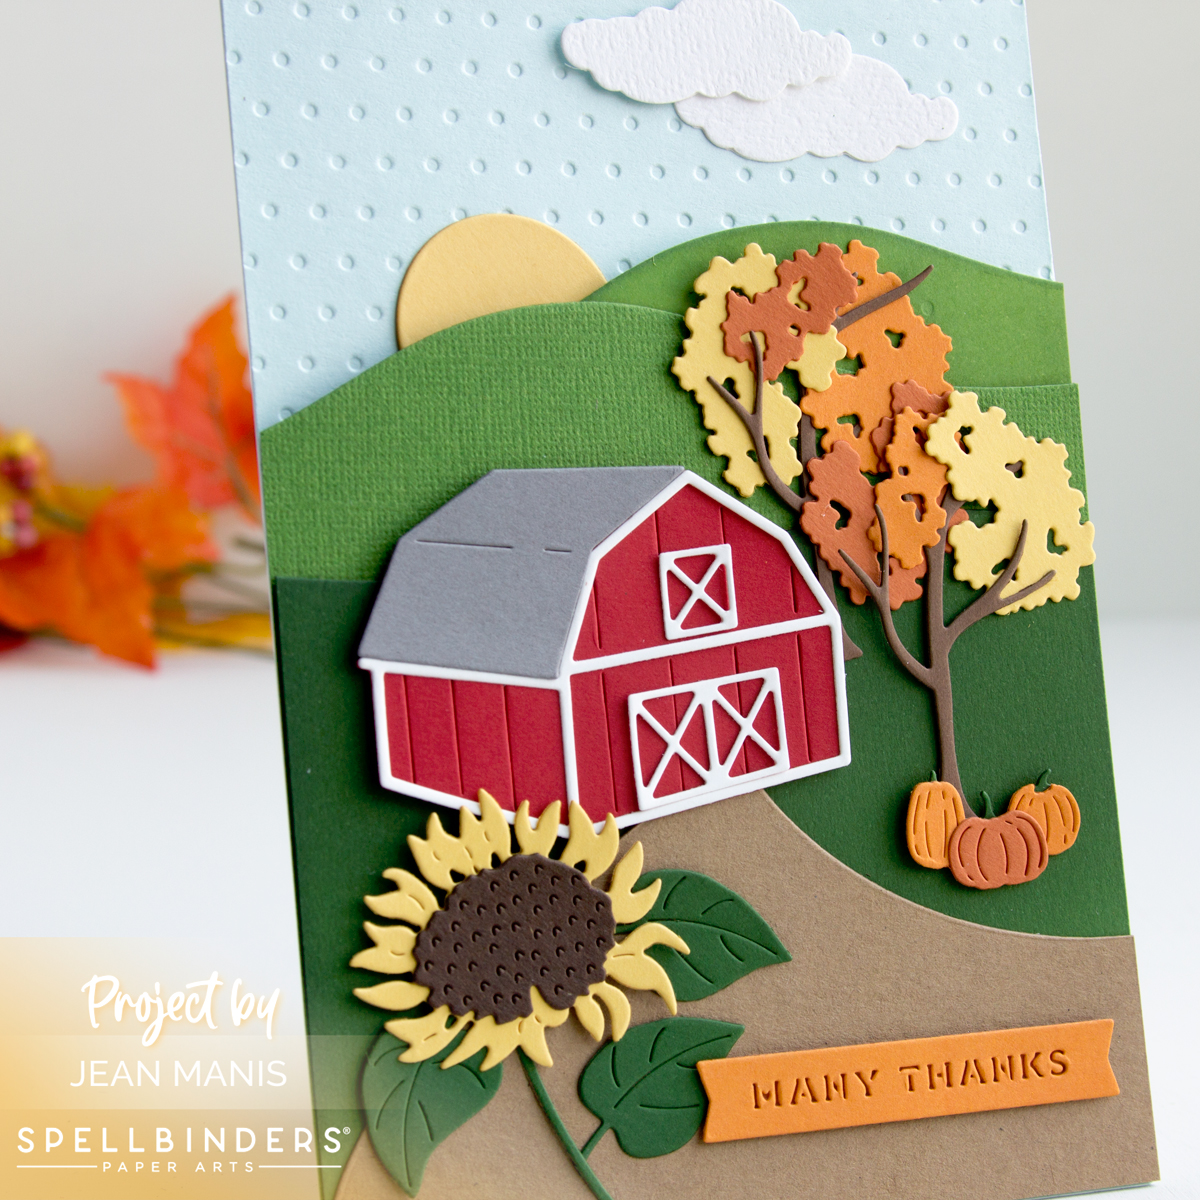
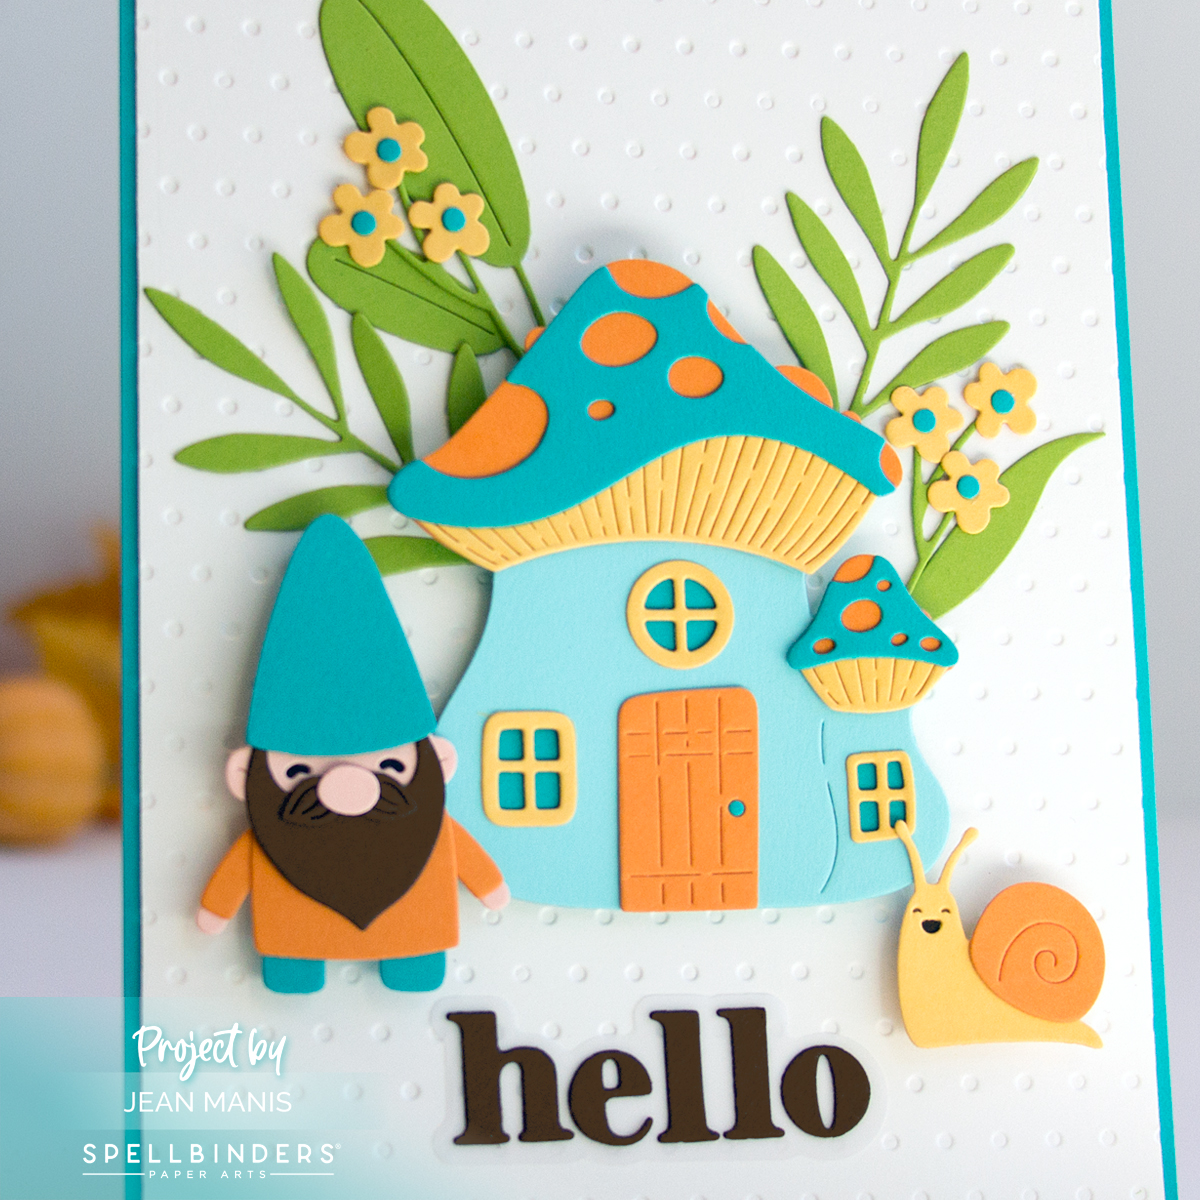
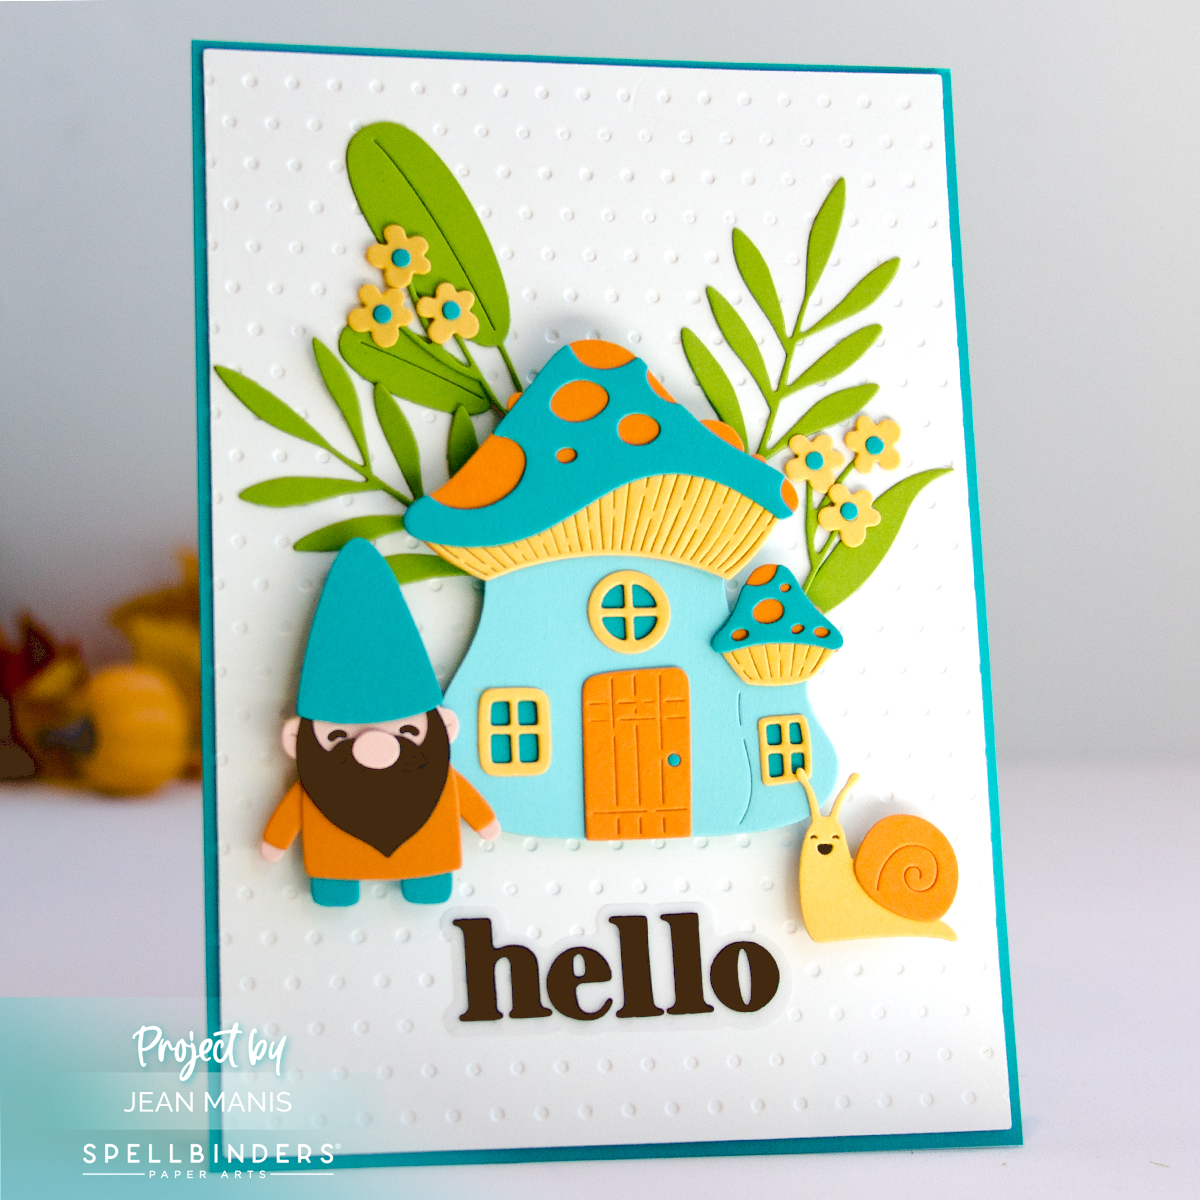
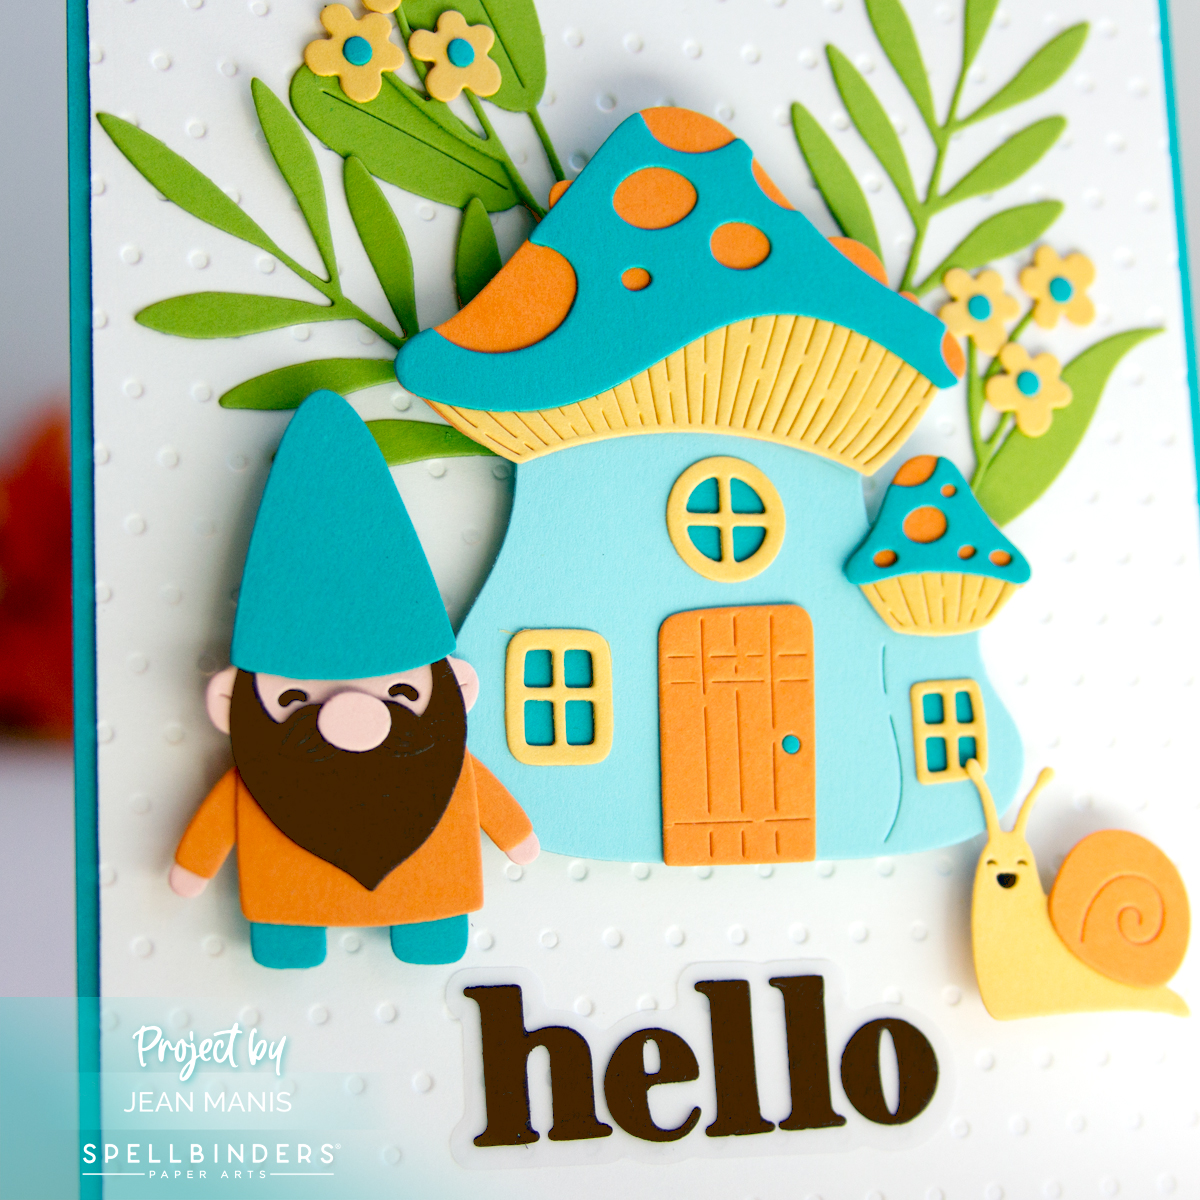
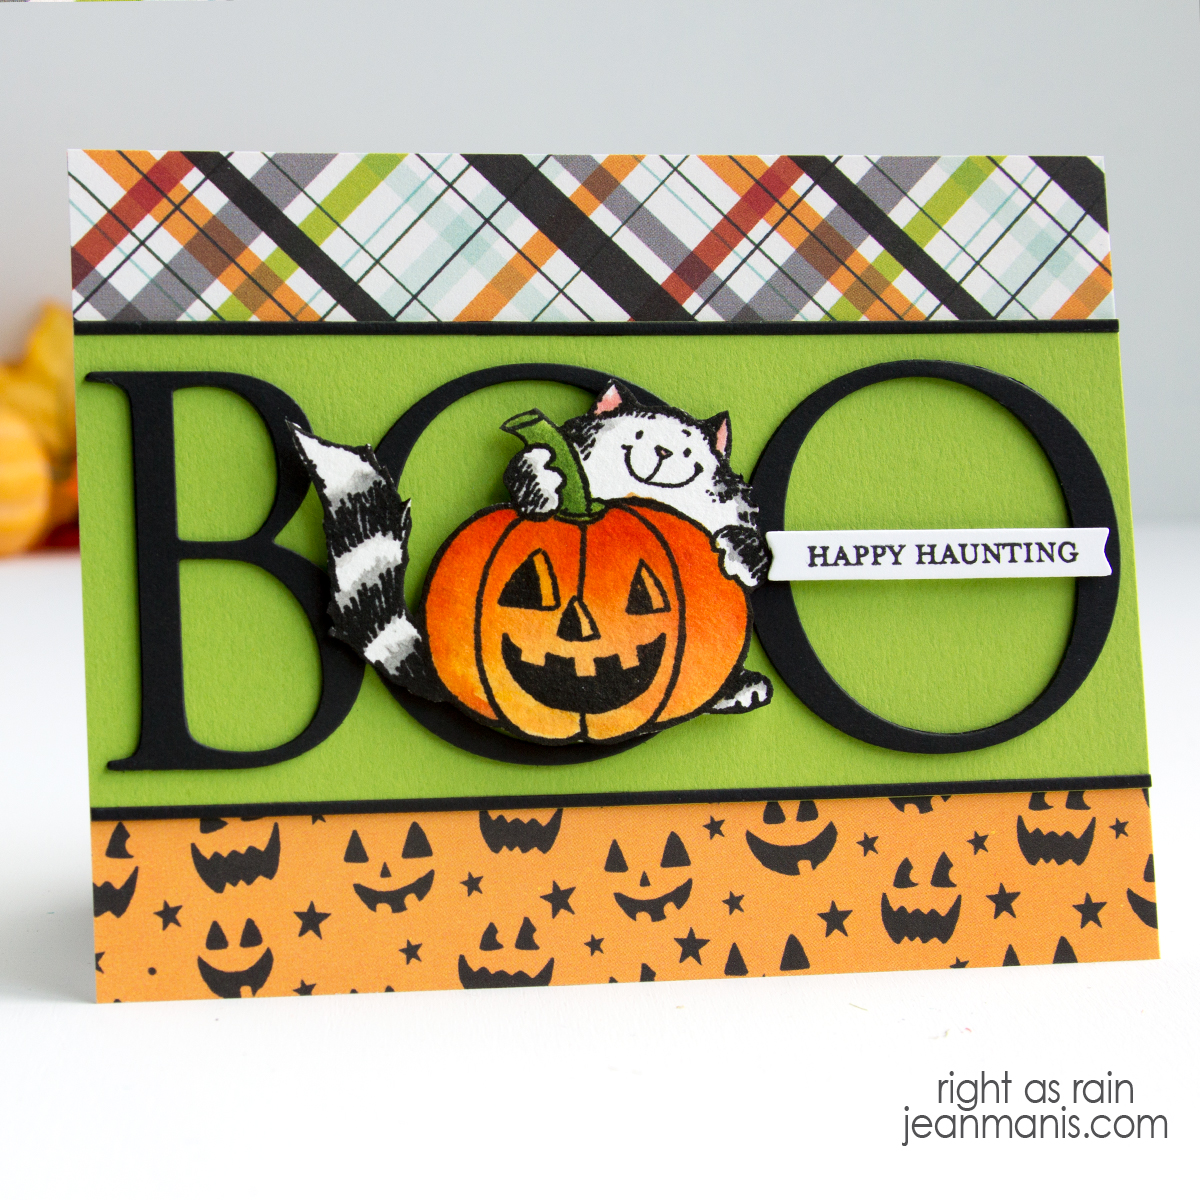
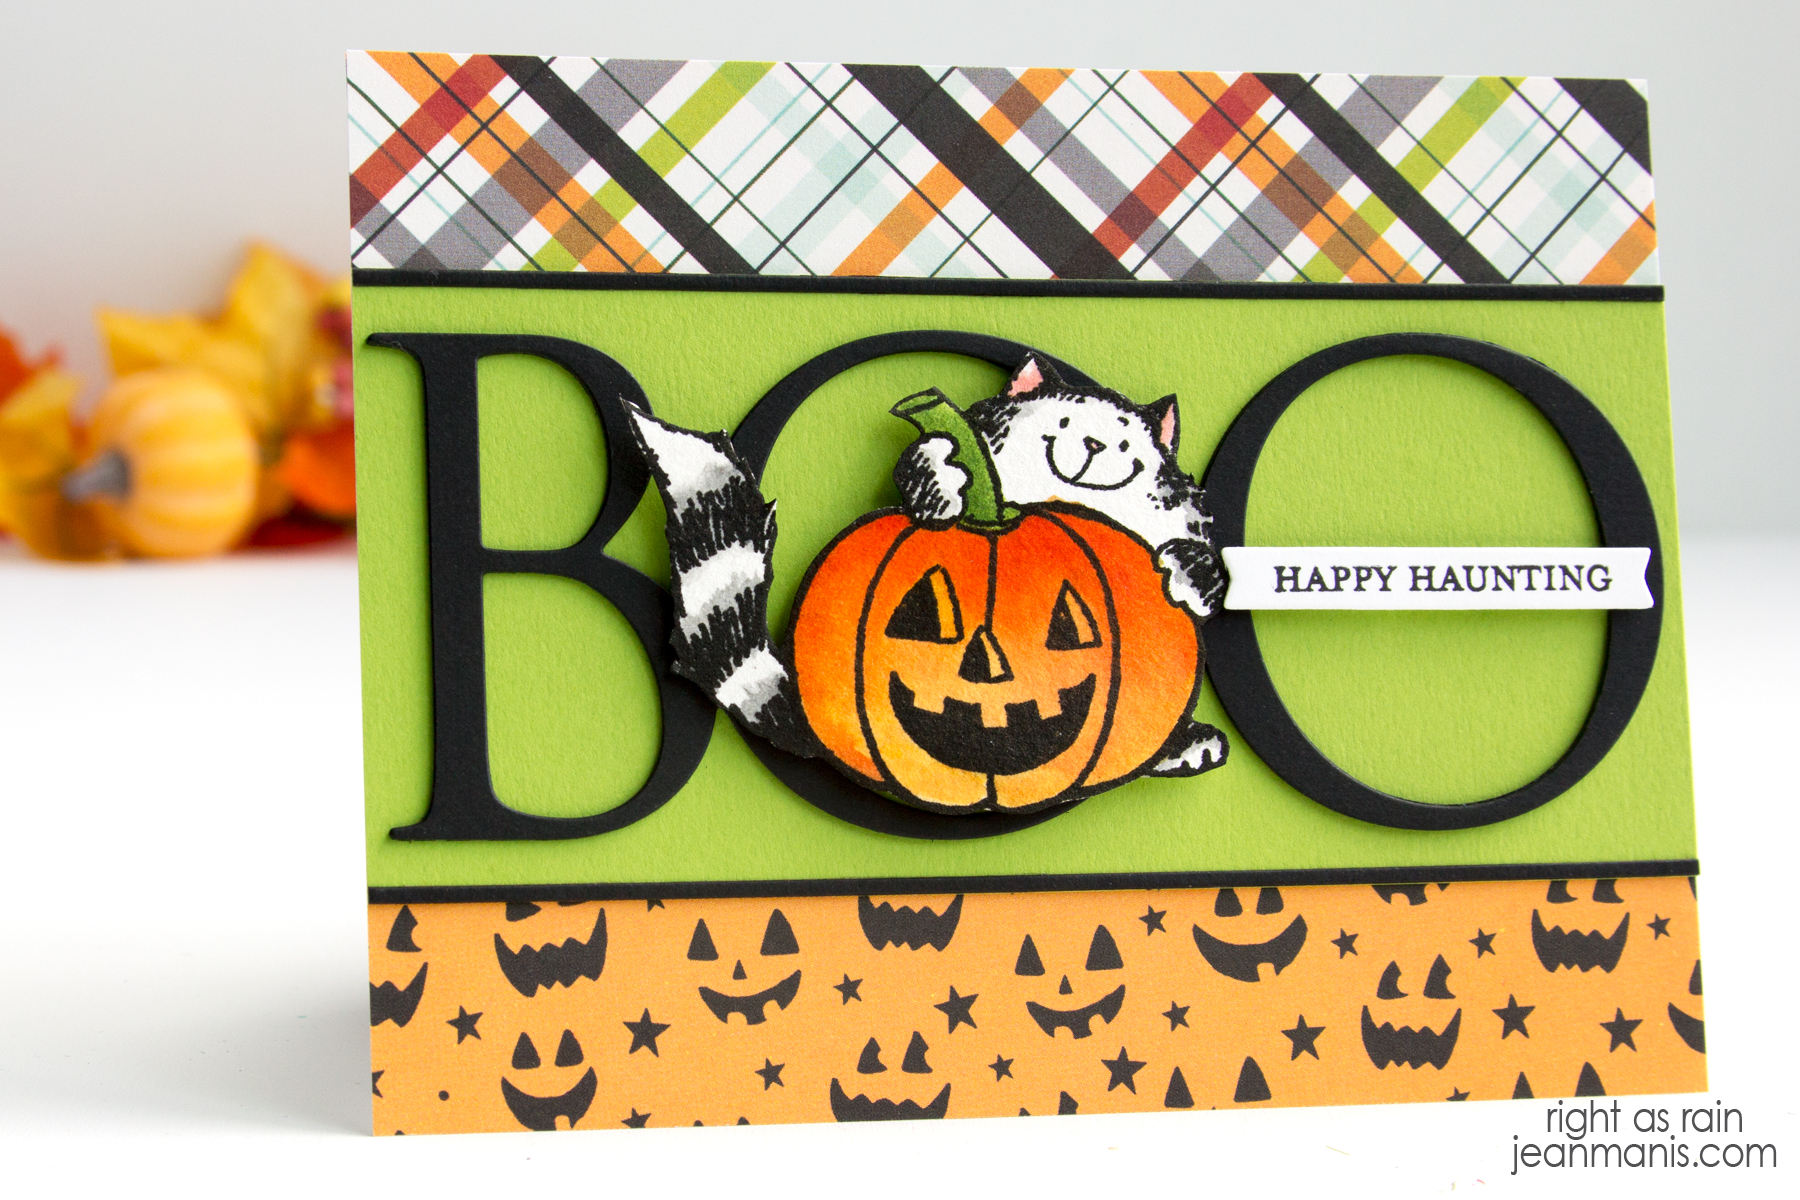
Penny Black | Whimsical Halloween Delight

Hello! A playful hedgehog, a spooky tree, and a “Boo” sentiment create a whimsical scene on this Halloween card showcasing Penny Black stamp and die sets. The scene embodies the spirit of Halloween and emphasizes the creativity found in older crafting sets. Several of these products were introduced in 2020 as part of the Autumn Extraordinaire Collection. I previously used the Windy die set on Halloween cards HERE and HERE. Other products used on the card have been in my collection even longer.

Penny Black | Whimsical Halloween Delight

    • As I mentioned HERE in my post on stamped backgrounds, background stamps can be stamped with colored ink on to inked backgrounds. For this card, the inked background was created with Wilted Violet and Villainous Potion Distress Oxide ink colors (sky section), and the Dots in Space background stamp was stamped with Wilted Violet Distress ink (not Oxide). I lightly stamped the background on to scrap paper, before stamping on to the inked background, so that the amount of ink stamped would be more subtle. The ground was masked when I inked the sky and stamped the dots. I inked the ground and then cut the panel with a stitched A2-size die, and attached it to a card base.
    • Stamp Candy Kisses in Versafine on Arches Cold Press watercolor paper and heat set. Color the images with watercoloring mediums of choice. I used mini Distress Inks in the following colors: Antique Linen, Gathered Twigs, Ground Espresso, Spiced Marmalade, Rusty Hinge, Crackling Campfire, Squeezed Lemonade, Wilted Violet, Picked Raspberry, Saltwater Taffy, Peacock Feathers, and Scattered Straw. Once dry, cut the image with the die in the coordinating set. (Check out my “Resources for Watercoloring Stamped Images” HERE.)
    • With the Windy die set, cut the tree from cardstock on which Distress Oxide inks have been applied. Assemble.
    • Cut the “Boo” sentiment with a die in the eeek! set from cardstock on which Distress Oxide inks have been applied. Cut again from black foam for depth. Adhere the two and attach to the card.
    • Add tree to the card with dot adhesive and the hedgehog with foam adhesive.

Penny Black | Whimsical Halloween Delight


Spellbinders | Festive Christmas Ornaments

Hello! Today, I am delighted to share a whimsical and festive holiday card featuring new die sets and stamp set from the Merry Mugs & Circle Delights Collection at Spellbinders by Nichol Spohr. Adorned with three charming ornaments, including a jolly Santa Claus, this slimline card is sure to bring a smile to its recipient’s face.

Spellbinders | Festive Christmas Ornaments

Spellbinders | Festive Christmas Ornaments


Spellbinders | Holiday Snow Globe

Hello! Today, I am showcasing die sets in the Simon’s Snow Globes Collection by Simon Hurley at Spellbinders. The holiday card captures the depth of a three-dimensional snow globe scene within the confines of a two-dimensional space. Inside the globe, a charming snowman stands in front of a row of charming houses while Santa and his sleigh fly overhead.

Spellbinders | Holiday Snow Globe

  • For the background, cut an A2-size piece of patterned paper and attach to a card base.
  • Next, create the snow globe. With the Simon’s Snow Globe die set, cut snow globe pieces – glass and base – from Sea Glass and Brushed Gold. Use the sentiment die in the Snowman Scene set to cut “Let It Snow” from Snowdrift and Brushed Silver cardstock.
  • Cut Santa and reindeer, trees, and village from cardstock with dies in Simon’s Snow Globe set. Cut the village two more times with white glitter foam. Set one aside; this one goes in the back and helps create depth. With the other village section, to create the front snowbank, cut off the houses from the top then cut the bottom with the globe circle. Back the windows of the silver village section with Beeswax cardstock to simulate light. Attach the silver village section to the intact white glitter foam section. Adhere the trimmed snowbank to the front. Add assembly to the light-blue globe.
  • With the Snowman Scene set, cut the snowman pieces. Assemble.
  • Adhere Santa and reindeer above the snow globe assembly. Add snowman to scene, tucking the bottom of the snowman into the snowbank. Add globe base. Optionally, for a more finished look in the back, cut an additional globe base and slide in the back.

Spellbinders | Holiday Snow Globe

Save up to 40% on select Spellbinders dies, now through October 13.

Spellbinders Die-cutting Sale


Spellbinders | Merry Build-A-Wreath

Hello! Today, I am sharing a textural holiday card showcasing the Spellbinders Build-A-Wreath and Christmas Wreath Add-Ons die sets.

Spellbinders | Merry Build-A-Wreath

The combination of the wreath and snowman blends the traditions and festive spirit of the Christmas season.

  • To begin, create an A2-size card base from white Canvas cardstock.
  • Cut Waterfall panel with largest die in the Precision Layering A2 B set. Dry-emboss the panel with the Flurry of Snowflakes folder. Adhere to card base with the debossed side up.
  • Cut pine boughs from Fern cardstock with the Build-A-Wreath dies. Use a tool in the Susan’s Garden Ultimate Tool Kit set to curl the leaves. Glue several boughs together, dab section with VersaMark ink, shake on Snowflake Tinsel powder, and heat-emboss. Continue until there are enough pieces to form a 3″ wreath. Glue together.
  • Cut 3″ circle from vellum and add to card base. Glue wreath around vellum.
  • Glimmer foil in Gold on Snowdrift cardstock the “Merry Christmas” sentiment from the Mini Christmas set. Cut the sentiment with a banner die and add to card front.
  • Die-cut snowman elements with the Christmas Wreath Add-Ons set and assemble. Add dimensional foam to back of snowman.
  • Add snowman to center of wreath.
  • Embellish wreath with snowflakes cut from white glitter foam using dies in the Christmas Wreath Add-Ons set.

Spellbinders | Merry Build-A-Wreath


Duplicating Holiday Magic | Spellbinders October 2023 Small Die Kit Club

Hello and “Ho! Ho! Ho”! In the world of holiday paper crafting, there’s something magical about taking a single die set and creating variations. Today, I am showcasing the adorable Spellbinders Small Die of the Month kit titled “Big Jolly Santa.” This Santa is a standout that nicely fills an A2-size card. Keep reading for directions on how to make the two cards. You can also head HERE for a tutorial on how to use the set.

Spellbinders October 2023 Small Die Kit Club

Spellbinders October 2023 Small Die Kit Club

    • To begin, create card front from Brushed Silver cardstock OR cut patterned paper (older Christmas paper from Echo Park in my stash). Add to A2-size card base.
    • With the largest die in the Stylish Ovals set, cut Waterfall cardstock and dry-emboss with the Flurry of Snowflakes folder OR cut oval from patterned paper (flip side of the Echo Park Christmas paper used for the card front).
    • Die-cut Santa pieces with the Big Jolly Santa set from a variety of cardstock materials. Cardstock in the Crushed Velvet Assortment pack was used for the Santa on the Waterfall background. Assemble. Add enamel dots for buttons. I used a Uni-Ball Signo Broad Point Gel Impact Pen White to create the catchlights in the eyes.
    • With dies in the Big Jolly Santa set, cut sentiment sign from Brushed Gold cardstock OR heat-emboss sentiment in the Big Jolly Santa Sentiments set on Teal Topaz cardstock and cut with the banner die.
    • Cut Glitter Foam OR Snowdrift cardstock with snowline die in the Camper Life set. Cut snow with largest die in the Stylish Ovals set and adhere to the oval background.
    • Adhere Santas to cards. Embellish with snowflakes cut from Glitter Foam.

Spellbinders October 2023 Small Die Kit Club

Spellbinders October 2023 Small Die Kit Club

With just different cardstock colors and background choices, the feeling of the card changes!