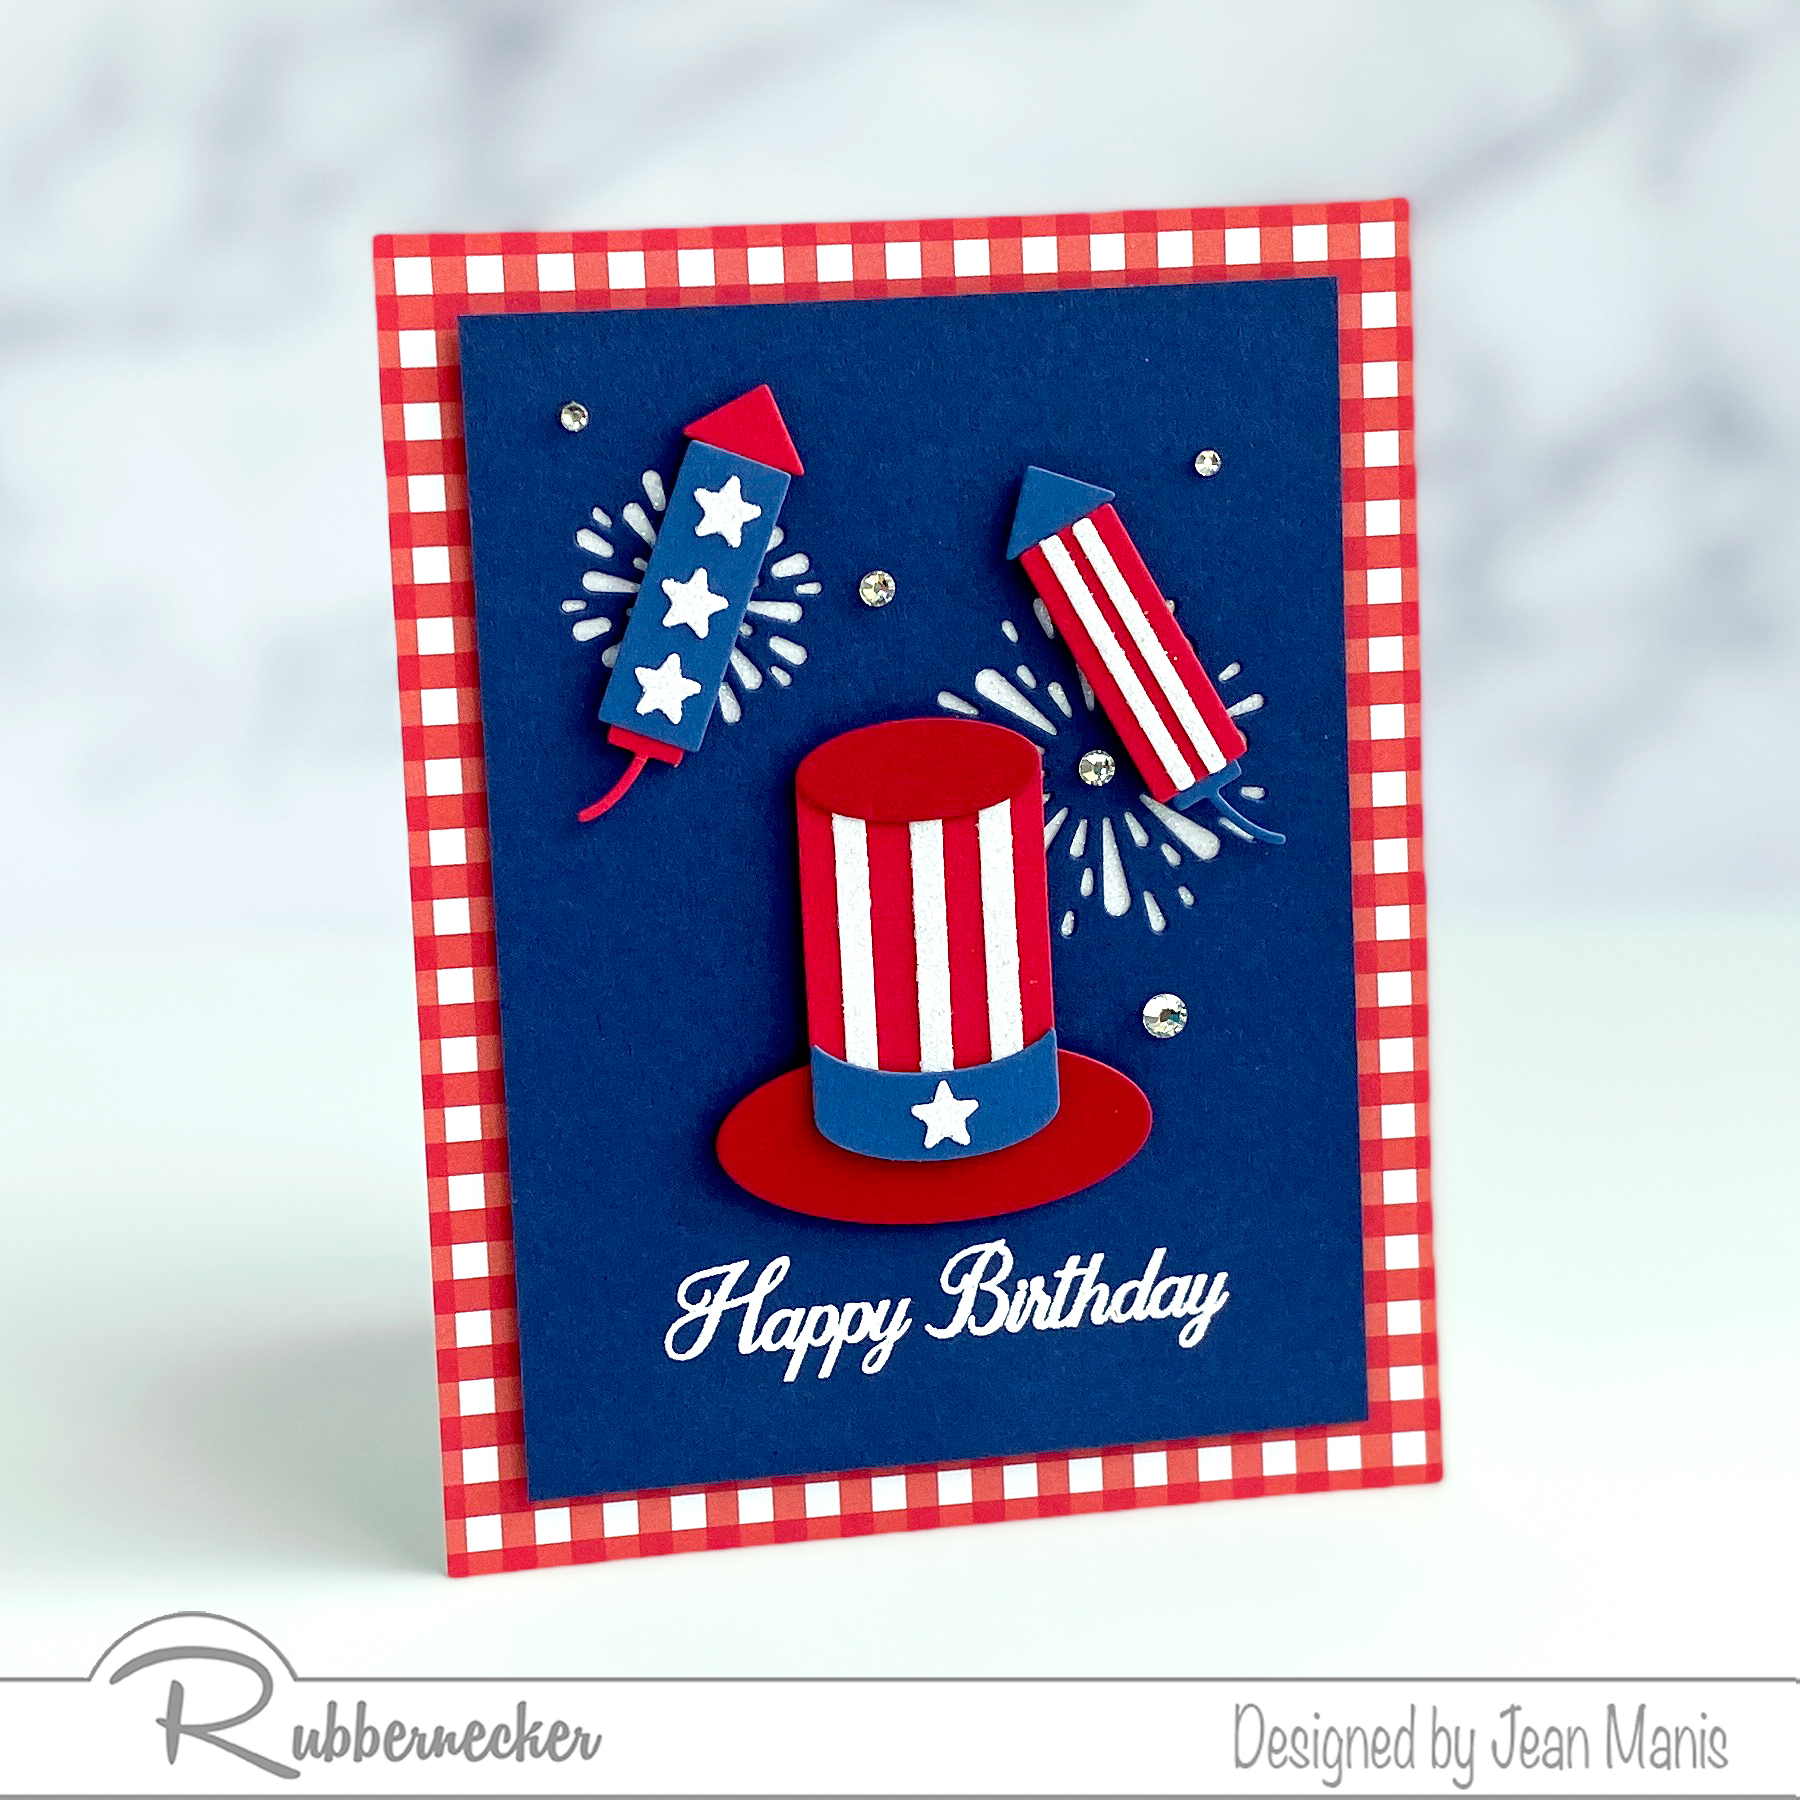
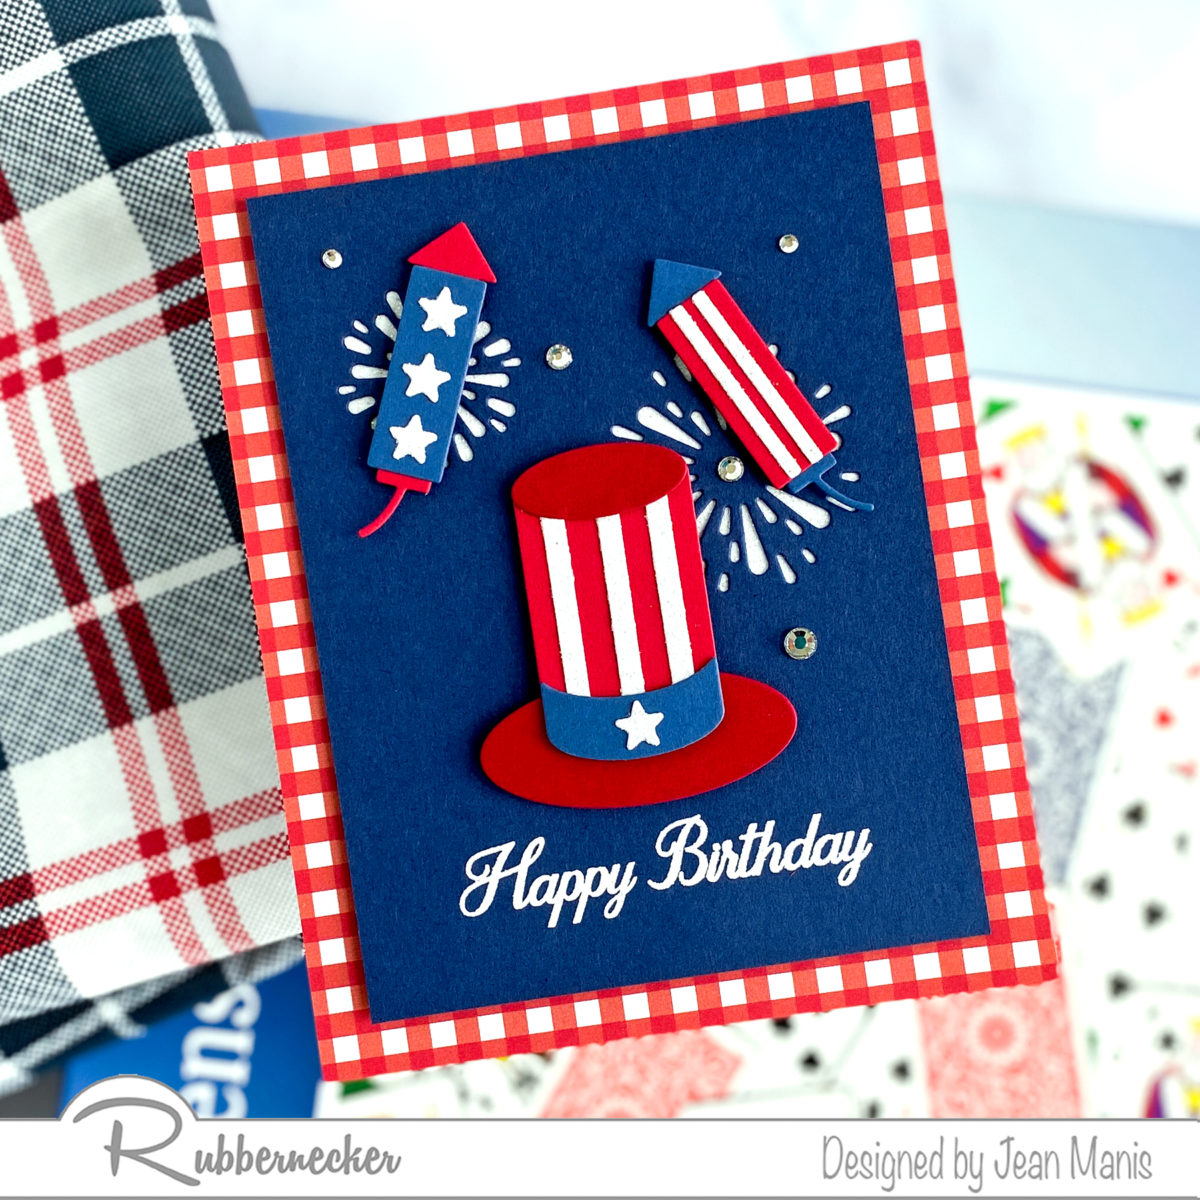
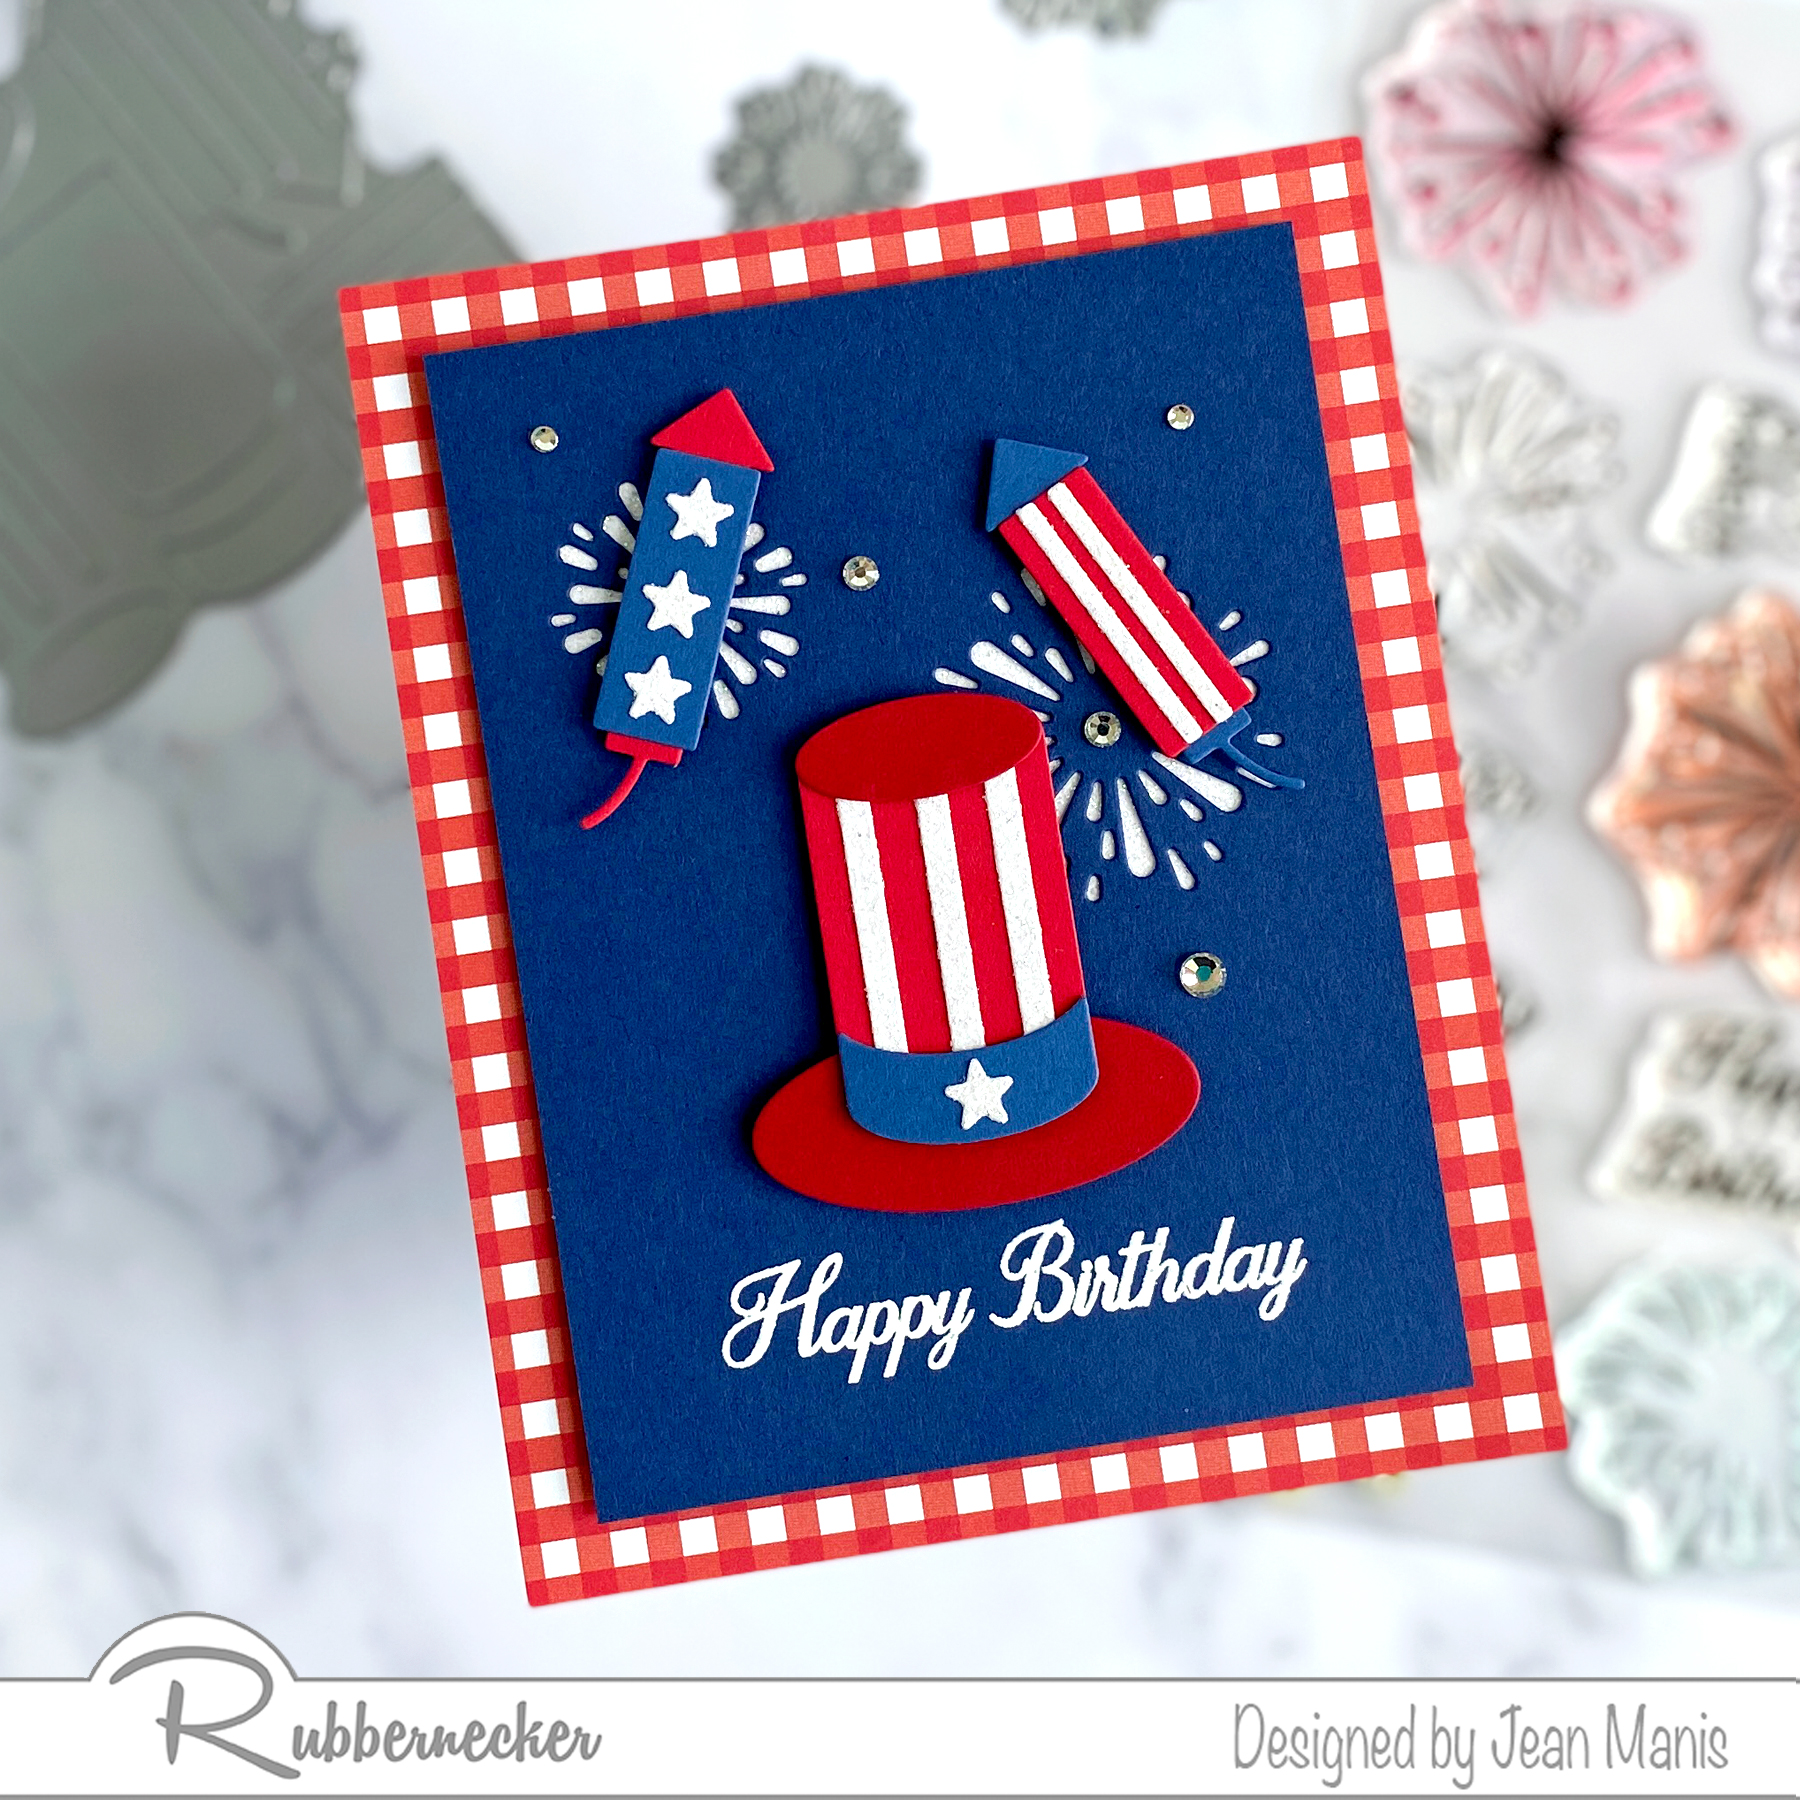
Spellbinders Small Die of the Month Kit – Our Favorite Font Sentiment Set

Hello! Today, I am sharing two cards created with the December Small Die of the Month kit from Spellbinders – “Our Favorite Font Sentiment Set.”Spellbinders Small Die of the Month Kit - Our Favorite Font Sentiment SetThe set includes fourteen word dies, in a versatile font, with which you can create a variety of expressions for a number of occasions such as: “Thinking of You,” “With Sympathy,” “Birthday Wishes to You,” and “Congrats to You,” as well as the more obvious “Thank You,” “Love You,” and “Happy Birthday.”

My first card is a Valentine, which includes several other Spellbinders sets, on which I used the “Love You” sentiment.

Spellbinders Small Die of the Month Kit - Our Favorite Font Sentiment Set

I’ve combined the Tux set (he’s still wearing a scarf but I removed his ear muffs) with the First Crush die set (balloon). I created the heart panel with the largest die in the Nestabilities Class Heart set. The card measures 4 1/2″ square.

Spellbinders Small Die of the Month Kit - Our Favorite Font Sentiment Set

My second card is a Thank You note on which I combined the sentiment with the Butterfly Frame-A-Long die set.

Spellbinders Small Die of the Month Kit - Our Favorite Font Sentiment Set

I dry-embossed the background (measuring 4 1/4″ square) with the Pretty Plaid embossing folder. I created a frame by adhering the butterfly/flower strips together at the corners; I then added the flower overlays, cut from yellow cardstock. I glued pearls to the centers of the flowers for embellishment.

Spellbinders Small Die of the Month Kit - Our Favorite Font Sentiment Set

CAS Christmas Tree – Impression Obsession Christmas Tree Cutout

Hello! Today, I am sharing a CAS Christmas card created with supplies that I’ve owned for some time. In fact, I first used (it’s possible it was the only time I used) the Impression Obsession Christmas Tree Cutout die in this post for Ellen Hutson in 2014. I like revisting my supplies and finding new designs on which to use them.

Impression Obsession Christmas Tree Cutout

  • I white heat-embossed one of my favorite sentiments (from the now-retired Hero Arts Operation Write Home Winter Wishes set) on Taylored Expressions Blue Raspberry cardstock. I cut the panel with a stitched rectangle die.
  • I cut the Impression ObsessionChristmas Tree Cutout tree using the outline die from Poppy Parade cardstock and again with both the outline die and detail die from white cardstock. I glued the two together.
  • I stamped the Hero Arts Candy Stripes background with Lady Bug ink.

Impression Obsession Christmas Tree Cutout

I like the whimsy of the Christmas tree, reinforced with the colors and the striped card background. Thanks for stopping by!

Supplies:

Penny Black Rustic Birdhouse

Hello! Today, I am sharing a Thank You card featuring the Penny Black Rustic Birdhouse die set.

Penny Black Rustic Birdhouse

  • I cut the birdhouse from cardstock, including Lawn Fawn Paper Bag (post and birdhouse trim). Lighter colors such as SU Crumb Cake were too light. I sponged Brushed Corduroy Distress Ink on the edges of the trim and post. I cut the bird from SU Blueberry Bushel and the body of the birdhouse from SU So Saffron.
  • I cut the flowers with dies in the Penny Black Hanging Plants and A Garden sets (SU Poppy Parade with SU Daffodil Delight centers).
  • I stamped the sentiment on the card background (SU Pool Party).
  • I used the Spellbinders July 2019 Small Die of the Month kit – Spellbinders – “Besties Forever” – to cut the grass (SU Garden Green). I tried a lighter green for the back row of grass but it just didn’t work with the colors. I’ve also discovered that Penny Black now has a grass edge die 51-549 Garden Edgers.

Penny Black Rustic Birdhouse

Supplies: Penny Black Rustic Birdhouse, Hanging Plants, A Garden, and Silver Linings die sets; Penny Black Flower Sparks stamp set

Supplies:

Spellbinders – Tulip Flower Frame

Hello! Today, I am sharing a CAS Thank You card created with the Tulip Flower Frame Card Creator die set designed by Maria Job for Spellbinders. I previously shared cards created with the set in this post.

Spellbinders - Tulip Flower Frame

I specifically wanted to use patterned paper on the card base as this particular “cover plate” die has an ample amount of open space. Once I cut the frame and placed it over the patterned paper, I decided that some of the tulips in the frame should be filled in, which I did with the inlay method.

I heat-embossed a sentiment from the Everyday Script set and cut it with its coordinating die. I cut circles from both red and cream cardstock, which I adhered to the card center. I adhered the sentiment to the circles with foam adhesive.

Spellbinders - Tulip Flower Frame

Thanks so much for dropping by!

Enjoy the Ride – Spellbinders May 2019 Small Die of the Month

Hello! Happy May! Today, I am sharing two CAS projects created with this month’s Small Die of the Month die set “Enjoy the Ride” from Spellbinders.

Enjoy the Ride - Spellbinders May 2019 Small Die of the Month

For my first card, I created a sky/road scene with a pink scooter using letters in the set for the “Ciao” sentiment and balloons (die in the set) tied to the back of the scooter.

Enjoy the Ride - Spellbinders May 2019 Small Die of the Month

  • I dry-embossed the roadway piece (gray cardstock) with the Beach Towel Embossing Folder.
  • I cut the “Ciao” sentiment from white cardstock and adhered it to the roadway with liquid adhesive using the dry-embossing lines as a guide for the letters.
  • I cut the scooter out and assembled it with liquid adhesive and tape.
  • I added embroidery floss to the balloons, cut from several shades of pink, and attached them to the sky background with dot and foam adhesive. I taped the strings to the sky background making sure that they would be covered by the back of the scooter. I attached the scooter to the scene with dot adhesive.

Enjoy the Ride - Spellbinders May 2019 Small Die of the Month

I love using color and repetition on card designs, so for my second project, which measures 6 1/2″ x 3 3/4″, I created three scooters in bright colors.

Enjoy the Ride - Spellbinders May 2019 Small Die of the Month

  • I created the Go sentiments on my computer and printed them on white cardstock.
  • I cut and assembled the scooters from brightly colored cardstock.
  • I added a strip of washi paper to the right side of the card base to emphasize the road/transportation theme.
  • I adhered the scooters to the scene with dot adhesive.

Enjoy the Ride - Spellbinders May 2019 Small Die of the Month

Thanks for stopping by! Vroom!