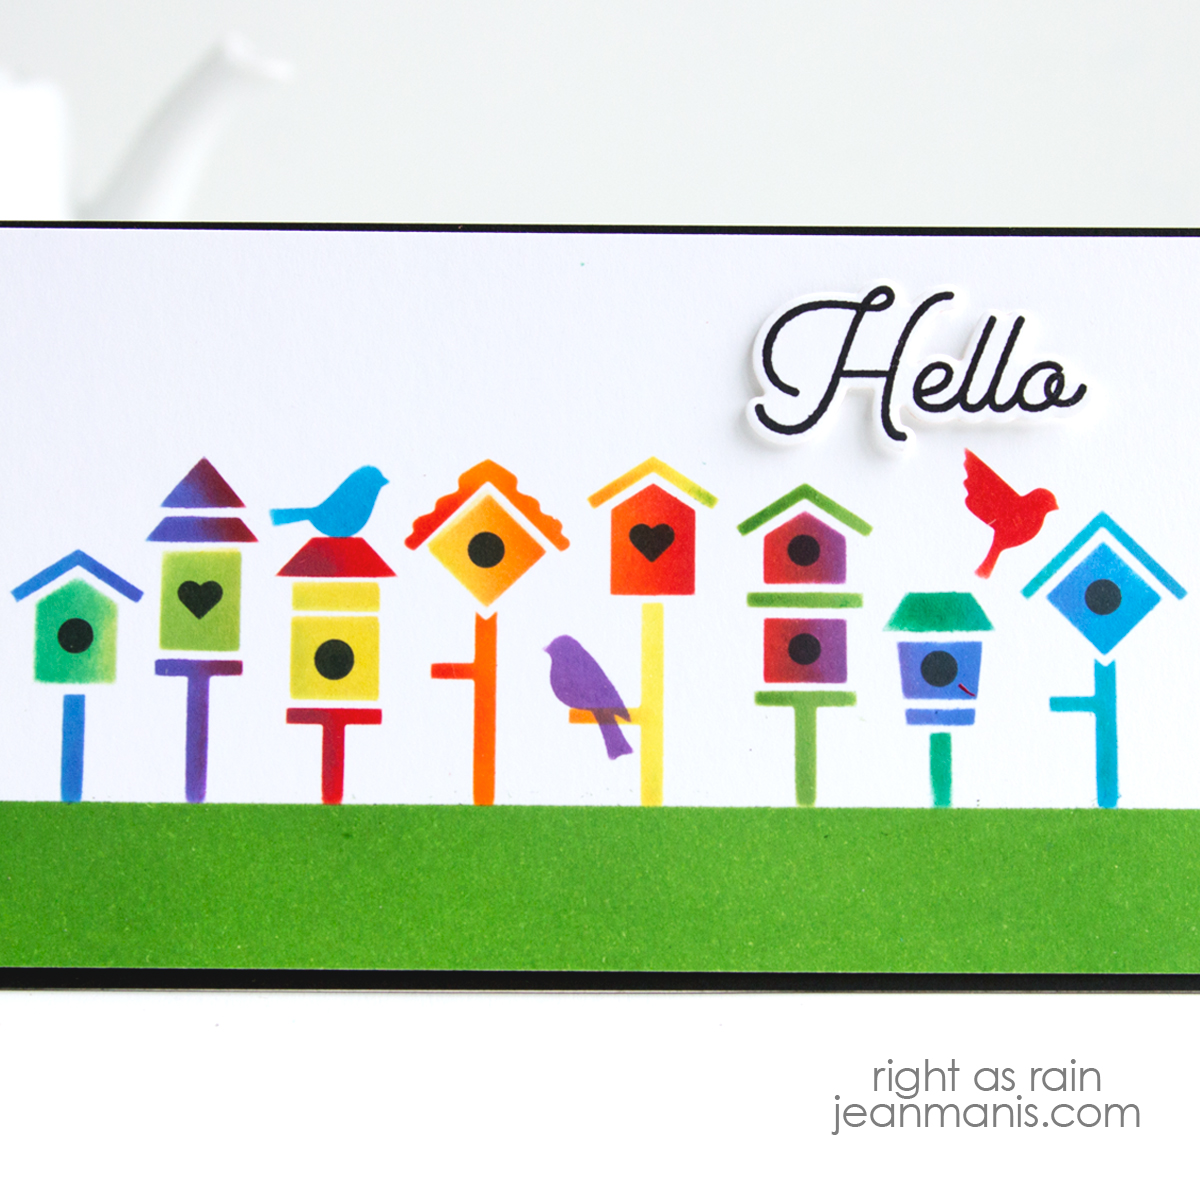
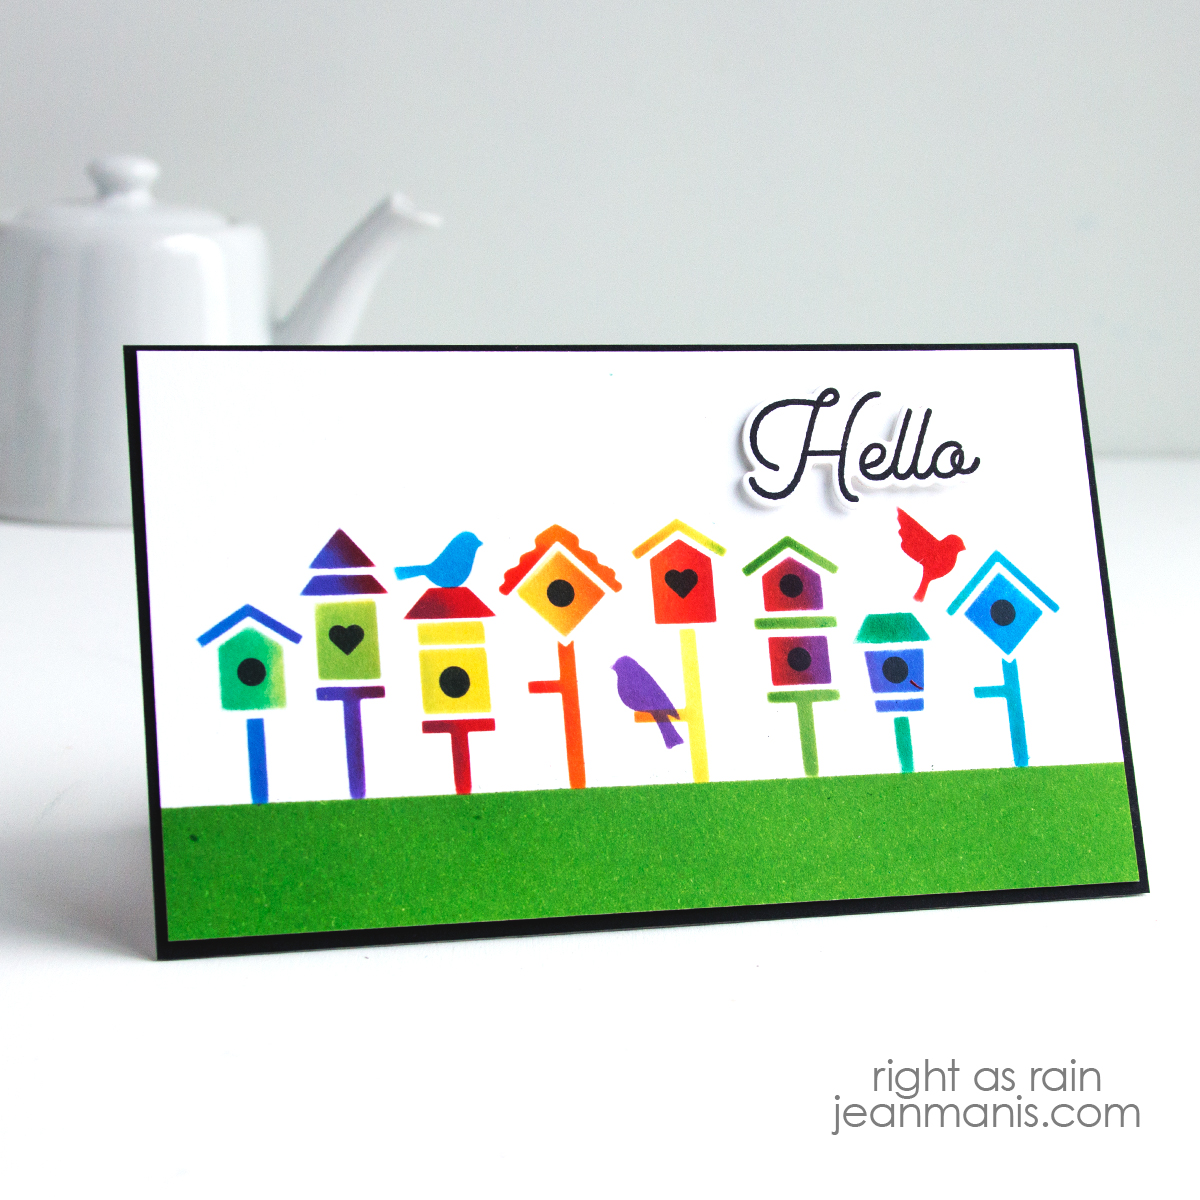
Mixed Media Birthday Card | Newton’s Nook

Hello! Birthdays are all about fun, friends, and of course—presents! Today, I am sharing a card featuring an adorable Newton’s Nook stamped image featuring two playful cats, a happy pup, and a stack of brightly colored packages. To add to the celebration, I created a cheerful balloon-filled background with a stencil.

Mixed Media Birthday Card | Newton’s Nook

    • Ink Bristol cardstock with a light ink color – I used Tumbled Glass Oxide. Add balloons through the Bokeh Balloons stencil. I used darker inks at the top and lighter towards the bottom.
    • Stamp the Sky High Celebrations sentiment in black ink on the stenciled panel. Cut panel with A2-size Lawn Fawn Stitched Rectangle die and add to a card base.
    • Stamp Sky High Celebrations image with VersaFine ink on Cold Pressed Watercolor paper and heat set. Color with medium of choice. I used Zig and Tombow markers: Zig Dark Gray 95, Zig Orange 70, Zig Mustard 67, Zig Sand 601, Tombow Purple 665, Zig May Green 47, Zig Persian Blue 32, Zig Yellow 50, Tombow N15 Black, Tombow Burnt Sienna 947, Zig Medium Beige 76, Zig Geranium Red 29, and Tombow Dusty Rose 772.
    • Add additional color with Derwent Inktense pencils: Poppy Red, Neutral Gray, Yellow.
    • When dry, cut image with the coordinating die set.
    • Add image to card base with foam adhesive.

Mixed Media Birthday Card | Newton’s Nook

Note: The Sky High Celebrations stamp set and coordinating die set can be purchased directly from Newton’s Nook and Frantic Stamper.

I shared another birthday card HERE that showcases the other image on the Sky High Celebrations set.


Storybook House Valentine

Hello! After posting this roundup of house-themed cards, I was inspired to craft a storybook house Valentine with a heart serving as the house body. Using Lawn Fawn dies for the roof, door, and windows, I transformed a simple idea into a whimsical creation full of charm. Let me take you through how I made this Valentine’s Day card

Storybook House Valentine

    • The overall card size is 5″ square. I do not own a die that size, but I realized I could use by rectangular die to cut the sky and the ground to form a square. To begin, use a 5″ x 3 3/4″ rectangle die to cut light teal cardstock. Apply modeling paste through the Fall Hearts stencil and set aside to dry.
    • Stamp the Simply Celebrate Hearts sentiment on white cardstock. Cut the top with a die in the Simple Stitched Hillside Borders set and the base with a 5″ x 3 3/4″ rectangle die. Adhere the sky and snowbank to a 5″ square card base.
    • Use a heart die to cut the house base from textured red cardstock. I used a now-retired nesting set from Spellbinders.
    • Use dies in the Build-A-House, Scalloped Treat Box Spring House Add-On, and Scalloped Treat Box Beach House Add-On sets to cut the door, window, roof pieces, and stairs; assemble as required.
    • Add the assembled elements to the heart house with foam adhesive. Add the assembly to the card base.

Storybook House Valentine


Pond-Themed Stencil Card | Waffle Flower

Hello! Dive into the tranquility of nature with a pond-themed card created with the Waffle Flower The Pond stencil, part of their postage collage line. The layering stencil design brings the scene to life and a preprinted punny sentiment adds the perfect finishing touch.

Pond-Themed Stencil Card | Waffle Flower

As I worked with the Waffle Flower stencil, I found myself fully immersed in the creative flow—layering colors and details became a meditative process.

    • Dry-emboss yellow cardstock panel (SU Daffodil Delight) with the Penny Black Texture folder; add to an A2-sized card base.
    • Cut white cardstock with the Postage Collage Die before stenciling The Pond. On my first foray into the Waffle Flower postage collage line, I stenciled first and then cut. Cutting first is the better approach!
    • Optionally, back the stenciled panel with white cardstock. Stamp the postage elements with the Postage Collage stamps set with Archival black ink.
    • Add the Hoppy sentiment with foam adhesive to the center of the panel. The subsentiments are preprinted. I used Black Soot ink around the edges to cover the white of the cardstock for a polished look.
    • Add the panel to the card base with foam adhesive.

Pond-Themed Stencil Card | Waffle Flower

Distress Ink colors: Broken China, Mermaid Lagoon, Squeezed Lemonade, Lost Shadow, Black Soot, Mowed Lawn, Rustic Wilderness, Kitsch Flamingo, Carved Pumpkin, Crackling Campfire


Simon Hurley | Deck the Halls

Hello! Today, I’m sharing a festive card created with Simon Hurley’s layering stencil – Mod Christmas Trees. This design features three inked Christmas trees adorned with gold decorations, adding depth and shimmer. The “Deck the Halls” sentiment ties the design together, complementing the trio of decorated trees.

Simon Hurley | Deck the Halls

    • Create an A-2 size card base from Pomegranate cardstock.
    • Stencil the first layer of trees with Later Gator green ink.
    • Next, add Rustic Wilderness ink to all three trees with the half tree portion of the Mod Christmas Trees stencil.
    • Stencil gold pigment ink (I used Color Box) through the stencil for the tree trunks.
    • Next add the three gold pastes (left to right) – Slippery When Wet Astro Paste, Slippery when Wet Lunar Paste, and Golden Hour Solar Paste. Once dry, trim the panel and mat with gold cardstock. Add assembly to card base.

Simon Hurley | Deck the Halls

This Clean and Simple card design shines with its simplicity, but achieving that effortless look takes attention to detail and a steady hand.


Snow Much Fun | Waffle Flower

Hello! Today, I am sharing a winter-themed, holiday card created with one of the Postage Collage stencils offered at Waffle Flower. I have seen creations with these stencils for months now and wanted to give the products a try. The Waffle Flower Postage Collage Snowy stencil set makes it easy to layer winter mountain scenes with its multi-part stencil design. You can customize the colors for a different look, and the “stamps” can be separated for more creative possibilities.

Snow Much Fun | Waffle Flower

    • To begin, I swatched a number of different inks in my collection looking for purple, red, two shades of green, and two shades of blue. Knowing which inks I would use for the elements saved a lot of time. Scroll for the entire list of inks I used.
    • I cut the stenciled scenes with the Postage Collage die. Next time I will probably cut the cardstock first and then stencil. If you have used these products, what did you do – stencil first or cut the collage first?
    • I finished the card with one of the Snow Cheer Sentiments, which I cut with its coordinating die. I was particularly impressed that the sentiments are numbered on the packaging and the coordinating dies are etched with the corresponding number. All in all, I was very impressed with all of the Waffle Flower packaging.

Snow Much Fun | Waffle Flower

Ink List – Mountains: Taylored Expressions Jelly Donut; Sky: Distress Ink Tumbled Glass; Lake: Taylored Expressions Sprinkles; Trees: Simon Hurley Later Gator, Distress Ink Rustic Wilderness; Cardinals: Memento Love Letter, Distress Ink Aged Mahogany, Distress Ink Black Soot