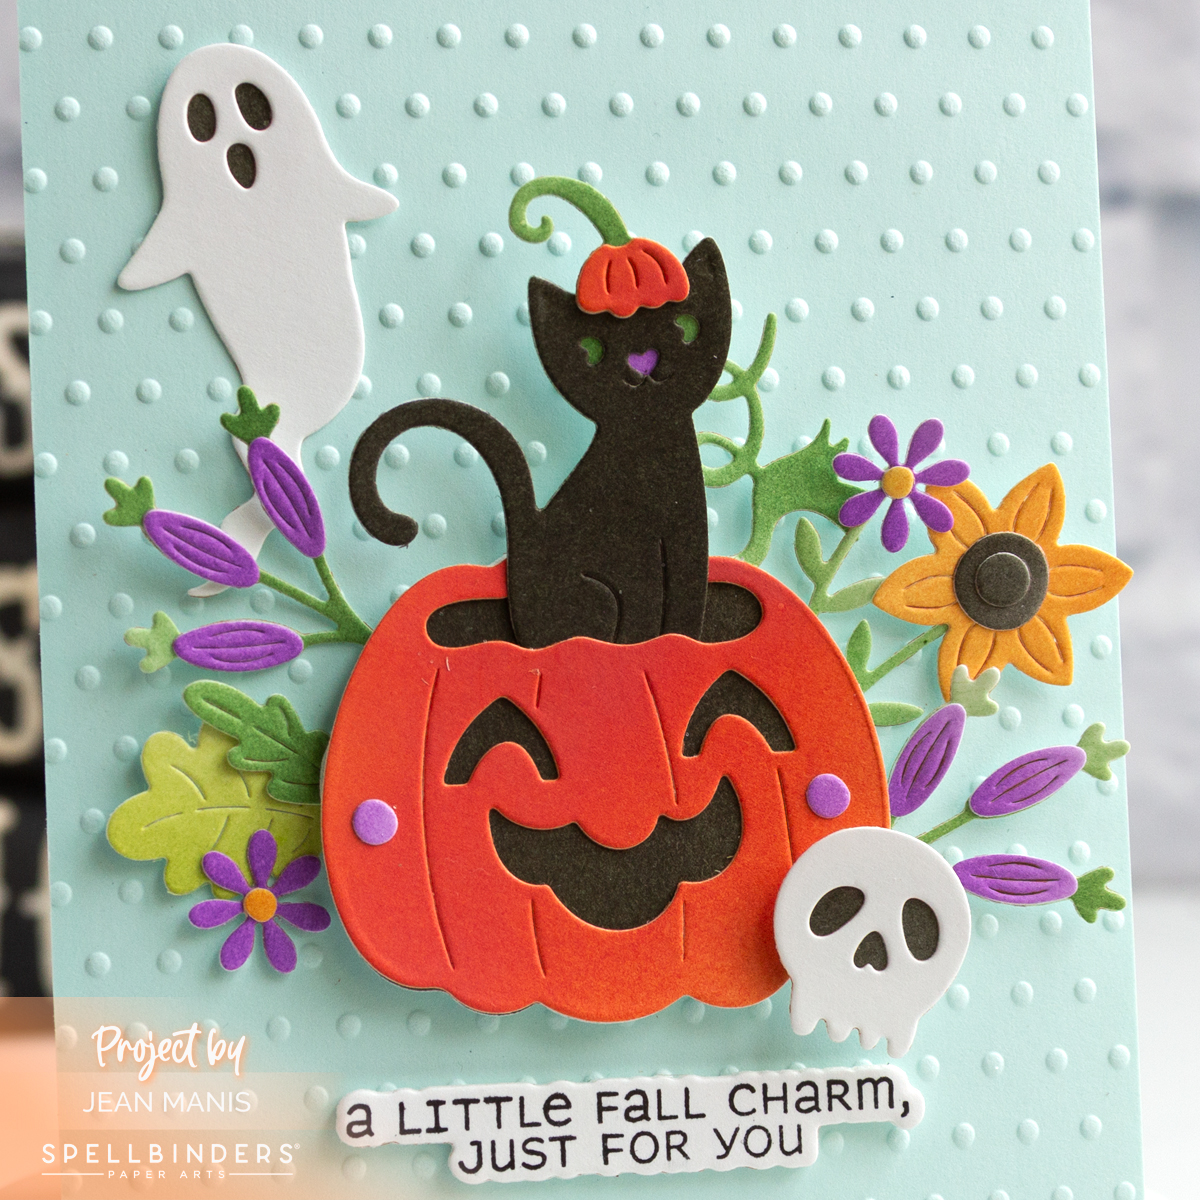
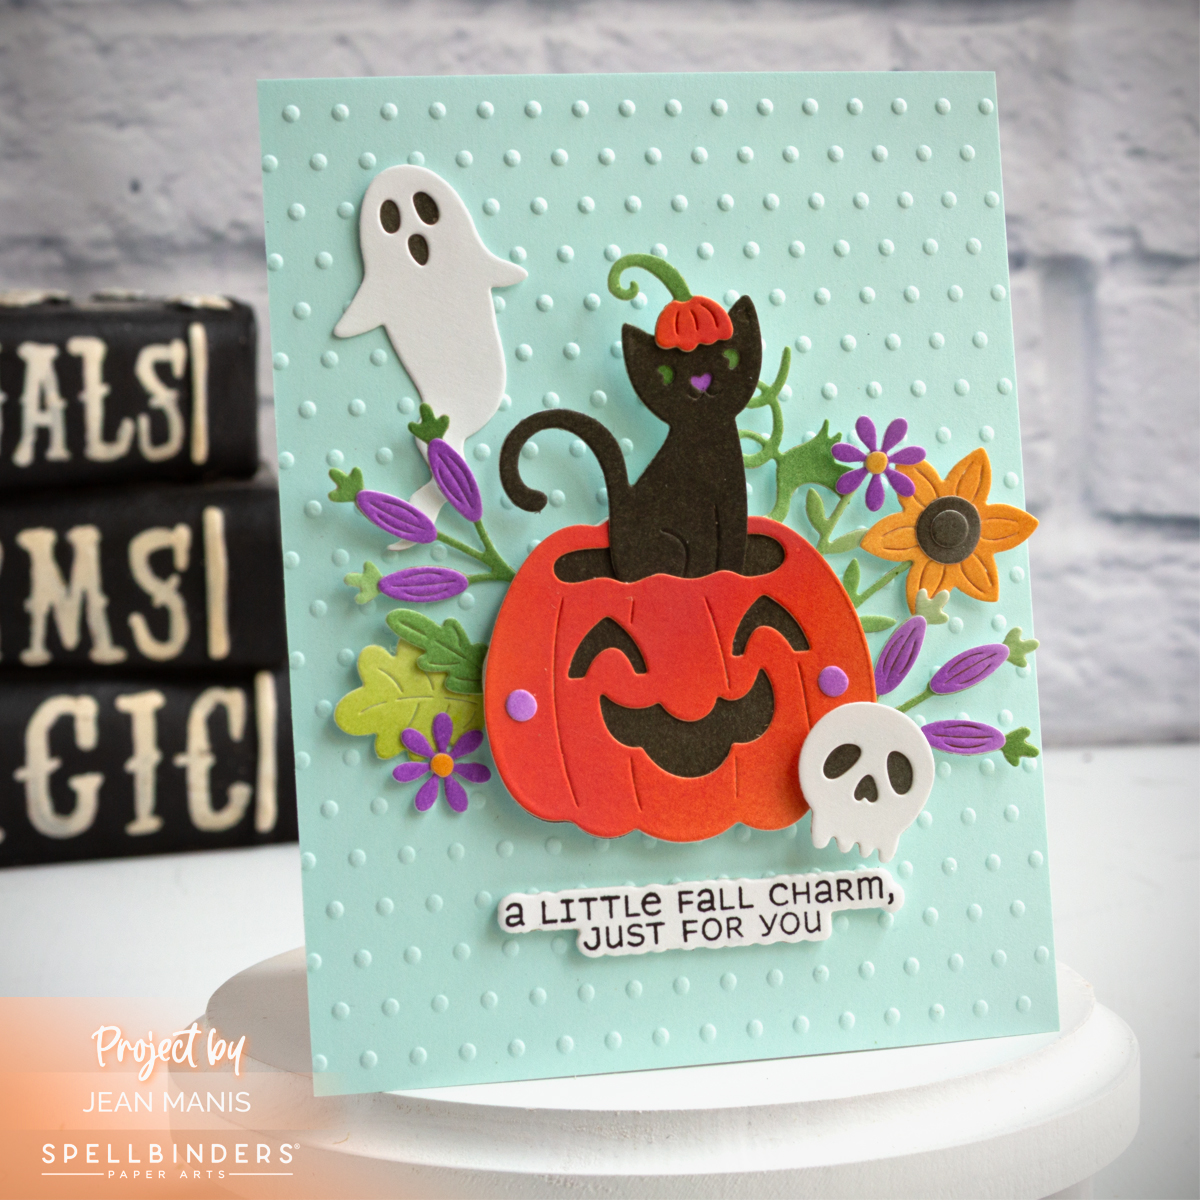
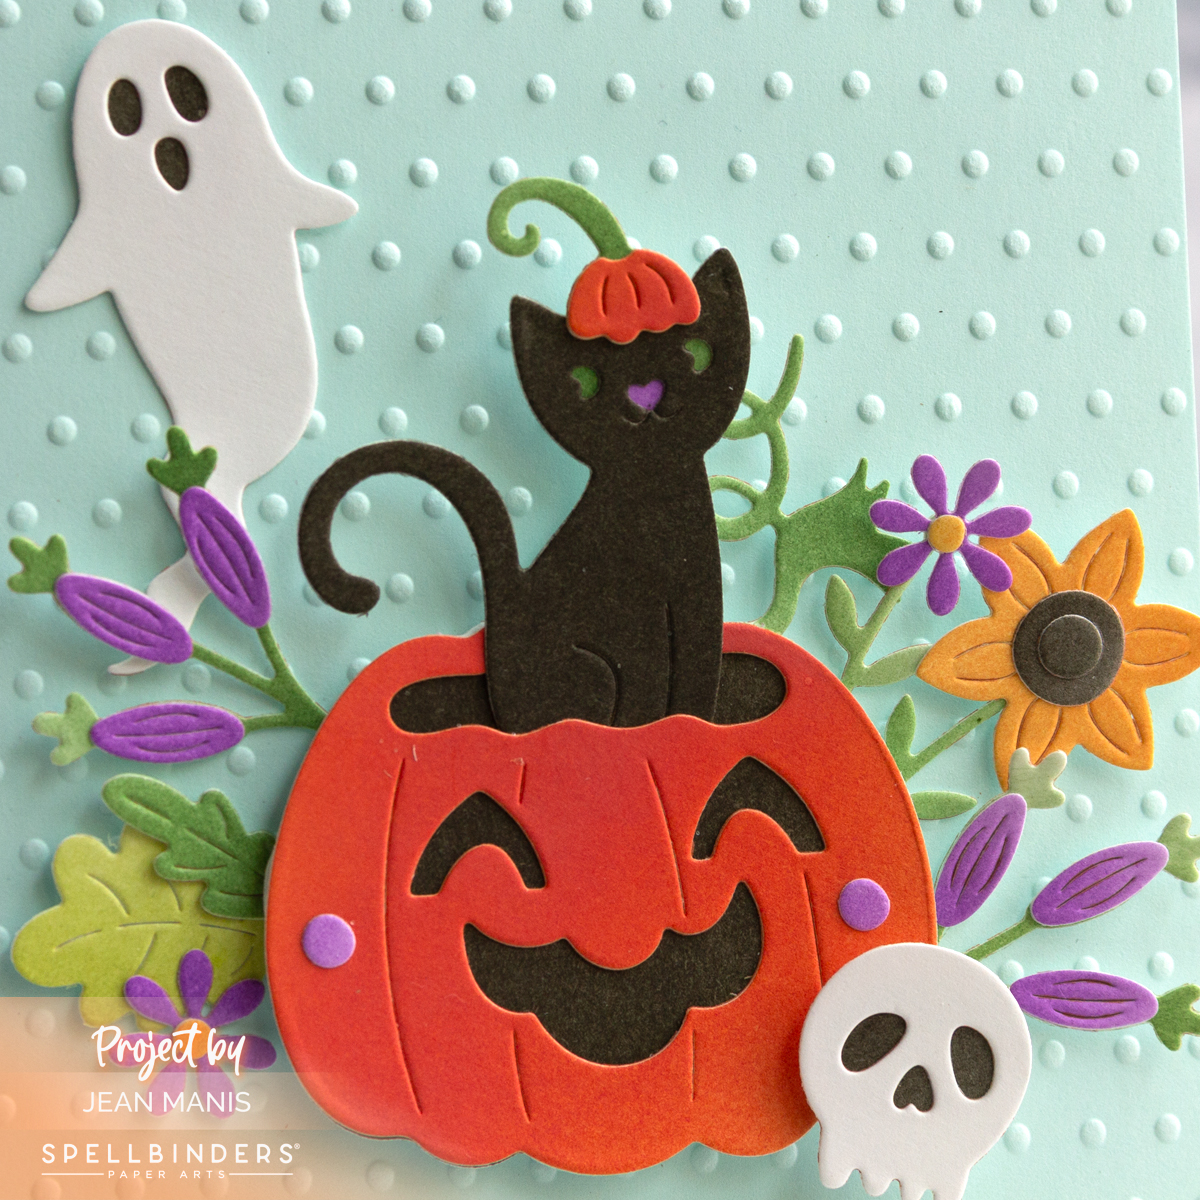
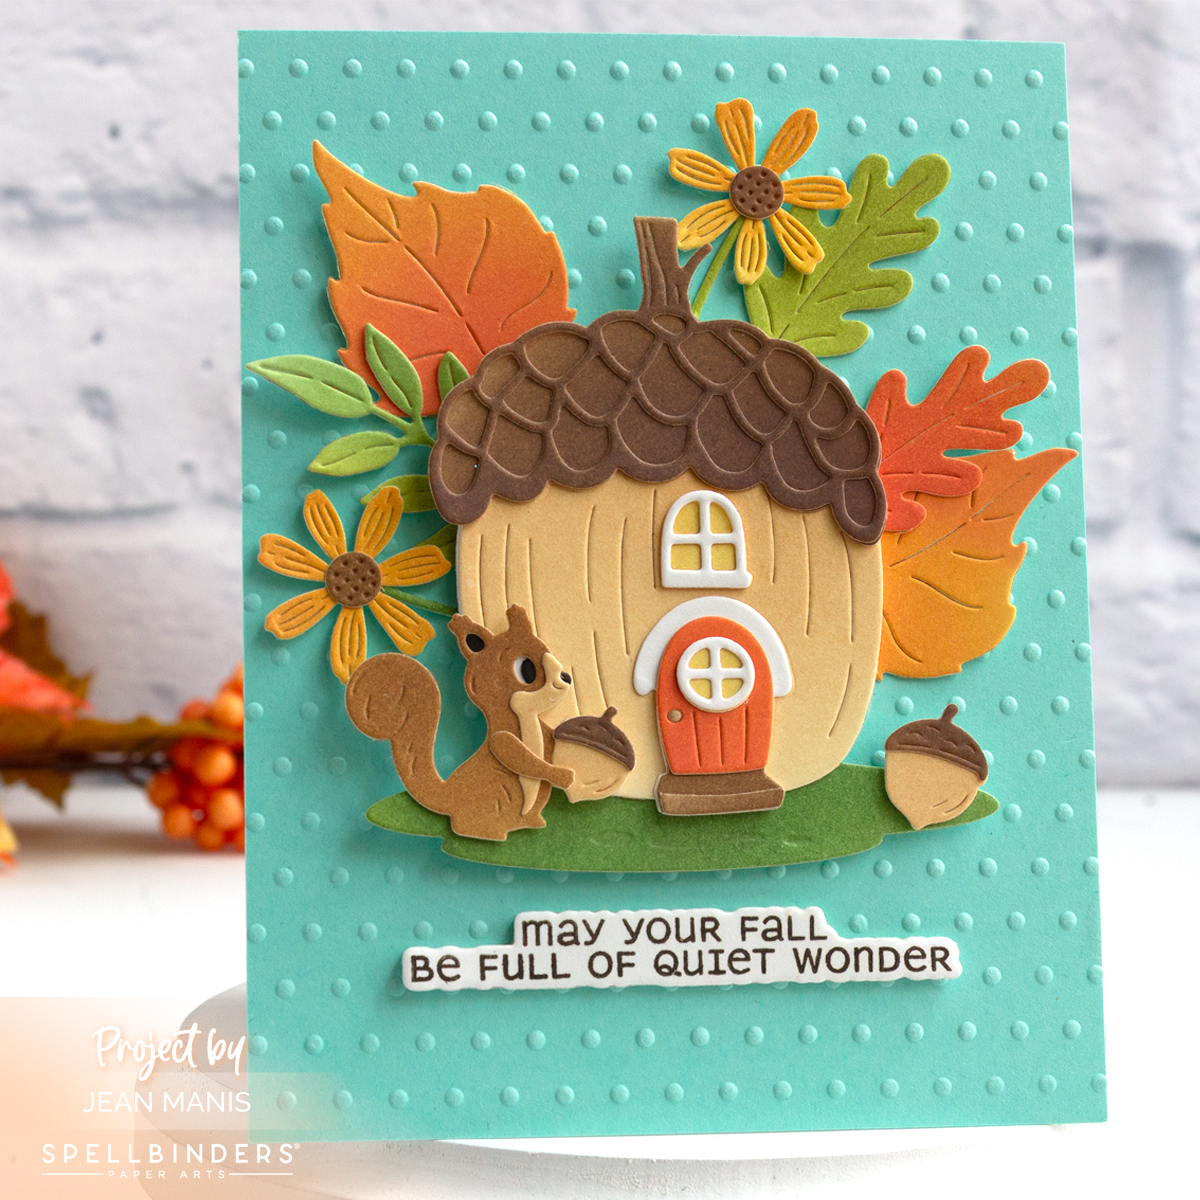
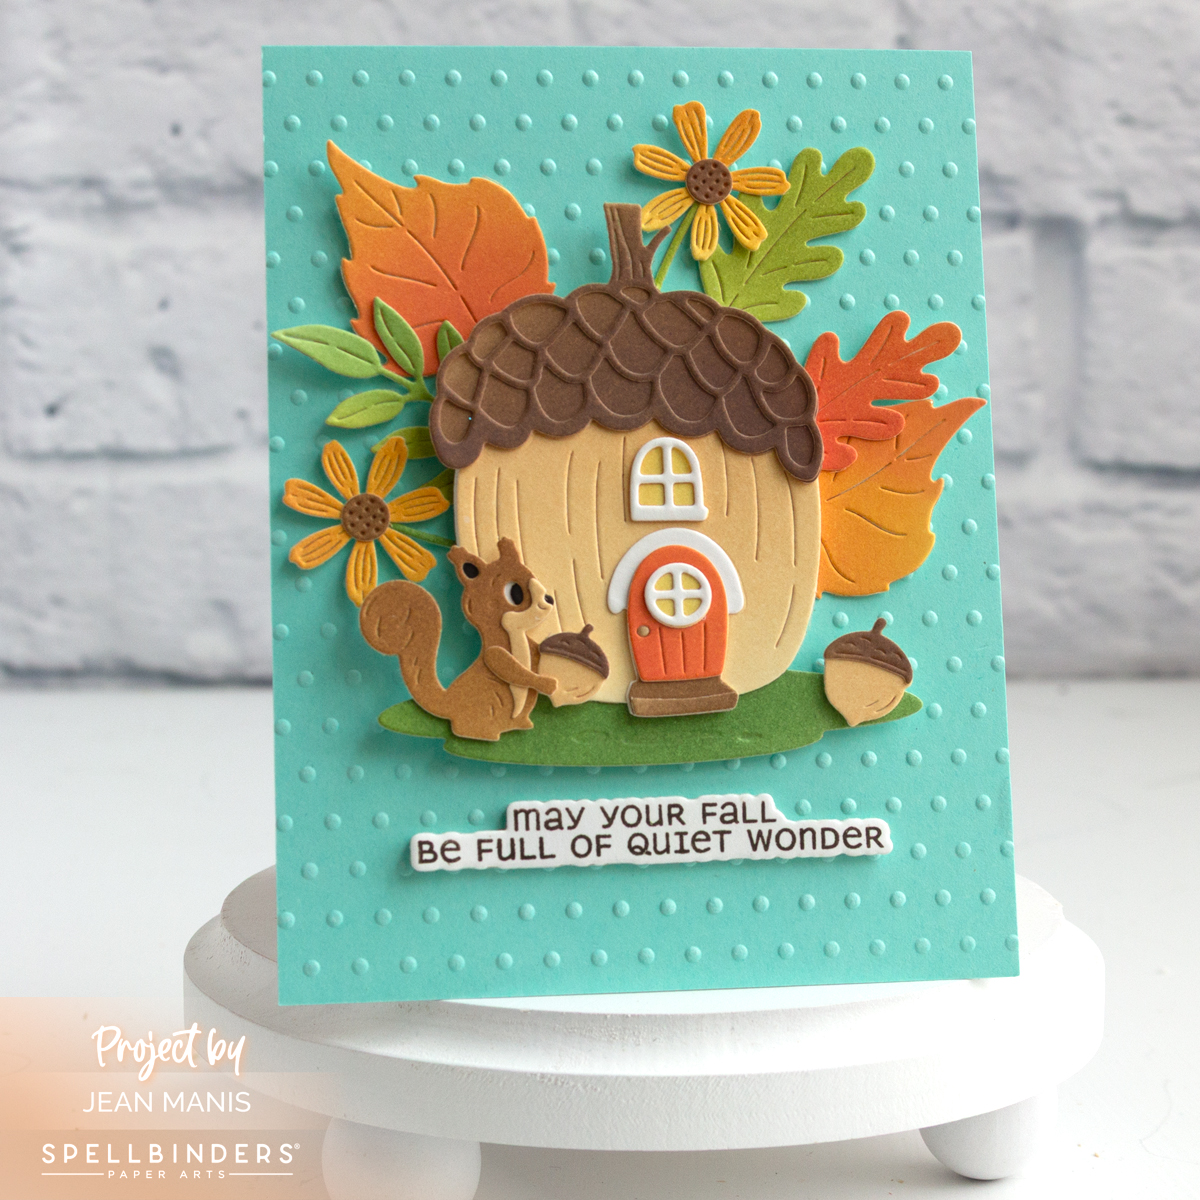
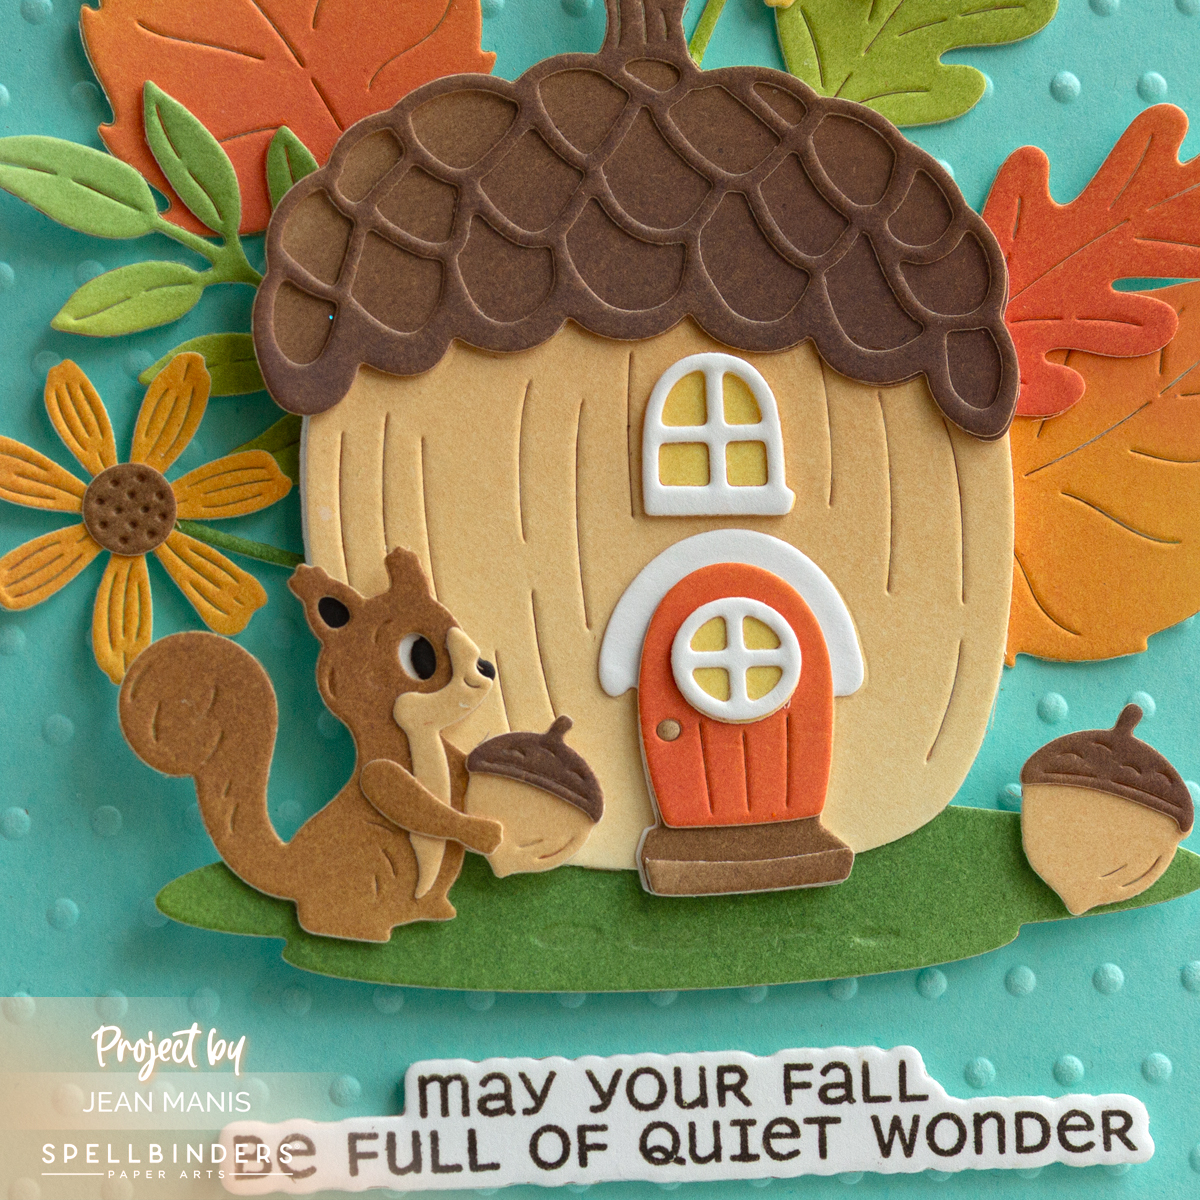
Die-Cut Staircase Christmas Card

Hello! There’s joy in breathing new life into older crafting supplies, and this Christmas card is a perfect example. With timeless Poppystamps dies, I created a nostalgic scene that exudes cozy charm. The patterned paper mimicking vintage wallpaper, cream cardstock for the staircase, and rich red accents capture the essence of a classic home. A die-cut staircase adorned with garland and stockings, a faithful dog resting on the floor, and a textured ground created with the Penny Black Allover Stitches embossing folder all come together seamlessly. This card demonstrates how older products can still craft something truly magical.

Die-Cut Staircase Christmas Card

I cut the Poppystamps Elegant Stair Frame from Memory Box Woodgrain Paper in Cream. The dry-embossed ground is SU Cherry Cobbler, which coordinated with the patterned paper I used for the sentiment and stockings. I cut the dog from SU More Mustard.

Die-Cut Staircase Christmas Card

Poppystamps Dies (now retired): Patient Pup, Elegant Stair Frame, Leafy Garland, Stocking Garland


How to Add Snow to Your Handmade Cards

Hello! You can bring the magic of winter to your handmade cards with a variety of techniques for adding snowy details. In this roundup, I’m sharing cards from past blog posts to illustrate different methods for adding snow, offering inspiration rather than focusing on specific products.

Snow can be featured in different areas of your cards, such as softly layered on the ground, gently falling in the sky, or as striking accents and focal points with die-cut snowflakes. I won’t be specifically mentioning where dies are used to create the snowflake accents, but you’ll see them featured in many of the examples throughout. Click on the card image to be taken to the original post for additional details.

One of the simplest ways to create a snowy scene is by using a hill die to cut white cardstock, adding instant winter charm to your card.

How to Add Snow to Your Handmade Cards

For an extra touch of sparkle, you can use glitter cardstock or glitter foam to create a snow-covered ground.

How to Add Snow to Your Handmade Cards

Glitter cardstock can be used to create focal items, such as sparkling snowmen, adding a festive and eye-catching touch to your card. When I use glitter cardstock for a snowman as a focal point, I don’t use it for the ground, as it would make the snowman less distinct and take away from its prominence. I own one die with snowflakes, and I used it on the card below, along with smaller die-cut snowflakes.

One easy option to use patterned paper featuring snowflakes or a gentle snowfall, instantly setting the scene for a winter feel. The style and color of the paper helps set the mood and tone for your card.

How to Add Snow to Your Handmade Cards

Another way to add snow is by using a background stamp. The ink color, along with the style and scale of the snowflakes, shapes the overall feel of the card, with subtle changes creating entirely different effects.

How to Add Snow to Your Handmade Cards

How to Add Snow to Your Handmade Cards

An embossing folder can add texture to create a snowy sky or overall background, with the style of the snow adding character to your card.

How to Add Snow to Your Handmade Cards

Stencils are a great way to add a snowy sky, whether you’re using designs like snowflakes, snowfall, or flurries. Applying white stencil paste through the stencil creates a textured, dimensional effect.

How to Add Snow to Your Handmade Cards

White embossing paste can be sprinkled with glitter before it dries, creating a beautiful, sparkly effect that enhances the snowy scene.

How to Add Snow to Your Handmade Cards

When I want to achieve the look of snow on greenery, such as evergreen trees or sprigs, I use various embossing powders to make the greenery look as though fresh snow has gently settled on it.

How to Add Snow to Your Handmade Cards

I hope these examples inspire you to get creative with adding snow to your cards. There are many ways to capture the magic of winter—how will you add snow to your next card?

Traditional Christmas Mantel Card

Hello! A decorated mantel embodies the warmth and joy of the holiday season, making it the perfect inspiration for a Christmas card. Mantels are often the focal point of a home, traditionally adorned with garlands, stockings, and festive decor to set the tone for cozy holiday gatherings. This handmade card captures that charm with a beautifully crafted Christmas mantel, created entirely with Spellbinders products. The embossed background adds depth and elegance.

FYI – Black Friday Savings have begun at Spellbinders!

Traditional Christmas Mantel Card

    • To begin, create an A2-size card base with glitter gold cardstock.
    • Cut a rectangle from Snowdrift cardstock with the largest die in the Nestabilities set.
    • Dry-emboss the rectangle with the 3D Vintage Ornaments folder and adhere to the card base.
    • With dies in the Mantel Village and Mantel Decorations sets, cut the mantel, houses, reindeer, banner, trees, and greenery from a variety of cardstock colors. Assemble individual elements.
    • Cut foam with the mantel die and adhere to the back of the die-cut mantel.
    • To create depth on the mantel, attach the assembled houses and sentiment banner to the back of the mantel. Adhere the greenery to the reindeer and then attach that assembly to the front of the mantel.
    • Finally, add the assembly to the card base, adding the trees to the card base on either side of the houses.

Traditional Christmas Mantel Card

I previously shared a card created with these products HERE.


Hooray! Spellbinders Whimsical Frog Card

Hello! Today, I am sharing a playful birthday card created with the November Large Die of the Month – “HOORAY! It’s Your Birthday” – by Spellbinders. The colorful card features a cute frog driving a car attached to a “Hooray!” flag. Scroll for information about the Pre-Holidays Savings Event at Spellbinders.

November 2024 Large Die of the Month

    • Cut a Sea Glass cardstock panel with the Essential Rectangle die and dry-emboss with the Stargazer folder.
    • Cut a strip from Doodlebug patterned paper and add to the dry-embossed panel to create a ground.
    • Add assembly to an A-2 card base.
    • Create car, frog, flag, and presents with dies in the Large Die of the Month set from a variety of cardstock colors and assemble.
    • Add the assemblies to the card background.

November 2024 Large Die of the Month

This limited time Pre-Holiday Clearance Sale is available until November 13, 2024 at 11:59 MST.

Pre-Holiday Clearance Sale


Playful Penguins in a Snow Globe

Hello! Today, I am sharing a whimsical Christmas card featuring a die-cut snow globe and playful penguins crafted with several die sets from Spellbinders. The penguins, nestled in a snowy scene, add fun and charm inside the globe, while the base is decorated with a poinsettia and seasonal greenery.

Playful Penguins in a Snow Globe

The BOGO Sale is on! Now through November 5 at Spellbinders, buy ONE participating item and get ONE participating item of EQUAL OR LESS value FREE.

    • To create the card, begin by dry embossing Sea Glass cardstock with the Vintage Ornaments 3D folder. Trim to A2-size and add to a card base.
    • Cut the Playful Penguins from a variety of cardstock colors and assemble. I shared a card featuring the HERE.
    • Cut the snow globe pieces (dome, base, and snow slopes) with dies in the Snow Globe and Snowman Scene sets and assemble.
    • Using dies in the Delivering Joy Sleigh set, cut the poinsettia, greenery, and sentiment tag. I previously shared a card created with the Delivering Joy Sleigh set HERE.
    • Add assembled globe, penguins, and poinsettia embellishment to the card base with glue and foam adhesive.

Playful Penguins in a Snow Globe