Summertime Gnomes: Celebrating the 4th of July

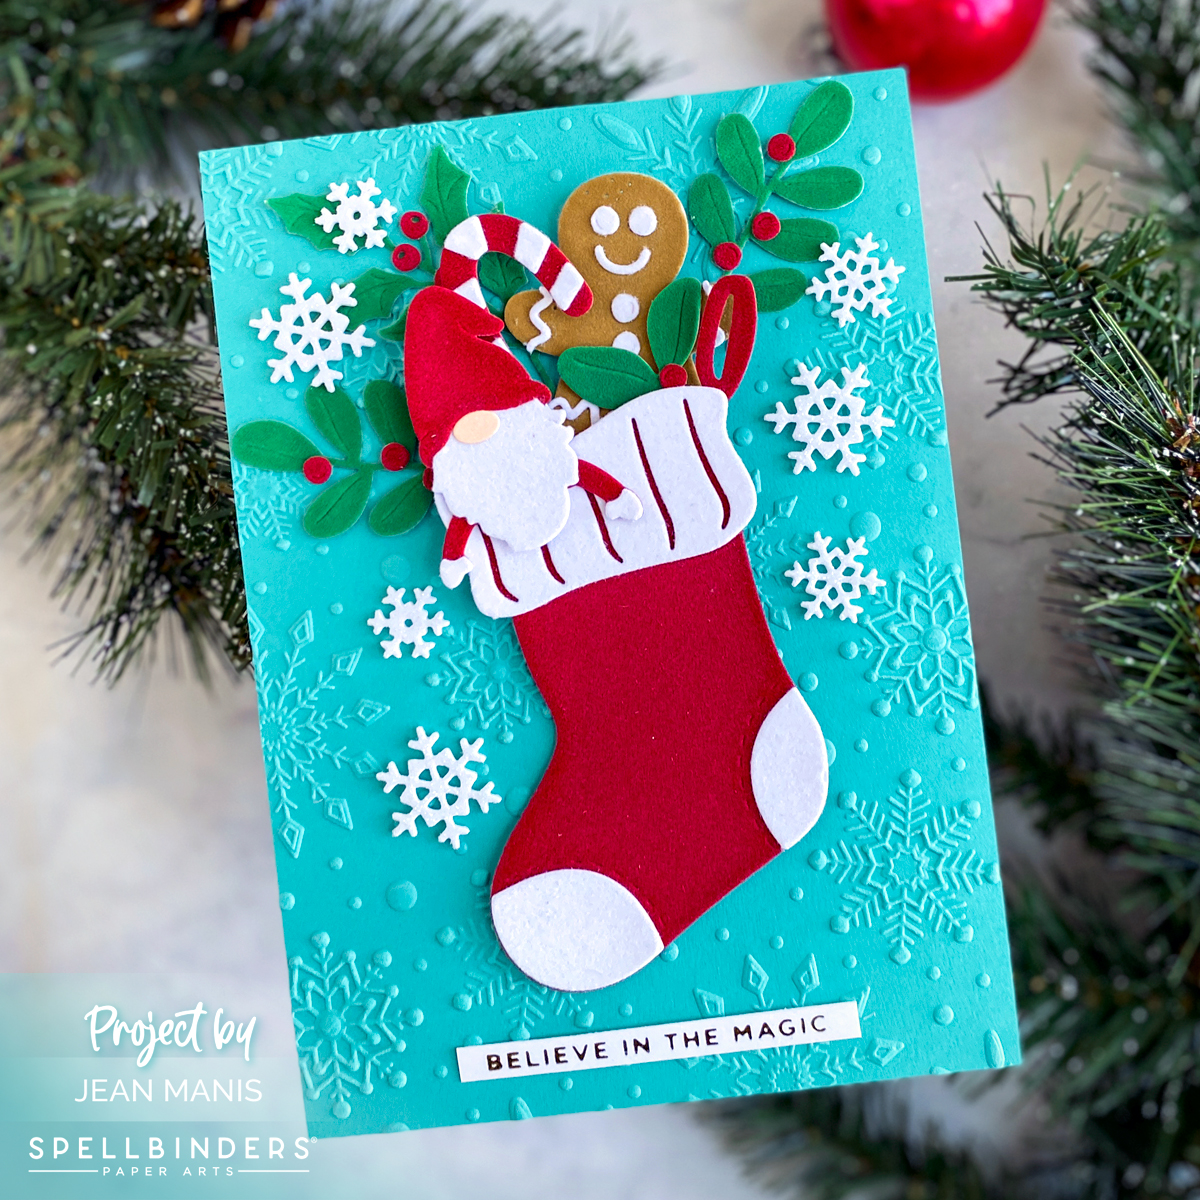
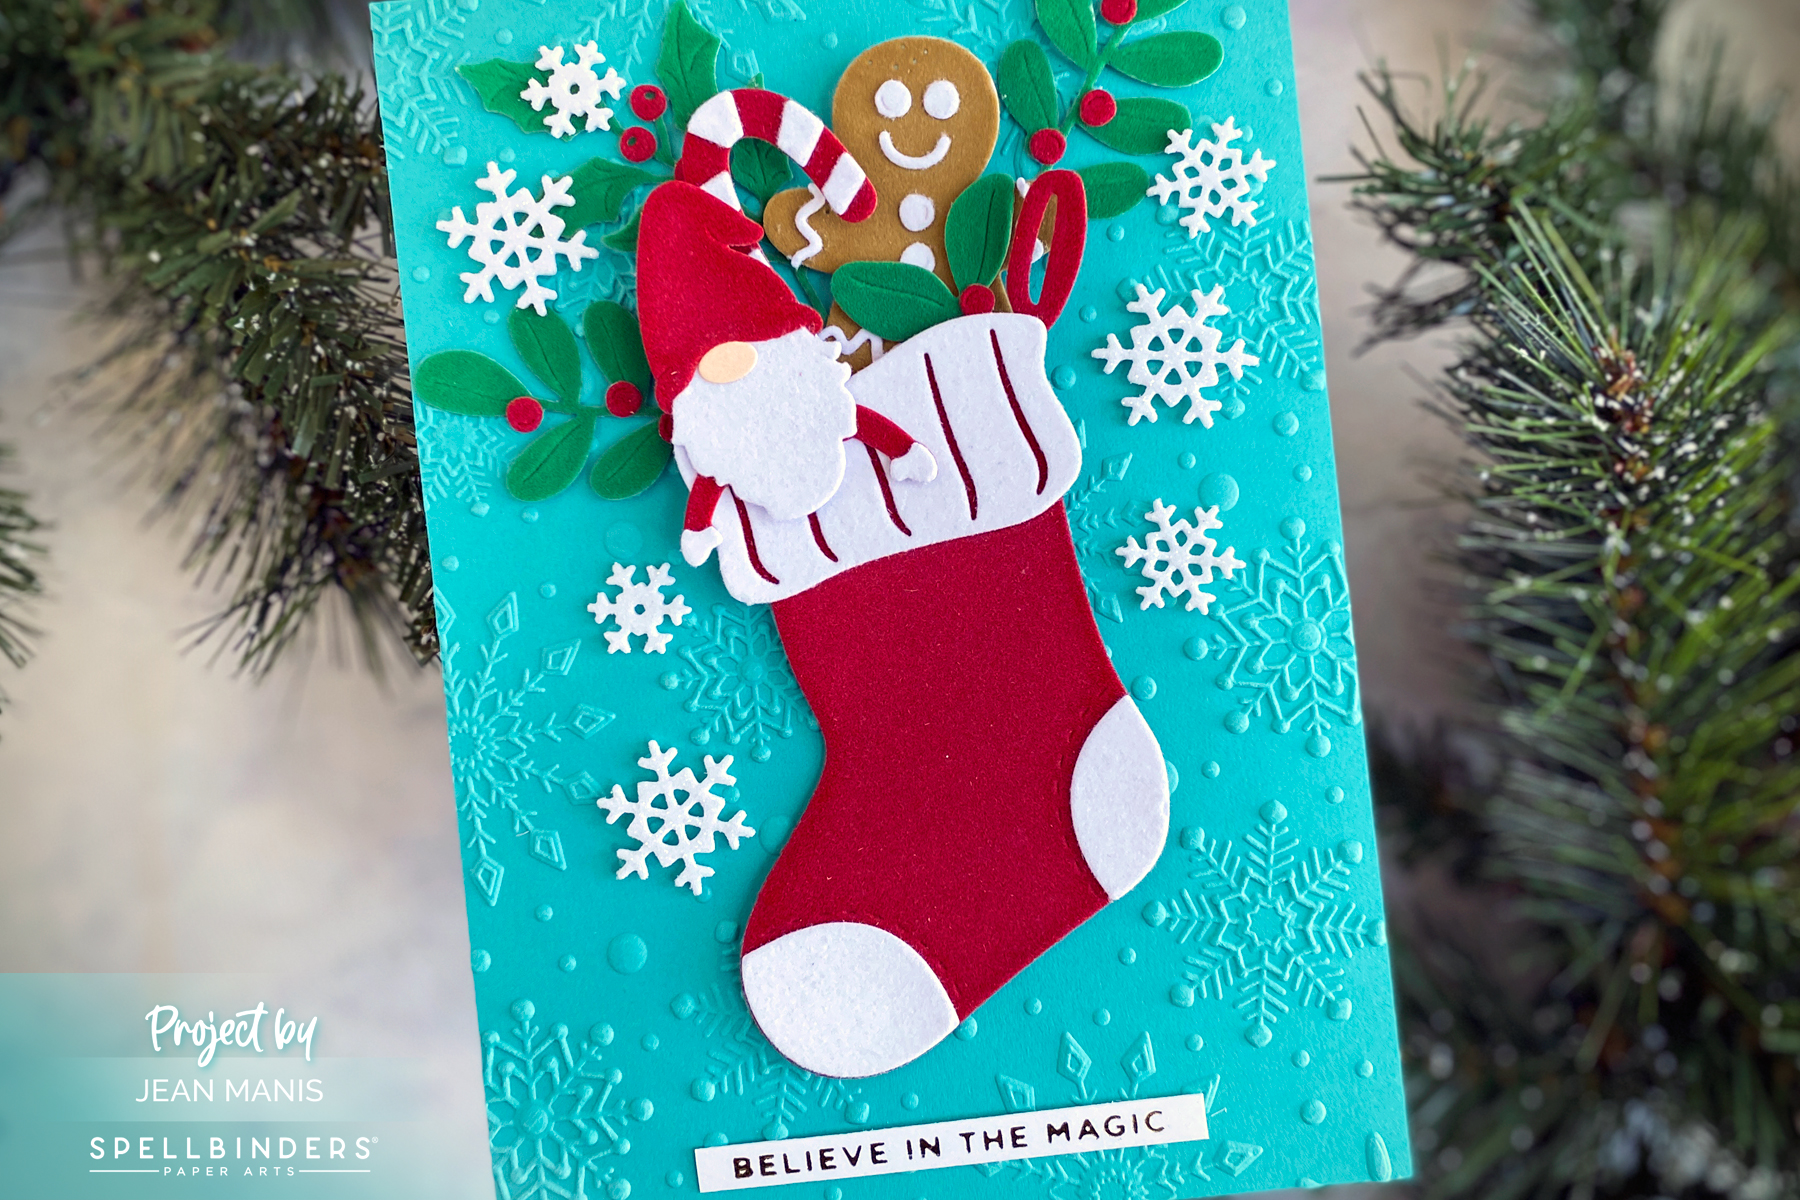
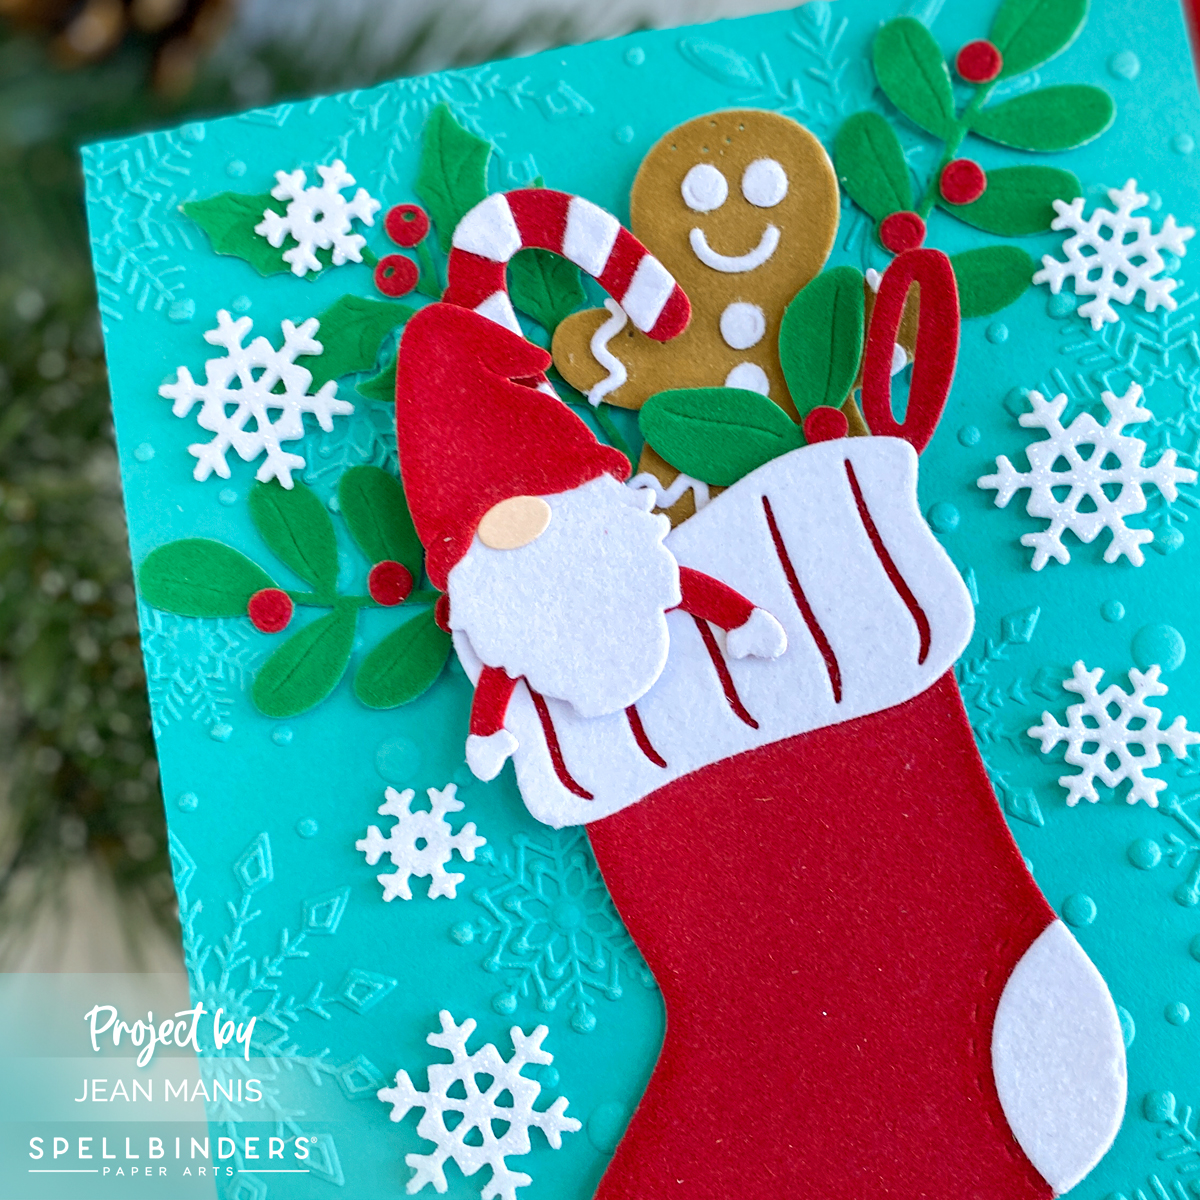
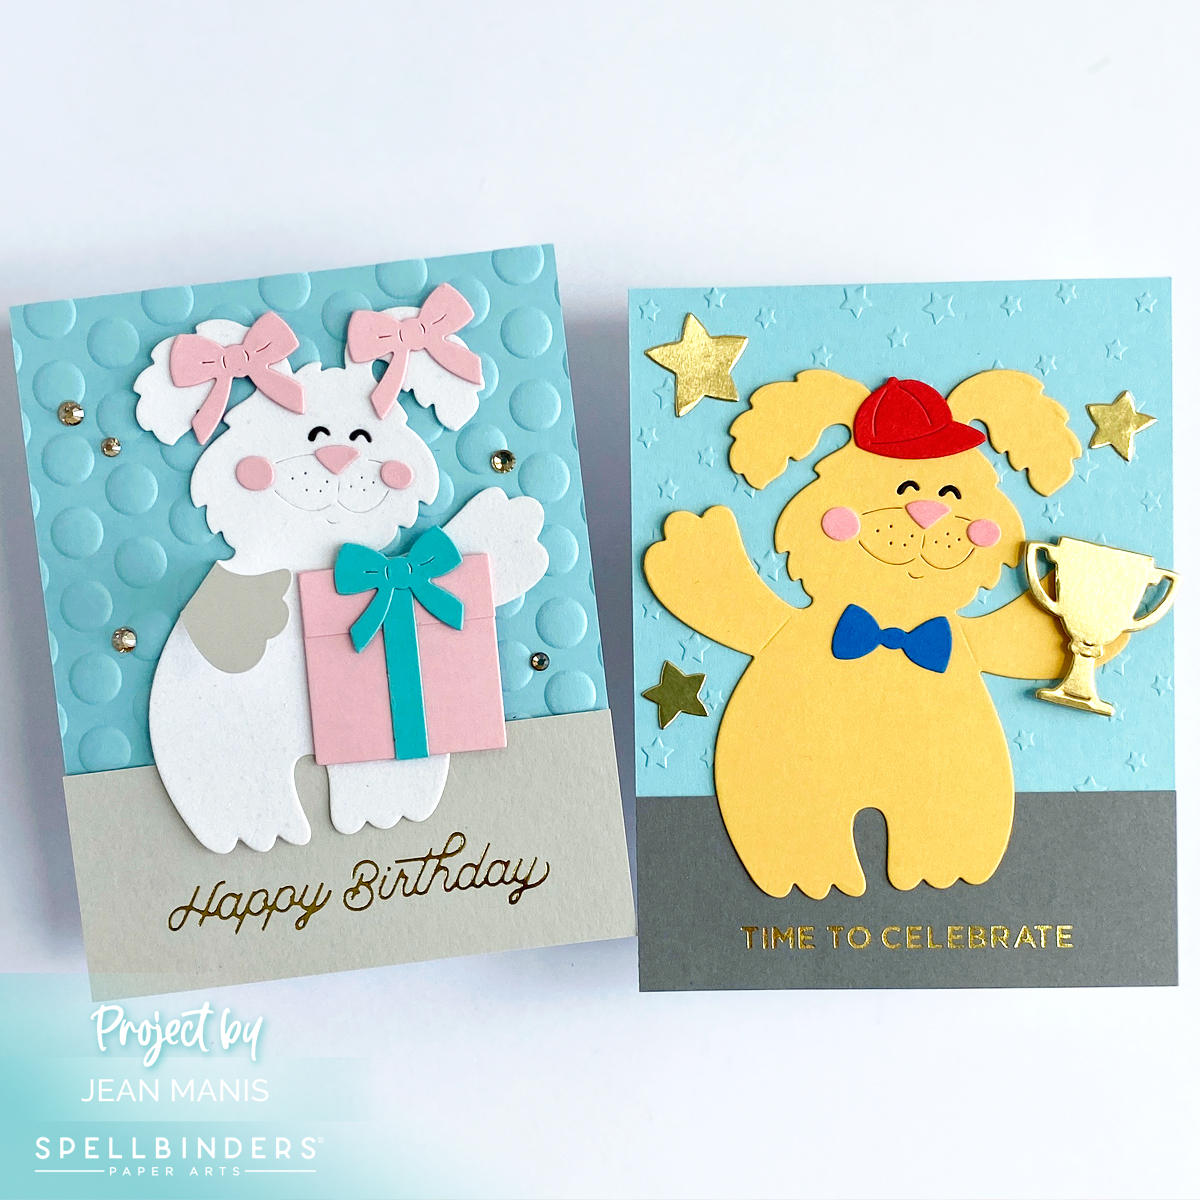
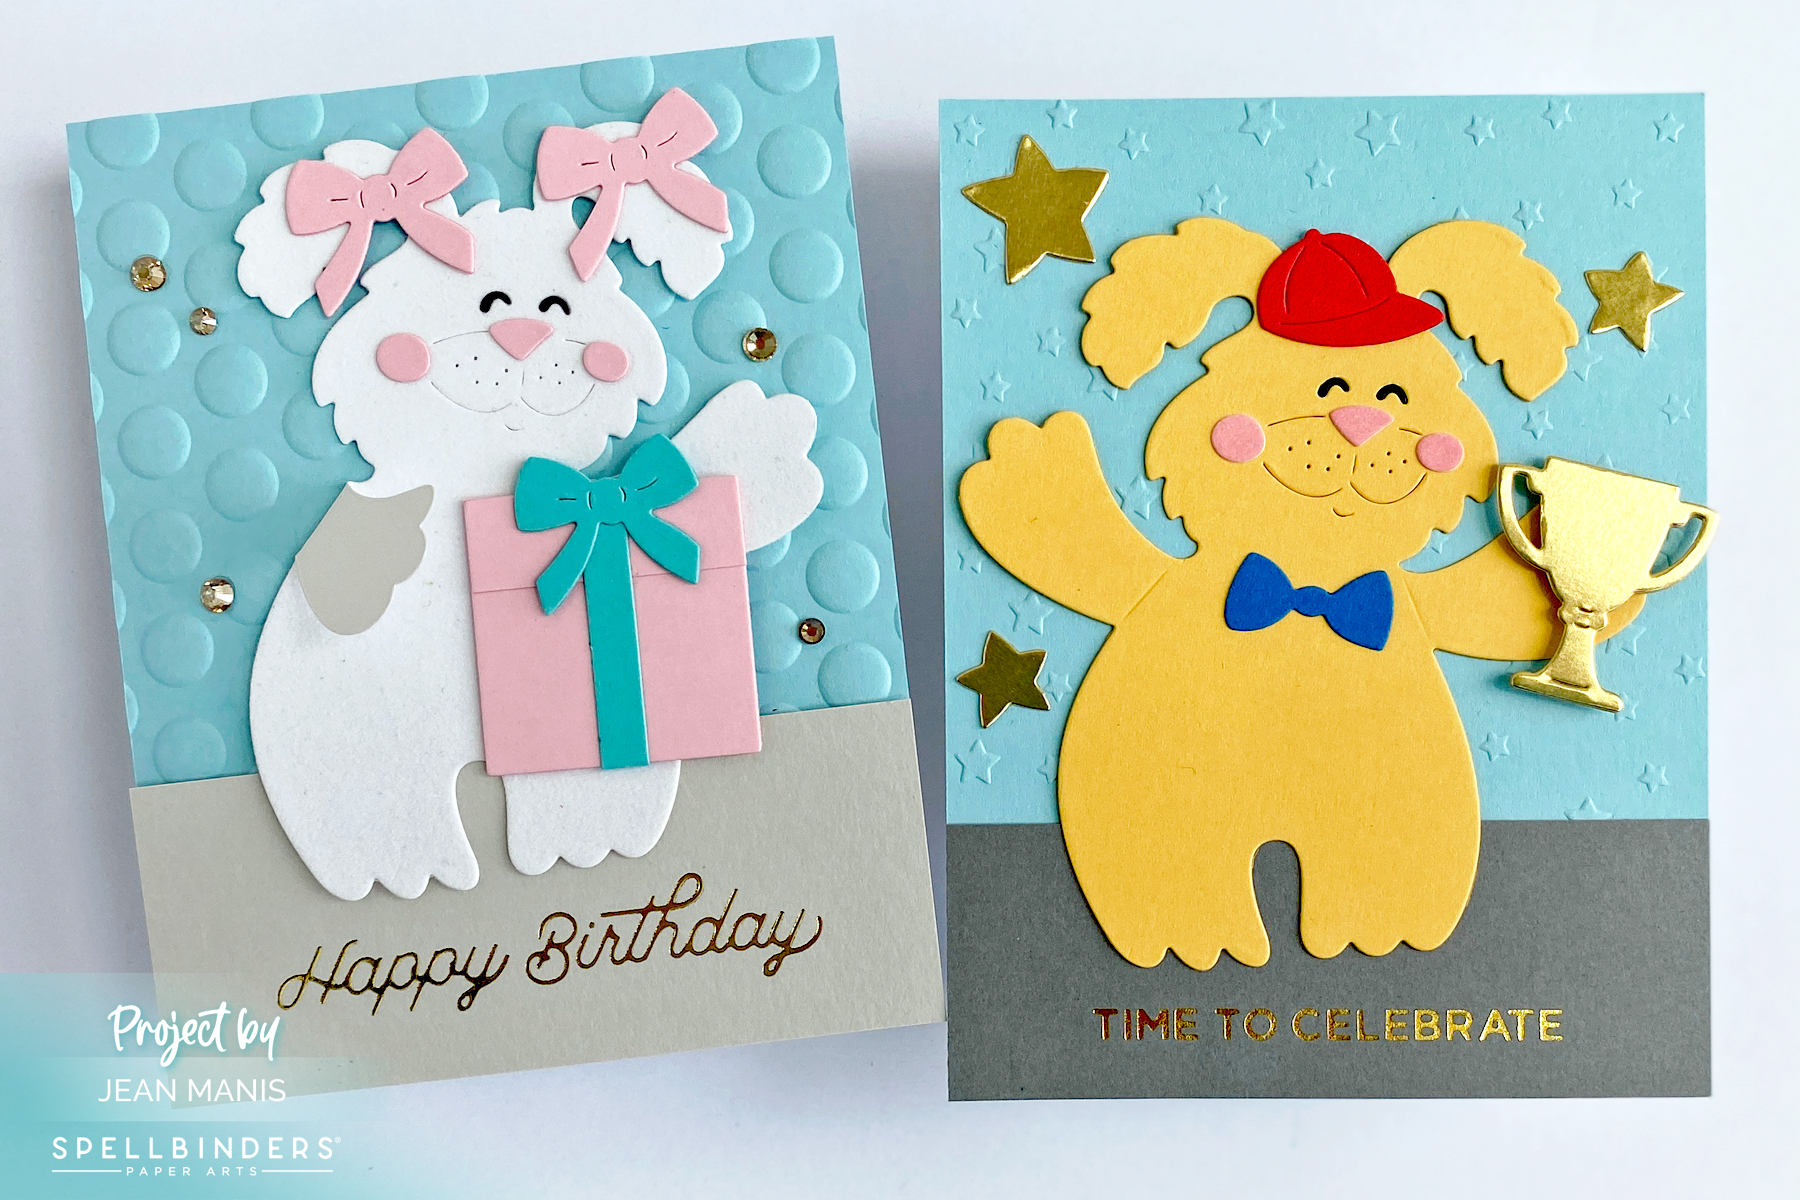
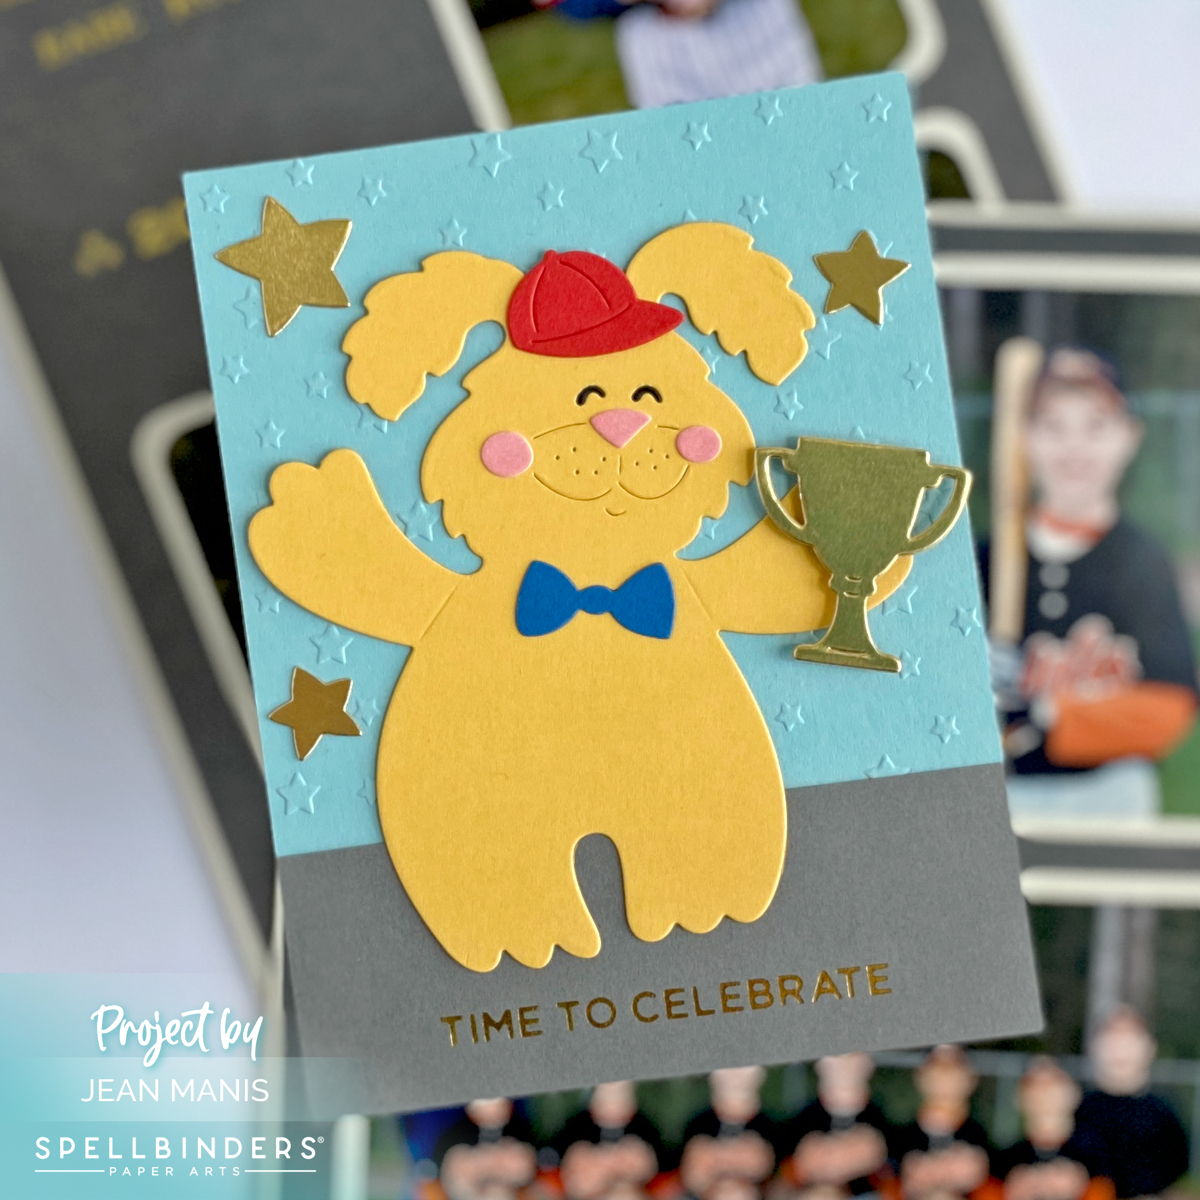
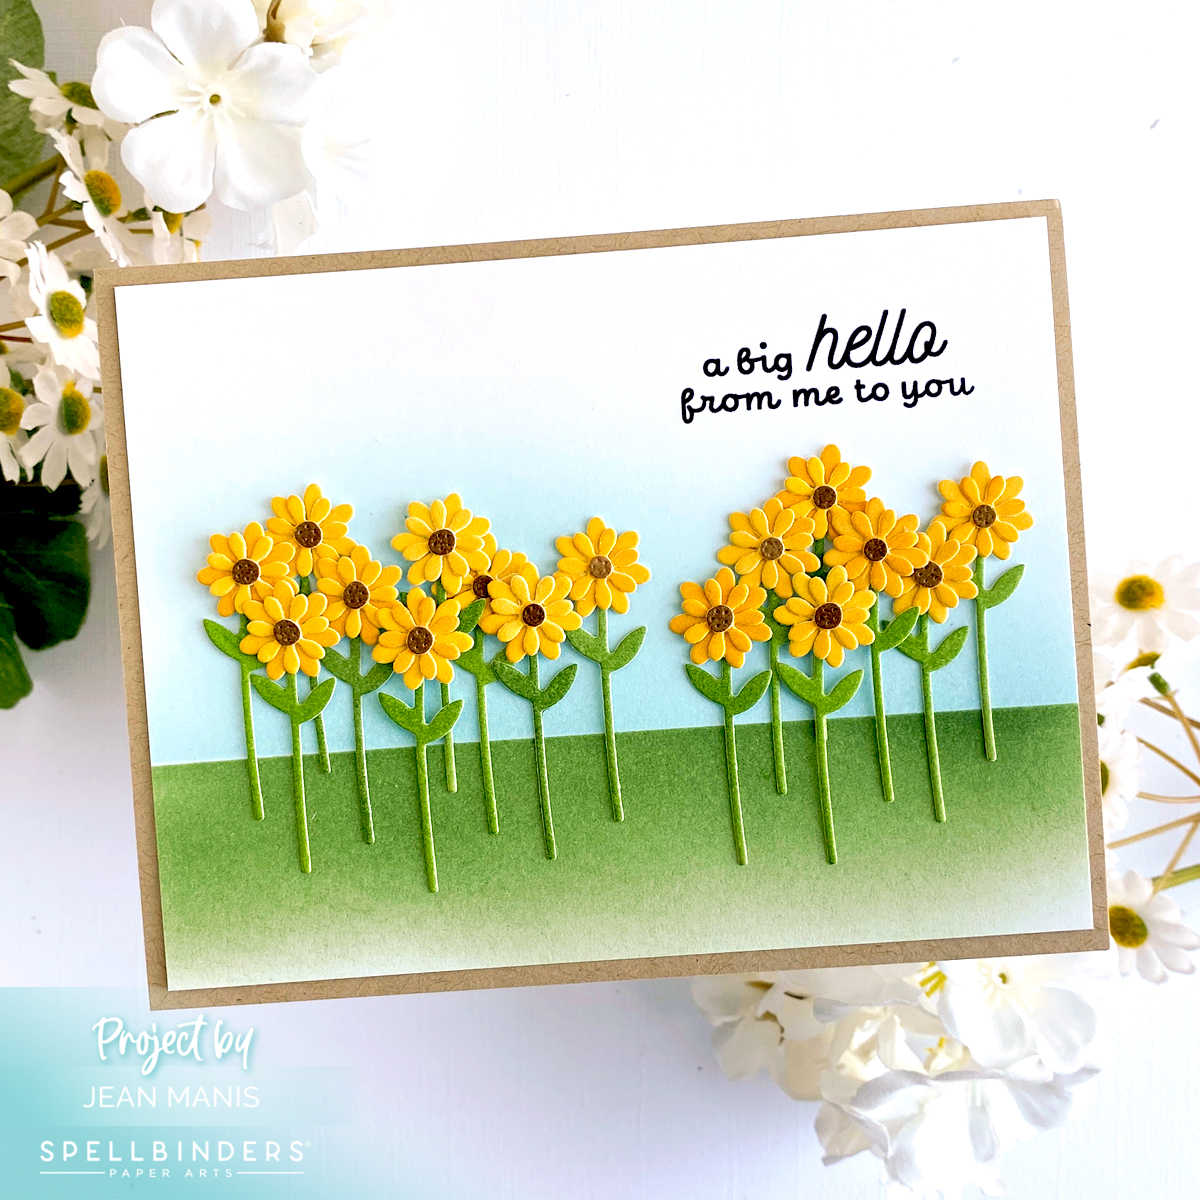
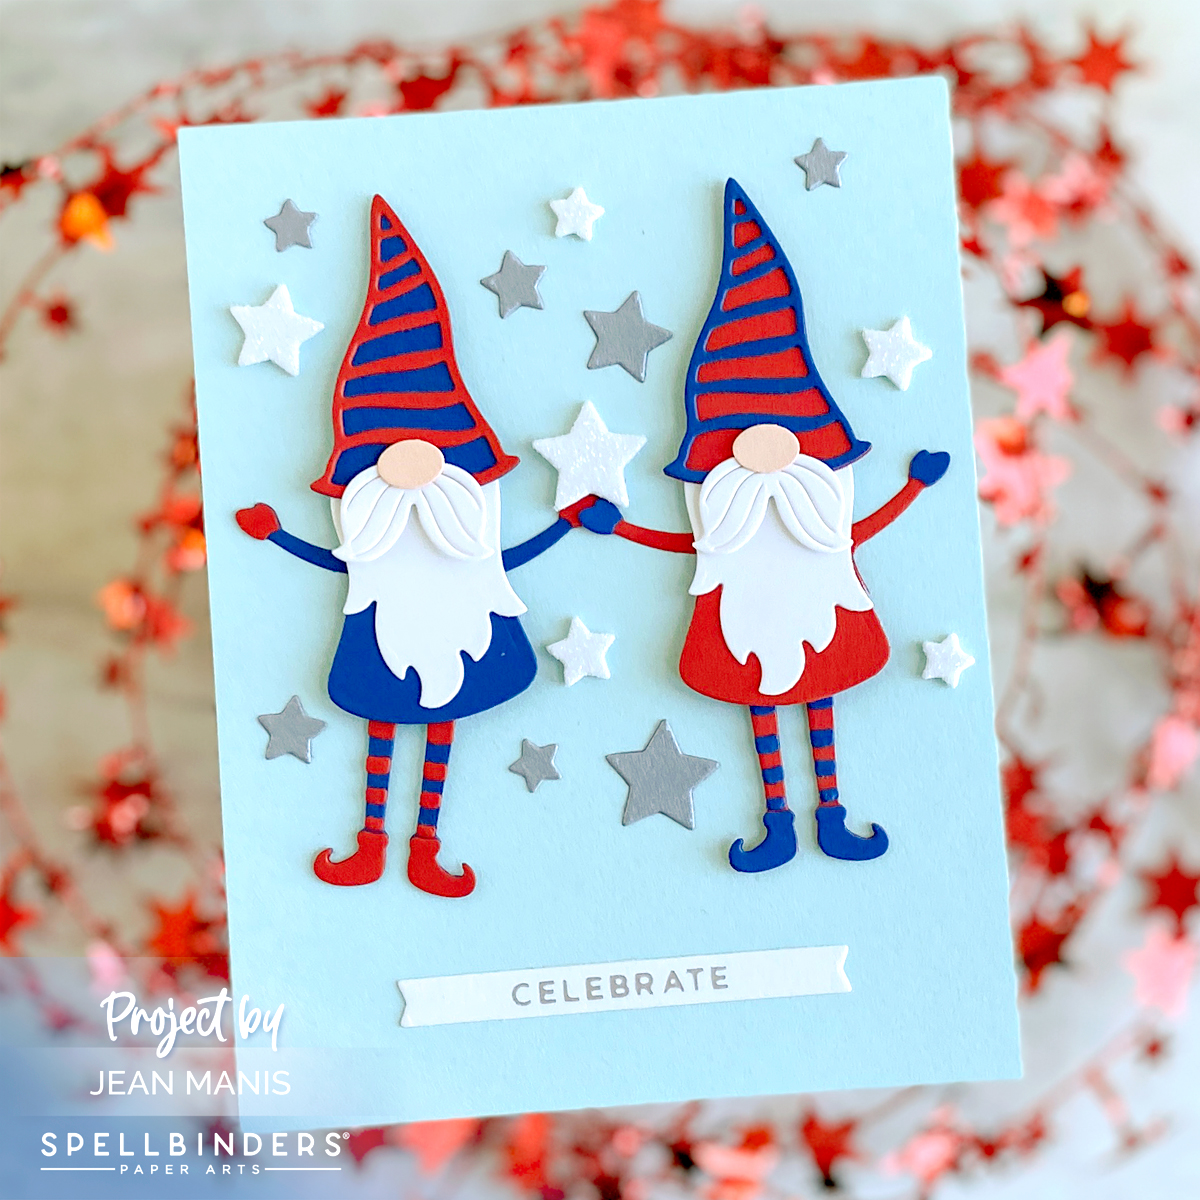
Hello! I am sharing a 4th of July card that features two whimsical gnomes, dressed in patriotic colors, and an array of sparkling stars adding a touch of magic. The gnomes were originally part of a Spellbinders die set released during the Christmas season. By repurposing the gnomes, I showcase their ability to bring joy and celebration to any occasion, be it Christmas or the 4th of July! Scroll for information on the Spellbinders Star Spangled Savings Event.

Summertime Gnomes: Celebrating the 4th of July

This charming 4th of July card is the perfect way to spread joy and celebrate the spirit of independence. Whether the recipient is a grandparent, a grandchild, a close friend, or a fellow crafting enthusiast, this card will surely bring a smile to their faces.

Light up your 4th of July with fantastic deals – up to 40% off dies, stamps, machines, and more during the Spellbinders Star Spangled Savings Event!


Crafting Christmas Magic | Spellbinders Large Die of the Month

Hello! I am thrilled to share a delightful Christmas card featuring the July 2023 Spellbinders Large Die of the Month set – “Stocking Full of Joy.” A stocking symbolizes the anticipation and excitement of receiving gifts and the warmth of festive traditions. Expect to see a number of “Christmas in July” projects this month.

Crafting Christmas Magic | Spellbinders Large Die of the Month

JULY 2023 Spellbinders Large Die of the Month

With this versatile die set, I cut the gingerbread person, a whimsical gnome, festive greenery, and a peppermint stick. To add texture and visual appeal, I used a range of materials including brushed white cardstock.

The assembled pieces were arranged on a dry-embossed background, measuring 5 x 7 inches, created from Teal Topaz cardstock with the Flurry of Snowflakes 3D folder. Note: the stocking does fit on an A2-size card base.

Adding a touch of elegance, I glimmer foiled the sentiment – “Believe in the Magic” – in gold.

To complete the card and reinforce the magical theme, I embellished with snowflakes cut from white glitter foam.

Crafting Christmas Magic | Spellbinders Large Die of the Month

Find more inspiration HERE.


Stampendous Hugs Collection at Spellbinders

Hello! Today I am delighted to share two cards created with products in the just-released Stampendous Hugs Collection at Spellbinders. From a charming die-cut dog proudly holding a trophy to another adorable pup clutching a present, this collection can be used to easily create cards for a variety of occasions. The Stampendous Puppy Hugs set, which I used on both cards, is designed to work with the collection’s Puppy Hugs Faces and Sentiments (not shown).

Stampendous Hugs Collection at Spellbinders

With the sentiment “Time to Celebrate,” the first card can commemorate special moments or victories, such as a grade school graduation or a trip to the Little League All Stars, to name a few.

Stampendous Hugs Collection at Spellbinders

    • Cut dog body from Beeswax cardstock with die in the Stampendous Puppy Hugs set. Cut eyes from Onyx cardstock and cheeks and nose from pink cardstock. Cut trophy from gold foil cardstock. Assemble.
    • Create background by dry-embossing light blue cardstock with the Stargazer embossing folder.
    • Glimmer foil in gold a sentiment in the More Sentiments set on dark gray cardstock. Trim and add to background; attach to A2-size card base.
    • Embellish with additional stars cut with dies in the Stampendous Puppy Hugs set.

The second card, with a feminine color palette, was designed with a girl’s birthday in mind.

Stampendous Hugs Collection at Spellbinders

    • Cut dog from flocked white cardstock with die in the Stampendous Puppy Hugs set. Cut eyes from Onyx cardstock and cheeks and nose from Pink Sand cardstock.
    • Cut hair ribbons and package pieces with dies in the Stampendous Hugs Accessories set from Pink Sand and Waterfall cardstock. Note: The package is designed to be folded or partially folded; I cut the package piece on the score lines so it would lie flat.
    • Create background by dry-embossing light blue cardstock with the Puff Dotty embossing folder.
    • Glimmer foil in gold a sentiment in the Birthday Unboxing set on light gray cardstock. Trim and add to background; attach to A2-size card base.
    • Add dog to card, folding one arm over as if to hold the package. Note: both of the arms can be folded inwards.
    • Embellish with Gold Mix Gems.


Sending Hugs from the Sea | Spellbinders Small Die Kit Club

Hello! Today I am sharing a mini-slimline, underwater scene card created with the Spellbinders June 2023 Small Die Kit Club – “Dancin’ Octopus & Friends”- with which I paired the sentiment of “Hey” (included in the kit) and “Sending Hugs.” Octopuses are visually interesting creatures with their distinctive and otherworldly appearance, tentacles, and vibrant coloration. This card would work for a number of occasions, whether to connect with a friend, brighten the day of someone feeling under the weather, or “just because.” Keep reading to learn how I created the card.

Spellbinders June 2023 Small Die Kit Club

Spellbinders June 2023 Small Die Kit Club

    • Create background by applying Distress inks – Salty Ocean, Mermaid Lagoon, and Blueprint Sketch – on Distress Watercolor cardstock. Trim to mini-slimline size of 6 1/2 x 3 1/2 inches and add to card base.
    • Glimmer foil the Sending Hugs sentiment from the Mini Sincere Sentiments set in black  on Snowdrift cardstock. Trim.
    • Cut June 2023 Small Die Kit Club pieces – octopuses and jellyfish – from light gray cardstock and cardstock to which Distress Oxide inks have been applied. Assemble. Note: The bottom layers of the octopus and jellyfish can move, hence the name “Dancin’ Octopus & Friends.” For my design, I did not leave that layer free to move.

Spellbinders June 2023 Small Die Kit Club

    • Add octopuses to card, trim edges as necessary. Add jellyfish and sentiment.

Spellbinders June 2023 Small Die Kit Club

Head to the Spellbinders blog for a tutorial with the Small Die Kit Club – “Dancin’ Octopus & Friends.”


Creating a Field of Sunflowers with the Spellbinders Garden Builder

Welcome! I’m excited to share a recent card creation featuring the Spellbinders Garden Builder set from the Country Road Collection by Annie Williams. Repetition is a powerful design principle that can add impact to any project. The repetition of the sunflower (16 in total!) creates a stunning field of flowers. Read on for step-by-step instructions on how to create the card.

Creating a Field of Sunflowers with the Spellbinders Garden Builder

  • Glimmer foil in black the Sentiments for Everyday sentiment on Snowdrift cardstock.
  • Use vellum to mask and apply Tumbled Glass Oxide ink for the sky and Rustic Wilderness Oxide ink for the ground. Trim panel to 4 x 5 1/4 inches and add to a kraft cardstock base.
  • Cut sunflowers with the Garden Builder set from cardstock to which Wild Honey, Ground Espresso, and Rustic Wilderness inks have been applied. Assemble flowers and add to card. Tip: First glue the flowers together into clusters and then glue the clusters to the card.

Creating a Field of Sunflowers with the Spellbinders Garden Builder

Looking for more inspiration with the Country Road Collection? Check out this card pairing the Garden Builder set with the Country Wheelbarrow set.