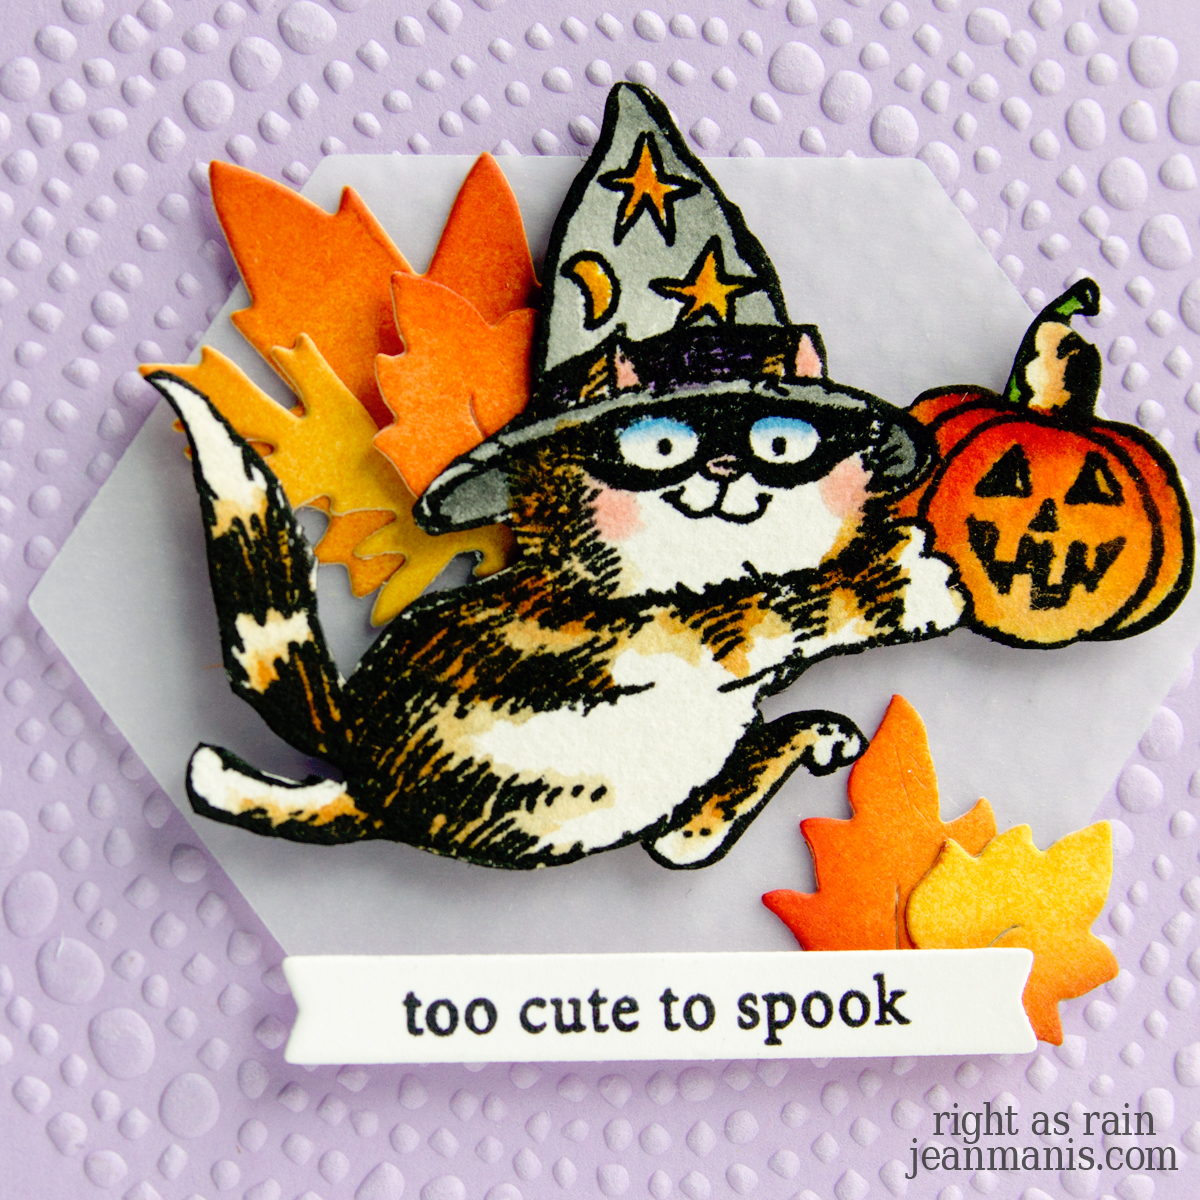
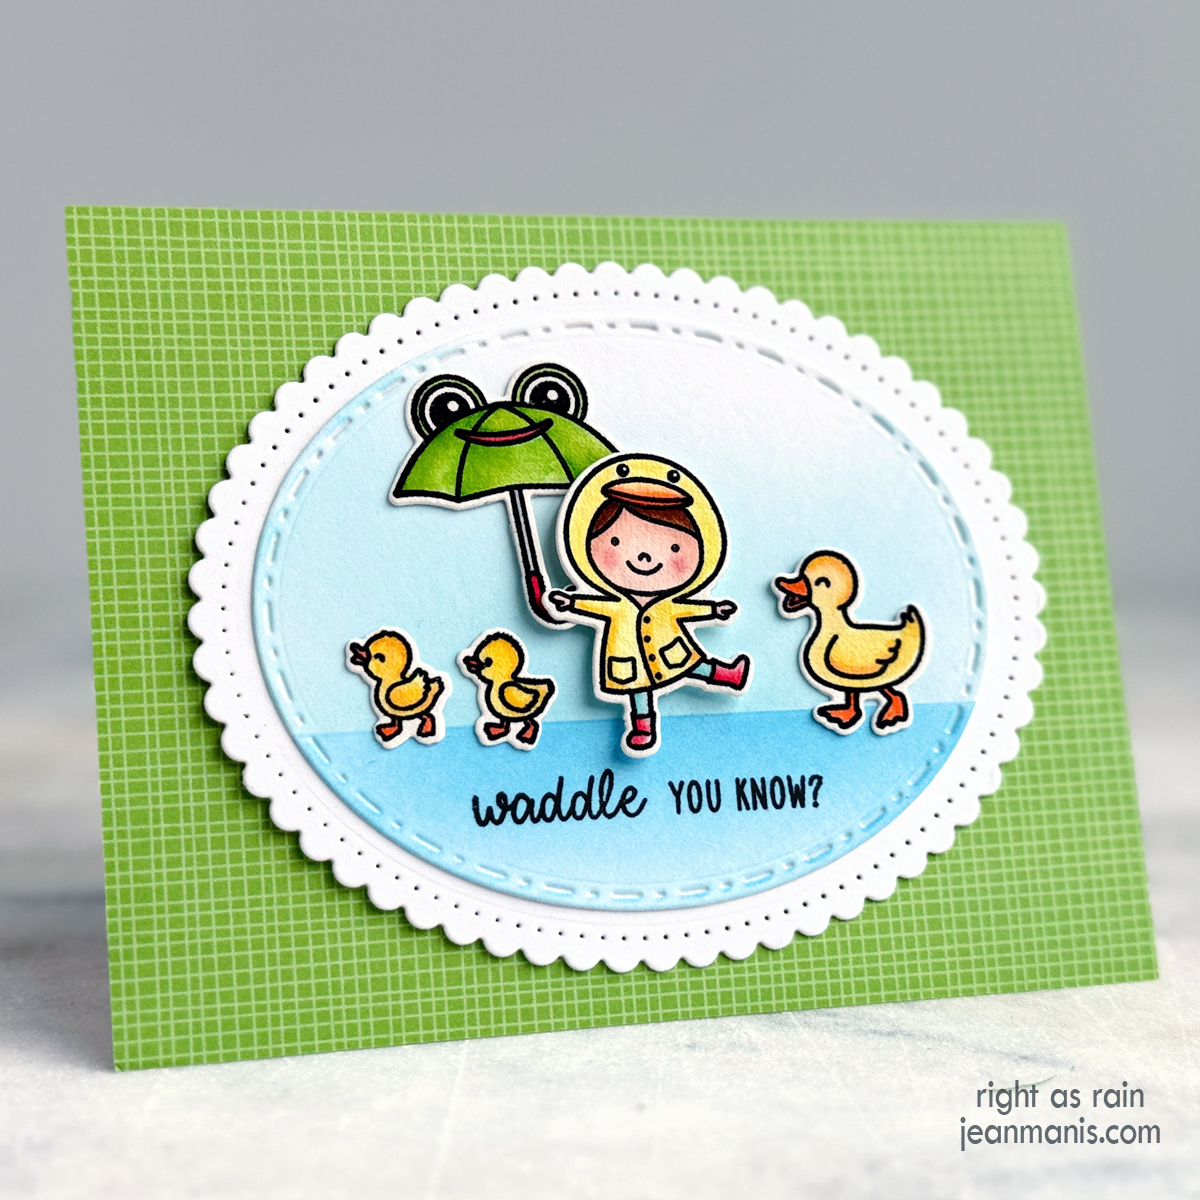
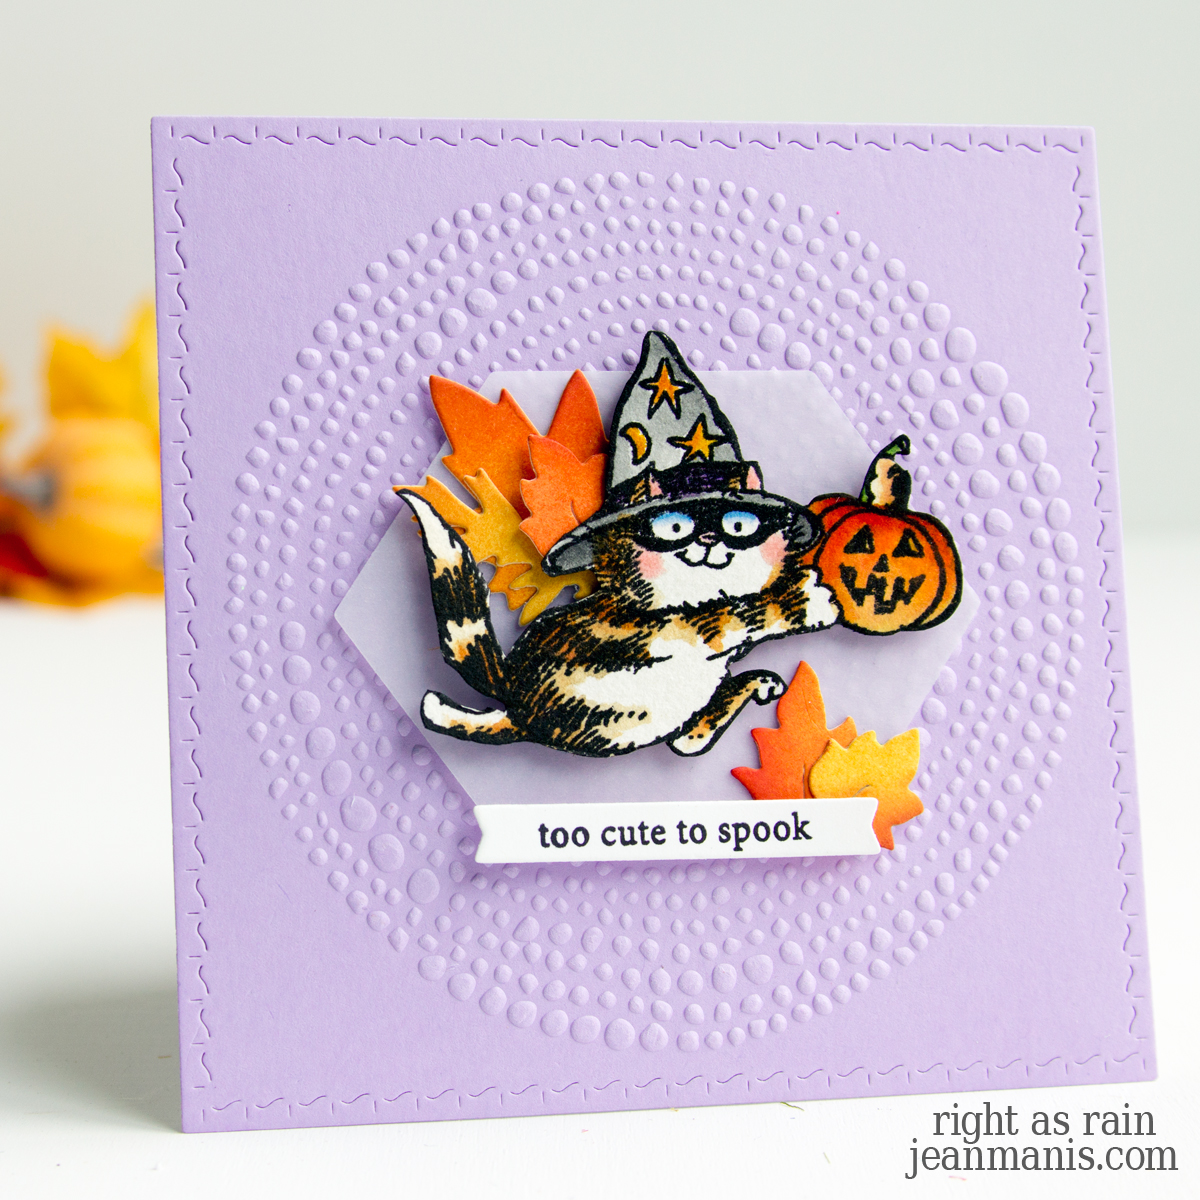
Sunny Studio Stamps | Snow One Like You

Hello! It is hard to resist a winter scene with a snowman. In this post, I am sharing two cards, both showcasing the delightful stamp set Snow One Like You from Sunny Studio Stamps. On one, I used the Lawn Fawn Say Cheese, Again Polaroid-style frame, and on the other, I used the Sunny Studio Stamps Mini Mat & Tag 3 set to create a mat for my scene. In this post, I discussed the use of frames and mats in cardmaking.

Sunny Studio Stamps | Snow One Like You

To create the background, cover an A2-size card base with patterned paper.

To create the focal image, stamp Snow One Like You with Versafine on Arches Cold Press watercolor paper and heat set. Color the image with watercoloring medium of choice. Once dry, cut the images with the coordinating die set. (Check out my “Resources for Watercoloring Stamped Images” HERE.)

Use one of the hill dies in the Slimline Nature Borders set to create the snowbank.

Cut the frame with the Lawn Fawn Say Cheese, Again frame. Add snowbank and patterned paper behind the frame, trimming as needed. Cut sentiment with the Art Impressions Journal Letter die set from white glitter foam. Adhere the letters to the frame, attach the frame assembly to the background, and add the focal image to the card with foam adhesive.

Sunny Studio Stamps | Snow One Like You

Alternatively, cut a mat with the Sunny Studio Stamps Mini Mat & Tag 3 die set. Use a rectangle die to cut the sky from patterned paper and to trim the snowbank. Add the sentiment, cut with the Art Impressions Journal Letter die set from white glitter foam, to the snowbank. Add the assembly to the card background and the focal image to the card with foam adhesive.

Sunny Studio Stamps | Snow One Like You

Below are sketches of the two designs.

Polaroid Frame Sketch

Rectangular Mat Sketch


Sunny Studio Stamps | Charming Cats and Mouse

Hello! Today I am sharing a whimsical “Hello” card featuring Sunny Studio Stamps products. I recently added the Wonderful Windows die set to my collection and wanted to use it on a card. By the way, their Holiday collection will be available to purchase on August 25. Sneak peeks are being shown on their blog this week.

Sunny Studio Stamps | Charming Cat and Mouse Tale

In this previous post, I discussed scene building with Sunny Studio Stamps and used the Birthday Mouse as a focal point. And here, I showed the same cat images in a sailboat. For today’s card, I combined the mouse and the cats.

To begin, I dry-embossed SU Smoky Slate cardstock with a retired Tim Holtz folder to create the card background. I own several brick embossing folders; this particular one provided the most texture.

To create the mouse and cats, I stamped the Birthday Mouse and Birthday Cat images with Versafine on Arches Cold Press watercolor paper and heat set. With watercolor markers, I colored the images. (Check out my “Resources for Watercoloring Stamped Images” HERE.) Once dry, I cut the images with their coordinating die sets.

Sunny Studio Stamps | Charming Cat and Mouse Tale

Next, to create the window and shutters, I cut white cardstock with the Wonderful Windows set. Next, I added curtains cut from SU Poppy Red cardstock. Finally, I backed the window assembly with Sea Glass cardstock.

Finally, to create the sentiment, I cut white Pop-Up Die Cutting Glitter Foam with the Journal Letter Die Set (glitter side down). I adhered the die-cut letters to a strip of Taylored Expressions Poppy Seed cardstock.


Lawn Fawnatics Challenge 154 | Into the Woods

Hello! I’m delighted to share a card that embodies the “Into the Woods” theme for the Lawn Fawnatics Challenge 154. Step into a world where whimsical critters drive, evergreen trees stretch towards the sky, and the call of adventure echoes through the air. Lawn Fawnatics Challenge 154 | Into the Woods

For the challenge, I’ve crafted a scene that features a car adorned with fishing gear, accompanied by two critters ready for an outdoor escapade. The forest border, mountain peaks, and the backdrop of evergreen trees complete the scene.

Lawn Fawnatics Challenge 154 | Into the Woods

I used the Car Critters and the Road Trip Add-On stamps and coordinating dies to create the focal point. I stamped the images on Arches Cold Press watercolor paper and used markers to color them. Once dry, I cut the images with their coordinating dies. To create the road, I used the On the Road die set. To create the forest in the background, I used the Forest Border die. I added trees cut with dies in the Forest Backdrop in the foreground.

Previously, I shared a card featuring the Car Critters set HERE.


Scene Building with Sunny Studio Stamps

Hello! Today, I am discussing how to start a scene building collection. To explore the topic, I am using Sunny Studio Stamps products on a “Hello” card featuring the Birthday Mouse as the focal image.

Scene Building with Sunny Studio Stamps

I have only recently started to create with Sunny Studio Stamps products; I showcased the Birthday Cat stamp set HERE, HERE, and HERE. When I can, I like to use products from the same company on my cards for two main reasons: the products are designed to coordinate, and I like to support the company’s vision. Since my crafting budget is not endless, I started with a few key dies to create a simple scene.

To begin, stamp the mouse with Versafine on Arches Cold Press watercolor paper; heat set. Color the mouse with watercoloring mediums of choice. (Check out my “Resources for Watercoloring Stamped Images” HERE.) Once dry, cut with the coordinating die.

Next, establish ground and sky for the scene, which can be achieved with a straight line or hill, for example. I purchased the Sunny Studio Stamps Slimline Nature Borders to cut a hill from Field Day cardstock. This five-piece die set includes two hills (both can be used in two ways), a wave, a cloud, and a grassy hill. I considered both a portrait and a landscape orientation for the card, choosing the portrait one because the mouse was lost in the landscape one.

To add detail and depth to the scene, I cut clouds with the Fluffy Clouds set from Snowdrift cardstock. Other scene building options include a fence, trees, a sun, a road, grass, a cityscape, doors, and windows.

Scene Building with Sunny Studio Stamps

Since I wasn’t creating a birthday card, I didn’t use the sentiment included in the Birthday Mouse set. Instead, to create the sentiment, I cut white Pop-Up Die Cutting Glitter Foam with the Journal Letter Die Set (glitter side down). Alternatively, I could have used small sentiment alpha stickers (of which I have plenty from my scrapbooking days).

What are your go-to scene building dies? What’s on your list to purchase next?


Winter Wonderland | Lawn Fawnatics Challenge

Hello! I am delighted to be participating in the Lawn Fawnatics’ Christmas in July Challenge for which I have created a winter-themed card.

Winter Wonderland | Lawn Fawnatics Challenge

Lawn Fawnatics #153

  • For the challenge, I created a winter scene background featuring the Lawn Fawn Build-A-Cabin perched upon a gentle snowbank and a night sky adorned with stenciled snow. I previously shared cards showcasing the Build-A-Cabin HERE and HERE. Crafting the cabin from Sugar Plum cardstock added playfulness to the scene.
  • I stamped images from the adorable Lawn Fawn Snowball Fight set and brought them to life with watercolors. Mice throwing snowballs adds whimsy to the scene.
  • After applying white paste through the Snow Flurries Background, I sprinkled on Sparkle Dust Glitter and set the panel aside to dry.
  • When I assembled the scene, I used foam adhesive to add depth to the elements.
  • To embellish, I added Mini Snowflakes cut from Pop Up white glitter foam.

Winter Wonderland | Lawn Fawnatics Challenge