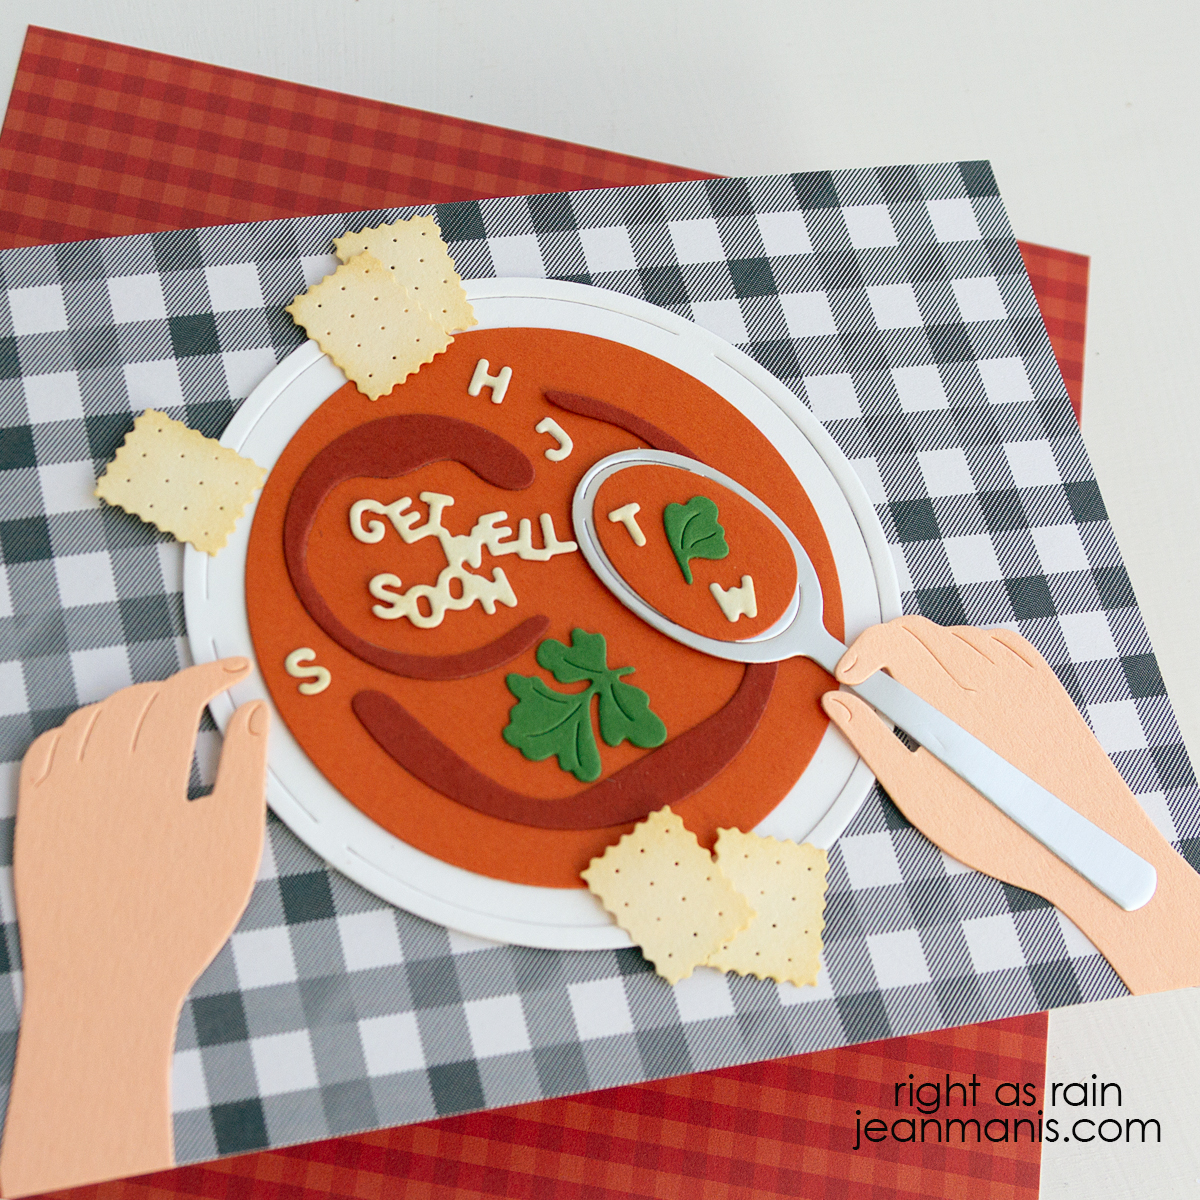
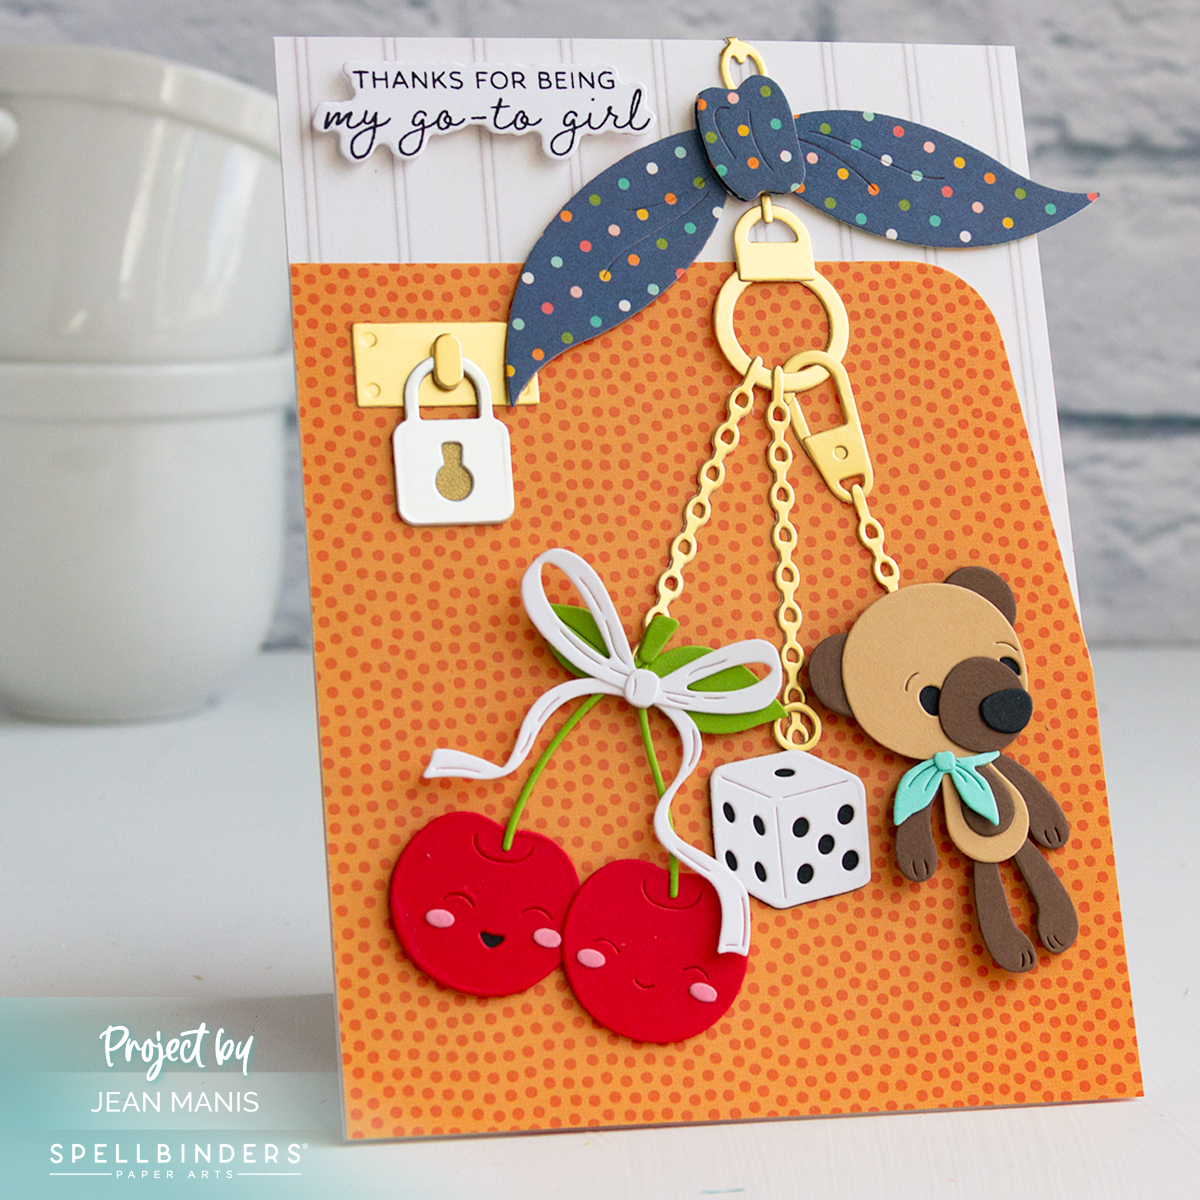
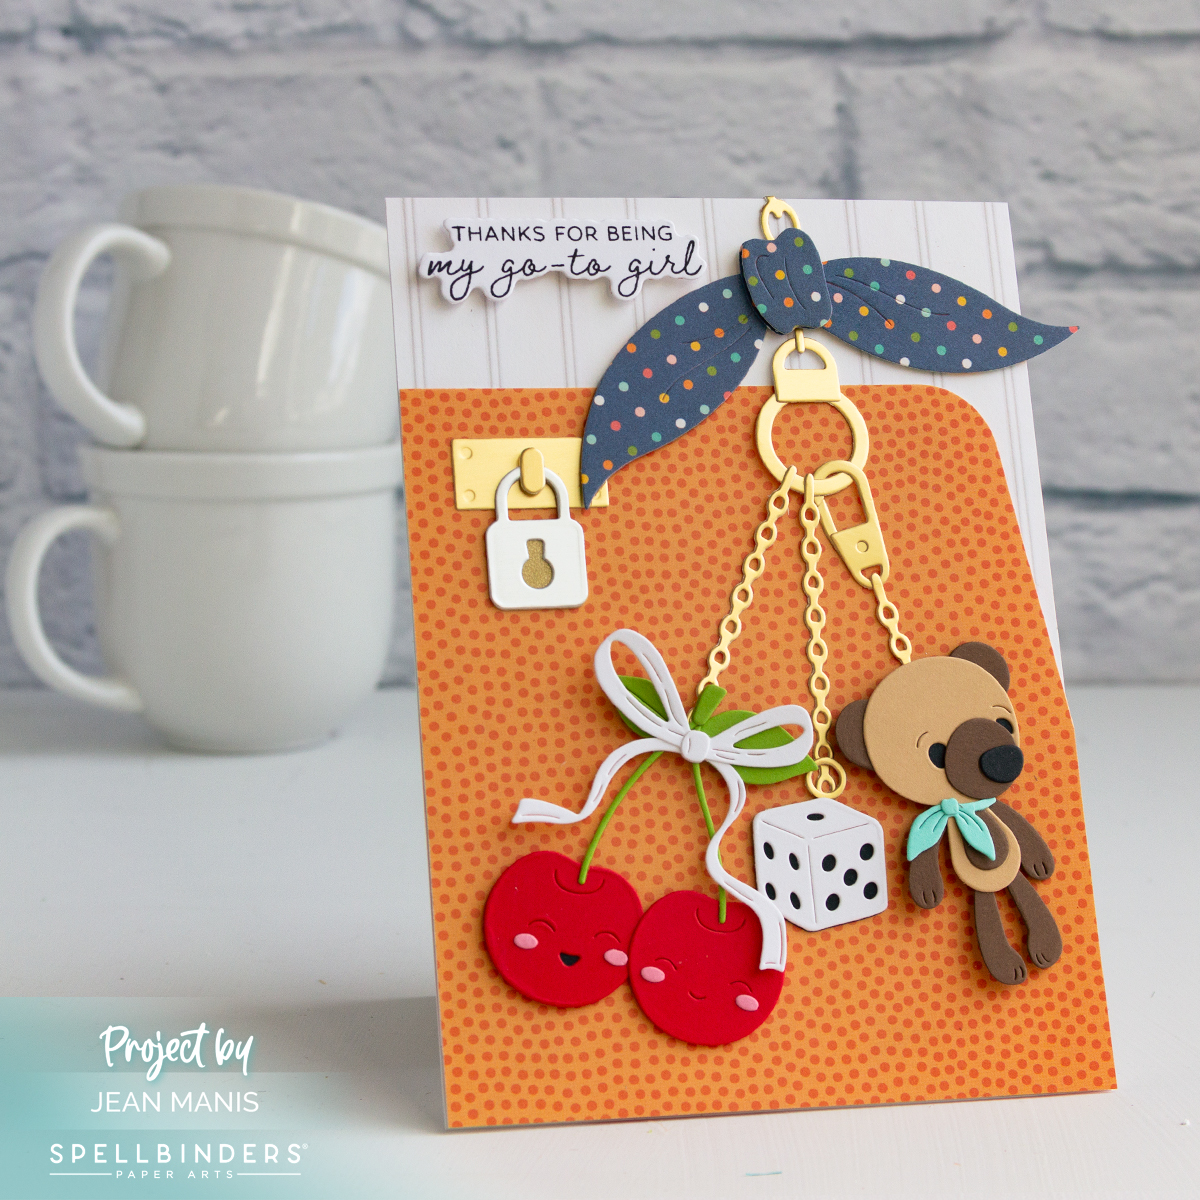
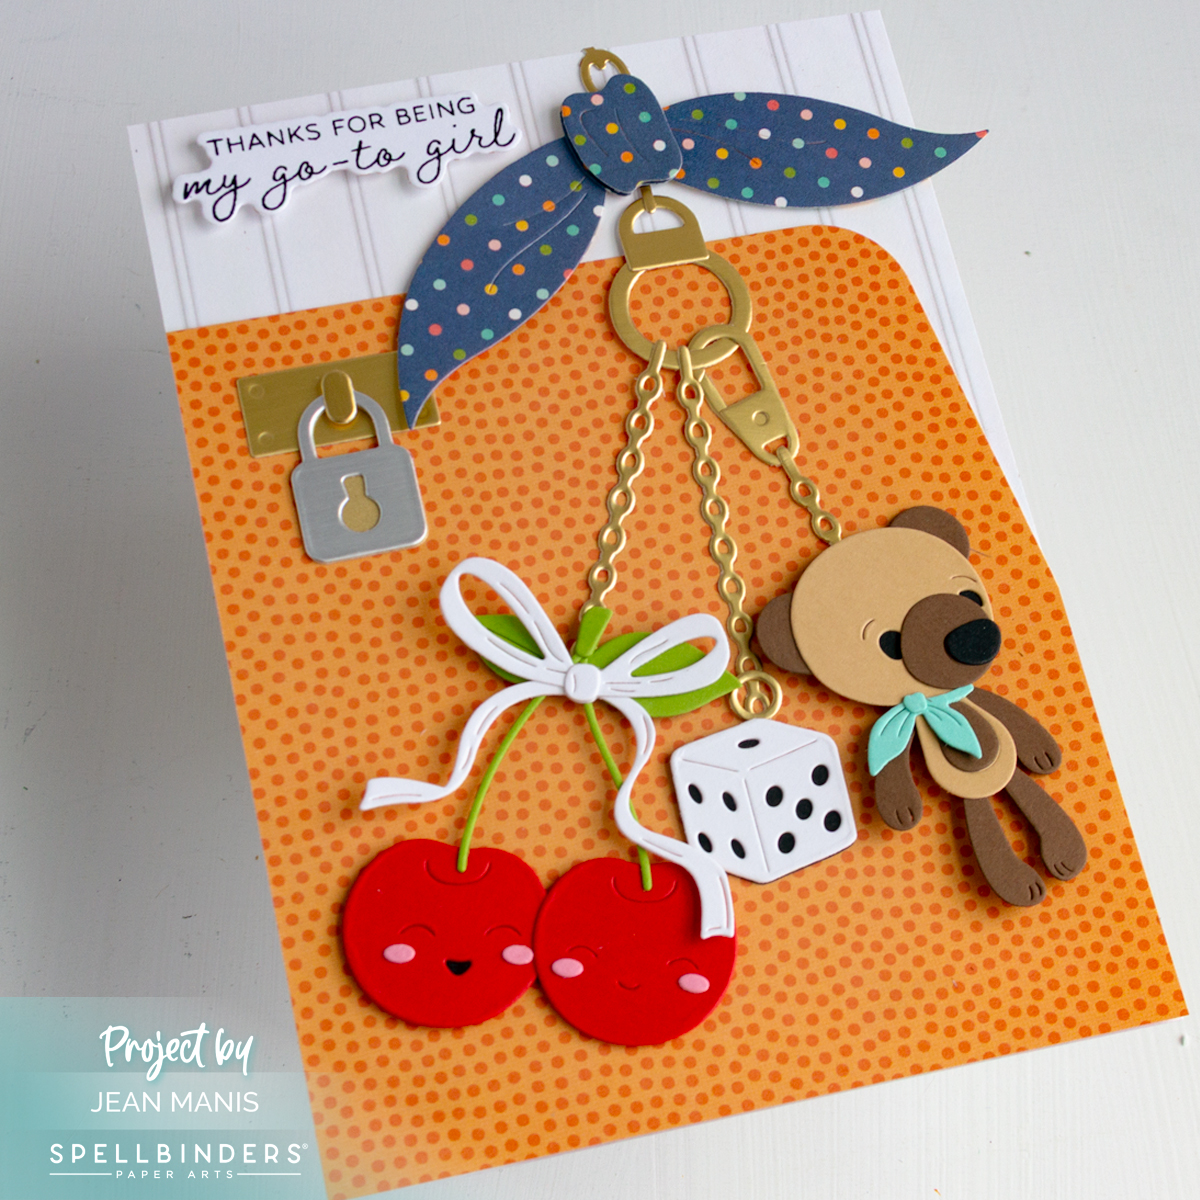
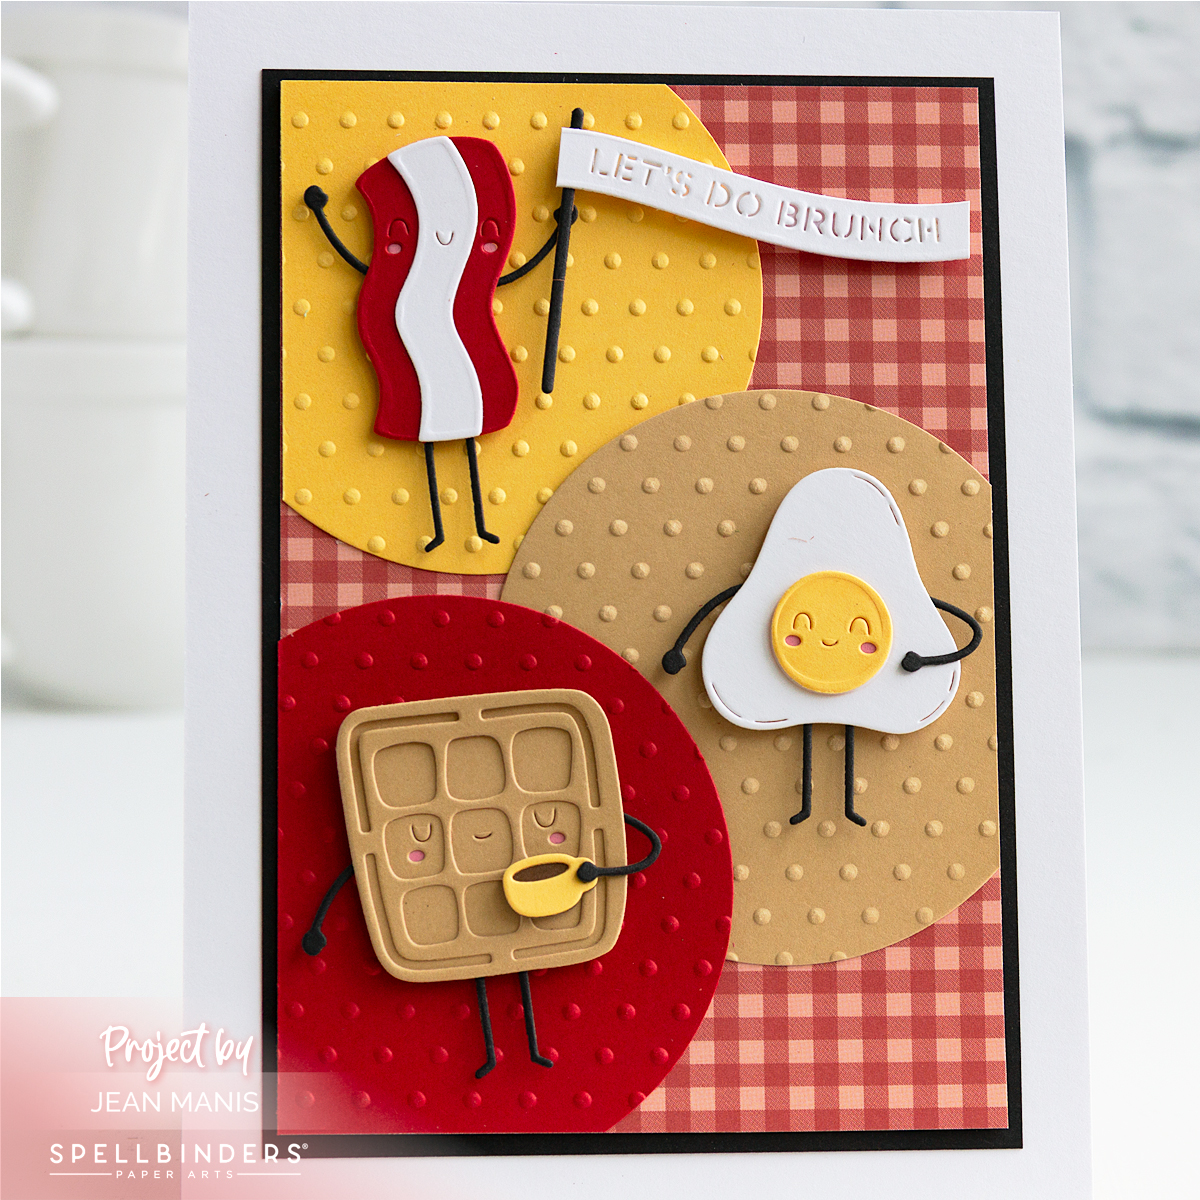
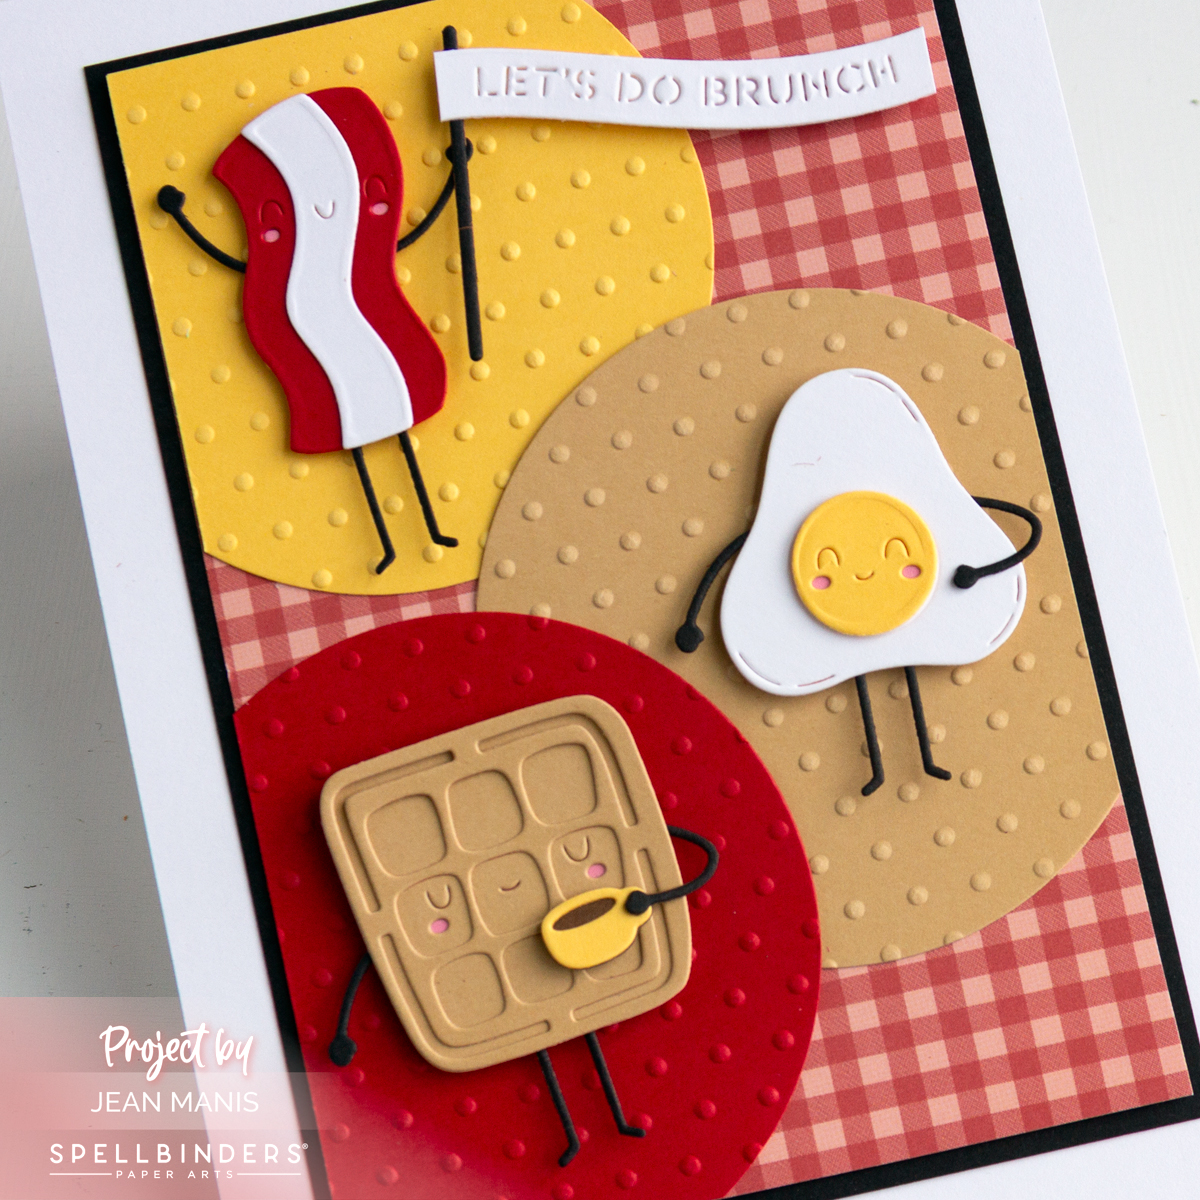
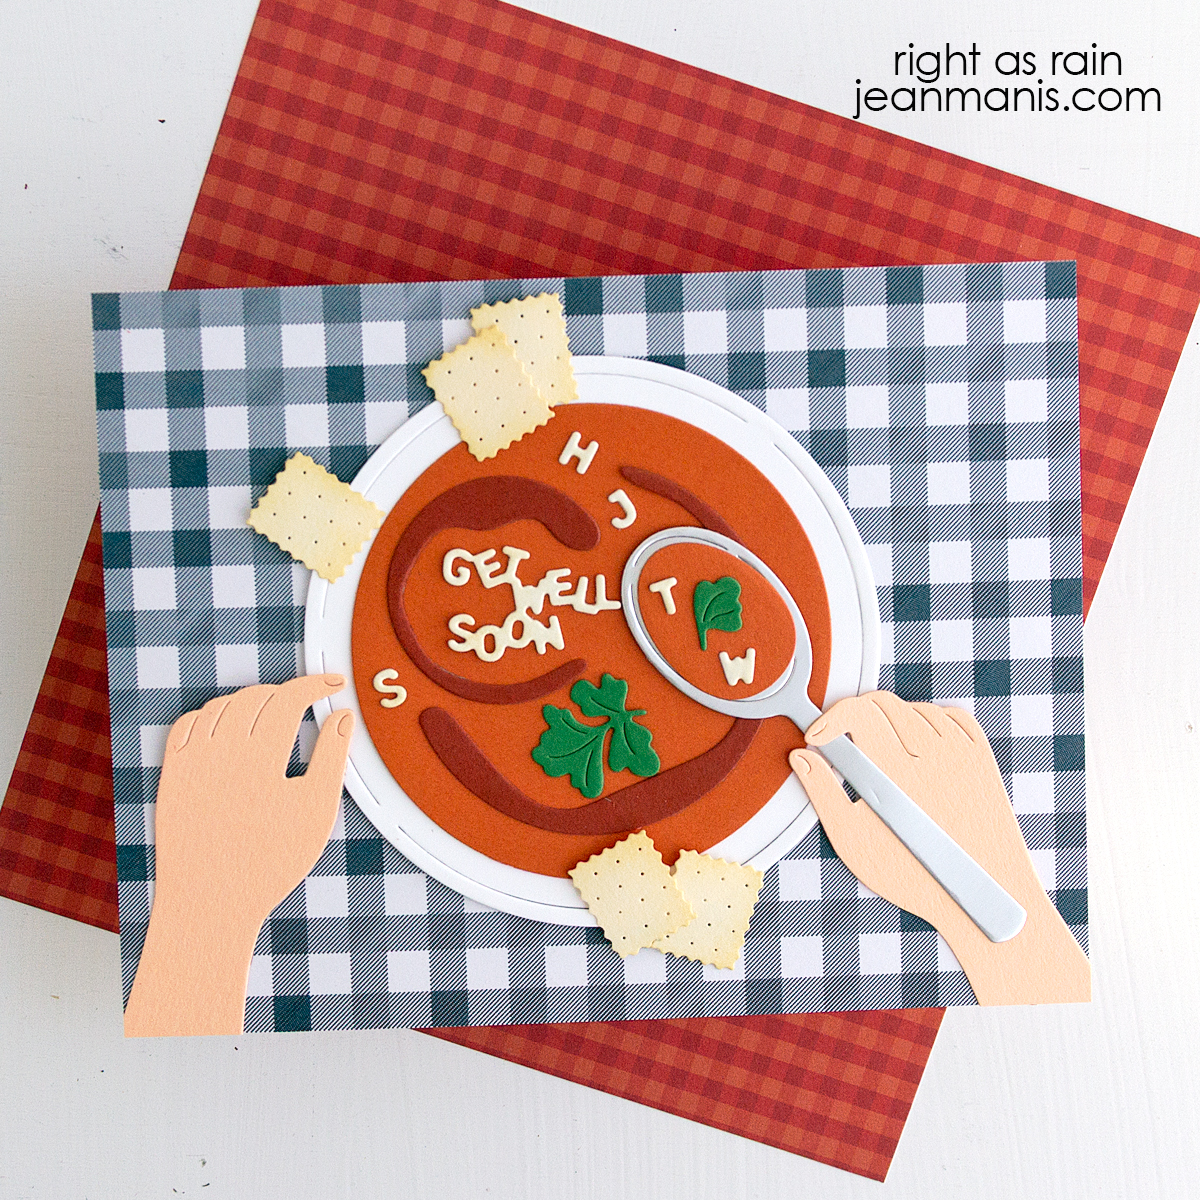
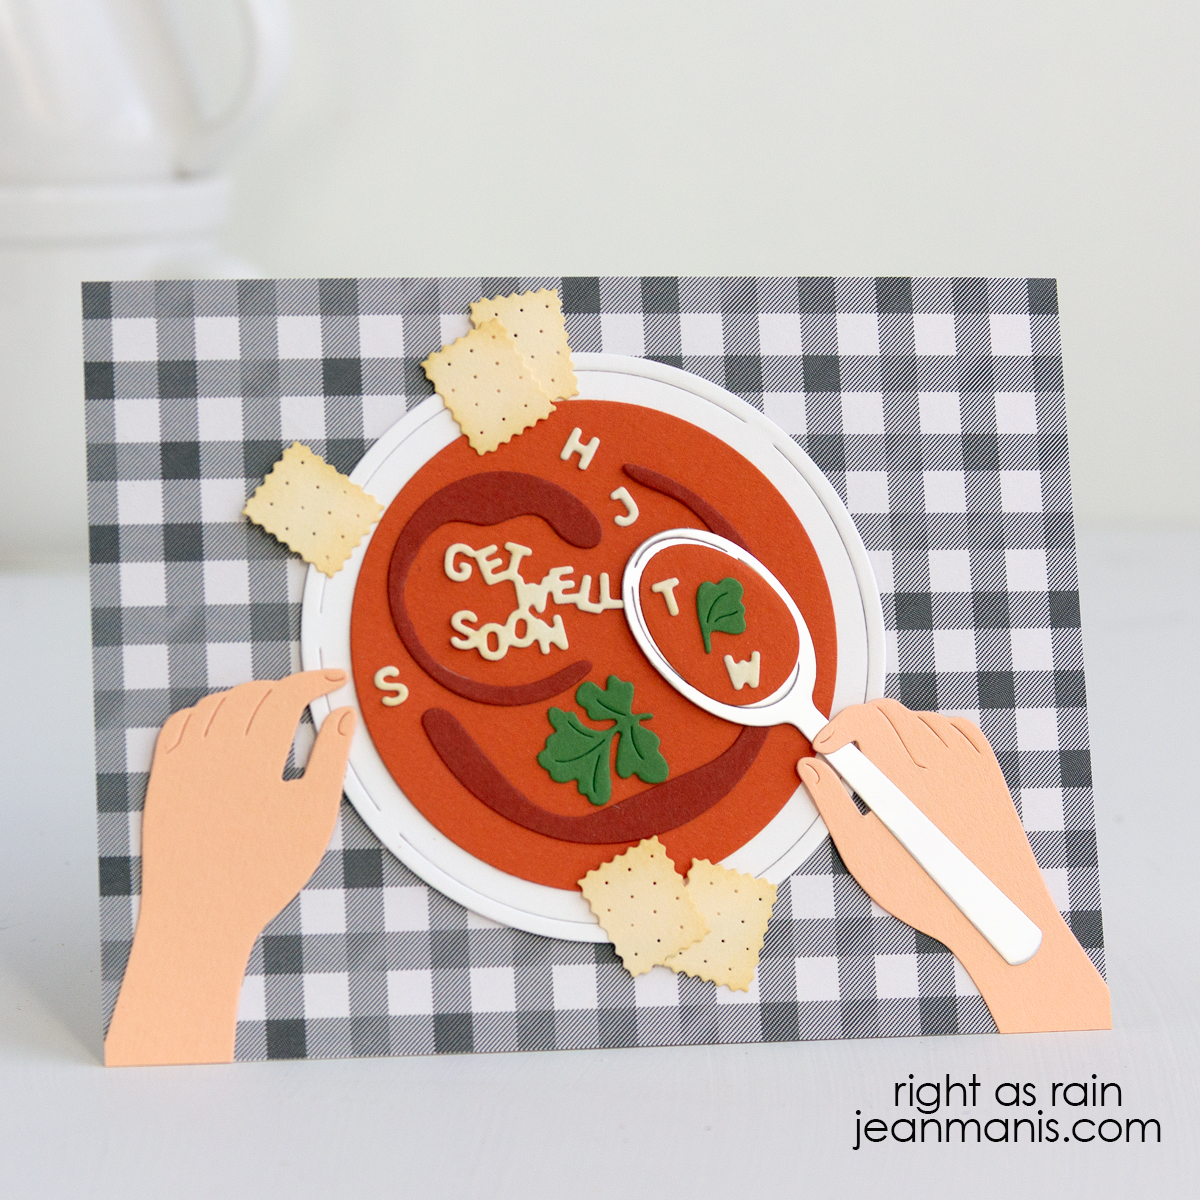
Waddle You Know? Friendship Card

Hello! I am delighted to share a friendship card created with the Sunny Studio Stamps Puddle Jumpers stamp set with coordinating die set. With watercoloring, I brought the images – a girl in a ducky raincoat, her froggy umbrella, duck, and ducklings – to life.

Waddle You Know? Friendship Card

    • Begin by covering an A2-size card base with patterned paper in the DoodleBug Design Gingham and Linen pad.
    • Stamp the Puddle Jumpers images in Versafine on Arches Cold Press watercolor paper and heat set. Color the images with watercoloring mediums of choice. Once dry, cut with coordinating dies.
      Zig Pale Pink (28), Light Green (41), May Green (47), Scarlet (23), Summer Sun (503), Bright Yellow (52), Orange (70), Lemon Yellow (51); Tombow Light Apricot (850), Tan (942), Dusty Rose (772).
    • Cut an oval from white cardstock (I used the retired Spellbinders Fancy Edge Ovals die set). Create a sky and base by sponging on Distress Inks. Stamp the Puddle Jumpers sentiment. Mat the oval with a scalloped oval (same die set). Add oval assembly to card base.
    • Add the watercolored images with dot and foam adhesive.

Looking for more spring-themed card inspiration? I recently posted a round-up of spring-themed cards HERE.

Waddle You Know? Friendship Card


Art Impressions Whimsical Friendship Card

Hello! Today I am stepping into a world where imagination takes flight with a friendship card showcasing the Art Impressions Mushroom Cubbies stamp and die set. It has been awhile since I had the time to watercolor stamped images, and I found myself immediately absorbed in the activity! I have written about my journey with watercolor stamped images HERE.

Art Impressions Whimsical Friendship Card

    • Create the background with the Lawn Fawn Stitched Cloud Backdrop from Sea Glass cardstock. Add to an A2-size card base.
    • Heat-emboss the Mushroom Cubbies “Lots of Bugs and Kisses” sentiment on Noble Fir cardstock. Cut with the grass die included in the Sunny Studio Stamps Picket Fence Border die set. Add to card base.
    • Stamp the images in the Mushroom Cubbies set with Versafine on Arches Cold Press watercolor paper and heat set. Color the images with watercoloring mediums of choice (I used Tombow + Zig markers). Correct any mistakes with Copic Opaque White, which I used on the mushroom cap white spaces. Tombow Markers: Poppy Red (856), Dark Jade (177), Light Green (195), Saddle Brown (977), Redwood (899), Process Blue (452), Navy Blue (528), N95 (Cool Gray 1), N65 (Cool Gray 5), Light Apricot (850), Tan (942), Sand (992), N15 (Lamp Black), N25 (Black); Zig Markers: Yellow (50), Bright Yellow (52).
    • Once dry, cut the images with the dies included in the set. The die for the mushroom house cuts the windows and door. I backed those with yellow cardstock. Add images to card front with dot and foam adhesive.

Art Impressions Whimsical Friendship Card


Warm Wishes and Bear Hugs

Hello! This winter-themed friendship card, adorned with a charming bear created with the Impression Obsession Cocoa Bear set, exudes a playful charm that is sure to bring a smile to the recipient.

Warm Wishes and Bear Hugs

      • Cut Cocoa Bear from a variety of cardstock colors and textures. Assemble.
      • Stamp the Bear Sayings sentiment on to a die-cut Polaroid frame. (I used one from Paper Smooches.)
      • Back the frame with patterned paper. (I used Cabin Fever from Carta Bella for the scarf, the back of the frame, and the card base.)
      • Add frame to a patterned paper card base (A2-size). Add bear to the front of the frame.

Warm Wishes and Bear Hugs

Warm Wishes and Bear Hugs


Crafting Warmth | Impression Obsession Plaid Thermos

Hello! As I mentioned HERE, I am looking to extend the use of my winter-themed supplies beyond the holidays. Today, I am sharing a card that features a charming plaid vintage thermos and cup, cut with the Impression Obsession Thermos die set. Send your “Warmest Wishes” with this versatile winter-themed card that transcends holiday cheer, celebrating the timeless beauty of coziness and connection.

Crafting Warmth | Impression Obsession Plaid Thermos

We owned a plaid thermos that looked very similar to the one I crafted. You can read about the Thermos company HERE. I talk about my enthusiasm for creating cards with a hot beverage theme HERE.

  • To create the background, I cut white cardstock with the Reverse Confetti Plaid Lines – Small and Plaid Lines – Big cover plate dies. I rediscovered these two dies after writing a post on cover plate dies, which you can read HERE. I added the two die-cut pieces to a card base covered with Fun Stampers Journey Cranberry Bliss cardstock.
  • I cut the Thermos from plaid patterned paper and black chalkboard cardstock. I trimmed the Thermos body off a bit and adhered a black mug to its top. For the other mug, I trimmed off the round top.
  • I stamped the Pretty Pink Posh Sentiment Strips Christmas sentiment on to patterned paper (I do not know whose). I trimmed the panel and added a frame cut with the Revere Confetti Stitched Notes & Frames die set. I added the assembly to the card base.
  • I added the Thermos and mug to the card with foam adhesive and embellished with snowflakes cut from white glitter foam with the Lawn Fawn Mini Snowflakes die set.

Crafting Warmth | Impression Obsession Plaid Thermos

Crafting Warmth | Impression Obsession Plaid Thermos

Memory Box Christmas Plaid patterned paper, Fun Stampers Journey Cranberry Bliss cardstock, SU chalkboard cardstock, Reverse Confetti Plaid Lines – Small and Plaid Lines – Big cover plate dies, Revere Confetti Stitched Notes & Frames die set (frame)


Newton’s Nook Designs | Fall Harvest Take Two

Hello! Today I am sharing two more cards created with the Newton’s Nook Designs Fall Harvest stamp set. I previously shared cards with this stamp and coordinating die set HERE. This time, I am using stenciled pumpkin backgrounds rather than patterned paper ones, applying ink through a stencil on to coordinating cardstock for a tone-on-tone background. You can read my post about creating stenciled backgrounds for cards HERE.

Newton’s Nook Designs | Fall Harvest Take Two

Newton’s Nook Designs | Fall Harvest Take Two

  • To create the focal images, stamp the Fall Harvest images with Versafine on Arches Cold Press watercolor paper and heat set. Color the images with watercoloring mediums of choice. Once dry, cut the images with the dies in the coordinating set. (Check out my “Resources for Watercoloring Stamped Images” HERE.)
  • To create the card backgrounds, apply ink through the Pumpkin Patch stencil. For the background with the dog, I used Dried Marigold ink on SU Pumpkin cardstock, and on the other background with the cat, I used Wild Honey ink on SU More Mustard cardstock. Trim panels to A2-size and attach to card bases. (Next time, I will cut the cardstock to A2 size before applying ink through the stencil. The stencil pattern is 5 1/2″ square.)
  • Glimmer foil the sentiment in the Autumn Greetings set with Copper foil on white cardstock (I used Taylored Expressions Sugar Cube, as it is not stark white). Cut panel with a 2 3/4″ die in the Everlasting Circles set. Cut another circle from vellum with a 3″ die in the same set.
  • Assemble the focal images, add the images to the circle mats, and adhere to the card fronts.

Newton’s Nook Designs | Fall Harvest Take Two

Newton’s Nook Designs | Fall Harvest Take Two